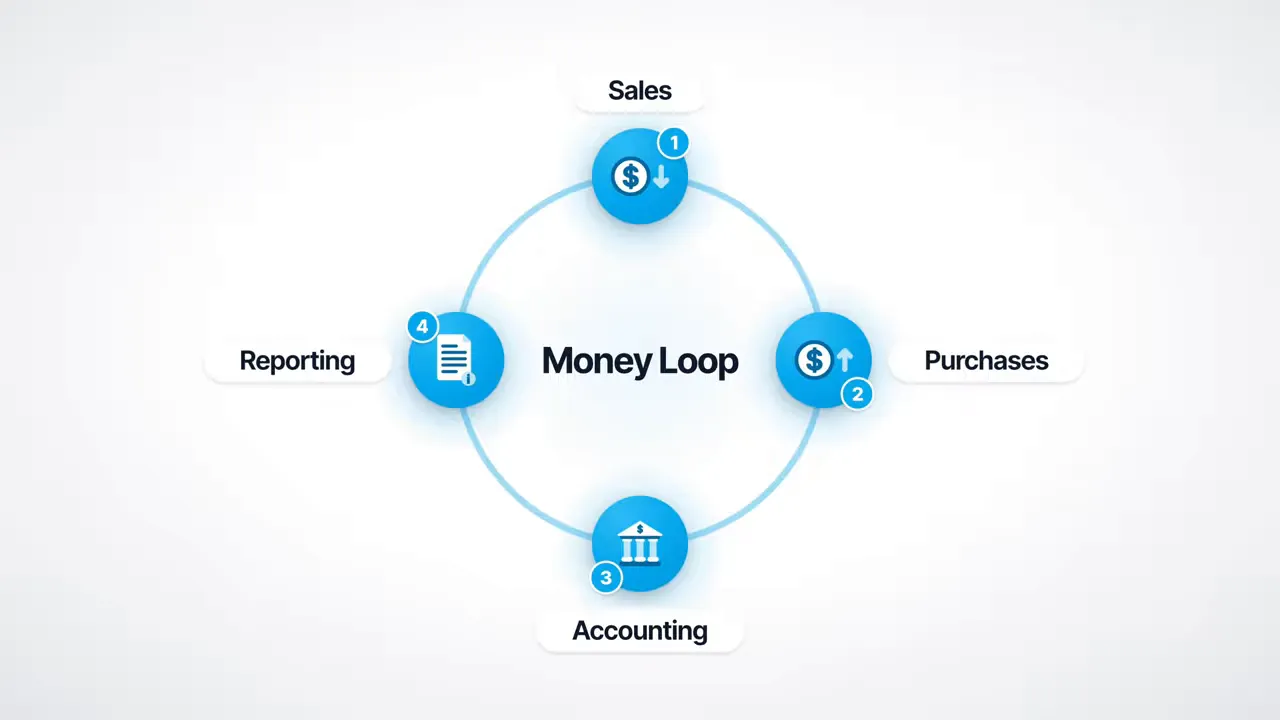
Xero is easier than it looks. For everyday bookkeeping, you can focus on four menus: Sales, Purchases, Accounting, and Reporting. Together, they form what I call the Money Loop.
You send an invoice, record your costs, match payments to your bank transactions, and check your results. Once that loop makes sense, the rest of Xero becomes much less intimidating.
We’ll use a small cleaning business as our example, following a $720 customer invoice through the process. You don’t need accounting experience, and the same basic workflow applies whether you’re a business owner, freelancer, or learning Xero for a job or course.
What You'll Learn
- Use Sales, Purchases, Accounting, and Reporting to manage the everyday bookkeeping Money Loop.
- Approve invoices and bills to record them, then match their payments during bank reconciliation.
- Use bank rules to fill in recurring transaction details while still checking each entry.
- Read three core reports to understand profit, your financial position, and unpaid customer invoices.
Table of Contents
- 1. Set Up Your Xero Account and Choose a Plan
- 2. Find Your Way Around the Homepage
- 3. Create and Send Your First Invoice
- 4. Enter a Supplier Bill
- 5. Connect Your Bank or Import a Statement
- 6. Reconcile Your Bank Account Without Recording Payments Twice
- 7. Save Time With Bank Rules
- 8. Read Three Reports That Answer Three Useful Questions
- 9. Ask JAX About Your Numbers
- A Simple Routine for Everyday Xero Bookkeeping
1. Set Up Your Xero Account and Choose a Plan
Start by creating your Xero account. The promoted signup offer gives businesses new to Xero 90% off their first six months. Check that the landing page displays that offer, and use the signup form rather than the separate plan cards on the page.
Before paying, confirm that the discount appears in your order. After six months, Xero’s normal pricing applies. This is an affiliate offer, which means we may earn a commission at no extra cost to you.
Enter your business details carefully
- Enter your name, email address, and phone number.
- Choose the country where your business pays tax, accept the terms, and continue.
- Confirm your email address using the link Xero sends you, then create your password.
- Add your business name and begin typing your industry. Select the closest suggestion.
- Check the business country again. You cannot change it later.
- Answer the questions about employees and your current accounting tool. Business type is optional.
- Select Buy Now to choose your plan.
Choose based on your invoice and bill volume
An invoice asks a customer to pay you. A bill is an invoice you receive from a supplier. That distinction matters when comparing plan limits.
The US plans used for this example are:
- Early: Allows 20 invoices and five bills per month.
- Growing: Removes those invoice and bill limits.
- Established: Adds features such as projects and multiple currencies.
If the entry-level limits are enough, start there. You can change plans later. Plan names and inclusions differ by country, so check the comparison shown during your own signup.
You don’t need add-ons for the workflow covered here. Continue to the billing account, enter your billing details, and confirm your subscription.
Xero will also prompt you to set up multi-factor authentication, either immediately or at a later login. This adds confirmation through an app on your phone when you sign in.
Complete the initial setup questions
Answer Xero’s onboarding questions for your business, including how you currently manage accounting and what you want to do in Xero. For our example, the priorities are cash flow, invoices, and bills.
If Xero opens invoice setup before you’re ready, cancel it and select Home. At this initial stage, the blank invoice is not saved until you add a contact.
2. Find Your Way Around the Homepage
Xero’s homepage, called the dashboard in older guides, gives you an overview of:
- Your bank balance.
- Money customers owe you.
- Bills you need to pay.
A new account will look fairly empty. It fills up as you enter records, and a sample-data switch lets you preview how the homepage looks with activity.
The four menus in the Money Loop each have a clear job:
- Sales: Money in, including customer invoices and quotes.
- Purchases: Money out, including supplier bills.
- Accounting: Bank accounts, reconciliation, and bank rules.
- Reporting: Your financial results.
The plus button at the top is a shortcut for creating invoices, bills, contacts, and other records.
If you want to practice without changing your own accounts, open your business-name menu and choose Demo Company. It contains sample data and is separate from your business records. You cannot send invoices from it.
The steps here use the US version. In the UK, Australia, and other countries, the core workflow is similar, but tax terminology, plan names, and some labels differ. Xero also updates its screens, so if a button has moved, look for the same name elsewhere on the page.
3. Create and Send Your First Invoice
Add your logo once
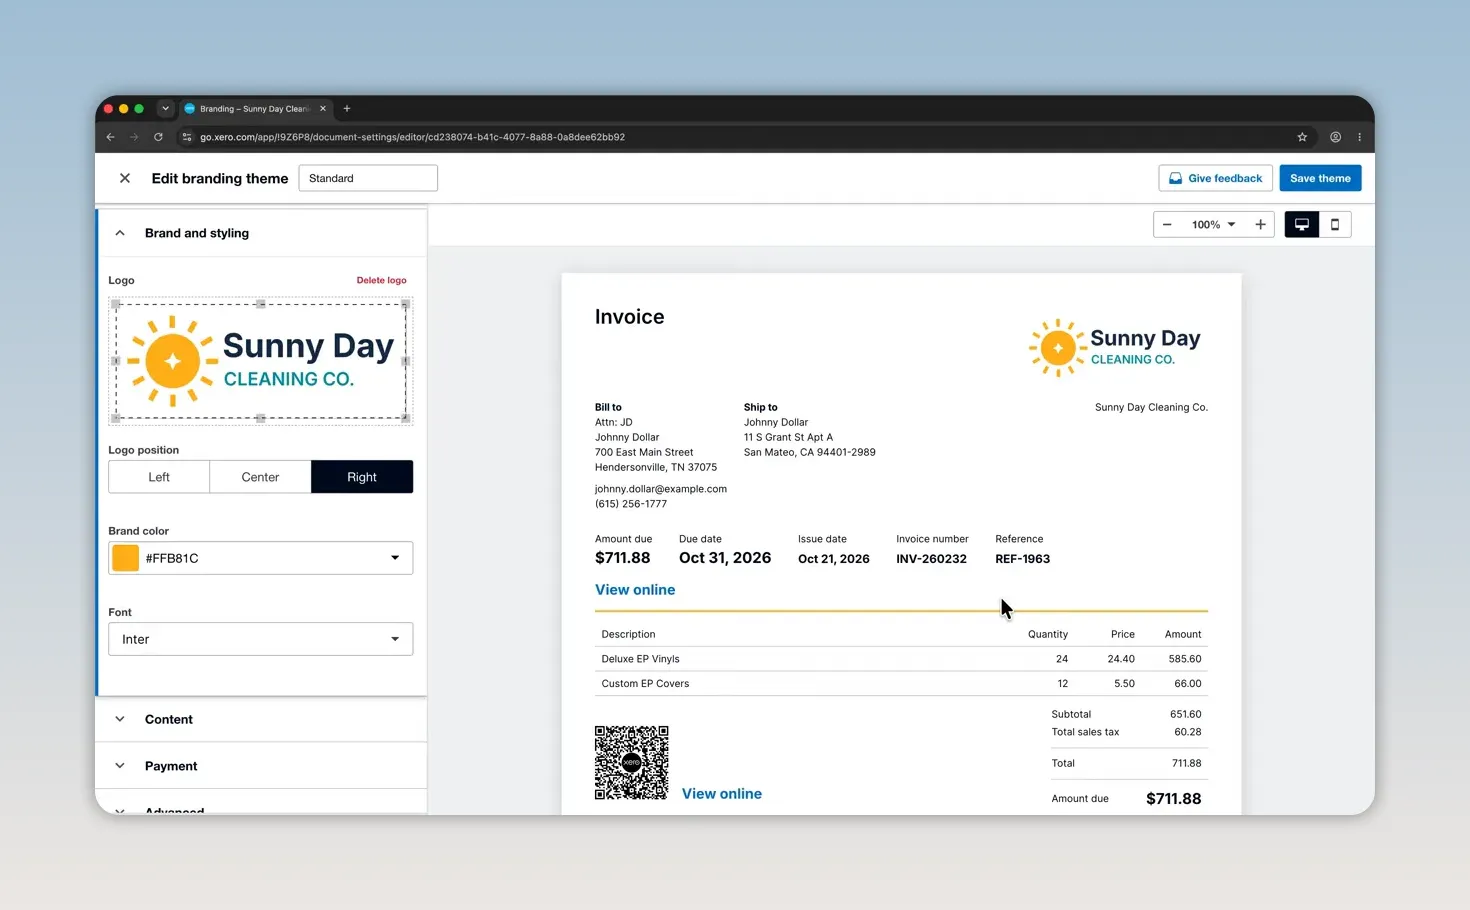
Before sending an invoice, give it your business branding:
- Go to Sales > Sales settings > Invoice settings.
- On the Standard theme, open Options.
- Select Preview and edit invoice theme.
- In the editor’s settings, open Brand and styling.
- Select Choose logo and upload your logo file.
- Check the preview, then select Save theme.
Xero adds the logo and selects a matching brand color. You only need to do this once for that theme.
Add the customer and payment deadline
Use the plus button > Invoice. You can skip the introductory banners and numbered tips while entering your first invoice.
Type your customer’s name and add them as a new contact. Include their email address because that is where Xero will send the invoice. Save the contact, and Xero will remember it next time.
Set the due date, which is the date the customer needs to pay. Our example gives the customer 14 days.
Add what you’re charging for
For repeat work, save the service as an item so you don’t have to enter its details each time. Our example uses office cleaning:
- Item code: A short identifier, such as CLEAN.
- Name: Office cleaning.
- Price: $180 per visit.
- Account: Service Revenue.
In Xero, an account is a category for the money. Service Revenue describes income earned from providing services.
Save the item, then enter the quantity on the invoice. Four visits at $180 each gives us a $720 invoice. Next time you select that item, Xero fills in its saved description and price.
If you charge sales tax, select the correct rate in the tax column. Other countries use terms such as VAT or GST. The right treatment depends on your business and location, so ask your accountant which rate to use. Our example business does not charge tax.
Approve and email the invoice
Check the total, then select Approve and email. Approval matters: an approved invoice is included in the relevant reports, while a draft is not.
Review the email and select Send email. Xero sends the customer a link to the invoice. If you connect a payment service such as Stripe through Sales > Online payments, customers can also pay through that link.
The invoice now shows Awaiting payment. The Sent checkbox confirms that the email went out.
For our example, we also create and approve a second invoice for $360 to Lakeside Yoga Studio. That one stays unpaid so we can see how Xero tracks outstanding customer balances.
Manage invoices, quotes, and reminders
Open Sales > Invoices to see your invoices. The tabs group them by status, making it easy to find those awaiting payment.
Xero enabled invoice reminders in this example. These email customers around the due date, so check the reminder settings as part of your setup.
If your business sends quotes first, you’ll find those under Sales too. Once a customer accepts a quote, you can create an invoice from it rather than starting again.
4. Enter a Supplier Bill
Recording a bill tells Xero what you owe, who you owe, and when payment is due.
Go to Purchases > Bills > New bill. If your supplier sent a PDF, the Upload bills option lets Xero read the details. To enter it manually, choose New bill again.
Our supplier is Metro Clean Supplies, and the bill is for $240 of cleaning supplies:
- Enter the supplier in From and add them as a contact.
- Check that the bill date matches the supplier’s document.
- Set the due date.
- Enter the supplier’s bill number in Reference.
- Add a description of the purchase and its $240 price.
- Select Supplies as the expense account.
- Select Approve.
Approving a bill records it. It does not pay the supplier. Normally, you pay from your bank and then match that payment in Xero.
In the US, an Approve and make payment option can send money after a separate, one-time setup. That is different from simply approving the bill. For this workflow, use Approve and leave the bill awaiting payment.
5. Connect Your Bank or Import a Statement
Xero needs your bank transactions before you can match them to invoices, bills, and expenses. You can bring them in through an automatic bank feed or a manual statement import.
Option A: Connect a bank feed
- Go to Accounting > Bank accounts.
- Select Add bank account.
- Search for your bank and select it.
- Choose Continue and log into bank.
- Follow the bank’s sign-in and authorization process.
A bank feed copies transactions into Xero automatically. The feed reads transaction data; it does not move your money.
Option B: Add the account without a feed
If you don’t want to connect a bank feed, choose Continue without bank feed and confirm that choice. You can connect it later.
Select Add account details, give the account a recognizable name such as Business Checking, and choose the account type. In this example, the checking-account option is labeled Everyday.
Enter the account number, select Add, then Finish adding accounts.
Import a CSV bank statement
Download a statement from your online banking as a CSV file, a simple spreadsheet-style file. Then:
- Close the account-added prompt using Import bank statements.
- Open the account’s three-dot menu and select Import a statement.
- Select your statement file and continue.
- Check the import settings, especially which columns contain the date and amount.
- Review the transaction dates and amounts.
- Select Complete import.
Our example imports eight bank lines. Next, we’ll tell Xero what each one represents.
6. Reconcile Your Bank Account Without Recording Payments Twice
Reconciling means identifying what each bank transaction was. Select Reconcile transactions to begin.
The reconciliation screen puts bank statement lines on the left and the corresponding Xero records or entry fields on the right. In this example, the oldest transactions appear first.
Match existing invoices and bills
Find the $720 payment from Harbor Dental Clinic. Xero highlights the suggested invoice match in green because it has found an existing record for that payment.
Green means Xero has found something to match. Check it rather than creating another entry. Creating a new income transaction for an invoice you already entered would record the same income twice.
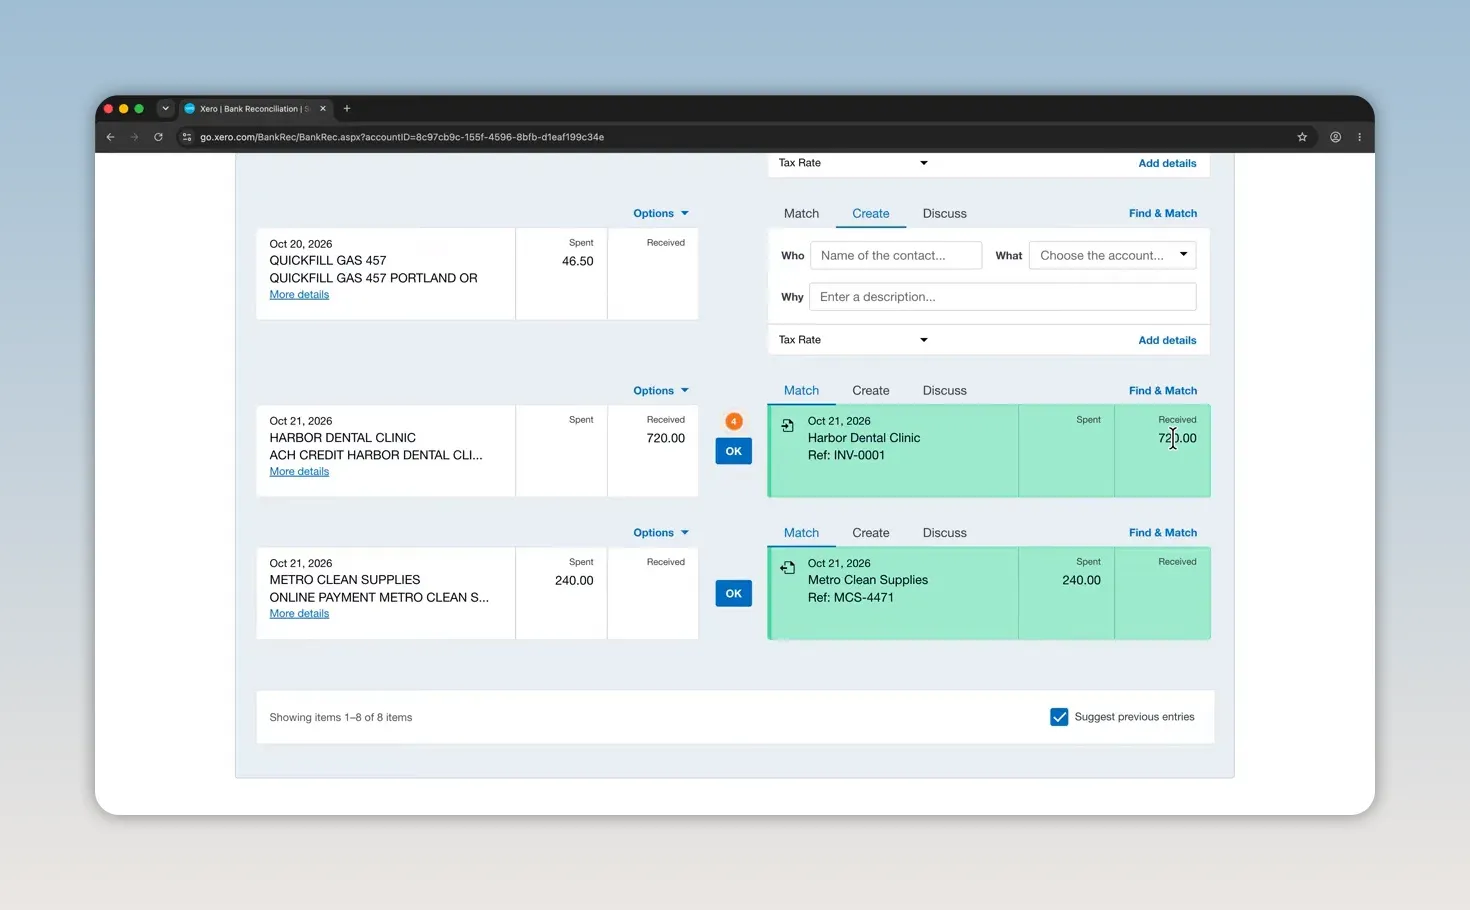
Check the customer, amount, and invoice, then select OK. This matches the bank payment and marks the invoice as paid. If Xero opens a cash-flow message, choose Keep reconciling.
The payment to Metro Clean Supplies also matches the $240 bill we entered. Check that match and select OK as well.
Undo a mistaken match with Remove and Redo
If you accept the wrong transaction:
- Open the bank account’s Account transactions tab.
- Tick the transaction.
- Select Remove and Redo.
The statement line returns to the reconciliation screen so you can handle it again.
Create records for transactions you haven’t entered yet
Some bank payments won’t have an invoice or bill to match. For those, use the Create tab and answer three questions:
- Who: Who did you pay or receive money from?
- What: Which account category describes the transaction?
- Why: What short description explains it?
For our phone payment, the contact is Blue Wave Mobile, the account is Telephone and Internet, and the description explains the phone expense. Xero fills in the tax rate associated with the account. Check it, then select OK.
We handle the software subscription and bank fee the same way, using Dues and Subscriptions and Bank Fees respectively.
7. Save Time With Bank Rules
Three remaining bank lines are fuel purchases from Quick Fill. Instead of entering the same details three times, we can create a bank rule.
- On a fuel transaction, select Options > Create bank rule.
- Review the conditions Xero has copied from the bank line.
- For this example, remove the extra description condition.
- Change the payee condition from Equals to Contains.
- Enter Quick Fill as the text to match.
- Set the contact to Quick Fill, creating it if needed.
- Add a short description, such as Fuel.
- Choose Vehicle Expense as the account.
- Leave the reference and bank-account settings as they are for this example.
- Give the rule a recognizable name and save it.
Using Contains allows the rule to recognize payee names that include Quick Fill alongside additional bank text.
Back on the reconciliation screen, the rule fills in all three fuel transactions. You still check each one and select OK. Future matching transactions arrive with those details filled in too.
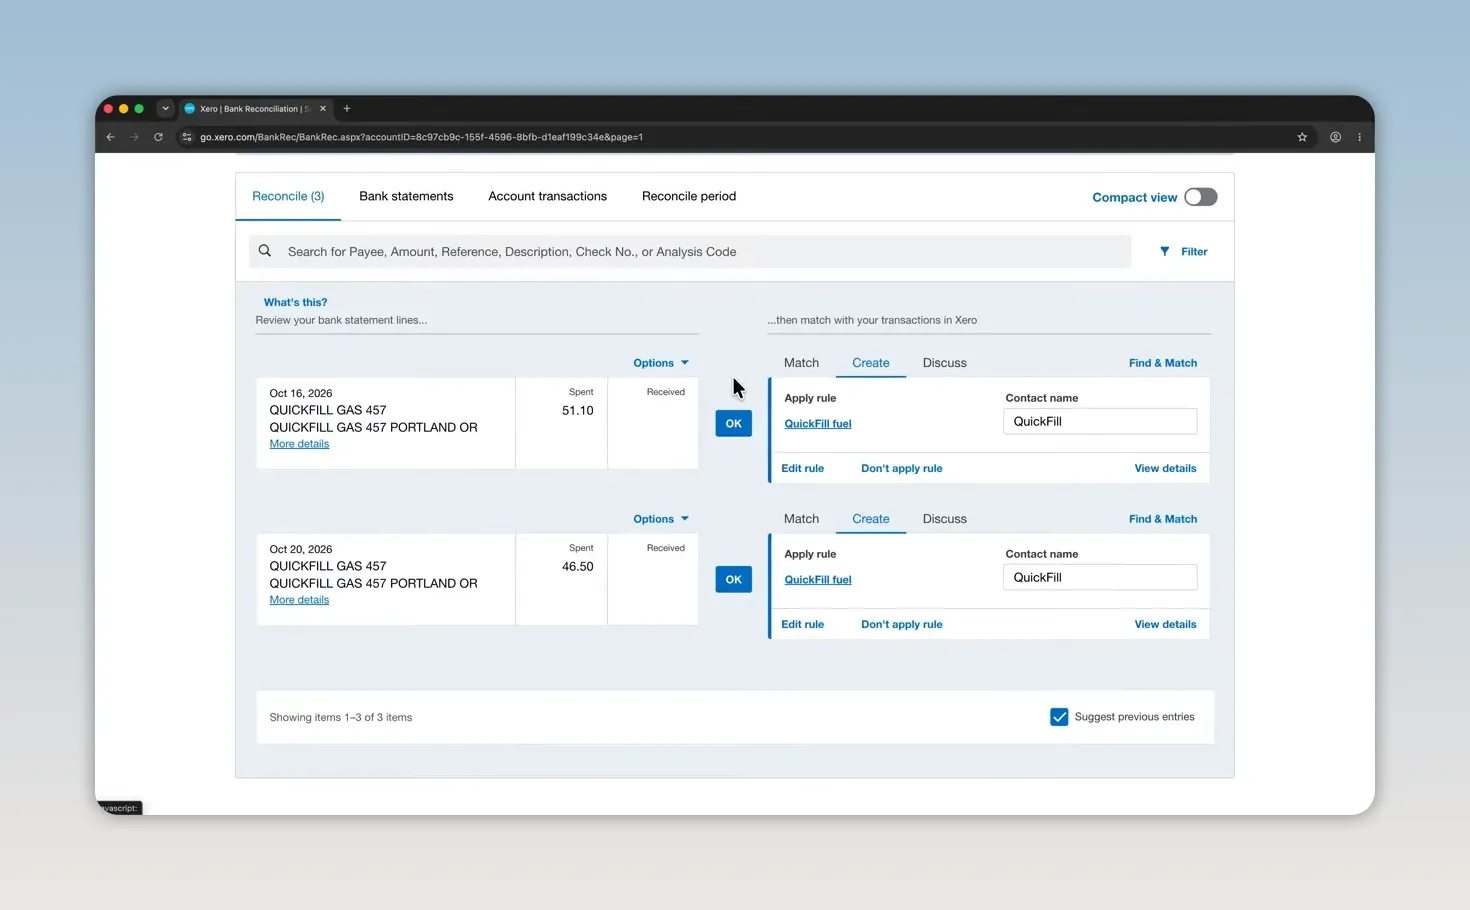
You can edit rules later under Accounting > Bank rules.
Check that your balances agree
Once all the lines are reconciled, return to Accounting > Bank accounts. In our example, the statement balance and the balance in Xero both show $220, and the account displays Reconciled.
If the balances don’t agree, check for:
- A missing transaction.
- A transaction entered twice.
- A starting balance that has not been entered in Xero.
Starting balances are entered under Accounting > Accounting settings > Conversion balances. For additional product guidance, Xero Central provides help with bank feeds, reconciliation, and account setup.
8. Read Three Reports That Answer Three Useful Questions
Xero can only report on the information you’ve entered. Reconcile first, then read your reports.
Go to Reporting > All reports. These three reports are a practical starting point.
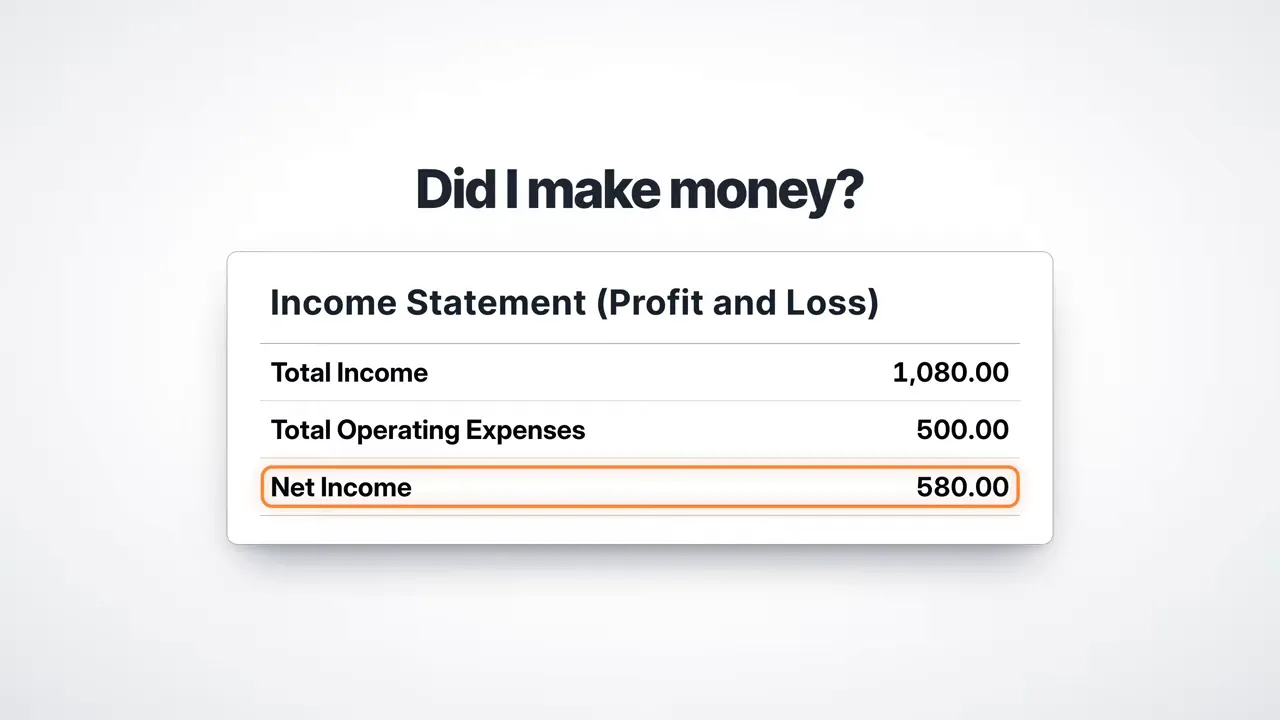
Did I make money? Income Statement or Profit and Loss
In the US, open the Income Statement. In other countries, it is commonly called Profit and Loss.
This report covers a period of time. Check the start and end dates, then select Update.
Our example shows:
- Income invoiced: $1,080.
- Expenses: $500.
- Net income: $580.
Net income is the profit remaining after those expenses.
What do I own and owe? Balance Sheet
Return to All reports and open the Balance Sheet. Unlike the Income Statement, it shows your position on a single date. Set the date to today and select Update.
Our bank balance is $220, even though our profit is $580. Why the difference? The profit in this example includes the $360 invoice that the customer has not paid yet.
Profit and money in the bank are not the same thing. That unpaid invoice explains the difference in our simple example.
Who owes me money? Accounts Receivable Aging Summary
Open the Accounts Receivable Aging Summary, also called Aged Receivables in other countries.
Receivables are amounts customers owe you. Here, Lakeside Yoga Studio still owes $360.
The aging columns show how late the amounts are. Current means an invoice is not due yet, not that the customer is overdue.
Keep your useful reports close
On the All reports page, select the star next to any report you want to favorite. Starred reports appear near the top and directly in the Reporting menu.
You can also invite your accountant to check your records. Open your business name > Settings > Users. Inviting your accountant is free.
9. Ask JAX About Your Numbers
JAX is Xero’s AI assistant. It can help explain how to do something in Xero and answer questions about your business records.
Open JAX using its icon at the top of Xero. Enter a question, such as asking for this month’s fuel spending, and press Enter.
In our example, JAX reports $160 spent on fuel. It finds the three fuel transactions we categorized under Vehicle Expense.
Check JAX’s answers against your reports. It can make mistakes, and its answers depend on the records available in your account.
A Simple Routine for Everyday Xero Bookkeeping
You don’t need to learn every feature before using Xero. Keep returning to the Money Loop:
- Sales: Create and send invoices for your work.
- Purchases: Record supplier bills so you know what you owe.
- Accounting: Bring in bank transactions, match existing records, and categorize new payments.
- Reporting: Check profit, your financial position, and outstanding customer balances.
Xero also has tools for payroll, projects, inventory, and multiple currencies. Some require a higher plan or an add-on. Leave those until your business needs them.
For now, focus on accurate records, careful matching, and regular reconciliation. That is the foundation of doing your own everyday bookkeeping in Xero.


