An affiliate marketing website does not need to be complicated. You need a clean website, useful content that helps people make purchasing decisions, and a way to earn a commission when someone buys through your recommendations.
The difficult part is not designing the perfect homepage. It is choosing topics you can realistically compete for, recommending products that make sense for your readers, and consistently publishing content before you see much of a return.
After about five years in affiliate marketing, I reached a point where my affiliate commissions were generating more than $100,000 per month in profit. That is my own result, not a promise of what a new website will earn. The important lesson is that this is a long-term business. Focus and commitment matter far more than getting every design detail right on day one.
We will build the foundation with WordPress, OceanWP, and Elementor, then work through niche selection, keyword research, AI-assisted writing, affiliate links, and growth. Most of the website tools have free versions. Hosting is a required expense, while premium research tools and AI subscriptions are optional costs.
A quick note on software: interfaces, plan names, prices, trial offers, and affiliate commissions change. Use the workflow below as your guide, and confirm current terms before purchasing a service or promoting a product.
Some links are affiliate links. If you purchase through them, I may receive a commission at no additional cost to you.
What You'll Learn
- Build a clean WordPress website with essential pages, reusable post layouts, and mobile-friendly navigation.
- Choose affiliate topics by balancing search demand, competition, purchase intent, and commission potential.
- Use ChatGPT section by section while verifying facts and retaining control of your recommendations.
- Grow through consistent publishing, relevant internal links, performance data, and relationships within your niche.
Table of Contents
- 1. Understand How an Affiliate Marketing Website Makes Money
- 2. Get Hosting, Register a Domain, and Install WordPress
- 3. Clean Up WordPress and Set the Basics
- 4. Install OceanWP, Elementor, and the Supporting Plugins
- 5. Build a Simple Homepage in Elementor
- 6. Set Up the Blog Archive, Sidebar, and Post Layout
- 7. Create the About and Contact Pages
- 8. Add Navigation, Branding, a Footer, and Policy Pages
- 9. Check Every Page on Tablet and Mobile
- 10. Connect Email Marketing and Finish Security Setup
- 11. Choose a Profitable Affiliate Marketing Niche
- 12. Build a Content Plan Around Purchasing Decisions
- 13. Set Up Rank Math, Search Console, and Analytics
- 14. Research Topics and Verify Affiliate Programs
- 15. Find Realistic Keywords with Semrush
- 16. Create a Well-Structured Affiliate Blog Post
- 17. Use ChatGPT as a Writing Assistant, Not a Publishing Button
- 18. Optimize the Article Without Chasing Every Plugin Point
- 19. Join Affiliate Programs and Add Your Links
- 20. Add the Featured Image, Organize the Post, and Publish
- 21. Grow with Consistent Content and Relevant Relationships
1. Understand How an Affiliate Marketing Website Makes Money
The basic process looks like this:
- Someone searches Google for a question, product review, or comparison.
- They find and open your article.
- Your article helps them choose a suitable product.
- They click your affiliate link and complete a qualifying purchase.
- The affiliate program credits you with a commission.
Notice that a click is not the same thing as a sale. Getting traffic matters, but the people arriving at your website also need a reason to buy, and the product you recommend needs to convert those visitors into customers.
For example, someone searching for the best email marketing tools is probably evaluating software. You could publish a roundup of seven tools, join the relevant affiliate programs, and include your tracking links where you recommend each option.
That article is the part of the website doing the commercial work. Your homepage, About page, and Contact page provide structure and context, but individual blog posts are the main search entry points in this strategy.
The simple website structure we are building
- Home: a clear introduction, an optional email signup form, and featured articles.
- Blog: an archive of your posts.
- Individual posts: reviews, comparisons, tutorials, and product roundups.
- About: information about you and the purpose of your website.
- Contact: a simple way to send you a message.
- Policy pages: privacy information, terms, and other disclosures appropriate to your website.
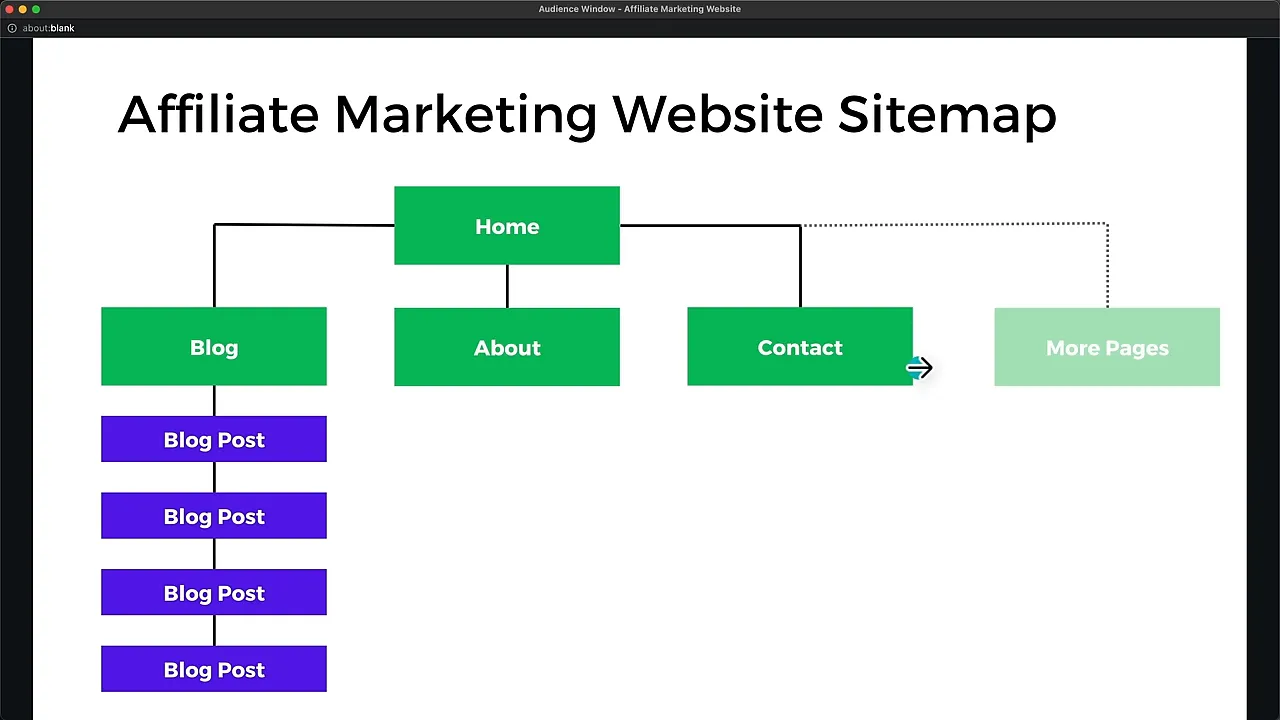
You can add categories to the navigation, and later you might want a Resources page. You do not need a large collection of pages to get started.
Pages versus posts in WordPress
Pages are the relatively permanent parts of your website, such as Home, About, Contact, and your policies.
Posts are your articles. They can have categories, tags, featured images, and a shared layout. When you publish another post, WordPress automatically places it in the appropriate archives and article listings.
Once the website structure is finished, most of your ongoing work will happen under Posts, not in the page builder.
2. Get Hosting, Register a Domain, and Install WordPress
WordPress is free website software. Hosting is the server space that stores your files and makes the website accessible at any time. Your domain is the address people use to reach it.
I use Hostinger for this setup because I have found it reliable, fast, and straightforward for beginners. The plan previously called WordPress Starter is now called Premium.
Choose your hosting term carefully
The example setup used introductory hosting pricing around $3 per month, with longer prepaid terms offering better long-term value than monthly billing. Those were promotional prices, not permanent rates.
Before checking out, compare:
- The total amount charged upfront.
- The introductory monthly equivalent.
- The renewal rate after the initial term.
- Whether a domain is included and for how long.
- The current refund policy and any exclusions.
A longer term can reduce your cost, but only choose a commitment you are comfortable paying for upfront. My Hostinger offer also used the coupon code METICSMEDIA for an additional discount. Check whether it is still accepted and whether it improves the final checkout price.
Create your account and claim your domain
- Select the hosting plan and billing term.
- Create your hosting account and complete payment.
- Verify the email address used for the account.
- Open the domain registration section and search for an available name.
- Enter the required registration details.
- Complete the separate domain email verification when it arrives.
I generally prefer a .com domain because it is familiar. Spend some time on the name, since changing an established website address creates extra work later.
Your own name can work if you want flexibility. A broader brand name can also work well for a review website. Avoid choosing a name so narrow that it prevents you from exploring related topics.
Install WordPress through your host
Start the WordPress setup process in your hosting dashboard. Create your WordPress administrator credentials, select your domain, and skip optional templates or plugin bundles if you want to follow this clean setup.
If you can choose a server location, select one reasonably close to your expected audience. For a mainly US audience, choose a US location. For a mainly European audience, choose a European location. If your audience is international and you are unsure, the default is a reasonable starting point.
Once installation finishes, open the WordPress dashboard. You can return to it by adding /wp-admin to your domain. Bookmark that address. You can also usually enter through the hosting dashboard using an Edit Website button.
3. Clean Up WordPress and Set the Basics
A fresh WordPress installation often contains sample content, dashboard notices, and plugins you will not use. Cleaning these up makes everything much easier to navigate.
Remove sample content and unnecessary extras
- On the Dashboard, open Screen Options and hide dashboard boxes you do not need.
- Under Posts, remove the sample post and empty the trash.
- Under Pages, remove sample pages you will replace.
- Under Plugins, deactivate and delete plugins you do not need.
- Under Appearance > Themes, remove unused themes once your chosen theme is active.
For this build, keep WPForms Lite if it is already installed. Also keep LiteSpeed Cache when it is included with your hosting setup, but leave caching deactivated during the design process. We will activate it later.
The goal is not simply to have the smallest possible plugin count. It is to avoid unnecessary functionality and maintenance.
Set your website title
Go to Settings > General and change the site title from the domain or default text to your actual website name. Save your changes.
Use readable permalinks
Go to Settings > Permalinks and choose a post-name structure. This produces readable article addresses rather than URLs built around dates or numeric identifiers.
My example uses a custom structure of /%postname%, without a final slash. The important decision is to choose a clean structure early and use it consistently.
Decide whether to allow comments
For a new affiliate website, I usually disable comments to avoid spending time moderating spam.
Go to Settings > Discussion and untick the option allowing people to submit comments on new posts. You can enable comments on selected articles later if you want them.
4. Install OceanWP, Elementor, and the Supporting Plugins
The theme controls the basic structure and many sitewide layouts. The page builder gives us a visual way to design individual pages.
- Go to Appearance > Themes > Add New.
- Search for OceanWP, install it, and activate it.
- Go to Plugins > Add New.
- Install and activate Elementor.
- Install and activate Ocean Extra, which adds supporting OceanWP features.
Elementor lets you drag headings, text, images, and other elements onto a page. OceanWP handles areas such as the blog archive, shared post layout, header, footer, and sidebar.
This distinction is important: not every part of your website is edited in Elementor. Some changes belong in the WordPress Customizer.
We will add other plugins only when we need them:
- The Post Grid: article cards on the homepage.
- WPForms Lite: the contact form.
- Qi Addons for Elementor: additional form styling.
- Duplicate Page: reusing an existing page layout.
- Wordfence Security: an additional security layer.
- Rank Math: SEO settings and article checks.
- ThirstyAffiliates: managing affiliate links.
Enable automatic updates for the theme and plugins as appropriate for your maintenance setup. In the Plugins screen, the action labeled Deactivate indicates that a plugin is currently active. If automatic update controls are hidden, check Screen Options.
5. Build a Simple Homepage in Elementor
The homepage has two main sections: a hero area explaining what the website helps people do, and a grid of articles underneath.
Import temporary posts to preview the design
It is easier to design article listings when you have something to display. The free website resource folder contains dummy posts, images, policy starting points, article structures, and writing prompts.
- Download the dummy-post XML file from the Website Content folder.
- In WordPress, go to Tools > Import.
- Install and run the WordPress importer.
- Upload the XML file.
- Assign the imported posts to your user account.
- Select the option to download and import file attachments, then submit.
If featured images are not assigned, download the supplied blog images, upload them to the Media Library, and set one as the featured image for each dummy post. Update each post afterward.
These are design placeholders only. Delete them before you begin presenting the website to search engines as a real content site.
Create and assign your Home page
- Go to Pages > Add New and name the page Home.
- In the OceanWP page settings, choose a full-width layout, disable default padding, and disable the page title.
- Publish the page.
- Go to Settings > Reading.
- Select a static homepage and assign Home as the homepage.
- Save, then open Home with Elementor.
Simply naming a page Home does not make it your front page. The Reading setting is what tells WordPress to use it at your main domain.
Set global colors and fonts first
Before styling every element individually, open Elementor’s Site Settings and configure Global Colors and Global Fonts.
The example uses a deliberately simple palette:
- Accent: green, #00B150.
- Text: dark gray, #252525.
- Dark background: #181F1C.
You can use the example website palette or generate another combination in Coolors. Its generator lets you lock a color you like while changing the remaining colors.
For typography, I use Open Sans throughout the example. Roboto is another straightforward option. The goal is easy reading, not a decorative font that makes every paragraph harder to process.
Global styles make the website more consistent and make future changes much faster.
Create the hero section
Add a two-column section or an equivalent two-column container layout:
- Left column: a heading, a short supporting paragraph, and an optional email signup form.
- Right column: a relevant image.
The example heading communicates a clear benefit: helping people choose suitable marketing tools. Your heading should do the same for your niche.
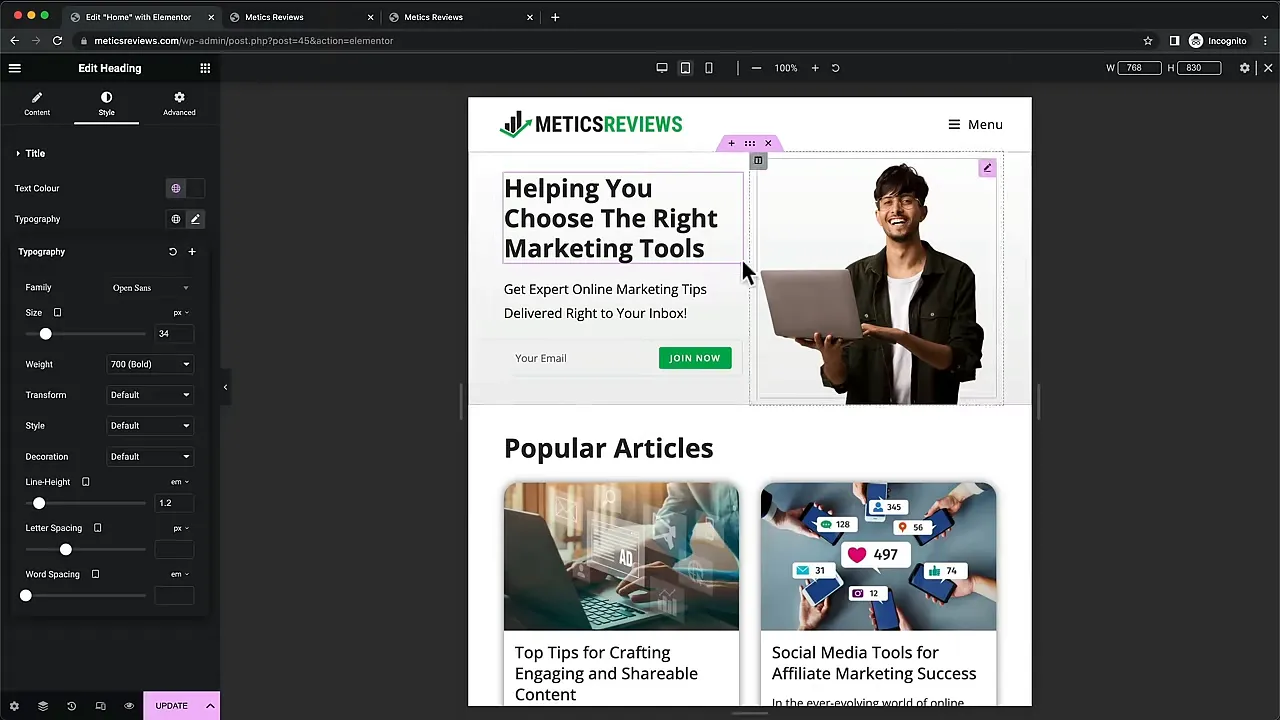
Adjust the heading size, weight, and line height so it reads comfortably. A weight around 700 gives the example heading a bold appearance without needing a different typeface.
If you want email collection, add the OceanWP Mailchimp widget available in Elementor’s WordPress widgets. Remove duplicate introductory text if the heading and paragraph already explain the signup, then set your button label. Keep any consent language your setup requires. We will connect the form later.
Understand margin and padding
These two controls solve most beginner spacing problems:
- Margin: space outside an element’s border.
- Padding: space inside the border, around the content.
Unlink the four values when you want to change only one side. For example, you might reduce the top margin above a form without changing its left or right spacing.
The example uses a negative top margin to bring the signup form closer to the paragraph. Use adjustments like this carefully, and check the result on smaller screens.
Match the theme’s colors to Elementor
If a widget stays blue after you change Elementor’s global colors, it may be inheriting its styling from OceanWP.
Open your website while logged in, select Customize > General Options > General Styling, and set the theme’s primary, hover, and link colors to match your palette. Publish those changes and reload Elementor.
Add the hero image and background
You can source suitable stock photography from Pexels or Unsplash. Check the applicable license and choose a sensible image size rather than uploading the largest original file.
The example uses a person holding a laptop with the background removed. Canva’s background remover can do this, though it is a premium feature. Remove.bg is another option, with limitations on free download quality.
Upload the resulting transparent image and add it to the right column. Set the section’s vertical alignment to the middle so the image and text sit comfortably beside one another.
For the background, use a subtle gradient from white to light gray. If the gradient stops before the edge of the screen, check the section’s full-width or stretch setting.
Add the article grid
Install and activate The Post Grid, then return to Elementor. Add a new single-column section and insert the plugin’s grid layout widget.
For the example design:
- Use Layout 1.
- Hide the built-in section title and metadata.
- Set the excerpt preview to roughly 170 characters.
- Use a text-style Read More link with an arrow icon.
- Apply the accent color to Read More and title hover states.
- Add approximately 20 pixels of card corner rounding.
- Add a subtle box shadow.
- Use a title size around 22 pixels.
Place a separate heading above the grid, such as Popular Articles or Recent Articles. The example uses a 36-pixel heading at weight 700, with some spacing underneath.
Add breathing room around the section. My starting values are about 30 pixels above and 100 pixels below, then I adjust based on the actual layout.
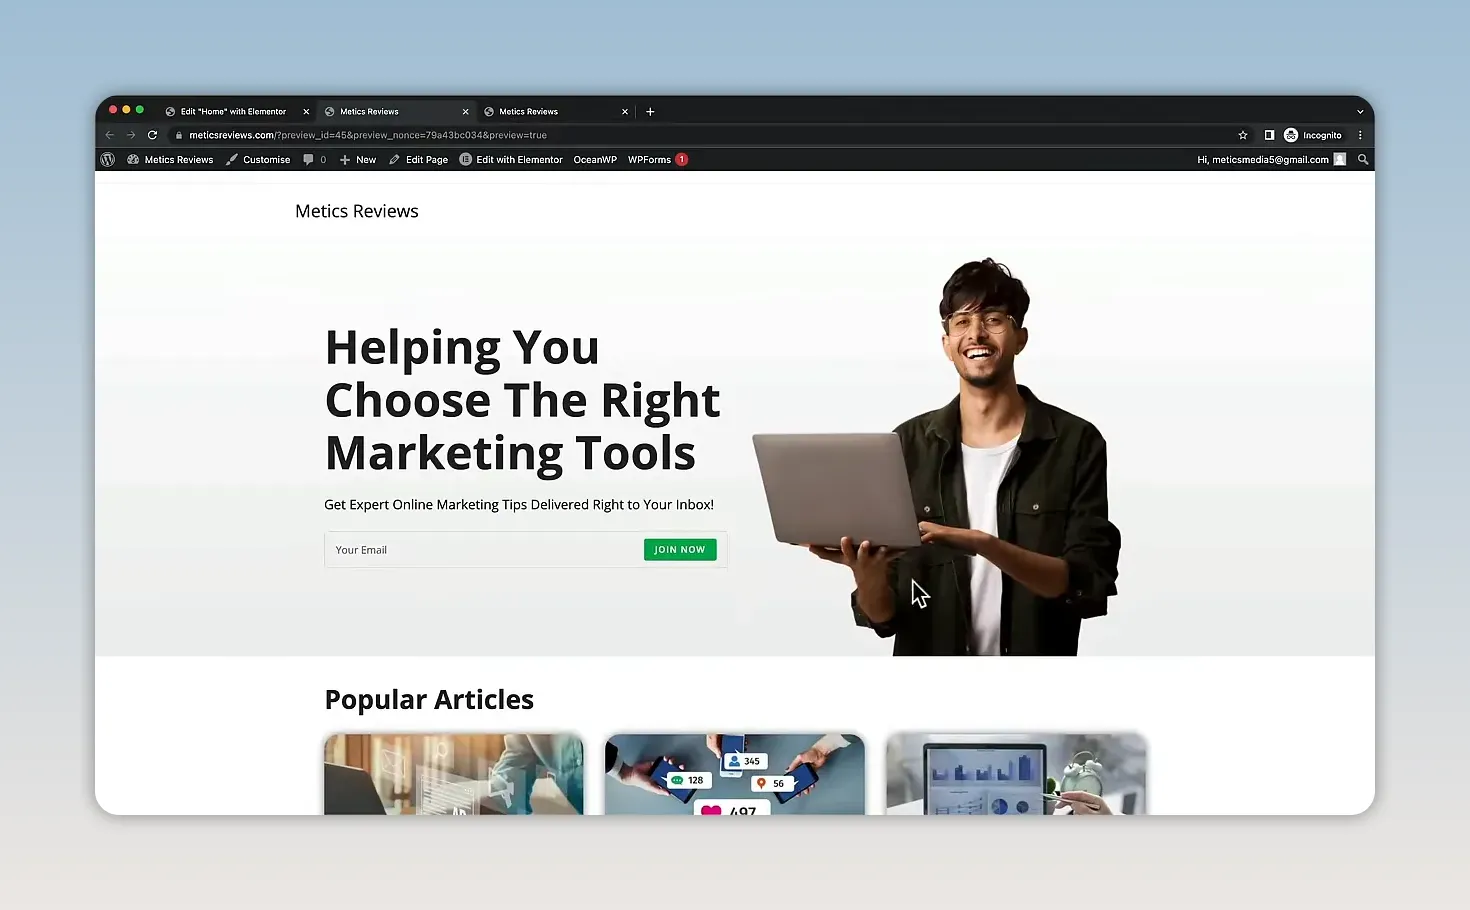
Save your changes and open the page preview. A clean, readable homepage is enough. Do not spend weeks polishing this while your website has no original articles.
6. Set Up the Blog Archive, Sidebar, and Post Layout
Create the Blog page
- Create a new page called Blog and publish it.
- Go to Settings > Reading.
- Assign Blog as the Posts page.
- Save and open the page on the front end.
WordPress now fills this page with your posts automatically. Unlike the custom homepage, this archive is styled through the theme rather than built manually in Elementor.
Open Customize > Blog > Blog Entries and change the blog style from Large Image to Thumbnail if you want the compact example layout.
You can also hide the theme’s page-title banner under General Options. Under Typography, set the body font to match Elementor and increase the example body size from 14 to 16 pixels for easier reading.
Build the shared sidebar
Go to Customize > Widgets > Default Sidebar. Remove the default widgets and add:
- A search field.
- An About Me widget.
- An optional Mailchimp signup widget.
- A Recent Posts widget.
For the About Me widget, add your name, a short description, and your actual social profile links. If it asks for an image URL rather than offering an upload button, upload your photo in the Media Library, copy its file URL, and paste it into the widget.
The example displays six recent posts. Sidebar headings around 18 pixels and widget text around 14 or 15 pixels provide a useful starting point.
This sidebar can appear both on the Blog archive and beside individual articles, so you only need to build it once.
Adjust the individual post layout
Open Customize > Blog > Single Post. OceanWP already supplies a layout with the featured image, title, metadata, content, sidebar, and related posts.
I simplify the metadata by removing comments and, optionally, categories. I also use the modified date so that meaningful article updates can be reflected in the displayed date.
To change the author name shown publicly, go to Users > Your Profile, enter the appropriate nickname, select it under Display Name Publicly As, and update the profile.
7. Create the About and Contact Pages
Build a straightforward About page
Create an About page using the same full-width settings as Home, with default padding and the automatic page title disabled. Open it in Elementor and add:
- A heading.
- A few readable paragraphs about your background and the website.
- A photo, if appropriate.
ChatGPT can help turn your own notes into a draft. Give it real information about your experience, what you test or research, and who the website is intended to help.
For example, a marketing-tools website could provide notes about years of relevant experience, the types of tools being tested, and the goal of helping businesses choose suitable software. Replace those details with your actual background.
Read and edit the result. Remove invented claims, replace placeholders, break up long paragraphs, and make sure it sounds like you.
The example adds a small image beneath the text, aligns it left, and increases its border radius for a circular appearance. It also uses the same approximate 30-pixel top margin and 100-pixel bottom margin as the other simple pages.
Create the contact form
Use WPForms Lite for the form itself. For the additional styling shown here, install Qi Addons for Elementor and leave only its form-related widgets enabled if you do not need the other features.
- Open WPForms > Add New.
- Select the Simple Contact Form template.
- Change the name field to a single, simple name input.
- Add clear labels or placeholders for name, email, and message.
- Make the message field required.
- Save the form.
Create a Contact page with the same full-width page settings, then open it in Elementor. Add a heading, a brief introduction, and the Qi WPForms widget. Select your saved form.
To recreate the example styling, use your accent color for the submit button, make the button full width, add about 15 pixels of input padding, and place a subtle shadow and rounded corners around the form area.
Finally, test the form. Submit a message using an email address you control and confirm that the notification reaches the intended inbox. Check that replying to the notification addresses your response to the person who submitted it.
8. Add Navigation, Branding, a Footer, and Policy Pages
Create the main navigation
- Go to Appearance > Menus.
- Create a menu called Main Menu.
- Add Blog, About, and Contact.
- Drag the items into your preferred order.
- Assign the menu to the theme’s Main location.
- Save.
You can add category archives from the Categories panel in the same menu screen. This is useful when the website has enough articles to make topic-based navigation helpful.
Customize the header
In the Customizer, disable the top bar if you do not need it. You can also remove the header’s bottom border for the cleaner example design.
Under Header and Menu settings:
- Set the navigation text color.
- Add an underline hover effect if desired.
- Use your accent color for that effect.
- Disable the header search icon if search is already available elsewhere.
- Increase the menu font size to suit the design, around 17 pixels in the example.
Create and upload a simple logo
Canva is enough for a basic text logo with a small graphic. The example begins with a 1,400 by 200 pixel design, adds the website name, and applies the same green and dark-gray colors used throughout the website.
Create two versions:
- A dark-text logo for a light background.
- A light-text logo for the dark footer.
Export with a transparent background where your design tool supports it. Upload the header version under Customize > Header > Logo and reduce the maximum display width until it fits comfortably.
If you use the theme’s retina-logo option, supply an image at twice the normal dimensions.
Build the footer
For the simple example, set Footer Widgets to one column. Apply the dark background color, white text, and an accent-colored link hover state.
Under Widgets > Footer One, add:
- The light version of your logo.
- A separator.
- Links to your policy pages.
Use Footer Bottom for your copyright text, or disable that section if you do not want a separate bottom strip.
Create and link the policy pages
Create separate Privacy Policy and Terms of Service pages. A policy generator such as Termly or the supplied starting templates can help organize the content, but the text needs to match your actual website and practices.
Replace every placeholder, including the business name, domain, and contact email. Searching the document for an opening bracket is a quick way to find unfinished fields.
Do not assume a generic template, or another website’s policy, is automatically suitable for you. Email collection, analytics, cookies, and affiliate relationships all affect what you need to explain.
Also make your affiliate relationship clear where readers encounter recommendations. The FTC’s disclosure guidance is a useful starting point for understanding clear disclosures in the US.
To save design time, you can install Duplicate Page, duplicate your first policy page, and replace its title and text for the next one. Check the new page’s URL as well.
Once the pages are published, add their actual URLs to the footer text. Test each link rather than assuming it works.
9. Check Every Page on Tablet and Mobile
A page that looks good on desktop is not automatically finished. Open Elementor’s responsive controls and inspect desktop, tablet, and mobile layouts.
Start with the homepage and check:
- Whether the main heading is too large.
- Whether the line height creates awkward gaps.
- Whether columns stack sensibly.
- Whether images remain an appropriate size.
- Whether forms and article cards fit the screen.
- Whether spacing creates excessive empty areas.
For responsive-enabled controls, desktop settings generally flow down to tablet and mobile unless you override them. A tablet-specific change does not normally change the desktop value, while a mobile-specific change is limited to the mobile breakpoint.
Fix the mobile header in the theme
If the logo pushes the menu icon onto another line, fix that in OceanWP’s Customizer rather than inside the Elementor page.
Go to Header > Mobile Menu, choose a mobile logo, and reduce its maximum height. The example uses 35 pixels as a starting point.
You can also hide the Menu text, choose a hamburger-icon animation, and disable mobile search if it is not needed.
Repeat the check for About, Contact, the policies, the blog archive, and an individual article. Then open the website on an actual phone and test the navigation and forms.
10. Connect Email Marketing and Finish Security Setup
Connect the Mailchimp signup forms
Email collection is optional. If you do not want a newsletter, remove the signup sections rather than leaving forms that do nothing.
If you do want email marketing, create a Mailchimp account and audience. A free plan was used for the example, but contact and sending limits can change, so check the current plan before relying on a particular allowance.
- In Mailchimp, find the API Keys section in your account settings.
- Create an API key and name it after the website.
- In WordPress, open OceanWP > Integrations.
- Paste the key into the Mailchimp integration field.
- In Mailchimp’s audience settings, find and copy the Audience ID.
- Paste that ID into the corresponding OceanWP field.
- Save your changes.
Test a signup using an address you control, then confirm it appears in the correct audience. Treat the API key as a credential and keep it private.
Once the connection works, you can build newsletters or automation sequences. The Mailchimp setup tutorial covers campaign setup in more detail.
Install Wordfence and activate caching
Install and activate Wordfence Security. Follow its free-license registration process, confirm your email, and install the license.
This adds a security layer, but no plugin is a guarantee that a website can never be compromised. Keep the rest of the installation maintained too.
Now return to Plugins and activate LiteSpeed Cache for the compatible hosting setup used here. Check that automatic updates are enabled where intended, then test the website after caching is active.
11. Choose a Profitable Affiliate Marketing Niche
The website foundation is now in place. The next decisions matter much more than the exact shade of your buttons.
Before creating an article, evaluate three things:
- Traffic: are people searching for the topic?
- Competition: can your website realistically earn visibility?
- Revenue potential: can that search lead to a purchase that earns a worthwhile commission?
You need all three. A topic with lots of demand and valuable products is not useful if the competition is far beyond your current reach. A low-competition topic is not useful if nobody searches for it. And traffic without relevant purchase intent may generate very little affiliate revenue.
Why I prefer digital products
In my experience, digital products have often offered a more attractive starting point than low-commission physical products.
Software, platforms, and online courses do not have the same production and shipping costs as physical goods. Some programs can therefore pay substantial one-time commissions or recurring percentages.
Among programs I researched, examples ranged from roughly 10% to 40% commissions or one-time payouts around $50 to $300. These are examples, not universal rates. Physical-product commissions also vary, so compare actual programs rather than assuming every product category pays the same amount.
Research the product’s official affiliate page. Check:
- The commission amount or percentage.
- Whether payments are one-time or recurring.
- Any limits on recurring commissions.
- The product’s price and the kinds of customers it serves.
- The program’s acceptance requirements and promotional rules.
A high commission is only valuable if the product is appropriate for your audience and people actually purchase it.
Use a broad brand, then test narrower topics
I prefer to give the website room to grow while focusing initial content on smaller subtopics.
For example, a technology website might explore cybersecurity, then narrow further into web application penetration testing if the broader topic is too competitive.
As you publish, look at what earns impressions, rankings, clicks, and commissions. Lean into the areas where the website shows traction instead of assuming your first niche decision must be perfect.
The affiliate niche ideas document can help with initial brainstorming. Choose something you are at least somewhat interested in, because continuing through quiet early months is much harder when you dislike the subject.
Give yourself time. I would approach this with a willingness to work consistently for at least six months before deciding whether the business model suits you. That is a commitment guideline, not a guarantee of results within six months.
12. Build a Content Plan Around Purchasing Decisions
For this strategy, I focus on four main article formats.
Best X for Y
These help someone choose from a group of products. Examples include the best website builders for small businesses or the best website builders for photographers.
How to do something
A practical tutorial can naturally involve a tool. Someone learning how to build a website may need hosting or a website builder, giving you a relevant recommendation opportunity.
Product reviews
Someone searching for a specific product review is often evaluating whether to purchase it. Your job is to help them understand the product, its limitations, and who it suits.
Product comparisons
A search such as Wix versus Squarespace suggests that the person has already narrowed down the options. A useful comparison helps them make the final decision.
Start with reviews and comparisons, then expand
Broad roundups and tutorials can attract substantial search demand, but they are often highly competitive. Reviews and specific comparisons can provide more approachable starting opportunities.
For a website-builder topic cluster, the sequence could be:
- Publish individual reviews of Wix, Webflow, and Squarespace.
- Compare Wix versus Webflow, Wix versus Squarespace, and Webflow versus Squarespace.
- Build broader guides and roundups after developing knowledge and supporting content.
- Link related articles together where those links help the reader.
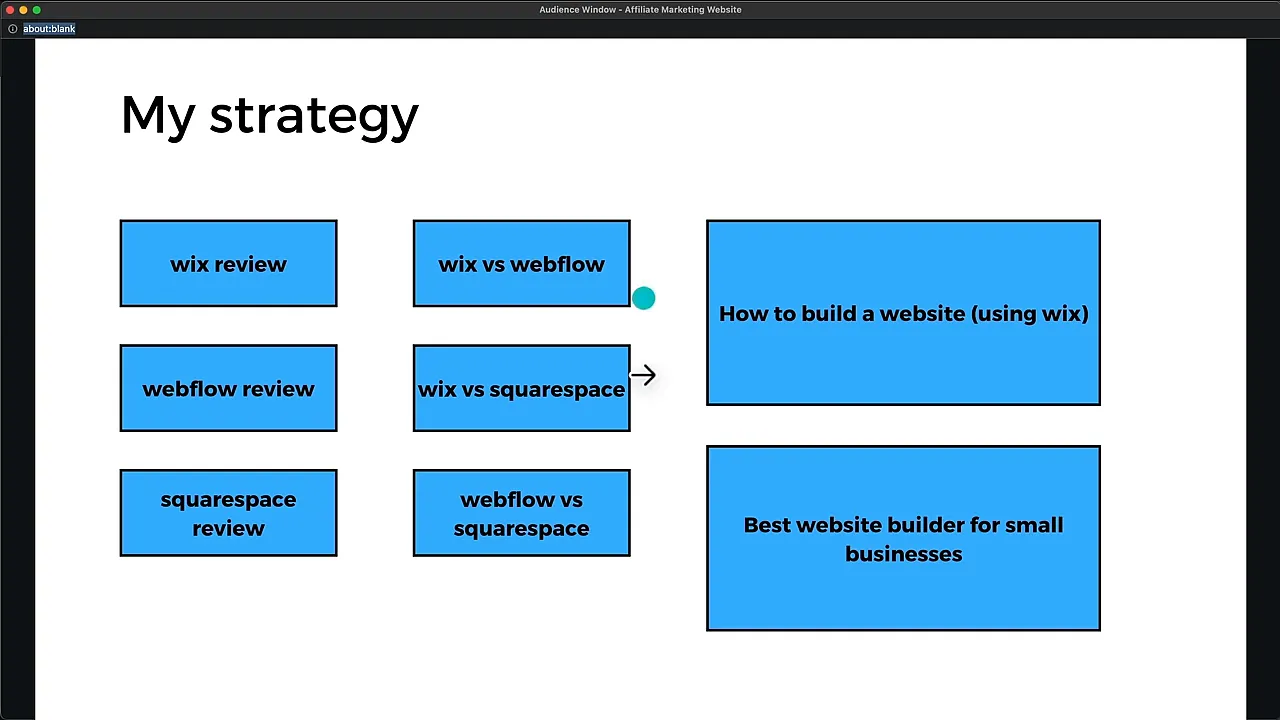
This is a practical publishing sequence, not a rule that every review keyword is easy. Research each topic before committing to it.
13. Set Up Rank Math, Search Console, and Analytics
Before setting up SEO tracking, delete the imported dummy articles and empty the trash. You want search engines discovering real content, not unrelated design placeholders.
- Install and activate Rank Math.
- Create or connect a Rank Math account.
- Start the setup wizard in Advanced mode.
- Select the appropriate website type and confirm the website name.
- Add a square logo for the relevant site identity settings.
- Connect your Google account through the Google Services step.
- Select the correct Search Console property and Analytics account, property, and web stream.
- Enable the sitemap and complete the wizard.
The integration can help connect the services, but check that the correct properties are actually selected. Use Google Analytics 4 rather than relying on an older Analytics setup.
If your website does not appear in the property dropdown, allow some time, reconnect, or try another browser. If it still does not appear, set up the properties manually or follow Rank Math’s connection troubleshooting instructions.
Search data will not appear immediately. A new website needs time to collect impressions and clicks.
Rank Math’s reporting options can also differ by plan and version. You can always use Google Search Console directly to inspect search performance and indexing information.
14. Research Topics and Verify Affiliate Programs
ChatGPT is useful for brainstorming, especially when you know your broad niche but are not sure which subtopics to investigate.
An adaptable request would be:
I am starting an affiliate marketing website about online marketing. Suggest subniches that could support useful product-focused content and affiliate recommendations.
Possible directions include SEO, social media marketing, content marketing, email marketing, and paid advertising.
Once you choose a direction, ask for relevant products and affiliate programs to research. For email marketing, that might produce tools such as MailerLite, ActiveCampaign, GetResponse, and ConvertKit, as named in the example research.
Treat the response as a research list, not verified program information. Open each product’s website, inspect pricing, and find the official Affiliate or Partner page, often linked in the footer.
Recurring software commissions are one reason this research matters. In my own ActiveCampaign account at the time of the example, the dashboard showed about $71,000 in total commissions and one customer with estimated annual commissions around $1,735. Those were account-specific results under the applicable terms, not typical earnings or promises about current program payouts.
The useful principle is to investigate the economics before investing months of work in a topic.
15. Find Realistic Keywords with Semrush
Once you have a promising product area, use a keyword research tool to estimate demand and competition.
I use Semrush for this process. The Semrush offer promoted an extended 14-day trial rather than the standard seven-day trial. Verify the current offer and billing terms before signing up. You can use a trial period to build a keyword list for several months of writing.
Filter for achievable opportunities
- Open the Keyword Magic Tool.
- Enter a product name, such as MailerLite.
- Choose the relevant search database.
- Inspect estimated search volume and Keyword Difficulty, or KD.
- For an initial filter, try a KD range from 0 to 29.
- Sort by search volume and look for relevant purchasing intent.
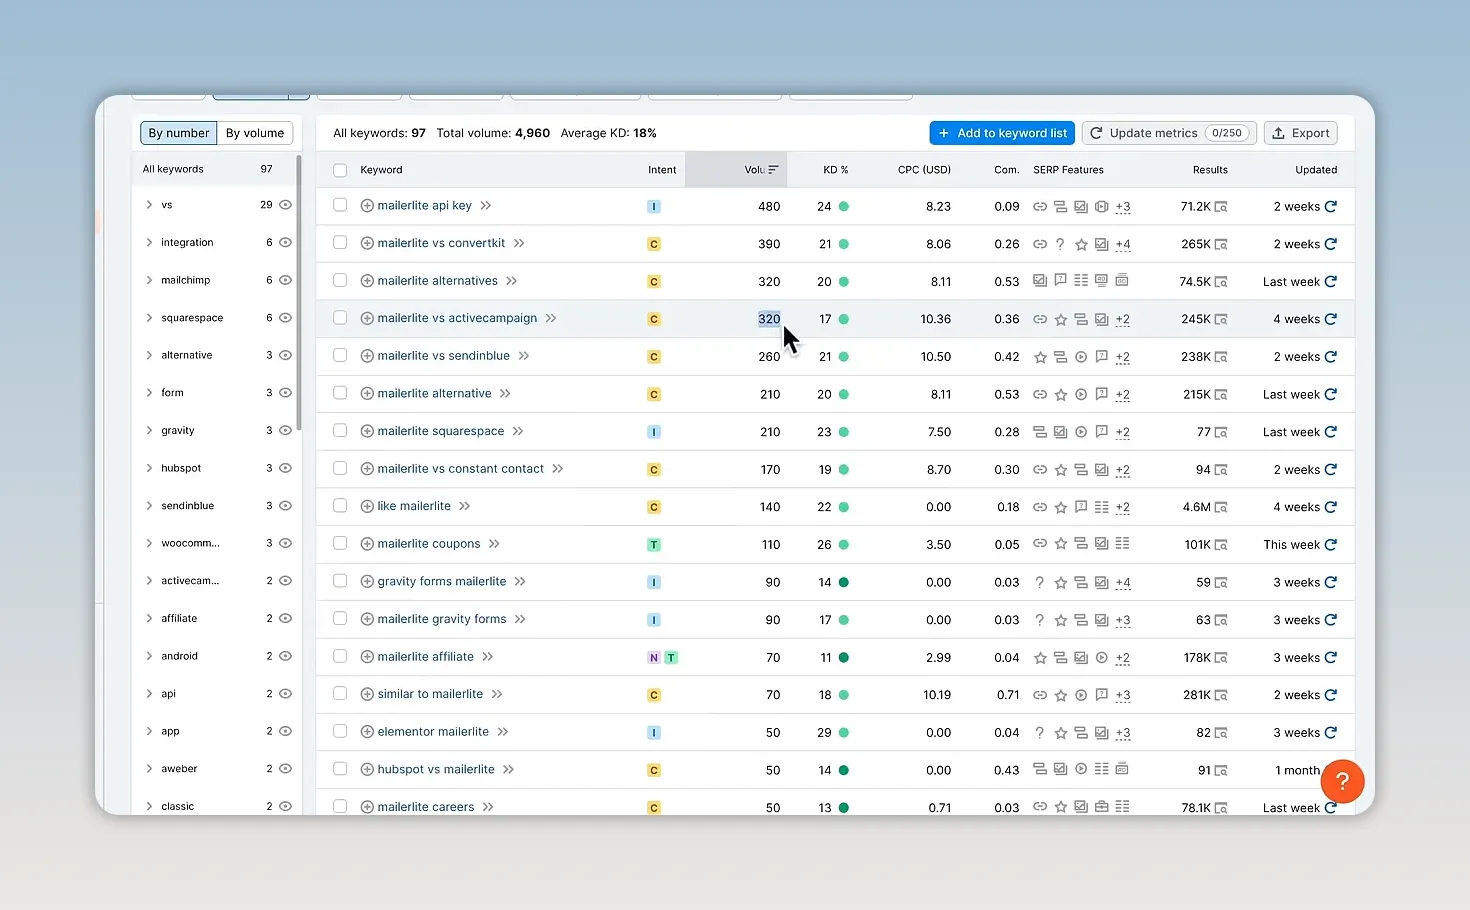
The broad MailerLite keyword in the example had around 27,000 monthly searches and a KD of 79. That looked attractive for demand, but difficult for a new website and less specifically aligned with a comparison article.
The more focused historical examples were:
- MailerLite versus ConvertKit: about 390 monthly searches, KD 21.
- Flodesk versus MailerLite: about 30 monthly searches, KD 0.
- MailerLite versus ActiveCampaign: about 320 monthly searches, KD 17.
These figures were research snapshots, not current estimates. They show the tradeoff: the easiest-looking keyword may have very little demand, while a slightly harder comparison can offer a better balance.
Use CPC as supporting evidence
Cost per click shows an estimate of what advertisers pay for paid-search clicks. A high CPC can suggest commercial value, but it does not prove that an article will rank or earn commissions.
Inspect the actual search results
Open a promising keyword and review its SERP analysis. Visit some of the ranking articles and ask:
- Are the results mainly enormous established websites, or are smaller publishers present?
- Does the content fully answer the comparison?
- What referring domains and backlinks do the ranking pages have?
- Can you produce a genuinely useful competing article?
Semrush Authority Score is a third-party metric, not a score assigned by Google. It can still help compare competitors, provided you do not treat it as a ranking guarantee.
In the MailerLite versus ActiveCampaign example, lower-scoring sites and pages with few backlinks appeared among the top results. That made the keyword worth adding to the content list.
Save suitable keywords in a topic-based list, such as Email Marketing Tools. Keep researching rather than stopping after the first promising phrase.
16. Create a Well-Structured Affiliate Blog Post
Go to Posts > Add New. Use the WordPress block editor for the article itself. You do not need to build every post in Elementor.
Open the Rank Math panel and enter the focus keyword. For our example, that is MailerLite versus ActiveCampaign.
Use a clear heading hierarchy
- H1: the article title.
- H2: the main sections.
- H3: subsections within an H2.
Do not make a paragraph bold and assume it is a heading. Use the heading block and select the appropriate level.
A comparison article can begin with a short introduction and quick recommendation, then compare the products across useful categories before giving a final verdict.
For email marketing software, relevant categories might include:
- Pricing structure.
- Email marketing features.
- Automation.
- Ease of use and interface.
- Templates and design.
- Landing page functionality.
- Personal experience.
- Who should choose each product.
The exact sections should follow the reader’s decision, not a rigid template.
Write the title around the actual search
A straightforward title could be MailerLite vs ActiveCampaign: Which Email Marketing Tool Is Best?
You can include a year when the article is genuinely maintained for that year. Keep the permanent URL independent of it so you do not need a new address every time you update the article.
17. Use ChatGPT as a Writing Assistant, Not a Publishing Button
The goal is not to request an entire article, copy everything, and publish it untouched. Work section by section so you retain control over the structure, facts, and recommendations.
The original example compared GPT-3.5 and GPT-4 and preferred the stronger model for drafting. Model names and plan access change, so use a capable model available to you and judge the output rather than relying on an old subscription label.
Step 1: Generate and edit the outline
Ask for comparison categories based on the target keyword and the reader’s buying decision. Then remove irrelevant sections and add anything your own product experience suggests is missing.
You can ask for the headings formatted as H2 headings without numbering. When pasting into WordPress, verify that they became actual heading blocks.
Step 2: Draft one section at a time
Here is an adaptable request:
Draft the pricing section for a MailerLite versus ActiveCampaign comparison. Explain the main differences clearly, use the target phrase naturally where appropriate, and suggest where a screenshot or graphic would help. Identify pricing details that need checking against the official websites.
Then check the output against the products themselves. Verify prices, subscriber limits, plan names, features, and any other specific claims. These are exactly the details that can be outdated or wrong.
Repeat the process for each main section. Ask for rewrites when the tone is too formal, repetitive, or vague. Keep related drafting in the same conversation to preserve context, while still reviewing for consistency yourself.
Step 3: Add your own experience
If the article includes personal experience, supply the actual experience. Do not let the assistant invent product testing or results you have not obtained.
AI can help organize your notes and explain differences. You remain responsible for the recommendation.
Step 4: Write the conclusion, then the introduction
I write the conclusion after the comparison sections, then create the introduction last. At that point, the full article exists, so it is easier to produce an opening that accurately explains what the reader will learn.
Use the focus topic early when it reads naturally. Do not force an awkward sentence solely to satisfy a plugin check.
Step 5: Replace visual placeholders with useful images
If the draft suggests a pricing screenshot, visit the official pricing page and capture the relevant information. Add that image next to the explanation, then remove the placeholder note.
Use screenshots and graphics that help readers understand the product, not decorative images inserted only to make the article longer.
For image alt text, describe the visible content accurately. Include a relevant keyword only when it fits the image description naturally. Alt text should remain useful to someone who cannot see the image.
18. Optimize the Article Without Chasing Every Plugin Point
Rank Math gives you a useful checklist, but its score is an editing aid, not a prediction that Google will place your article on page one.
Check the title, description, and URL
- Make the SEO title clear and relevant to the target search.
- Write a concise meta description that explains the article’s value.
- Use a short, descriptive slug.
- Keep dates out of evergreen URLs where possible.
For the example comparison, a slug such as mailerlite-vs-activecampaign is cleaner than including the full headline and year.
Rank Math may initially use the opening text for its description preview. You can edit the description in the snippet settings. Google may still choose a different search snippet from the page.
Use the topic naturally
Do not repeat the exact keyword until the article sounds unnatural. Include it where it helps, and use related wording when appropriate.
A comparison can naturally refer to the products in either order. There is no need to force every phrase variation into the article.
Add useful external and internal links
Link to official documentation, product information, or another relevant resource when it supports the explanation. Add internal links to related reviews and comparisons as your website grows.
For example, a comparison article could point to your individual product reviews for readers who want a deeper look.
Affiliate links need appropriate qualification. Google recommends identifying paid or affiliate relationships with rel="sponsored"; nofollow is also accepted for these links. See Google’s outbound link guidance for the distinction.
Add navigation for long articles
A table of contents is helpful when the article has many comparison categories. Rank Math includes a block for this. Showing only H2 headings often keeps it easier to scan than listing every subsection.
Finally, check paragraph length, heading clarity, image placement, and overall completeness. Do not add filler simply to reach a suggested word count or score.
19. Join Affiliate Programs and Add Your Links
You can publish useful content before every affiliate application is approved. Some programs want to see an established website with original articles and some traffic.
Find the official Affiliate or Partner page, apply with an honest description of your website, and explain how you intend to promote the product. Approval is not guaranteed.
Once accepted, locate your tracking link in the affiliate dashboard. Programs may use their own dashboards or operate through an affiliate network.
Manage links with ThirstyAffiliates
A link-management plugin lets you maintain a readable website link that redirects to the affiliate destination. Before using redirects or cloaking, check the program’s rules.
- Install and activate ThirstyAffiliates.
- Select Add New Affiliate Link.
- Give the link a recognizable product name.
- Paste your affiliate tracking URL into Destination URL.
- Configure the relevant link qualification and new-tab options.
- Save the link.
The result can be a readable address on your own domain, such as a Recommends path followed by the product name.
Place links where they help the decision
You do not need to link every mention of the product. I usually add a link at the first relevant mention, then use a clear product button where a reader is ready to take the next step.
For a comparison, the conclusion is a sensible place for separate product links, provided you have explained who should choose each one.
Make link text visually distinguishable from body text, keep the relationship disclosed, and test the final destination of every link.
20. Add the Featured Image, Organize the Post, and Publish
Create a relevant featured image
For a product comparison, a custom graphic with the two product logos is usually more informative than a generic stock photograph.
In Canva, search for a comparison or versus design and adapt it. The example uses an 800 by 500 pixel image with the product logos and their corresponding brand colors.
If you need to identify a color from a product website, the ColorZilla browser extension can copy a visible color’s hexadecimal code. Canva may also detect colors from imported graphics.
Export the image at a sensible file size, then add it under Featured Image in the post settings.
Assign the category and optional tags
Put the comparison in a relevant category, such as Email Marketing, and remove Uncategorized if it no longer applies.
Tags are optional. Use them only when they provide a sensible way to organize related content rather than adding a large collection of loosely related terms.
Run a final publishing check
- Save the article as a draft.
- Review the SEO checklist for genuine omissions.
- Open the front-end preview.
- Read the entire article.
- Confirm that facts and pricing have been checked.
- Remove placeholders, unfinished sections, and drafting notes.
- Check images, headings, spacing, and mobile readability.
- Test internal links, external links, and affiliate destinations.
- Confirm that the recommendations and disclosures are clear.
- Publish.
After publishing, the article can appear automatically in the Blog archive and relevant homepage listings. You can reopen it at any time, make changes, and select Update.
21. Grow with Consistent Content and Relevant Relationships
Publishing the first article is the beginning, not the end of the process.
I would focus on two ongoing activities:
- Publish more high-quality, focused articles.
- Build relationships with relevant websites in your niche.
A schedule of two or three articles per week can give you a concrete routine, but only if you can maintain the quality. Consistency is more useful than a burst of rushed posts followed by months of inactivity.
Alongside publishing, reach out to relevant websites and businesses. A useful guest contribution is one possible way to share expertise and introduce your work to another audience.
For example, after writing about email marketing tools, you could approach a relevant company or publisher with an idea for a genuinely useful article. An editorial link to a relevant resource on your website may fit naturally, but do not make manipulative link exchanges the purpose of the contribution. Links intended primarily to influence rankings can fall under Google’s link spam policies.
Keep returning to the data: which topics earn impressions, which articles get clicks, which recommendations convert, and where your website is developing traction.
Build the foundation once, then spend your time helping people make better decisions. That means researching achievable topics, publishing useful content, improving it as products change, and staying committed long enough to learn what works.
Made with VideoToBlog using How To Build An Affiliate Marketing Website 2026 (COMPLETE GUIDE)


