A simple invoice generator might not look like much of a business. But when a useful tool attracts enough traffic, even display ads can become a meaningful revenue stream.
Consider this example: 2 million monthly visits, 4.2 pages per visit, and three ads per page. At an assumed $1 CPM, meaning $1 per 1,000 ad impressions, that works out to roughly $25,200 in monthly ad revenue. That is an illustrative calculation, not verified earnings or a guaranteed result. Building the tool is one part of the process. Getting that level of traffic is another.
The exciting part is that you no longer need to write all the code yourself to get started. Hostinger Horizons can turn a plain-language description into a functioning web app, then help you refine its design, connect a database, and publish it.
We’ll build an invoice generator called InvoSnap, test what the AI creates, add user accounts and saved invoices with Supabase, set up Google AdSense, and prepare the app for search traffic.
What You'll Learn
- Generate a working invoice app, then refine it with focused prompts and hands-on testing.
- Publish on a custom domain and configure AdSense without interrupting the app’s core workflow.
- Connect Supabase to add user authentication, saved invoices, and payment-status management.
- Research relevant search keywords and export the code when your app needs more advanced development.
Table of Contents
- 1. Set Up Hostinger Horizons and Generate Your App
- 2. Test the First Version Before Adding More Features
- 3. Customize the App With Clear, Focused Prompts
- 4. Publish the Web App and Connect a Custom Domain
- 5. Add Google AdSense Monetization
- 6. Connect Supabase for User Accounts and Saved Data
- 7. Add an Invoice History Page
- 8. Use SEO to Help People Find the App
- 9. Export the Code When You Need More Control
1. Set Up Hostinger Horizons and Generate Your App
Start by creating a Hostinger Horizons account and choosing a plan. In the setup demonstrated here, there were four plans, with the main difference being the number of monthly AI message credits. The Starter plan included 70 messages per month, which made it a reasonable starting point with room to upgrade later.
The advertised entry price was below $7 per month, and a 12-month term included hosting and a free domain for the first year. Pricing, message allowances, and domain offers can change, so check the current checkout details before purchasing.
Our special signup offer provides an additional 10% discount on Hostinger Horizons, subject to the offer’s current terms. This is an affiliate link, which means I may earn a commission at no extra cost to you.
After selecting your plan and term, enter your email address, create a password, and complete the billing and payment information. You’ll then reach the app creation screen.
Describe the app you want to build
Your first prompt should give the AI enough direction to create a useful starting point. Include:
- The app’s name: InvoSnap.
- Its purpose: Help users create professional invoices.
- The main workflow: Enter invoice information, see a live preview, and download a PDF.
- The visual direction: Describe the style and layout you want.
- Important features: Include the functionality you expect, such as light and dark modes.
The initial prompt is where you describe the overall product. Later prompts should focus on individual changes.
For this project, the brief describes an invoice generator with company and client information, invoice details, line items, a live preview, and PDF downloading. Once the description is ready, click the purple send button.
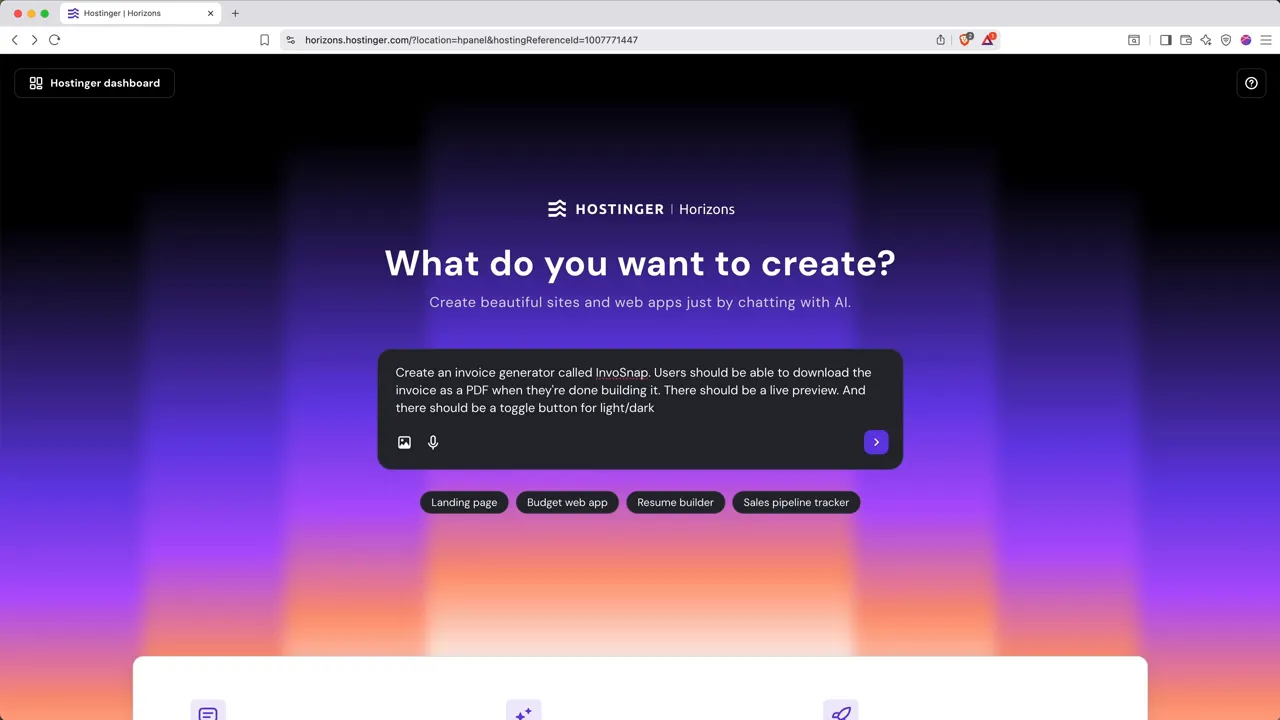
If an invitation popup appears, close it and let the build continue. Horizons generates the app’s code in the background, with progress notes and prompting tips along the way. The initial build can take a few minutes.
2. Test the First Version Before Adding More Features
A generated app can look impressive right away. The next question is whether its features actually work.
For InvoSnap, I filled out the invoice fields with sample information and checked the live preview. Then I clicked Download PDF and opened the downloaded file. Sure enough, it produced an invoice.
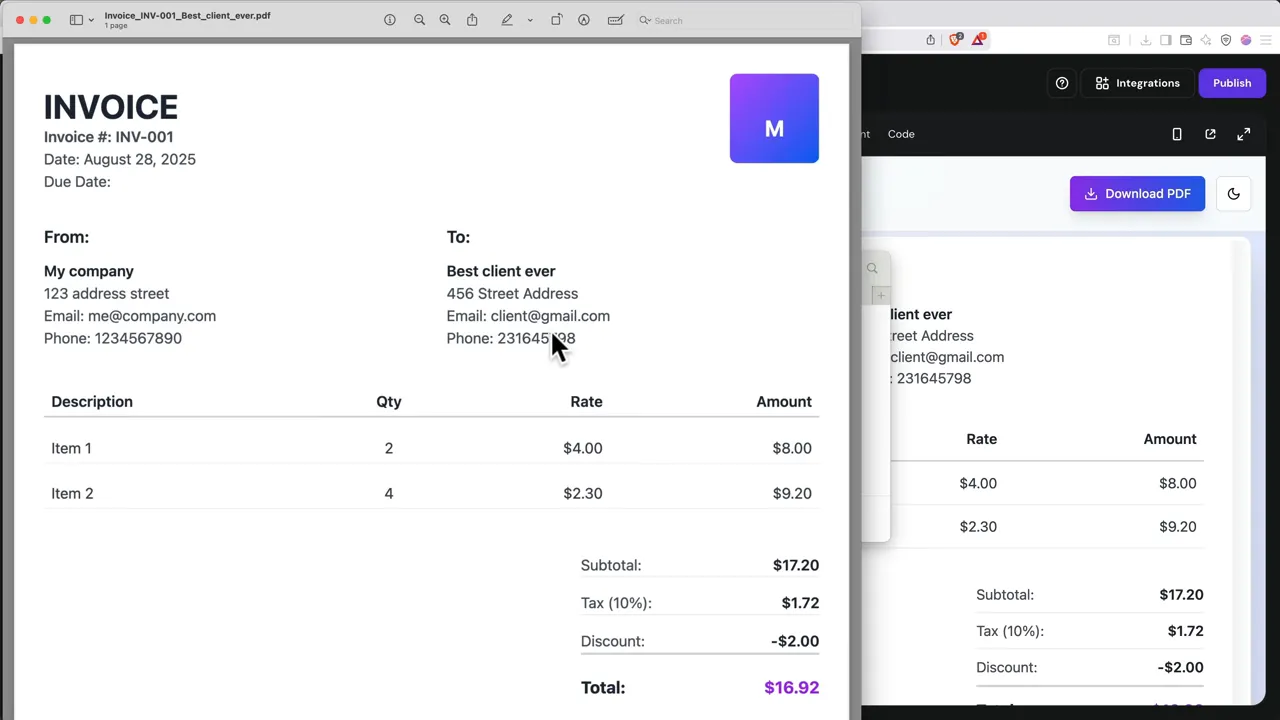
Testing also revealed several things worth improving:
- The invoice included a generic logo instead of the user’s branding.
- Dark mode also darkened the invoice, even though a white document background would be more suitable for the downloaded PDF.
- The invoice preview looked squeezed on mobile.
- The mobile header felt cramped.
Use the phone icon in the upper-right corner to inspect the mobile layout. You can also open the app in a separate browser tab using the square-with-an-arrow icon. That gives you a cleaner view outside the editor.
Make a short list of issues before changing anything. It is much easier to guide the AI when you know exactly what needs attention.
One small troubleshooting tip: if the live preview seems to disappear inside the editor, try reducing your browser zoom. In this build, zooming out brought the side-by-side invoice preview back into view.
3. Customize the App With Clear, Focused Prompts
The best results come from requests that are concise and specific. In general, ask for one change at a time. Bundling unrelated requests makes it harder to tell whether the AI understood everything correctly.
Replace the generic logo with an upload option
The first change is to let users upload their own logo rather than forcing a placeholder onto every invoice.
A focused request could read:
Replace the placeholder logo in the invoice’s upper-right corner with a user-uploaded logo. If the user has not uploaded one, leave that area empty.
Send the request and wait for Horizons to process it. In this build, the generic logo disappeared, and an upload option became available in the company information section.
Notice that the prompt defines both states: what should happen when a logo exists, and what should happen when it does not. That kind of detail helps avoid unwanted placeholders.
Use screenshots to explain layout problems
For visual issues, a screenshot can communicate the problem more clearly than a long description.
- Switch to mobile preview.
- Capture the cramped header. On a Mac, press Command + Shift + 4, then drag over the area.
- Drag the screenshot into the Horizons chat field.
- Add a short request explaining what should change.
For example:
The mobile header feels crowded. Simplify its layout so the branding and controls fit comfortably on small screens.
The first revision improved the spacing, but it still wasn’t quite right. The tagline was taking up too much room, so I followed up with a separate request to hide it on mobile and keep the header on one line.
That second, narrower adjustment produced a much cleaner result. You do not have to accept the first revision just because it is technically better.
Save message credits with Edit Content
Each AI message uses a message credit in the demonstrated workflow. You can check the remaining balance through the hamburger menu in the upper-left corner.
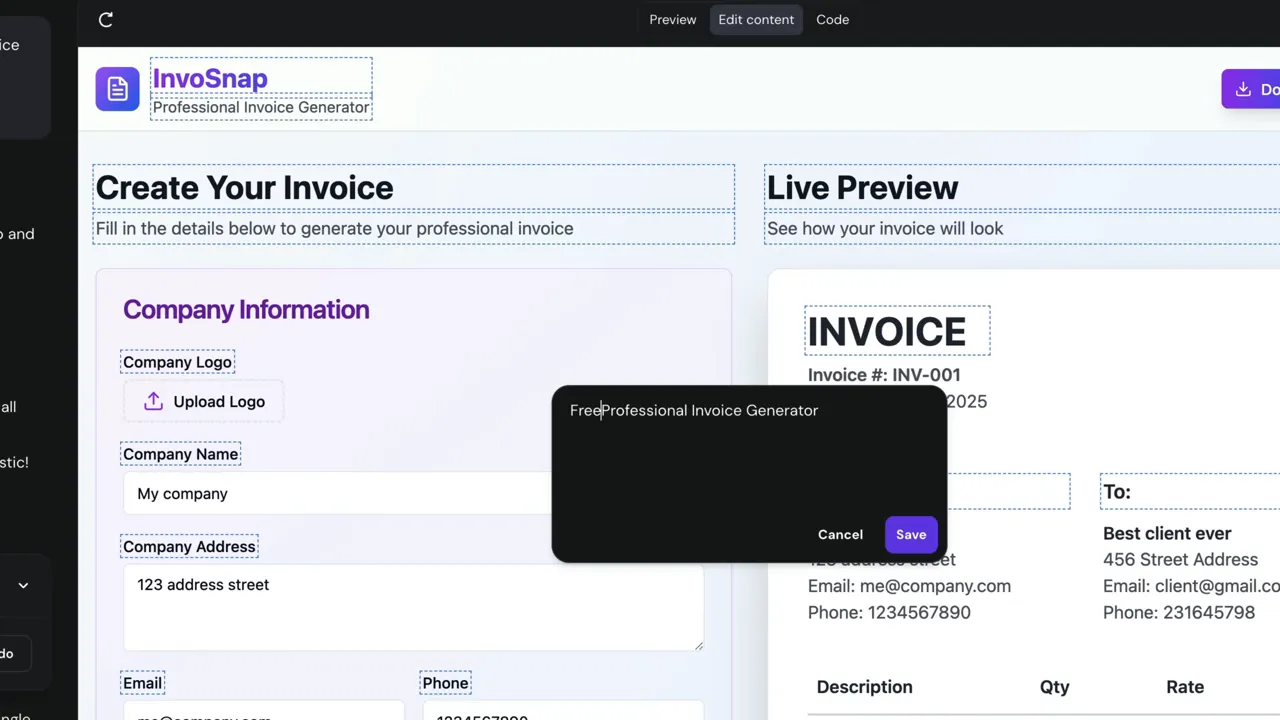
For simple wording changes, use Edit Content instead of sending another prompt:
- Open the Edit Content tab above the preview.
- Click an editable text element.
- Change the wording in the text editor.
- Click Save.
I used this to add “Free” to the invoice generator tagline. That edit did not consume an AI message credit.
If you know how to code, the Code tab also lets you browse the project’s files and edit them directly. You do not need it to complete this workflow, but it is there when you need more control.
Undo changes or restore an earlier version
Sometimes a change simply does not work out. I tested a bright blue invoice background and immediately preferred the original white version.
There are two ways back:
- Undo: Use the undo option associated with the change in the chat.
- Restore: Find an earlier version in the chat history and restore that version.
Be careful with Restore. The confirmation warns that changes made after the selected version will be permanently deleted. Confirm only when you are comfortable discarding that later work.
4. Publish the Web App and Connect a Custom Domain
Once the core app works, click Publish in the upper-right corner. When publishing finishes, select View Site to open the public version at its temporary address.
That is enough to make the app accessible, but a custom domain is easier to remember and gives the project its own identity.
Register and connect your domain
- Return to Horizons and open the upper-left hamburger menu.
- Select Hostinger Dashboard.
- Choose Horizons in the dashboard navigation.
- Find your app and click Connect Domain.
- Search for an available domain and select it.
- Complete the domain registration contact information.
I generally prefer a .com when it is available. In this example, the first-choice name was taken, so I tried a hyphenated variation and found an available option included in the first-year domain offer.
After registration, check your inbox for Hostinger’s domain verification email and click Verify Email. Do not skip this step, since domain contact verification is important for keeping the domain active.
Return to the dashboard, confirm that the new domain is linked to the app, and open it using the external-link icon. Your web app is now live at its own address.
Remember that editor changes are not automatically live. Whenever you make an update that should appear publicly, publish again.
5. Add Google AdSense Monetization
With the app online, you can apply to monetize it through Google AdSense. Installing the code is only part of the setup. Google still needs to verify and review the site before it can serve ads.
Create your account and install the AdSense code
- Sign up for AdSense or sign in to your existing account.
- Enter your live website address and complete the onboarding form.
- In the dashboard, enter your payment information.
- Open the ad preview using Explore.
- Click Get Code and copy the supplied snippet.
Return to Horizons and send a request such as:
Add the following Google AdSense snippet inside the head section of every page on this website.
Paste the exact code from your AdSense account beneath the instruction. You can use Shift + Enter to add line breaks without submitting the message.
Once Horizons finishes, publish the app again. You may not see any visual difference because the snippet is added in the background.
Go back to the AdSense preview, close the code popup, and refresh the site preview. In this setup, successful detection caused the Get Code button to disappear.
Enable Auto ads without disrupting the tool
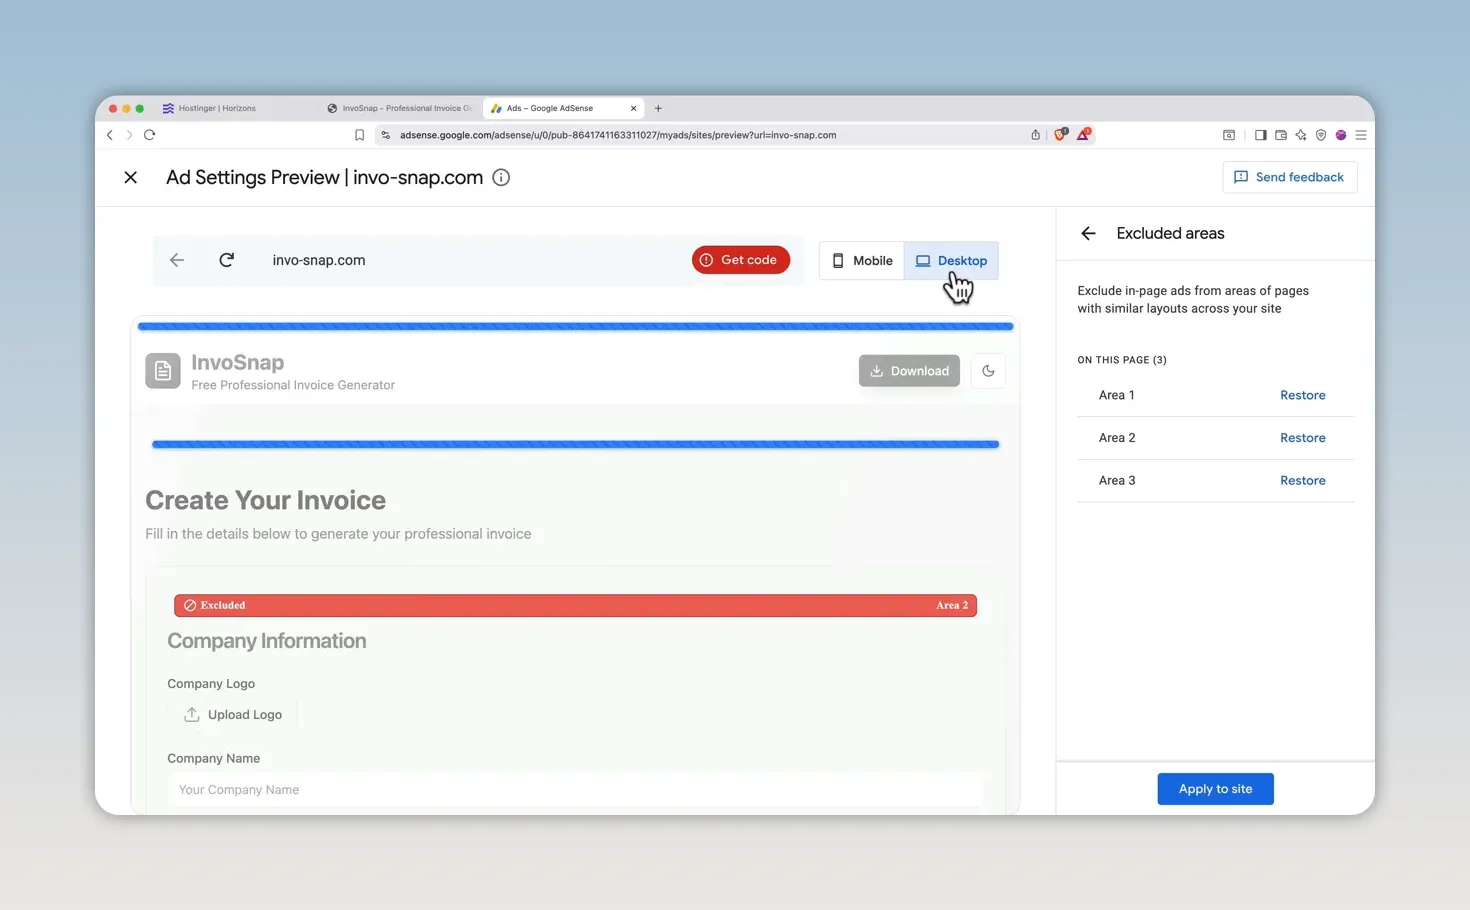
Turn on Auto ads to let Google select ad placements. Then inspect the previews carefully.
An invoice generator needs to remain easy to use. An ad inserted in the middle of a form can interrupt the task people came to complete.
To remove unsuitable placements:
- Open Excluded Areas using the exclusion control in the preview.
- Hover over the blue placement bars.
- Click the areas where ads should not appear.
- Check both mobile and desktop previews.
- Click Apply to Site, then save.
Verify ownership and request a review
Back in the AdSense dashboard, open the final site connection step. The AdSense code snippet method should already be selected because you have installed that code.
Check the box confirming that you placed it, then click Verify.
If verification fails, explain the problem to Horizons:
Google AdSense cannot detect the verification snippet. Check the installation and make sure the code is accessible to Google’s crawler.
Let the AI process the correction, publish the update, and try verification again. That resolved the issue in this build.
If the snippet method still does not work, select the meta tag verification option in AdSense. Copy the supplied tag, ask Horizons to install it in the site’s head section, publish, and retry.
After ownership is verified, click Request Review. Complete the consent-message setup appropriate for your site and audience. The onboarding flow includes Google-provided consent options, but you should still review the applicable requirements rather than assuming a single selection covers every obligation. Google’s AdSense program policies provide useful supporting guidance.
You can check progress under Sites in AdSense. Review may take several days or longer, and Google will email status updates or requested changes. Site verification is not the same as approval to serve ads.
6. Connect Supabase for User Accounts and Saved Data
The first version of InvoSnap works as a browser-based tool, but it does not yet provide dependable, account-based access to past invoices. A database turns it into something users can return to.
We’ll use Supabase to add authentication and persistent invoice storage.
Create and authorize a Supabase account
- In Horizons, open Integrations.
- Select Supabase, then click Connect.
- Sign in, or create a Supabase account with your email and a password.
- Confirm your Supabase account through the email verification link.
- Create an organization and give it a name.
- Choose the organization type and plan. The free plan was sufficient for this example.
- Authorize Hostinger Horizons to access the organization.
Create and connect a project
Back in the Horizons integration panel, select Create New Project under your organization.
Choose the organization, name the project after your app, create a database password, and select a region close to your intended users. Then create the project and wait for setup to finish.
When Supabase shows the project as ready, return to Horizons and refresh the organization’s project list. Select the new project, click Connect, and confirm the connection.
In this build, Horizons then added the required package, created a table for invoice data, and set up authentication. After the app reloaded, a new account icon appeared in the header.
Test signup and configure the live site URL
Click the account icon and create a test user. The app should prompt you to confirm the account by email.
Before completing that flow, check the authentication settings in Supabase:
- Open Authentication in the Supabase dashboard.
- Confirm that the test user appears in the user list.
- Open URL Configuration.
- Replace the default localhost Site URL with your actual live website URL.
- Save the changes.
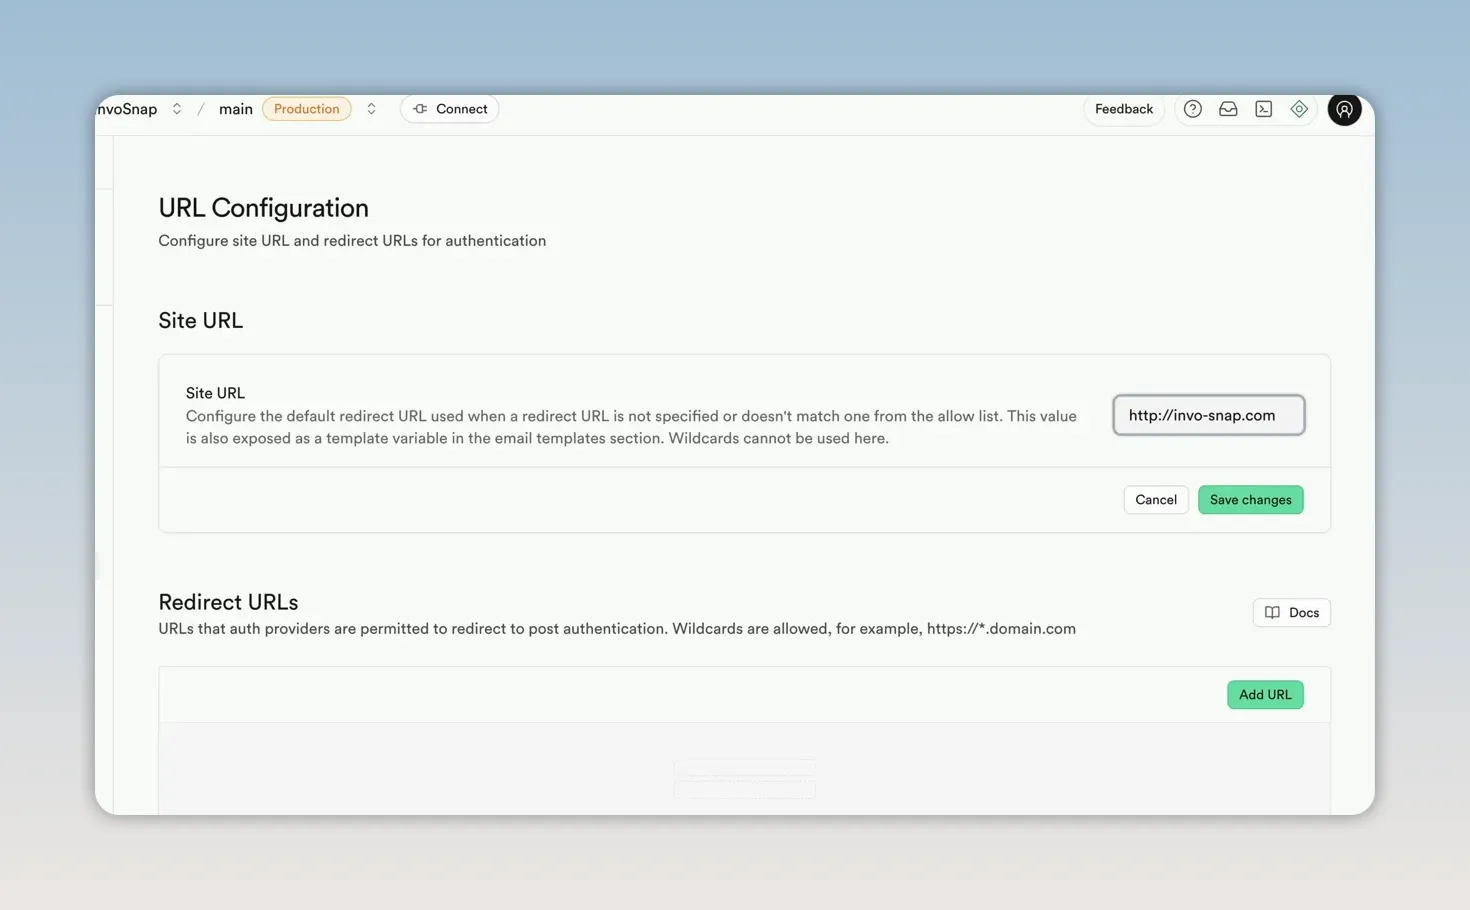
This setting controls where the authentication flow sends users. Supabase’s redirect URL documentation provides more detail if you need to troubleshoot redirects.
Now open the signup confirmation email and verify the test account.
If the live app opens without the new account controls, the likely issue is simple: the authentication changes are still only in the editor. Return to Horizons, publish, and reopen the live site.
Sign in and confirm that the interface changes to show a sign-out control. That verifies the basic account flow is working.
7. Add an Invoice History Page
User accounts are useful, but people also need a way to retrieve their work. The next feature is a page where signed-in users can see previous invoices and update their payment status.
A clear prompt is:
Create a page where signed-in users can access the invoices they have created and update each invoice’s status when the customer pays.
During this update, Horizons displayed a Web App Error Detected message. If that happens, use the Ask to Fix button and let the AI attempt a repair.
Once the app loads again, sign in and inspect the result. In this example, a My Invoices button appeared in the header. It opened a page with saved invoice drafts, status controls, and a button to create a new invoice.
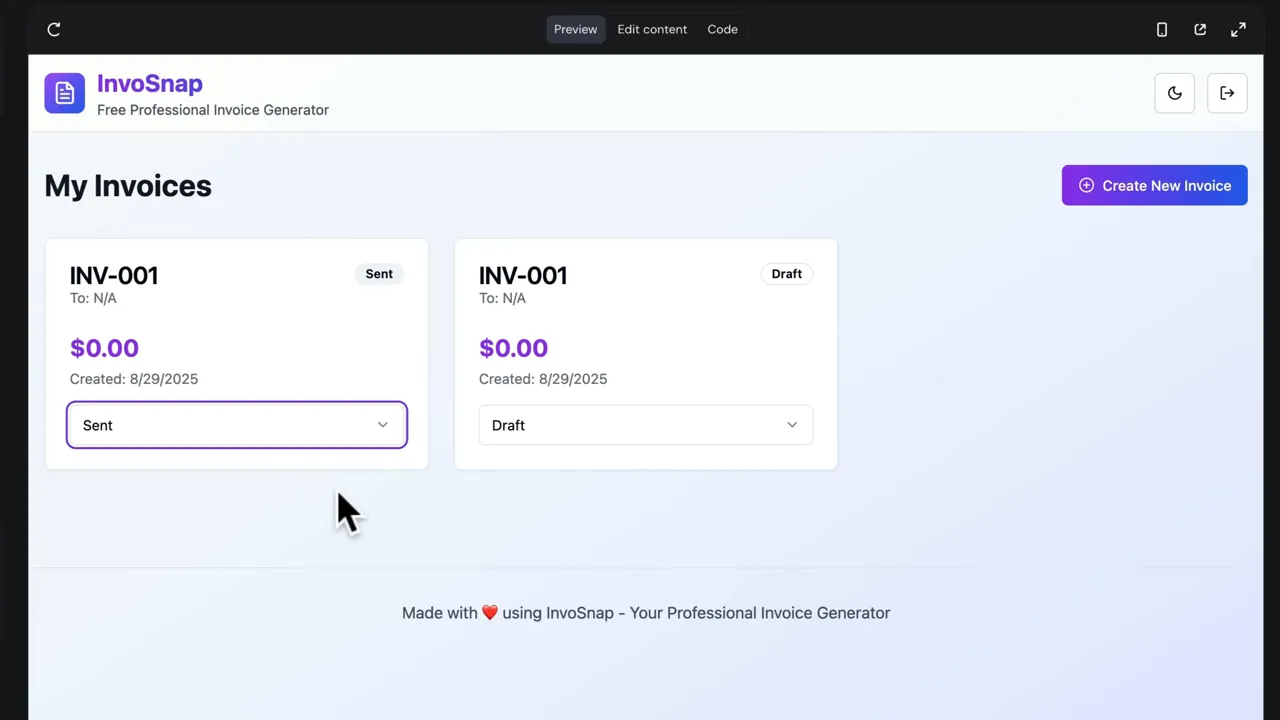
Test the complete workflow: create an invoice, open My Invoices, change its status, and start another invoice. Also look for unintended design changes. In this case, the AI moved the download button while adding the new page. It was unexpected, but the new placement worked better.
When the updated workflow is working, publish again.
At this point, you have an MVP, or minimum viable product: a working invoice generator with PDF downloads, user authentication, saved data, and invoice management.
8. Use SEO to Help People Find the App
A published app still needs traffic. Search engine optimization helps connect your tool with people already searching for the problem it solves.
For an invoice generator, “free invoice generator” is an obvious starting point, with thousands of monthly searches in the keyword research example. But search volume alone is not enough. You also want to understand how competitive a keyword is.
Use a tool such as Semrush to look for relevant keywords with:
- Enough search demand to be worthwhile.
- Lower competition than the broadest terms.
- A close match to what your app actually does.
Once you have a keyword list, give it to Horizons and ask it to optimize the site’s SEO around those terms. Review the resulting wording to make sure it still describes the product accurately and reads naturally.
For a more detailed process, use the keyword research tutorial to build your list before requesting the SEO changes.
Just as with functionality updates, inspect the result and publish when you are happy with it. AI can help implement the changes, but keyword selection still needs to reflect the users you want to attract.
9. Export the Code When You Need More Control
Horizons is a useful starting point for simple web apps, but you may eventually want features that are too complex for the AI workflow.
When that happens, open the hamburger menu and choose Export Code. This gives you or a developer access to the project so you can continue developing beyond what you can achieve through prompts alone.
The important milestone is not creating an app that immediately earns $25,000 a month. It is building something useful, testing it properly, giving users a reason to return, and creating a way for people to discover it.
With the core product live, accounts connected, invoice history working, and monetization submitted for review, you have a practical foundation to improve and grow.
Made with VideoToBlog using How to Build A $25,000/Mo Web App in 20 Minutes (Using AI)


