You can use AI to build a custom WordPress website without writing code, then keep editing it yourself after you stop paying for AI. The important part is how the site gets built.
With this method, Claude designs your website first, helps prepare your photos, and then builds your pages using real Elementor elements. That means you get a visual editor you can use later, not a website full of custom code you do not know how to change.
We’ll work through three stages:
- Design the website: Give Claude your business details, choose a design direction, and finish the photos before buying hosting.
- Set up WordPress: Get hosting and a domain, install the free tools, and connect Claude to Elementor.
- Build and publish: Let Claude create the pages, finish the header and contact form, review everything, and go live.
I’m using a fictional wood-fired pizza truck in Austin called Old Flame Pizza Company as the example. The same process can be adapted to a bakery, salon, plumbing business, consultancy, or another small business.
What You'll Learn
- Approve your website design and photos locally before paying for hosting.
- Connect Claude to WordPress through Elementor MCP using a revocable application password.
- Build pages from editable Elementor elements rather than relying on custom code.
- Review mobile layouts, navigation, privacy details, and form delivery before completing your launch.
Table of Contents
- 1. Set Up Claude and the Free WordPress Skill
- 2. Give Claude a Clear Business Brief
- 3. Design the Website Before Paying for Hosting
- 4. Prepare Professional-Looking Photos with AI
- 5. Get Hosting and a Domain
- 6. Install WordPress, Astra, Elementor, and WPForms
- 7. Connect Claude to Elementor
- 8. Let Claude Build the Pages as Editable Drafts
- 9. Finish the Header, Footer, and Contact Form
- 10. Review the Website and Publish It
- How to Edit Your Website After Launch
1. Set Up Claude and the Free WordPress Skill
Claude is a good fit for this workflow because its desktop app can work with files on your computer and connect directly to WordPress. I built and tested the skill with Claude, so that is the simplest way to follow these steps.
Buttons and labels change regularly. Follow the purpose of each step rather than expecting every screen to look exactly the same.
Install Claude and choose a plan
- Download the Claude desktop app for Mac or Windows.
- Run the installer and open Claude.
- Sign in with Google or your email address, completing any email verification.
- Choose personal use when asked how you plan to use it.
- Upgrade to Claude Pro so you can use the Code tab needed for this workflow.
At the time of this build, Pro cost about $20 per month, or roughly $17 per month when paid annually. Prices can vary by country and may change. Monthly billing makes sense if you want the option to cancel once your website is finished.
Claude may also request an identity check. During setup, review the setting that controls whether Anthropic can use your chats to train its models, and turn it off if that is your preference.
Canceling Claude later does not switch off your website. The finished site runs on WordPress with your hosting provider.
Add the free website skill
A skill is a set of instructions that gives Claude a repeatable process. This one guides the WordPress and Elementor build in order, asks questions along the way, and tells you which settings need your attention.
The skill is free and consists of text files you can read before installing. It does not ask for your normal WordPress or hosting password.
|
On the GitHub page, scroll down and use the download link in the instructions, rather than the green Code button at the top. You do not need a GitHub account.
- Download the website skill ZIP file.
- In Claude, open the Skills page.
- Choose Add skill, then Upload skill.
- Select the downloaded ZIP without extracting it.
- Upload it and make sure its switch is turned on.
If Safari automatically extracts the download, right-click the extracted skill folder and choose Compress to make it a ZIP again. Claude runs a security scan during the upload.
Create your website workspace
Open Claude’s Code tab and start a new session. You will be chatting with Claude here, not writing code.
- Click the folder selector and choose Open folder.
- Create a folder in Documents called My Website and open it.
- Select Auto mode so Claude can work without pausing before every small action.
- Choose Opus, the model I tested with, or the best suitable model available in your app.
- Type Build my website and send it.
- If prompted, choose Trust workspace.
Claude reads the skill and creates a notes file in your project folder. Those saved notes are important because they let a new session pick up where the previous one stopped. Auto mode still leaves major decisions, such as approving the design and publishing, for you to confirm.
2. Give Claude a Clear Business Brief
Claude starts by explaining the process and costs, then asks questions one at a time. You can select an answer or type your own. The questions vary because Claude adapts them to your business.
Take your time here. Your answers become the brief for the whole website.
Describe the business and its main goal
Start with what your business does and where it operates. For my example, that is a wood-fired pizza truck in Austin. I supplied the name Old Flame Pizza Company, but Claude can suggest names if you do not have one yet.
One question asks whether this is a real business or a practice project. Choose the real-business option for your own business. The skill instructs Claude to leave marked gaps for missing facts rather than inventing prices, reviews, or other business claims. You should still check the finished content yourself.
Next, decide the single most important thing someone should do on your site. For the pizza truck, it is finding where the truck is today. A plumber might want quote requests, while a salon might want bookings.
Choose pages that support that goal
Claude suggests pages based on the business type. You can accept them, remove unnecessary ones, or add your own.
For Old Flame, I chose:
- Home: Introduce the business and point people toward the menu and current location.
- Menu: Show the pizzas and prices.
- Find Us: Display the truck’s weekly schedule.
- Catering: Explain the packages and provide a quote form.
I did not need a separate contact page, so I told Claude where the contact details and quote form should go instead.
Supply the style, photos, and practical details
Claude asks how the site should feel. I wanted a retro roadside look inspired by 1970s pizza signs and let Claude choose the colors.
If you already have photos, a logo, or a menu, select those options. Claude creates a photos folder inside your website workspace. Copy your files into it, then return to Claude and ask it to check them.
Claude can inspect the images and extract useful information. In my example, it read a photo of the chalkboard menu and used the dishes on the menu page.
It also asks for footer contact details and examples of websites you like. Before design begins, Claude summarizes everything in a short brief. Check the business name, page list, available photos, desired style, and main goal. Correct anything that is wrong before approving it.
3. Design the Website Before Paying for Hosting
Instead of immediately building one layout, Claude first pitches three visual directions. Each has its own name, fonts, colors, and design details.
You can choose one or mix ideas. I combined the hand-painted sign direction with string lights from an after-dark concept.
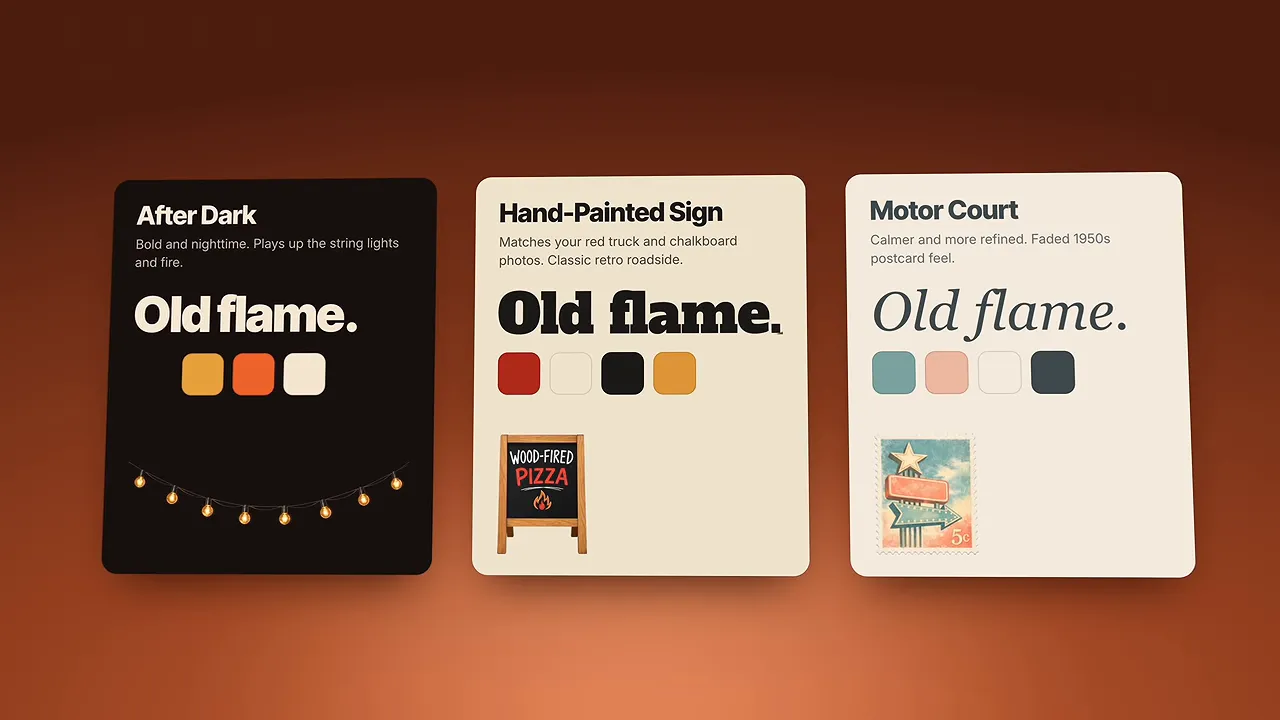
Claude then designs all the pages. My first version took about 10 minutes.
While working, Claude may open a small browser and offer to import cookies. You can decline. Local pages may appear as plain text in that browser because their styles have not loaded there. Judge the finished design in your normal browser, which Claude opens when the preview is ready.
You may also notice gray messages about failed or blocked actions. An isolated failed attempt does not necessarily mean the build has stopped. Claude often finds another way and continues.
Review every page and the phone layout
The first Old Flame design included hand-painted lettering, string lights, the oven story, a menu board, and the weekly parking schedule. The other pages covered the full menu, nightly locations, and catering packages.
Click through all your pages rather than judging only the top of the homepage. Make the browser window narrow to inspect the phone layout, too.
At this stage, the website is only a preview on your computer. Nothing is online. The empty image boxes are intentional placeholders labeled with the photos they need.
Ask for changes in plain English
If something is not right, choose Change something and explain what you want. You do not need design terminology.
I asked for a calmer wedding feel in the catering content. Claude checked whether I wanted that change on the catering page, the homepage catering section, or both. I chose both, and it revised the copy and changed the area to a calmer cream-colored treatment.
Keep refining the preview until you are happy with it. This is the easiest stage to settle the overall direction, before Claude rebuilds it in WordPress.
4. Prepare Professional-Looking Photos with AI
Photos make a big difference to a small-business website. You can use your own images, choose a free option Claude suggests, or connect an AI image tool.
I used Higgsfield because it connects to Claude and can enhance existing product photos as well as generate new images. My request was to make AI photos for the remaining spaces and improve three phone photos.
At the time of this build, Higgsfield Starter cost $19 per month in the US. A paid plan was needed to avoid the watermark on free images. Offers, prices, and credit allowances change, so check the current plan before purchasing.
Connect Higgsfield to Claude
When you choose Higgsfield, Claude provides the connection address and setup instructions.
- In Claude, open Customize > Connectors.
- Choose Add connector, then Add custom connector.
- Name it Higgsfield.
- Paste the connection URL supplied by Claude.
- Continue, add the connector, and select Connect.
- Complete the browser sign-in and authorization steps for Claude and Higgsfield.
- Allow the connection and return to Claude.
You can buy the paid plan during authorization or wait until Claude checks your account. If you want monthly billing, make sure that option is selected on Higgsfield’s pricing page.
A newly added connection loads in a new session. Start a new Code session in the same My Website folder and type Continue my website. If Claude tries to move on before making the photos, tell it you want to make them now.
Approve the credit use and inspect the results
Claude checks the plan, reviews whether your photos are safe to upload, and tells you the expected credit cost before starting. It does not buy a subscription for you. It uses credits already available in your plan.
For my example, the estimate was roughly two credits per photo. Claude made eight images for 16 credits, taking about seven minutes.
The enhanced pizza image kept the product recognizable while improving the lighting and background. That is the goal: make your actual product look better, not replace it with something customers will never receive.

Inspect every image yourself, even when Claude has checked it. Confirm that the products and details are accurate and that the photos fit the design. Claude also offers an optional footer disclosure that some images were made with AI. I chose to include it.
5. Get Hosting and a Domain
Your website now has a finished design and photos. Next, it needs a home on the internet.
- Hosting is the service that runs your website on computers that stay online.
- A domain is the address people type to reach it.
If you already have hosting, tell Claude. The skill can work with an existing provider.
I used Hostinger’s hosting offer because it installs WordPress in a few steps, and I tested this workflow on it. At the time of the build, that link offered an extra 10% off hosting plans on top of the existing sale. Eligible plans of 12 months or longer included a domain and email for the first year.
Some links here are affiliate links. If you purchase through them, we may earn a small commission at no extra cost to you.
On the pricing page, choose a term of at least 12 months if you want the included domain, then find the cheapest plan that qualifies. For this build, that was Premium.
Before paying, check:
- The full amount charged upfront, not just the advertised monthly equivalent.
- The renewal price.
- Whether the domain and mailboxes are included, and for how long.
- The refund terms. The offer shown included a 30-day money-back guarantee, with the domain cost excluded from the refund.
Once your account is ready, return to Claude, confirm that you have hosting, and select your provider.
6. Install WordPress, Astra, Elementor, and WPForms
WordPress is the free software that runs the website. Hostinger also offers its own website builder, but that is a separate product. Choose WordPress for this method.
Set up a blank WordPress site
Hostinger’s onboarding screens change, but the choices you need remain straightforward:
- Choose Set up manually rather than completing Hostinger’s AI design chat.
- Select Create a new site.
- Choose WordPress, not Hostinger Website Builder.
- Search for and select your domain.
- Complete the contact details needed to register it in your name.
- Choose a server location close to your customers.
- Create a separate WordPress login with a strong password saved in a password manager.
- Choose Build from scratch, not the AI website creation option.
If your preferred domain is taken, try a small variation. For my example, adding “truck” made an available address.
After installation, you will reach the WordPress dashboard. A temporary website address may appear initially, which is normal. To return to the dashboard later, add /wp-admin to your domain and sign in.
Check your email for both account and domain verification messages. Complete both. An unverified domain can stop working after 15 days.
Paste your website address into Claude. It checks that the site is online and secure before continuing.
Install the three free tools
Claude now guides you through adding a theme, page builder, and contact form plugin.
- Astra: The theme that provides site-wide areas such as the header and copyright bar.
- Elementor Website Builder: The visual editor used to build and edit your page content.
- WPForms: The form plugin used for contact or quote requests.
For Astra, go to Appearance > Themes > Add Theme, search for Astra, install it, and activate it. Ignore the invitation to install starter templates because Claude already has your design.
For the plugins, go to Plugins > Add Plugin. Search for Elementor Website Builder by Elementor, checking the name and author carefully, then install and activate it. Repeat the process for WPForms.
If a Hostinger AI agent panel opens, close it. We are keeping the build in Claude and Elementor rather than switching to custom-code page generation.
7. Connect Claude to Elementor
Elementor’s built-in MCP connection lets Claude use Elementor’s own building tools. In this setup, you do not need an extra connector plugin.
- In WordPress, open Elementor > Elementor MCP.
- Choose Enable MCP Access.
- Select Claude Code, not Claude Desktop. The Code tab inside the desktop app is Claude Code.
- Scroll to the setup prompt and read the application-password notice.
- Tick the acknowledgment and choose Generate prompt.
- Paste the generated prompt into your Claude session and send it.
The setup prompt contains a private application password. This is a separate access key for Claude, not your normal WordPress password. Do not post the prompt publicly or share it with anyone else.
Claude checks that the connection points to your own site and saves the setup. The workflow keeps the key out of your project files.
To revoke access later, go to Users > Profile > Application Passwords in WordPress and delete the key. The WordPress application password documentation explains where these controls live.
Start another new Code session in the same My Website folder so the connection loads. Check that Auto mode and your chosen model are still selected, then send Continue my website. You can archive the old session to avoid accidentally returning to it.
Once Claude confirms it can see your pages and Elementor’s tools, the site is ready to build.
8. Let Claude Build the Pages as Editable Drafts
Close any open Elementor editor tabs before Claude starts. Keeping an old editor open and saving it later can overwrite Claude’s newer changes.
Claude first uploads your photos, saves the design’s colors and fonts as reusable variables, and builds the homepage from Elementor elements. My homepage took about 10 minutes.
It then checks the layout at desktop and phone widths before asking you to review it.
If you reach Claude’s usage limit, your work is not lost. Use the automatic continuation option if available, or return after the limit resets and type Continue.
Approve the homepage before building the rest
If Claude does not supply a preview link, open Pages in WordPress, hover over Home, and choose Preview.
The page content should closely match the approved design. The theme’s header and thin copyright bar may still have their default appearance. Those are finished separately.
Check each section against the preview you approved. If something needs adjustment, tell Claude. Otherwise, approve the homepage and ask it to build the remaining pages.
My Menu, Find Us, and Catering pages took about another seven minutes. Everything remained in draft, so none of those pages was public yet. The contact form was still a placeholder.
The important result is that each section is made from real Elementor elements. You can click and edit them yourself later.
9. Finish the Header, Footer, and Contact Form
Claude can build the page content, but this workflow leaves some theme settings for you to change manually. It provides the exact colors, fonts, and steps in small groups.
If a question box hides the instructions, ask Claude to show them again.
Set the global colors and fonts
- Open Appearance > Customize in WordPress.
- Go to Global > Colors.
- Open each color and paste the matching color code from Claude’s list.
- Return to Global > Typography.
- Set the heading and body fonts to the names Claude provides.
- Click Publish to save the theme settings.
Return to Claude and reply Done. It checks the site and tells you if a setting did not save. Publishing Customizer settings does not publish all your draft pages.
Build the site-wide header
Open Header Builder in the Customizer. The layout at the bottom shows the header elements.
- Remove social icons or placeholder items that were not in your approved design.
- Open Site Title & Logo.
- Upload your logo, or remove the default logo and show your site title instead.
- If using the site title, enable it for desktop, tablet, and phone.
- Add a button using the plus icon in an empty header area.
- Enter its text and the address of the page it should open.
- Use the row’s design settings to apply Claude’s header background color.
- Set the title, menu, and button colors, then publish.
Tell Claude you are done so it can check the header and correct the sample navigation where needed.
Finish the copyright bar
Claude has already built the main footer content into the pages. The theme’s copyright bar is a separate area.
Open Footer Builder, select the copyright element, and replace the default text with Claude’s line. Apply the recommended colors, publish, close the Customizer, and report back to Claude.
Create and insert the contact form
Elementor’s own form widget is a paid feature, so this method uses free WPForms.
- Go to WPForms > Add New.
- Name the form something useful, such as Contact, Booking Request, or Catering Quote.
- Choose the Simple Contact Form template.
- Save the form and close the form builder.
- Open Pages and choose Edit with Elementor for the page containing the form placeholder.
- Open the elements panel and search for WPForms.
- Drag the WPForms widget with the form icon into the reserved area.
- Select your saved form from the dropdown.
- Delete Claude’s placeholder text.
- Use the arrow next to Publish and choose Save Draft.
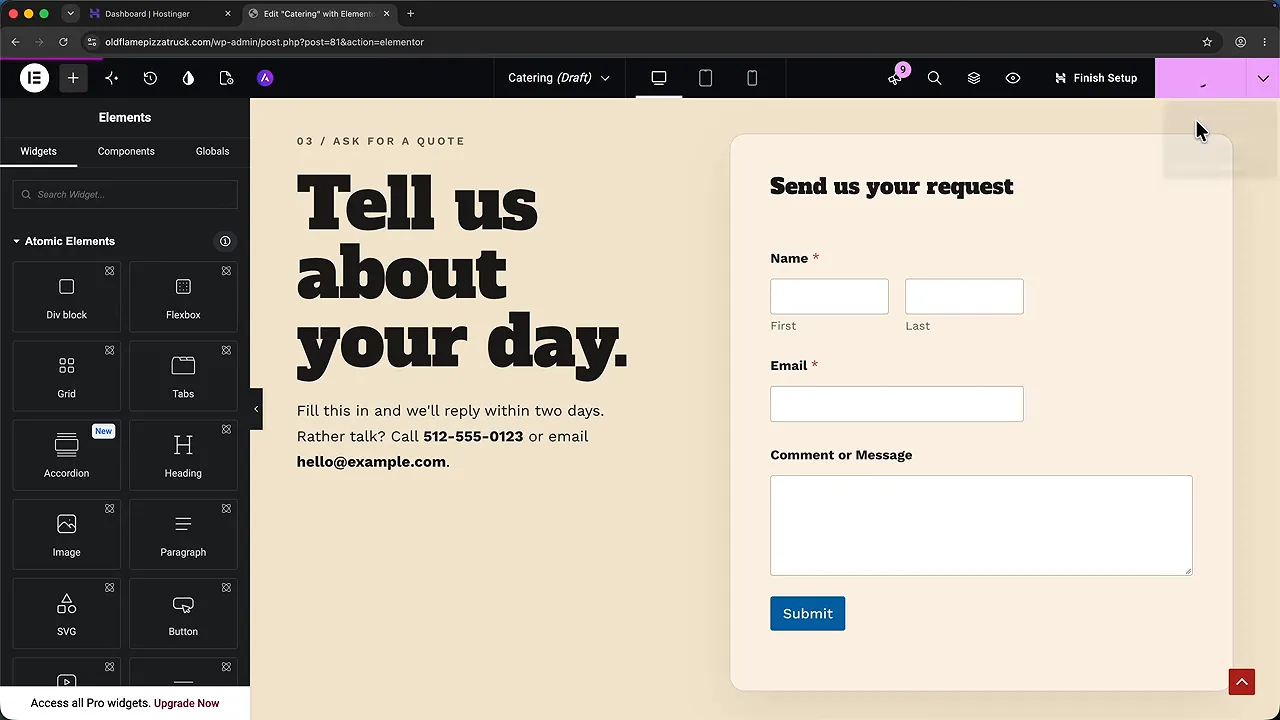
The submit button may start out blue. You can keep it or ask Claude for settings that match your design.
Leave the editor before asking Claude to change the page again. If Elementor displays a notice that the page was updated by AI, reload it before continuing.
10. Review the Website and Publish It
Ask Claude to start the final review. It assesses the site against eight design criteria and offers to improve the weakest areas. In my example, phone layout and trust needed the most attention.
Approve the fixes you want. Claude makes the changes it can handle and gives you a short list of manual jobs for the rest.
Check privacy and mobile navigation
Because the contact form collects personal details, Claude added a privacy policy page. Review the content and add the privacy policy link to your footer as instructed.
My example business was fictional, so Claude also recommended hiding it from search engines. Do not apply that practice-site setting to a real business you want customers to find.
For the mobile header, open Appearance > Customize and switch to the phone preview. Follow Claude’s instructions to adjust the site title’s font size and the colors of the off-canvas menu, which is the menu that opens on a phone. Publish those settings and tell Claude they are done.
Give explicit approval to go live
When everything is ready, confirm Yes, publish it. Claude publishes the pages and sets Home as the site’s front page.
It also checks the public pages while logged out. Do your own check in a private browser window by entering your domain.
- Read the words and inspect the photos on every page.
- Click through the navigation.
- Check that buttons open the right page or jump to the correct section.
- Submit a test contact or quote request.
- Confirm that the message reaches your inbox, checking spam if necessary.
For Old Flame, the quote button needed to jump to the catering form. A page can look finished while a button or email notification still needs attention, so do not skip these tests.
How to Edit Your Website After Launch
You now have two ways to make changes:
- Use Elementor for small edits: Change text, photos, and page elements manually through WordPress.
- Use Claude for bigger changes: Return to the same project folder and ask for a new page or a larger update.
To open your dashboard, add /wp-admin to your domain and log in. If you stop using Claude, go to Users > Profile > Application Passwords and revoke its key.
That is the advantage of this approach: AI helps with the design and build, but the finished website remains editable in WordPress. You can keep improving it with Claude or make the changes yourself.


