You can build a working app without writing the code yourself. Not just a mockup, but an application with user accounts, payments, a database, and a public URL that other people can actually use.
That is the promise of vibe coding. You describe what you want in plain language, the AI builds it, and you keep refining the result until it works the way you intended.
I’ve used this approach to launch a SaaS product with paying customers, so I’m excited about what it makes possible. But there are real limitations, too. The trick is knowing how to plan, communicate, test, and recognize when you need more control.
We’ll work through that entire process using a movie recommendation app built with Base44, from the initial idea to publishing and connecting the code to GitHub.
What You'll Learn
- Plan your app before generating it to improve the first draft and reduce corrective work.
- Use direct visual editing for simple changes and AI prompts for features and logic.
- Test authentication, payment access, mobile layouts, and data permissions before treating an app as launch-ready.
- Connect GitHub to extend your app with coding agents, code editors, and collaborators.
Table of Contents
- What Is Vibe Coding?
- Choosing a Vibe Coding Tool
- 1. Create Your Account and Plan Before Building
- 2. Generate the App and Evaluate the First Draft
- 3. Customize the Design Without Wasting Credits
- 4. Decide When to Upgrade
- 5. Add User Authentication
- 6. Connect Stripe Payments and Other Services
- 7. Debug With Specific Feedback
- 8. Publish Your App and Connect a Custom Domain
- What Vibe Coding Can and Cannot Do
- 9. Connect GitHub to Keep Building Beyond the App Builder
- Build the First App, Then Improve the Process
What Is Vibe Coding?
Vibe coding means building software by describing what you want and letting AI generate the code. Instead of writing every function yourself, you guide the AI through the design, features, and behavior of the app.
Andrej Karpathy coined the term in early 2025. The basic workflow is a loop:
- Describe: Explain what the app does, who it serves, and what it needs.
- Generate: Let the AI create a working version.
- Test: Use the app and identify what needs changing.
- Refine: Give the AI specific feedback, then repeat.
For a beginner, an all-in-one vibe coding platform goes beyond simply getting code from a chat assistant. Code is useful, but you still need somewhere to run it, a database, hosting, and an authentication system.
Think of it this way: a code response gives you the ingredients. An all-in-one app builder also cooks the meal by bringing those pieces together.
That does not mean one sentence produces a perfect app. You still make decisions, check the results, and explain what should change. The most useful skill is clear communication.
Choosing a Vibe Coding Tool
The tool landscape changes quickly, but three broad categories make it easier to understand your options. There is overlap between them, so think of these as starting points rather than rigid boundaries.
All-in-one app builders
Platforms such as Base44, Lovable, and Bolt.new aim to handle the front end, back end, database, and hosting together. You describe the app and work primarily through a conversational interface.
These are the most approachable starting point if you do not have a technical background and want to get something working without configuring servers.
AI-powered code editors
Tools such as Cursor, Windsurf, and GitHub Copilot help you build inside a traditional development environment. You work with actual code files, but AI can generate and modify much of the code.
They make sense when you have some coding experience or want more direct control over the implementation.
AI coding agents
Tools such as Replit Agent, Claude Code, and Codex can take a goal, plan steps, and work through code changes more autonomously. Depending on the tool, that can also extend into deployment workflows.
They can be powerful, but the surrounding workflow may be more involved than a beginner-focused app builder.
For our first app, I’m using Base44. It brings the design, database, hosting, and other core services into one place. Wix acquired the platform, and its all-in-one approach makes it a practical place to learn the process.
1. Create Your Account and Plan Before Building
On Base44’s landing page, click Build now and follow the account registration steps. You can start with a free account without entering a credit card.
Once you reach the dashboard, you’ll find the prompt box used to create an app. The interface may change as the software develops, so focus on the purpose of each control rather than its exact position.
Understand how credits work
Base44 uses message credits for AI work. In the setup demonstrated here, the free plan provides five daily message credits. Usage is not necessarily one credit per request: a small adjustment can consume a fraction, while a more substantial feature request can use more.
That makes planning valuable. If you start with a vague idea, you can spend your available credits repeatedly correcting something you could have clarified at the beginning.
Use Plan mode to create a blueprint
Before generating your app, turn on Plan mode. This lets you develop the idea through guided questions before the platform starts building.
For our example, the initial idea is simply a movie recommendation app. Base44 then asks questions that turn that rough concept into a useful specification:
- Audience: The general public.
- Recommendation approach: Recommendations based on ratings.
- Visual direction: A dark, cinematic design.
Review the resulting plan using Read more. Check the features, user flows, and design direction. If something is missing or wrong, ask for changes in plain language.
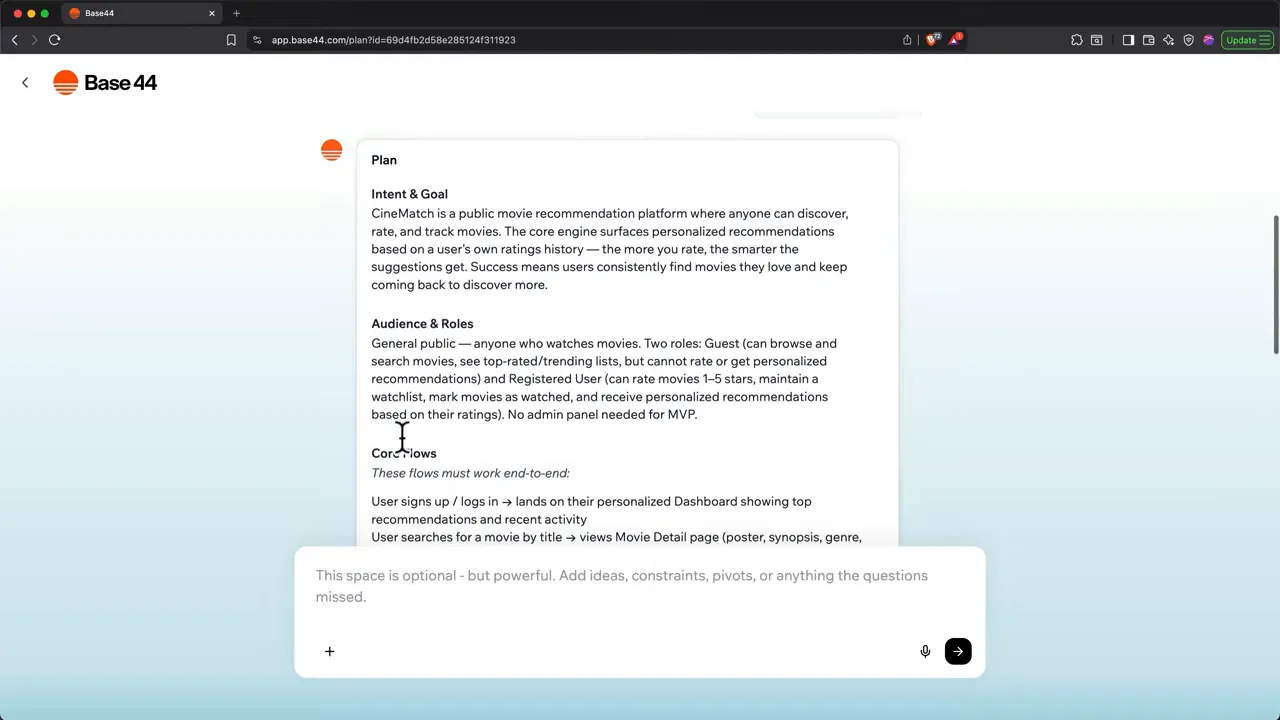
In this workflow, Plan mode does not consume message credits. Credits start being used when you click Start building. That gives you room to organize the idea before paying for implementation.
If you do not yet know what to build, brainstorm with a tool such as Claude or ChatGPT first. Once you have a direction, bring it into Plan mode and develop the blueprint.
A better plan usually means a better first draft and fewer corrective prompts later.
2. Generate the App and Evaluate the First Draft
When the plan looks right, click Start building. Base44 begins generating the app, and you can see files being written in the sidebar. Give it a few minutes to finish.
Our first version is called CineMatch. It includes:
- A search bar for finding films.
- Genre filters.
- Movie cards with hover interactions.
- A ratings area.
- A watchlist.
- A personalized recommendations area.
That is a substantial starting point. But a convincing interface is not the same as a finished product.
In this first draft, the movie images do not match the real posters. Some areas suggest signing in, but there is no obvious login flow yet. The serif headings also do not fit the cleaner style I want.
This is how to evaluate an AI-generated app: use it, notice the gaps, and turn those observations into a specific list of improvements.
3. Customize the Design Without Wasting Credits
You do not need an AI request for every visual adjustment. Base44 provides direct editing tools that let you handle many design changes without spending message credits.
Use the Theme panel for app-wide styling
Click the palette icon to open the Theme panel. This is where you adjust global colors and fonts.
For example, changing the primary accent from yellow to orange updates the places that use that theme color throughout the app. Choose the new color, then click Save and apply.
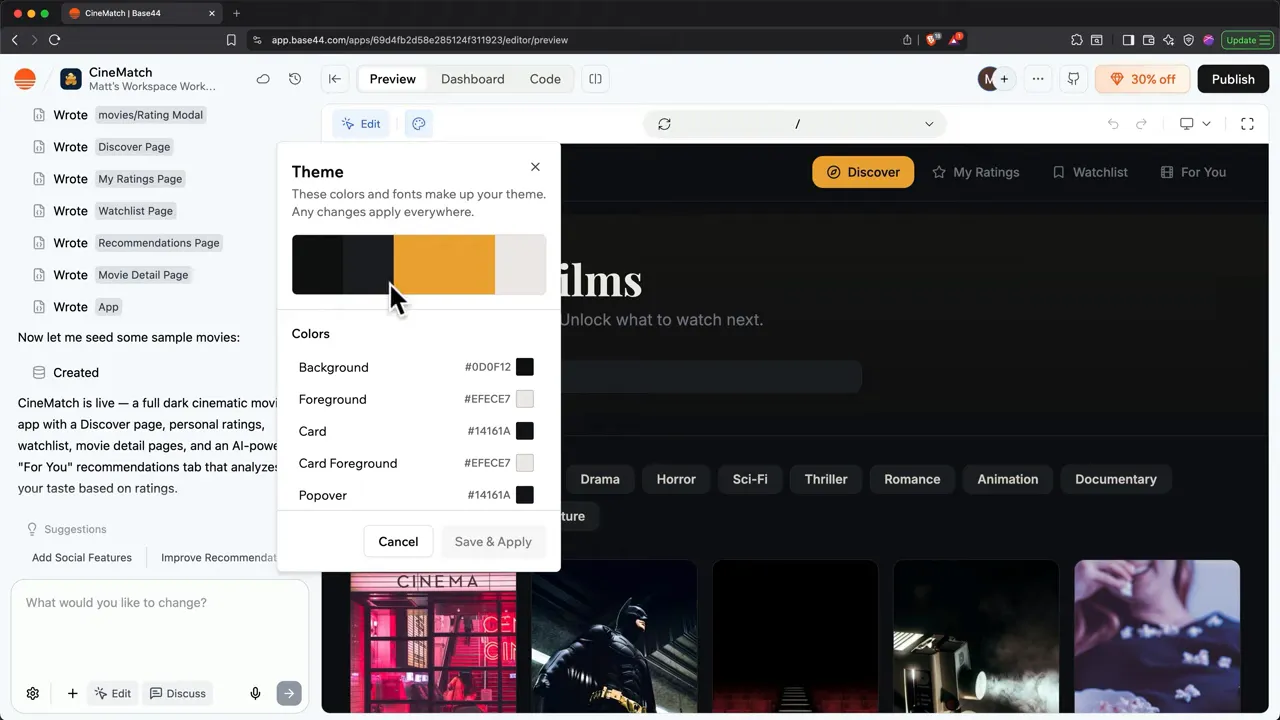
This is the right tool when the change should apply consistently across the whole application.
Use visual editing for individual elements
Click Edit in the toolbar to select a particular element. You can adjust individual colors, spacing, text, or remove something you do not need.
For our app, I update the supporting text to explain that rating films helps generate personalized recommendations. Select the text, open its text control, make the change, and exit the editing toolbar.
Both the Theme panel and visual editing are free to use in the demonstrated workflow. Save AI credits for features, functionality, and logic.
Use AI chat for changes that need implementation
When the request goes beyond a direct visual edit, explain it in chat. You can type, dictate using the microphone, or upload screenshots and files to provide context.
I like to use voice input while going through the app. I describe what I notice, review the resulting text, and submit a coherent set of related changes together.
For example:
Use modern sans-serif fonts for the app name and main headings. Add a wide movie backdrop behind the main discovery section with a dark overlay so the text stays readable. Replace the placeholder movie thumbnails with posters that match each film.
Grouping related observations avoids a separate conversation for every small issue. Just remember that credit usage can vary with the amount of work, so batching does not guarantee a fixed cost.
The updated app adds a cinematic backdrop and recognizable movie posters. But one poster is still missing.
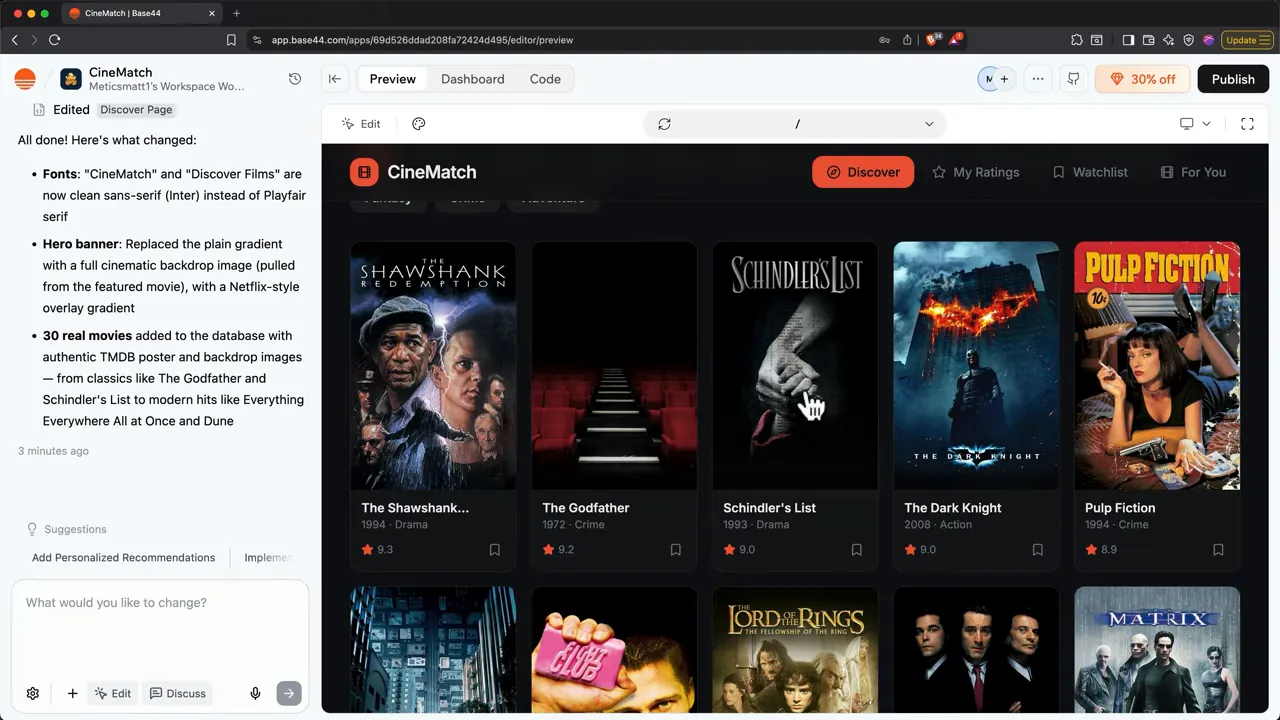
That is an important distinction: an improvement can still be incomplete. Ask the AI to make image retrieval more reliable and provide fallback images when a poster is unavailable.
Keep version history in mind
The clock icon opens Version history. If an update breaks something or takes the design in the wrong direction, you can return to an earlier version.
Think of it as an undo option for the app, not just the last text edit.
Check tablet and mobile layouts
Use the device or breakpoint selector near the top of the editor to switch between desktop, tablet, and mobile previews.
Our mobile layout changes the navigation into compact icon buttons and reduces the movie grid to two columns. Base44 generates responsive layouts by default, but you should still inspect the result.
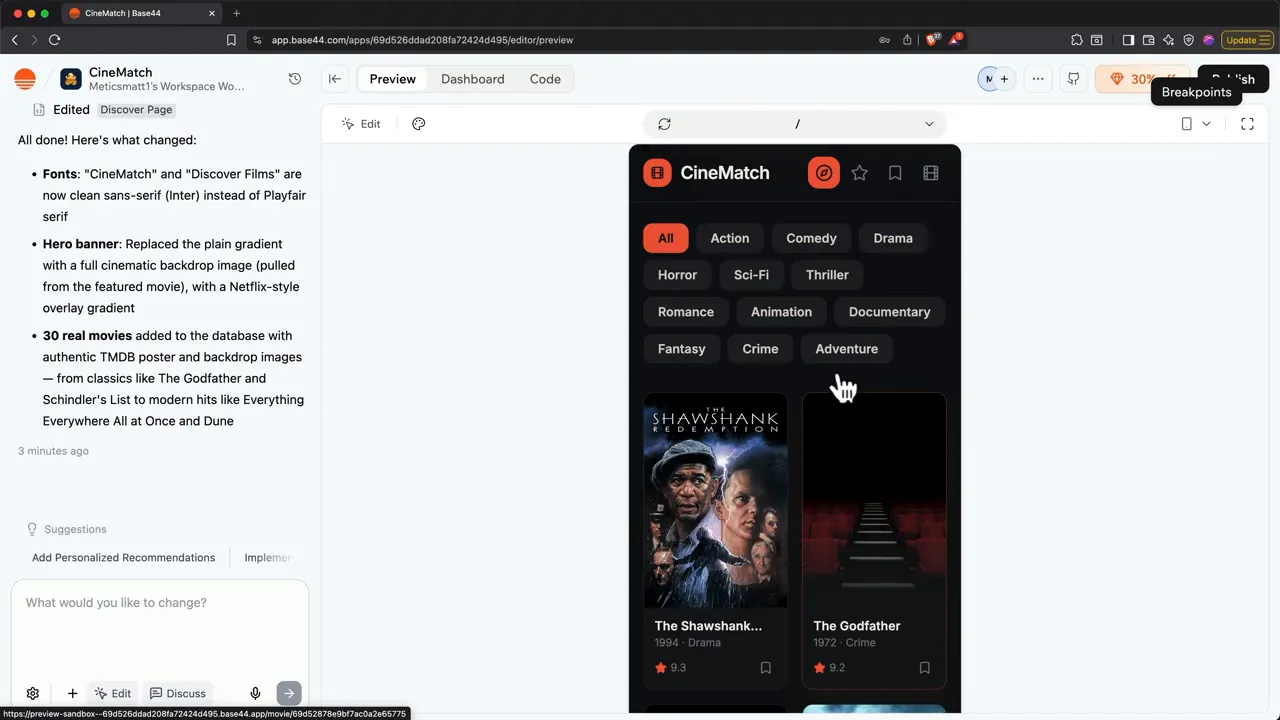
If text overlaps, buttons become awkward, or images crop badly, add those observations to the next request.
4. Decide When to Upgrade
The free plan is useful for learning, generating a first version, and experimenting with the design. More advanced product features can require a paid plan.
For the workflow demonstrated here, the Builder plan was presented at $40 per month, with 250 message credits, backend functions for features such as payments and email, custom domain support, and GitHub integration. Pricing, billing terms, and feature availability can change, so check the current plan details before committing.
To upgrade, open the Base44 menu, choose Upgrade your plan, and select Builder or higher.
The checkout offers monthly and yearly billing. The yearly option shown includes a domain for the first year and a lower long-term cost, while monthly billing means a smaller initial commitment. Choose based on how confident you are that you’ll keep using the platform.
A few years ago, I paid a developer more than $20,000 for a simple MVP that took months to build. That is why this workflow feels like such a big shift. It dramatically reduces the cost of testing an idea, even though it does not remove every development responsibility.
5. Add User Authentication
Authentication gives people their own accounts and personalized experience. For a movie app, that means each person can maintain their own ratings and watchlist instead of sharing one set of data.
Enable login methods
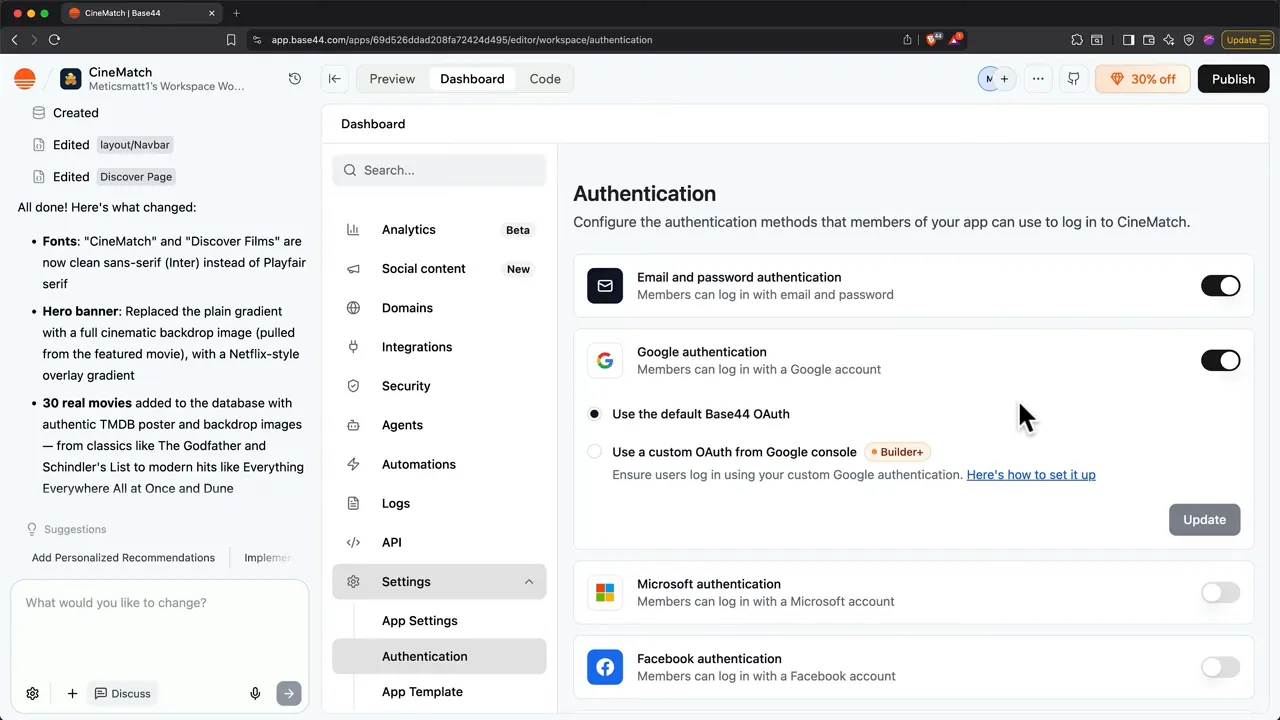
- Open the Dashboard tab.
- Expand Settings.
- Select Authentication.
- Enable the login methods you want to offer.
The available options shown include email and password, Google, Microsoft, Facebook, and Apple. For our app, I keep email and password plus Google enabled.
Add the signup and login interface
Enabling methods is only part of the job. People also need a clear way to access them. Return to the preview and ask the AI:
Add signup and login pages for user accounts. In the upper-right corner, show a logout button when someone is signed in and a signup or login button when they are signed out.
Once the update finishes, test both states. Log out, confirm that the login page appears, and sign back in.
The platform handles the underlying authentication infrastructure, including password storage and sessions, rather than requiring you to build those pieces yourself.
Define who can access each person’s data
Under Dashboard > Users, you can inspect user roles. An administrator may need broad access, while a regular user should only access their own private information.
Base44 supports this through row-level security, which controls access to individual database records. Explain the intended permissions to the AI, then verify that they work.
A working login screen does not, by itself, prove that user data is properly separated. We’ll come back to that before launch.
6. Connect Stripe Payments and Other Services
Payments are one example of a broader concept: third-party integrations. Your app can connect to existing services instead of rebuilding their capabilities from scratch.
- Stripe: Payment processing and subscriptions.
- Resend: Email delivery.
- Twilio: Text messaging.
For our movie app, we’ll offer premium recommendations through a monthly subscription.
Generate the payment integration
Start with a clear request:
Connect Stripe and add a monthly subscription for premium movie recommendations.
Approve the Install Stripe request. Base44 then creates the payment-related pieces, including a premium page and backend functions for checkout and subscriptions.
Test checkout without moving real money
The integration starts in test mode. Follow the generated testing instructions and use the supplied demo card details.
If checkout will not open inside the embedded editor preview, open the app’s separate preview URL in a new browser tab. In this example, that allows the Stripe sandbox checkout to run without publicly launching the app first.
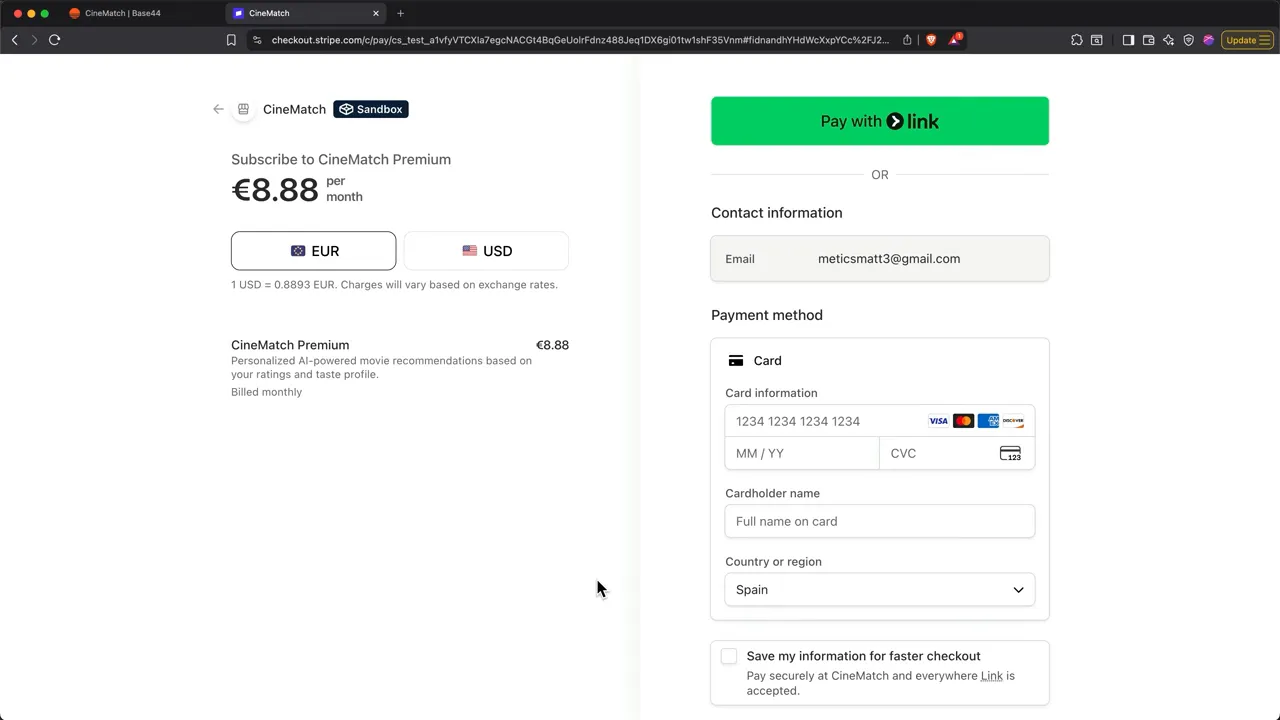
Complete the test payment and confirm that the checkout succeeds. Stripe’s testing documentation provides additional context for using test payment methods.
When you are ready to accept real payments, open Dashboard > Integrations and follow the Stripe setup guide to connect your real account. A successful sandbox checkout is not the same as live payment processing.
Connect payment status to product access
A checkout page alone does not define what paying customers receive. You also need the app to distinguish free and premium accounts.
For example:
Restrict personalized AI recommendations to premium subscribers. Free accounts should see a clear upgrade option. Send new premium subscribers a confirmation email after they sign up.
In our app, Base44 gates the For You recommendations area and adds the confirmation email to the Stripe checkout webhook workflow.
To check both experiences, create suitable test accounts and use Act as user from the three-dot menu. A free account should encounter the premium gate, while a subscribed account should have access.
This is where the app starts behaving like a product: accounts, payments, and business rules are connected rather than existing as separate screens.
7. Debug With Specific Feedback
Things will go wrong. That is normal in vibe coding, just as it is in traditional software development.
App files and features are interconnected, so a change in one place can affect another. Test after each implemented update rather than letting a long chain of untested changes accumulate.
Use built-in error resolution and rollback
When Base44 detects certain errors, it offers a Resolve with AI option. In the example here, the interface explicitly says that the repair will not deduct credits. It identifies and fixes a typo in an import path.
Check the message shown for your particular error rather than assuming every repair is free.
If a recent update created the problem, version history provides another route back to a working state.
Use “what I expected” versus “what happened”
When the AI misunderstands a request, do not simply repeat that it looks wrong. Explain the gap between the intended result and the actual result.
A useful correction has three parts:
- Expected: What should have changed.
- Actual: What changed instead.
- Correction: What to undo and what to do next.
I expected a cleaner, more minimal navigation header. Instead, the large hero section changed. Restore the previous hero design, then update only the top navigation and app title.
The distinction between the header and hero matters. What feels obvious to you may still be ambiguous in the prompt.
For clarity, the exaggerated wrong-banner example I used to demonstrate this was deliberately staged. Real mistakes are often subtler, but the correction framework is the same.
Use Discuss mode before committing to a fix
If you do not understand the cause of a problem, turn on Discuss mode. It lets you ask questions and explore a solution without changing the app.
In the demonstrated interface, Discuss mode costs 0.3 message credits, making it a lower-cost way to investigate before implementing changes.
For example, our rotating featured-film section has two issues: the navigation appears to obscure people’s heads in the backdrop images, and one film has no image at all.
Ask the AI to inspect the relevant files, explain likely causes, and propose a plan. Once you are comfortable with the plan, turn off Discuss mode and ask it to implement the fixes.
Then check the result. Here, the spacing improved, but the promised fallback image still did not appear. That means another iteration is needed, not that the task is finished because the AI said it was.
Precise feedback is your strongest debugging tool, but the actual app is the evidence that a fix worked.
8. Publish Your App and Connect a Custom Domain
A locally running app may only be accessible on the developer’s computer. Base44’s built-in hosting removes that extra deployment step from this beginner workflow.
Publish to a public URL
- Click Publish in the upper-right corner.
- For this publicly browsable movie app, set visibility to Public, no login.
- Click Publish app.
- Copy the resulting URL and open it in a separate tab.
Public browsing is appropriate for this example, while personal features still use accounts. Choose visibility settings that match the intended audience of your own app.
Choose and connect a domain
To use your own web address, open Publish > Get domain and search for a name.
Our original CineMatch name is not available as the desired .com, so I search for an alternative and choose Plot Pair. The checkout shown routes through IONOS and offers the domain for $1 for the first year. That is an example offer, not a guaranteed current price.
After completing the domain checkout, return to Base44 and check that the custom domain appears in the publishing panel.
Because the product name has changed, update the app before publishing again:
Replace the CineMatch name with Plot Pair everywhere it appears in the app.
Publish the updated version, then open the new domain.
If you initially encounter a DNS error, give the domain connection time to propagate. In this workflow, that can take a few minutes and sometimes up to an hour. An immediate failure does not necessarily mean you configured something incorrectly.
Publishing to iOS and Android
Base44 also provides a process for packaging the web app for submission to Apple’s App Store and Google Play.
The developer account costs cited here are:
- Apple Developer Program: $99 per year.
- Google Play: A one-time $25 registration fee.
App store submission is not instant. Apple reviews submissions against its guidelines, and Google has its own requirements. The packaged result is also not identical to an app built directly in Swift or Kotlin.
For the detailed process and current requirements, use Base44’s app store publishing guide.
What Vibe Coding Can and Cannot Do
Vibe coding is especially useful for validating a business idea, building an MVP, and creating internal tools. You can get an idea into a usable form quickly enough to learn whether people actually want it.
I’ve built a marketing platform for audio professionals this way, and paying customers use it. These tools are capable of more than throwaway demonstrations.
But the limitations are real. You can hit walls with:
- Complex applications with many interconnected features.
- Significant traffic and demanding scaling requirements.
- Deep customization beyond what the platform handles well.
Security needs particular attention. AI-generated code can handle sensitive information or API keys incorrectly if you are not careful.
At a minimum:
- Verify data separation: Each regular user should only access the private records they are supposed to access.
- Keep secrets out of prompts: Do not paste sensitive API keys directly into the conversation.
- Run the security audit: Use Base44’s built-in checks before treating the app as ready for real users.
The point is not to avoid building. It is to build with your eyes open. A polished interface and successful checkout are milestones, not proof that every production concern has been solved.
9. Connect GitHub to Keep Building Beyond the App Builder
GitHub is where developers store and manage code. It tracks changes and supports collaboration, giving you a place to work with other tools or bring in a developer.
Base44’s GitHub integration provides a path from the beginner-friendly builder to a more flexible development workflow.
Connect a repository
- Click the GitHub icon in the editor toolbar.
- Select Connect to GitHub.
- Sign in to GitHub or create an account.
- Follow the authorization prompts.
- Return to Base44, name the repository, and click Create.
A green connection indicator confirms that the integration is active.
In this setup, sync works in both directions: changes published from Base44 appear in GitHub, and code changes pushed to the connected repository can be picked up by Base44. Follow Base44’s GitHub integration guide for the detailed setup and supported workflow.
Bring in another AI tool when you need it
Remember the three categories of vibe coding tools? They do not have to be competing choices. You can use them together.
For example, if the missing movie-image issue remains difficult to solve through Base44’s chat, you could:
- Clone the GitHub repository onto your computer.
- Open it with a tool such as Claude Code.
- Ask the agent to investigate why that film’s images are missing.
- Review and test the file changes.
- Push the changes to GitHub so Base44 can pick them up.
You do not need to do this on your first day. The important point is that you have a next step when you need more control or help from a collaborator.
GitHub does not automatically fix security or scaling problems. It gives you a way to work on those problems using a broader set of tools and expertise.
Build the First App, Then Improve the Process
You do not need to understand every technical detail before building your first application. You do need a clear idea, a willingness to test, and the patience to explain what should happen when the result is not right.
Start with a focused app. Plan it carefully, use direct editing where possible, add accounts and business rules deliberately, and verify the behavior before publishing.
Vibe coding is not a replacement for every kind of professional software development. It is a much more accessible way to find out whether an idea works and get it into people’s hands. Once you have built one app, building another is the best way to improve.
You can start experimenting with Base44 for free, without a credit card. The link below is an affiliate link, which means we may earn a commission at no extra cost to you.
Made with VideoToBlog using The Ultimate Beginner’s Guide to Vibe Coding


