CapCut makes video editing approachable, even if you have never edited a clip before. The tricky part is knowing where to start when there are so many tools, effects, and AI features packed into one app.
The easiest way to learn is to build a complete project. I’ll use a short zoo vlog as the example, starting with raw footage and working through trimming, B-roll, audio, transitions, captions, color correction, and export. Then we’ll get into the fun stuff, including keyframes, background removal, and turning a still photo into an AI-generated video.
You can use your own footage or download the demo footage to follow the same editing workflow.
What You'll Learn
- Build a complete CapCut edit by trimming narration, layering B-roll, and organizing clips with markers.
- Clean dialogue, mute unwanted background audio, and use keyframes to balance music beneath speech.
- Create captions, animated text, color adjustments, and purposeful motion without rebuilding your edit.
- Explore AI tools, reframe for vertical platforms, and export your video with a custom cover.
Table of Contents
- 1. Install CapCut Desktop and Create a Project
- 2. Import Footage and Set Up Your Timeline
- 3. Trim Clips and Remove Unwanted Pauses
- 4. Adjust Video Framing
- 5. Layer B-Roll and Organize It With Markers
- 6. Stabilize Shaky Footage and Adjust Speed
- 7. Add Transitions and Clip Animations
- 8. Clean Up Dialogue and Mute Unwanted Audio
- 9. Add Background Music and Sound Effects
- 10. Use Keyframes for Audio Ducking and Video Motion
- 11. Generate Captions and Add Animated Text
- 12. Apply Color Correction, Filters, and Stickers
- 13. Explore CapCut’s AI Editing Tools
- 14. Generate AI Images and Video
- 15. Convert Horizontal Video Into Vertical Video
- 16. Export the Video and Design a Cover
1. Install CapCut Desktop and Create a Project
For this workflow, I recommend the CapCut desktop app rather than the web editor. The desktop version is my preference for working through a full project with multiple video layers, audio tracks, and effects.
- Create a CapCut account using your preferred sign-up method.
- If you sign up by email, enter your email address and password, complete the requested information, and verify your email.
- Download CapCut Desktop and run the installer.
- Open the app and click Create project.
Some features used here require CapCut Pro. The plan presented with this workflow includes additional AI editing tools, templates, assets, and 100 GB of cloud storage. Check the current offer and feature availability before upgrading, since promotions and plan details can change.
If you need an account, use the sign-up link below to check the available CapCut offer. It is an affiliate link, so I may earn a commission at no extra cost to you.
Get familiar with the editing interface
A new project opens into four main areas:
- Media panel: Import and organize your video, image, and audio files on the left. The tabs across the top also give you access to tools such as audio, text, transitions, and stickers.
- Player: Preview your edited video in the middle of the screen.
- Details and properties panel: Review project information or adjust the settings of a selected clip on the right.
- Timeline: Arrange clips, trim footage, layer B-roll, and add music and effects along the bottom.
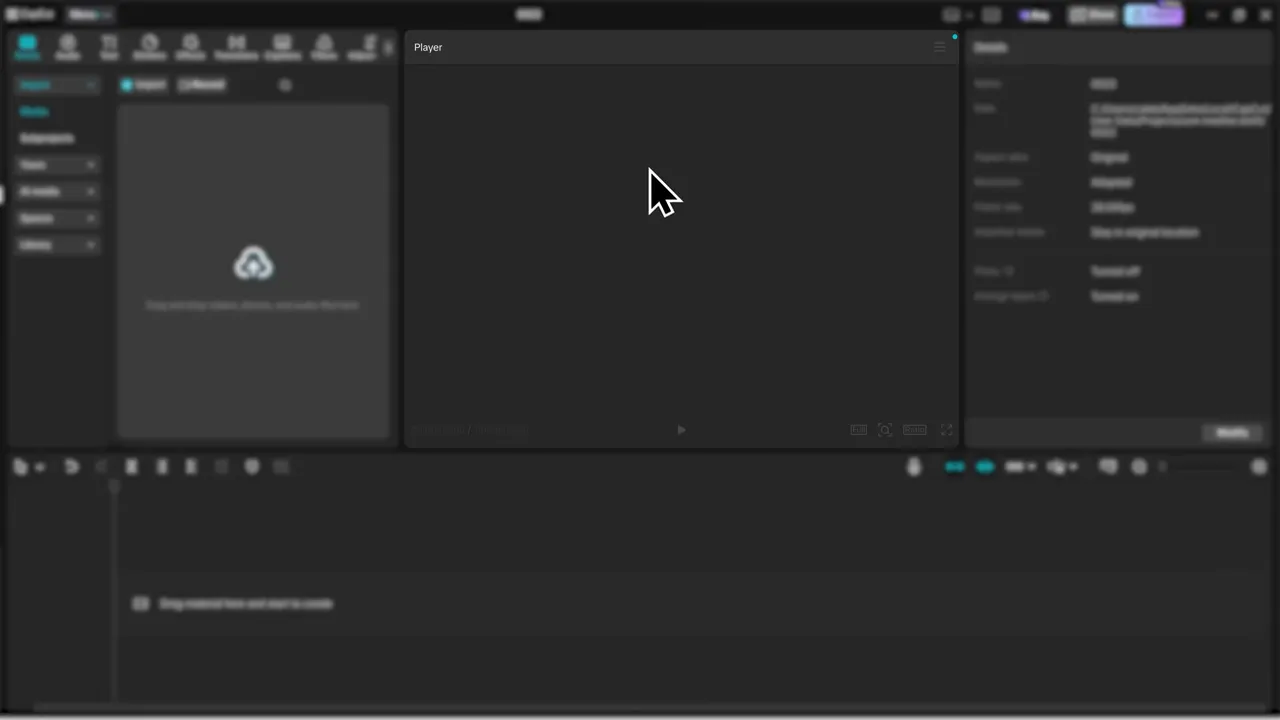
If you accidentally move a panel, use the layout menu in the upper-right corner to reset the workspace. You can also try alternate layouts, including a vertical layout and arrangements that prioritize media or attributes.
2. Import Footage and Set Up Your Timeline
Click Import in the media panel, select your first clip, and open it. You can also drag files into the media panel.
Importing a file makes it available in the project, but it does not place it into your edit. To add it to the timeline, either hover over its thumbnail and click the blue plus icon or drag it onto the timeline.
Learn a few shortcuts right away
Zooming in makes precise cuts easier. Zooming out helps you see how the whole edit is coming together.
- Ctrl + plus: Zoom into the timeline.
- Ctrl + minus: Zoom out of the timeline.
- Ctrl + mouse wheel: Scroll up to zoom in or down to zoom out. This is the method I prefer.
- Spacebar: Start or pause playback.
- Ctrl + Z: Undo a change.
- Ctrl + S: Save the project.
Use Command in place of Ctrl for the corresponding Mac controls. You can keep the keyboard shortcut guide nearby as a reference.
Adjust playback quality and project settings
If your footage looks blurry in the player, check the playback quality menu near the bottom-right of the player. A lower setting can help an older or slower computer preview the edit more smoothly.
Playback quality does not change the quality of your exported video. It only changes the preview while you edit. Try the available settings and use the one that works best on your computer.
The nearby Ratio control changes the shape of your video:
- 16:9: Horizontal video, as used in this zoo vlog.
- 9:16: Vertical video for TikTok, Reels, and Shorts.
- Original: Retains the original footage’s aspect ratio.
For other project settings, open Modify in the details panel. Here you can adjust the project name, aspect ratio, resolution, frame rate, and color space.
3. Trim Clips and Remove Unwanted Pauses
Before adding effects, get the basic timing right. Cutting an awkward pause at the start or removing the moment you lower the camera at the end often makes a bigger difference than adding another animation.
Trim by dragging the clip edges
Move your pointer to the beginning or end of a timeline clip. When the pointer changes into the trim cursor, click and drag inward to shorten the clip.
This is a quick way to remove extra footage from either end.
Split a clip at the playhead
The playhead is the vertical indicator showing your current position on the timeline. To make a cut:
- Select the clip.
- Move the playhead to the point where you want the cut.
- Click the Split button or press Ctrl + B.
- Select the unwanted segment and press Delete.
I prefer the shortcut because splitting is something you’ll do constantly. Press Ctrl + Z whenever you need to undo a cut or deletion.
Use text-based editing for spoken footage
CapCut also has a text-based video editor that displays recognized speech and marks silent sections. You can select unwanted words or pauses and delete the corresponding section of video.
For example, my opening clip has a pause followed by an unnecessary introductory phrase. Selecting those elements in the text-based editor removes them from the edit, so the narration starts directly with the zoo introduction.
This can be especially useful for long recordings, podcasts, and seminars, where finding every pause manually would take much longer.
Use waveforms to find where speech begins and ends
The waveforms along the bottom of a clip show changes in its audio level. Quiet sections tend to have low waveforms, while speech often creates larger peaks.
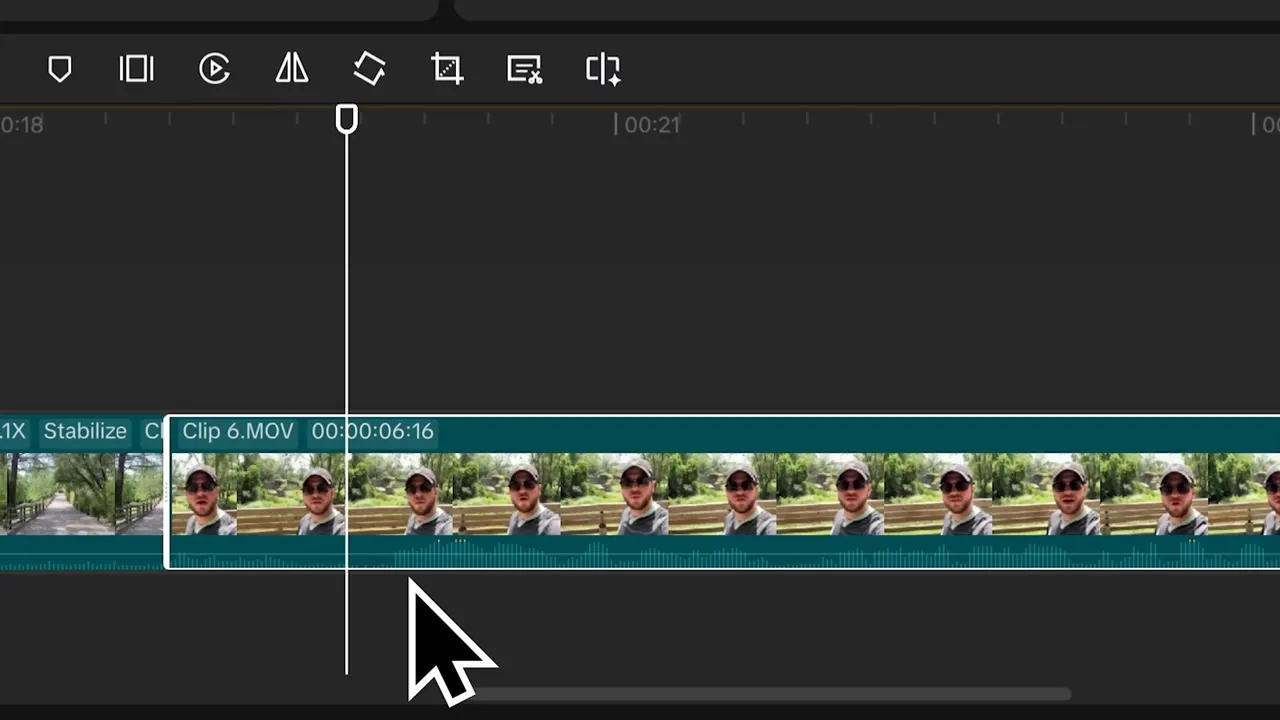
Zoom in, find the point where the waveform rises, and place your cut just before the speech. Repeat the process at the end, then preview the result to make sure the first and last words are intact.
For the zoo project, I use this approach to tighten both the walking introduction and the later giraffe narration.
4. Adjust Video Framing
Select a video clip on the timeline to open its transform controls. The three main settings are Scale, Position, and Rotation.
- Scale: Increase the value to zoom in or decrease it to zoom out.
- Position: Change the X and Y values, or simply drag the image in the player.
- Rotation: Use the rotation control to turn or straighten the image.
When you drag a clip in the player, blue alignment guides appear as it reaches the horizontal or vertical center. These make it easy to position a shot neatly.
In the opening zoo shot, I increase the scale to about 115% and move the image slightly left. That keeps me in the frame while making the zoo sign in the background easier to read.
5. Layer B-Roll and Organize It With Markers
B-roll is supporting footage that illustrates the narration. Instead of staying on the same speaking shot the whole time, you can show the location, signs, animals, or other details being discussed.
Import clips 2, 3, and 4 from the demo footage and drag them above the main narration clip. CapCut creates another video track.
That gives us a simple structure: narration on the lower track and supporting visuals on the upper track. The B-roll appears on screen while the narration continues underneath.
Understand track controls
On the left side of each track, you’ll find controls to:
- Lock the track to prevent accidental edits.
- Hide the track with the eye icon so you can see the footage below.
- Mute the track with the audio icon.
Hiding B-roll temporarily is particularly useful when you need to check the timing or framing of the narration underneath.
Place markers on important words
Markers save you from repeatedly searching for the same moment. Press M or click the marker icon to mark the playhead’s position. Double-click a marker to rename it or change its color.
Here is how I use them for the opening sequence:
- Trim the initial silence from the narration.
- Play the clip and add a marker just before the zoo’s name is spoken.
- Name that marker for the zoo-sign B-roll.
- Add another marker when the narration mentions Waco, Texas.
- Add a later marker where the narration shifts to exploring the zoo.
You can press M during playback, which makes marking a spoken phrase quick and natural.
Next, drag each supporting clip to its marker. Put the zoo sign over the zoo’s name, the flags over the location reference, and the final entrance shot over the invitation to explore.
Trim the B-roll to fit the pacing. In this example, short shots of roughly two to three seconds work well. As you drag a clip edge, the duration display shows seconds and frames, while snapping helps align the edge precisely with a marker.
Change the source section without changing the placement
Sometimes a B-roll clip is in exactly the right place, but the section of footage is not quite right. My entrance shot, for example, starts with the camera sitting still before the pan begins.
You do not need to rebuild the timeline timing to fix that:
- Right-click the B-roll clip.
- Choose Trim clip.
- Move the selection box to a better section of the source footage.
- Click Replace clip.
This lets me start the shot while the camera is already moving, preserving the placement and duration I chose earlier. I make the same adjustment to the zoo-sign shot for a smoother sequence.
Add stock footage from the library
Open Library in the media area to search CapCut’s stock photos and videos. You can preview assets and drag them directly into your timeline without leaving the editor.
For the zoo project, I search for zoo footage and choose a tiger clip. I place a short section over the part of the narration discussing the animals, using another marker to line it up.
The original stock clip is much longer than needed, so I split out a brief section, delete the excess, and move the remaining piece into place.
Finish organizing the remaining clips
Import clips 5 through 10. Clip 5 is the walking shot, clips 6 and 9 contain speech, and clips 7, 8, and 10 are giraffe B-roll.
Keep the speaking clips on the main track, move the giraffe shots onto the upper B-roll track, and trim the narration using the waveform technique. Then spread the giraffe shots through that section wherever they best support the narration.
At this stage, the main structure of the edit should be in place. You can still refine pacing later, but it is much easier to work on audio and graphics once the core sequence is organized.
6. Stabilize Shaky Footage and Adjust Speed
Stabilize a handheld shot
The walking clip was recorded handheld on a phone, so the footsteps introduce visible shake. To smooth it out:
- Select the clip.
- Find Stabilize in the right-side video settings.
- Enable it and wait for processing.
- Preview the result.
The stabilization options include Recommended, Minimum cut, and Most stable. Try each one and compare the result on your footage rather than assuming the strongest setting will always look best.
Once the shot is stable, trim away any unnecessary footage at the beginning and end.
Speed up or slow down a clip
With the clip selected, open Speed. Move the speed slider right to speed up the footage or left to slow it down.
For the walking shot, I use approximately 1.15x. It is a small increase, but it helps move through the scene more quickly.
You can also enter a target duration. If a clip needs to last exactly 1.5 seconds, for example, setting that duration changes the speed accordingly.
Footage recorded at higher frame rates, such as 60 fps or 120 fps, also gives you room to experiment with smooth slow motion.
7. Add Transitions and Clip Animations
CapCut treats transitions and animations differently:
- Transitions connect two clips.
- Animations apply to an individual clip.
Add a transition between clips
Open Transitions, choose a preset, and drag it onto the cut between two pieces of footage.
For the cut from the opening narration to the walking shot, I use Pull In 2. Select the transition on the timeline to adjust its duration.
A duration of 0.9 seconds gives it a more gradual feel, while 0.5 seconds makes it faster. Preview both and choose the timing that fits the sequence.
Add an in or out animation
Select a clip and open Animation. The options include:
- In: Controls how the clip enters.
- Out: Controls how it leaves.
- Combo: Applies a combined animation treatment.
On one of the entrance B-roll shots, I add a Zoom 1 in animation and a Swoosh out animation. You can adjust the duration of each independently.
I generally prefer separate in and out animations because they give me more control over the timing. Combo animations can be fun, but some presets may behave differently than expected, so always preview them in context.
8. Clean Up Dialogue and Mute Unwanted Audio
Good audio makes a huge difference. Before adding music, make the speech clear and remove distracting sound from supporting clips.
Adjust clip volume
Hover over the volume line near a clip’s waveforms and drag it up or down. CapCut displays the adjustment in decibels, or dB.
Be careful when increasing the level. Orange and red peak indicators are a warning that the audio may be too loud. If you push it too far, clipping can introduce unpleasant distortion.
You can also adjust volume numerically in the Audio panel.
Normalize loudness, reduce noise, and add fades
With a speaking clip selected, open Audio and try:
- Normalize loudness: Helps bring the clip to a more consistent listening level.
- Reduce noise: Helps reduce distracting background sound, such as the wind in these outdoor recordings.
- Fade in and Fade out: Add a slight fade at each edge for a smoother audio entrance and exit.
Other available tools include Enhance voice, Video translator, Separate audio, and Fill channel. For this project, normalization and noise reduction make the most immediate difference.
Apply the same listening check to each narration clip. One clean clip does not fix the others automatically.
Mute B-roll that does not need sound
The zoo-sign B-roll contains loud wind noise. Leaving it active means that noise plays over the main narration, even though the supporting image looks great.
Drag the B-roll’s volume line all the way down until it displays negative infinity, meaning it is muted. Repeat for the other supporting shots and the walking clip if their original audio is not needed.
You can use a track’s mute control when everything on that track should be silent. For this edit, the goal is an organized sound mix with clear narration rather than several recordings of wind competing at once.
9. Add Background Music and Sound Effects
Open Audio to access CapCut’s stock music library. Click a track’s cover image to preview it, then drag your choice underneath the video to create an audio track.
Lower the music so it supports the narration. In this example, I begin at approximately -15 dB, then listen to the music and speech together.
That value is a starting point for this project, not a rule for every song. The important thing is that the words remain easy to hear.
Open Sound effects in the same area to search for individual sounds or ambience. Searching for zoo sounds brings up environmental audio that could work behind the animal B-roll.
Preview the effect first, then drag it onto the timeline and adjust its placement and level just like any other audio clip.
10. Use Keyframes for Audio Ducking and Video Motion
Keyframes sound advanced, but the basic idea is simple: a keyframe stores a setting’s value at a particular moment. Add another keyframe with a different value later, and CapCut changes the setting between those two points.
Raise music during a gap in speech
The walking shot has no narration, so it is a good place to bring the music up.
- Select the music clip.
- Place the playhead near the start of the transition into the walking shot.
- Click the diamond icon beside Volume to create a keyframe at -15 dB.
- Move the playhead forward to around the end of the transition.
- Raise the volume to 0 dB to create the next keyframe.
Now the music gradually rises between those points instead of jumping to a louder level instantly.
Duck the music when speech returns
If the music stays loud when the next speaking clip begins, it competes with the narration. Audio ducking solves that by lowering the music under speech.
- Move the playhead to slightly before the next speaking section.
- Add a volume keyframe at the current louder level.
- Move forward to the beginning of the speech.
- Lower the volume back to approximately -15 dB.
Preview the transition. The music should have room during the walking shot, then settle underneath the narration as speech resumes.
Repeat this pattern throughout the project wherever you want music to rise during a pause and fall beneath dialogue.
Animate a zoom with scale and position keyframes
The same concept works for video. On the flags B-roll, I create a gradual zoom toward the Texas flag:
- Select the video clip and place the playhead at the beginning.
- Add keyframes beside Scale and Position.
- Move toward the end of the clip.
- Increase Scale from 100% to about 115%.
- Reposition the image so the zoom finishes on the flag.
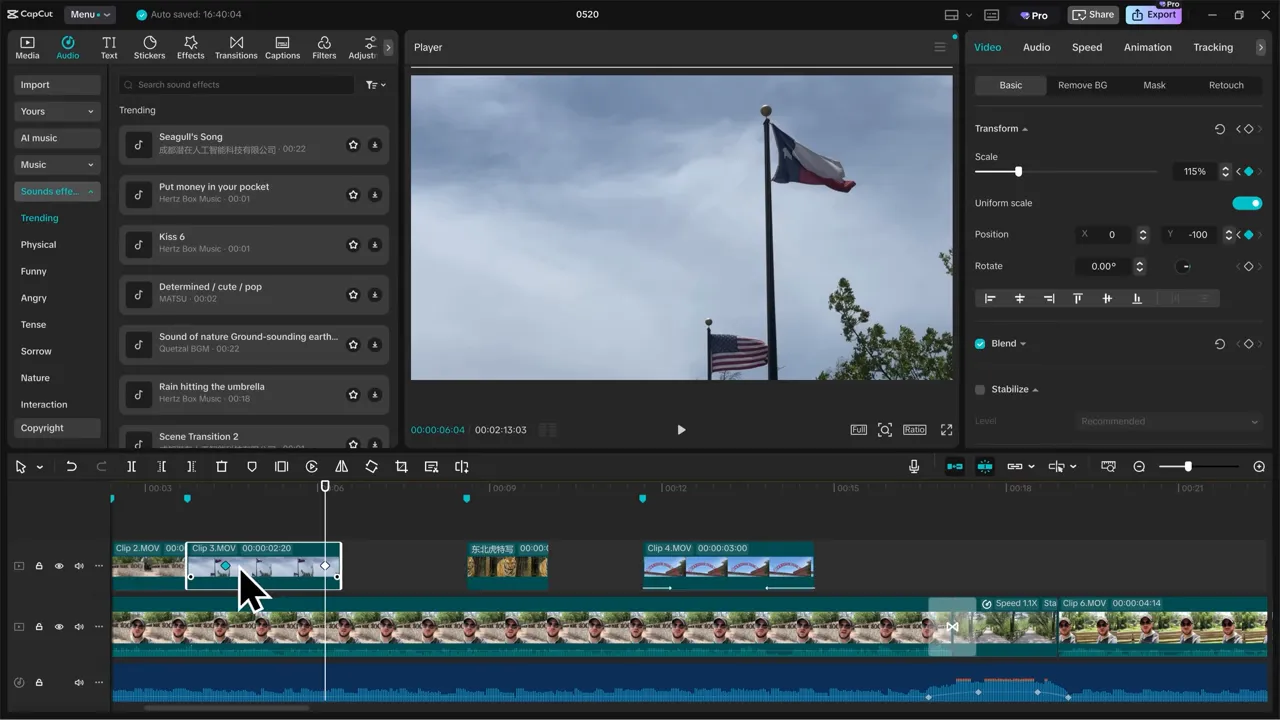
The distance between keyframes controls the speed of the change. Move them closer together for a quick zoom or farther apart for a slower move.
If the animation starts too late, drag the first keyframe to the start of the clip. For a gradual zoom across the whole shot, place the first keyframe at the beginning and the second at the end.
11. Generate Captions and Add Animated Text
Create automatic captions
Open Captions and select the spoken language. Depending on the available options, you can also enable bilingual captions, automatic keyword highlighting, and filler-word identification.
Click Generate. CapCut adds a caption track to the timeline.
Always review automatic captions before exporting. In the zoo project, the software initially turns a reference to 1,700 animals into 17 animals. That would be a very different zoo.
Double-click the affected caption on the timeline and correct the text in the editing panel.
Style your captions
The caption controls let you change the font, size, capitalization, colors, and preset style. You can also explore templates, bubbles, effects, and animations.
I keep this project simple with a yellow caption preset. Animated templates can be fun for vertical social content, but check them carefully after making text corrections. Some word-based animations may not line up cleanly with edited wording.
If a preset struggles with a corrected caption, a plain caption is better than a distracting animation.
Add a custom location label
For text that is separate from captions, open Text and drag Default text onto a new timeline track.
To label the flags shot:
- Replace the default wording with Waco, Texas.
- Choose a preset with a background and dark text.
- Scale it down and position it beside the flag.
- Add a Pop up in animation.
- Add a Fade out out animation.
- Trim the text layer so it leaves before it lingers over the next speaking shot.
This combines the same positioning, trimming, and animation skills you already used on video clips.
12. Apply Color Correction, Filters, and Stickers
Make basic color corrections
Select a clip and open Adjust. The available controls include:
- Temperature: Adjust the warmth or coolness of the image.
- Saturation: Increase or decrease color intensity.
- Exposure: Brighten or darken the image.
- Contrast: Adjust the difference between lighter and darker areas.
For the opening shot, I make small exposure and contrast adjustments rather than pushing the image into an exaggerated look.
If you want the same correction across the timeline, use Apply to all. This saves time compared with entering the same settings on every clip individually.
Try a stylized filter
Open Filters, browse the categories, and drag a filter onto your footage. A filter can add a stylized look quickly, while the Adjust panel gives you direct control over individual image settings.
Try a look, compare it with the original, and undo it if it does not suit the project.
Add an animated sticker
Open Stickers and search for something that supports a moment in the narration. For the closing giraffe section, I search for a sleep-themed sticker.
Hover over a result to preview whether it is animated, then drag it onto a track above the video. Scale it down, rotate it with the handle if needed, and position it near a corner without blocking the captions.
Add a fade in and fade out, then trim the sticker layer so it ends with the video.
There is also an AI-generated sticker option. If the library does not have what you need, you can describe a custom sticker with a prompt.
13. Explore CapCut’s AI Editing Tools
CapCut has a lot of AI features, and you do not need to use all of them in every project. It is more useful to know what they do so you can reach for the right tool when a particular problem comes up.
- Enhance image: Offers AI enhancement and upscaling options for lower-quality footage.
- AI expand: Expands the image beyond its original frame to fit a larger aspect ratio.
- AI remove: Lets you highlight unwanted elements for removal.
- Eye contact: Adjusts the apparent direction of a person’s eyes toward the lens.
- Relight: Changes the lighting treatment of a shot.
- Auto reframe: Helps keep the subject centered when reframing footage.
- Remove flickers: Provides a tool for addressing flicker.
- Motion blur: Adds motion-blur treatment.
Remove a background with one click
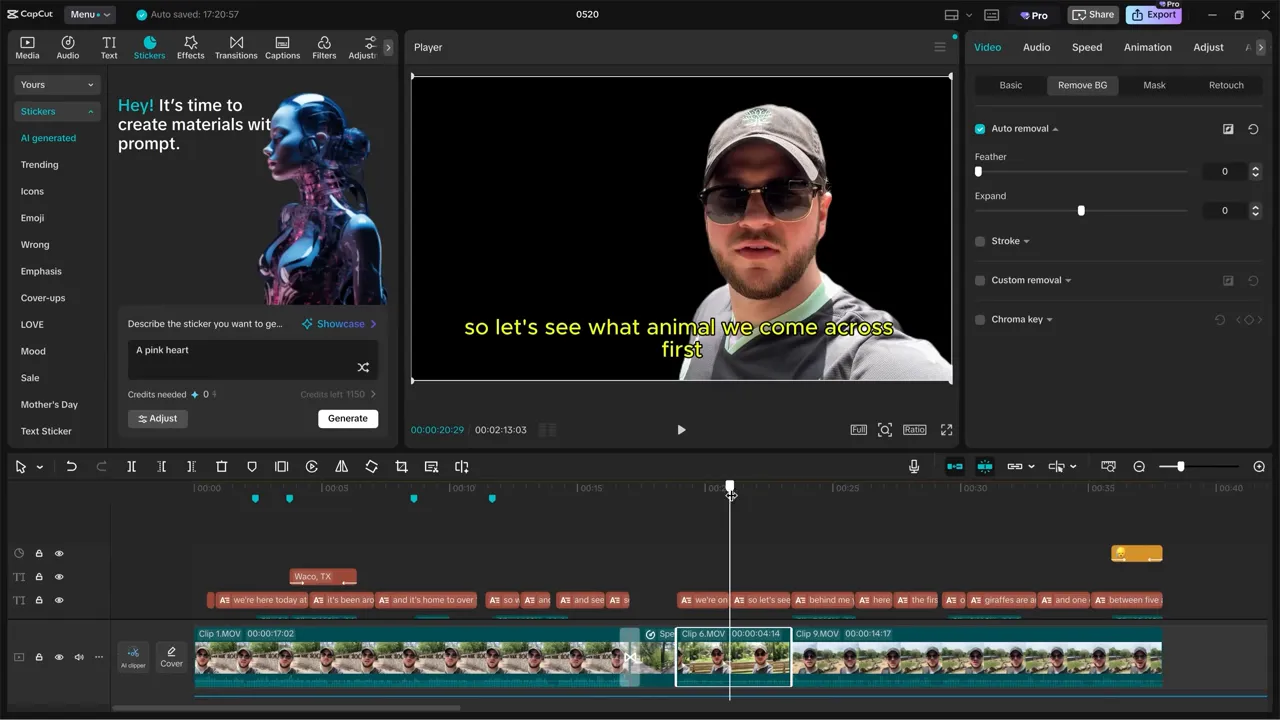
Select a clip, open Remove BG, and enable Auto removal.
CapCut separates the subject from the background across the clip, creating an effect similar to a cutout or green-screen composite. You can then place another visual behind the isolated subject.
Try retouching and AI styles
The Retouch panel offers appearance adjustments similar to beauty filters. Under AI stylize, you can experiment with treatments such as anime, comic-book, surreal, and doll-like styles.
Some of these get pretty goofy, which is part of the fun. Preview the effect across the clip before deciding whether it belongs in the final edit.
The CapCut home screen also offers tools for video translation, turning long videos into shorts, generating a video from a script, and generating AI images. Save your project before leaving the editor to explore them.
14. Generate AI Images and Video
Create an image from a prompt
Inside the project, open AI media and choose AI image. Describe the image you want and optionally add a reference image.
Choose a model suited to the job. In the available model descriptions, General v3.0 is positioned for realistic, high-quality images, while General XL is intended for uses such as text posters.
Then choose an aspect ratio, such as 16:9 for horizontal content or 9:16 for vertical content.
Turn a photo into a moving clip
Under AI video, you can choose text-to-video or image-to-video. For the zoo project, image-to-video is a useful example because it shows how a still photograph can become supporting footage.
- Choose Image to video.
- Import the giraffe reference image.
- Describe the motion you want, including a realistic giraffe walking naturally from left to right.
- Choose the video model. I use Video G3.0 for its stated focus on stable motion and realistic style.
- Keep motion speed on Normal and camera control on Default.
- Set the duration to 10 seconds and the aspect ratio to 16:9.
- Check the credit cost, then click Generate.
This generation uses 50 credits in the demonstrated setup. Check the cost shown in your account before generating, since it depends on the available settings.
Drag the generated clip onto the timeline and preview it. You can trim, scale, and position it just like other footage, or use it to replace a B-roll shot.
The practical use case is simple: perhaps you took a photo of an animal but forgot to record a video. Image-to-video can create a moving visual from that photo. The result can work in a pinch, although AI artifacts may still be noticeable.
15. Convert Horizontal Video Into Vertical Video
To adapt the project for social platforms, open Ratio and switch from 16:9 to 9:16.
The canvas changes immediately, but the composition still needs attention:
- Select each video clip and scale it to fill the vertical frame.
- Reposition the image to keep the important subject visible.
- Resize and reposition captions for the narrower canvas.
- Move stickers and custom text into appropriate positions.
- Preview the full sequence for awkward crops.
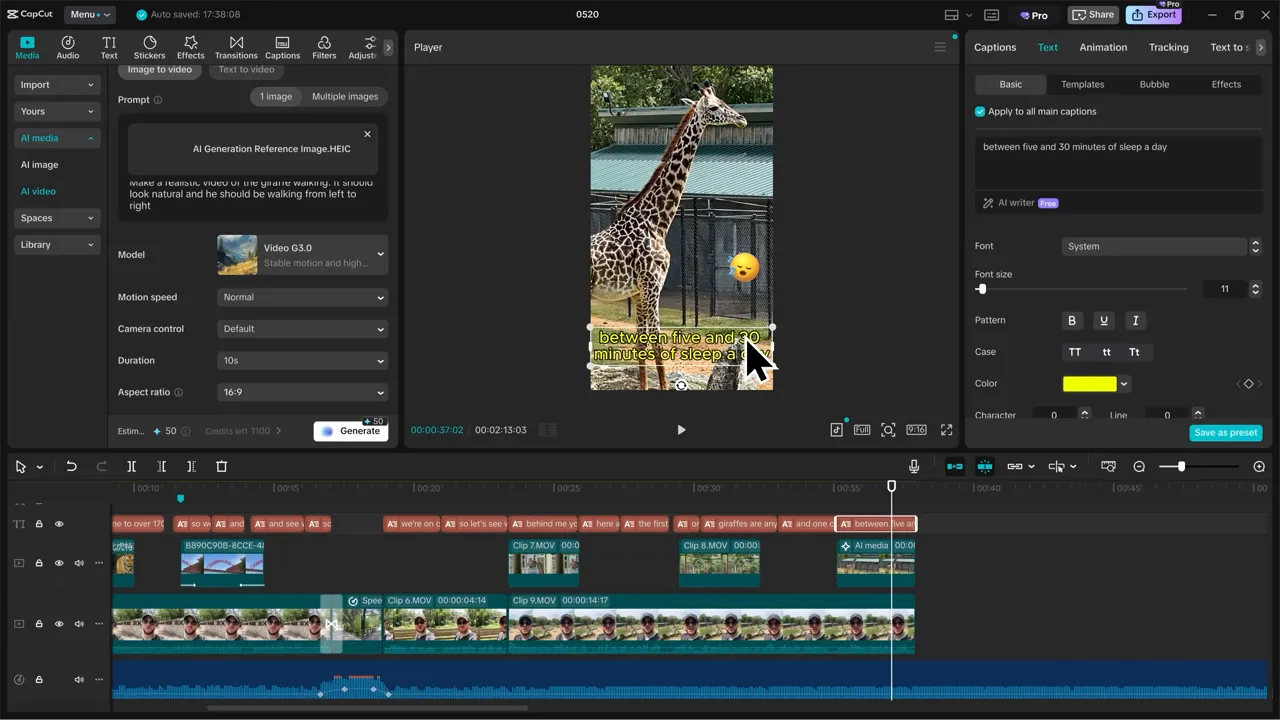
In the giraffe shot, I zoom in and move the image to center the animal, then adjust the caption placement.
Changing the aspect ratio is easy. Checking every layer is what makes the vertical version feel properly edited. Automatic reframing can help, but it may not choose the composition you want in every shot.
16. Export the Video and Design a Cover
Before exporting, zoom out and check the end of the timeline. In this project, the music extends beyond the video, so I trim it to finish with the narration and visuals.
Do the same check for B-roll, captions, stickers, and custom text. You do not want an extra layer accidentally extending the finished video.
Review export settings
Click Export in the upper-right corner. The export window lets you adjust:
- Video name and destination folder
- Resolution and bitrate
- Codec and file format
- Frame rate
- Audio settings
- Caption and GIF-related export options
- Cloud-space syncing and the available copyright check
There is also an Optical flow option for generating intermediate frames and smoothing motion, which can be useful for slow motion. I leave it off for this project.
If your destination is YouTube and you need help choosing delivery settings, the official YouTube upload encoding recommendations provide a useful reference.
Create a thumbnail inside CapCut
Before the final export, click Edit cover. Choose a frame with the slider, then click Edit to open the cover designer.
The designer includes templates, uploads, text, shapes, stickers, frames, collages, and brand-kit options.
For the zoo vlog, I choose a template with a circular portrait, replace the wording with the vlog title and my name, and remove the text I do not need.
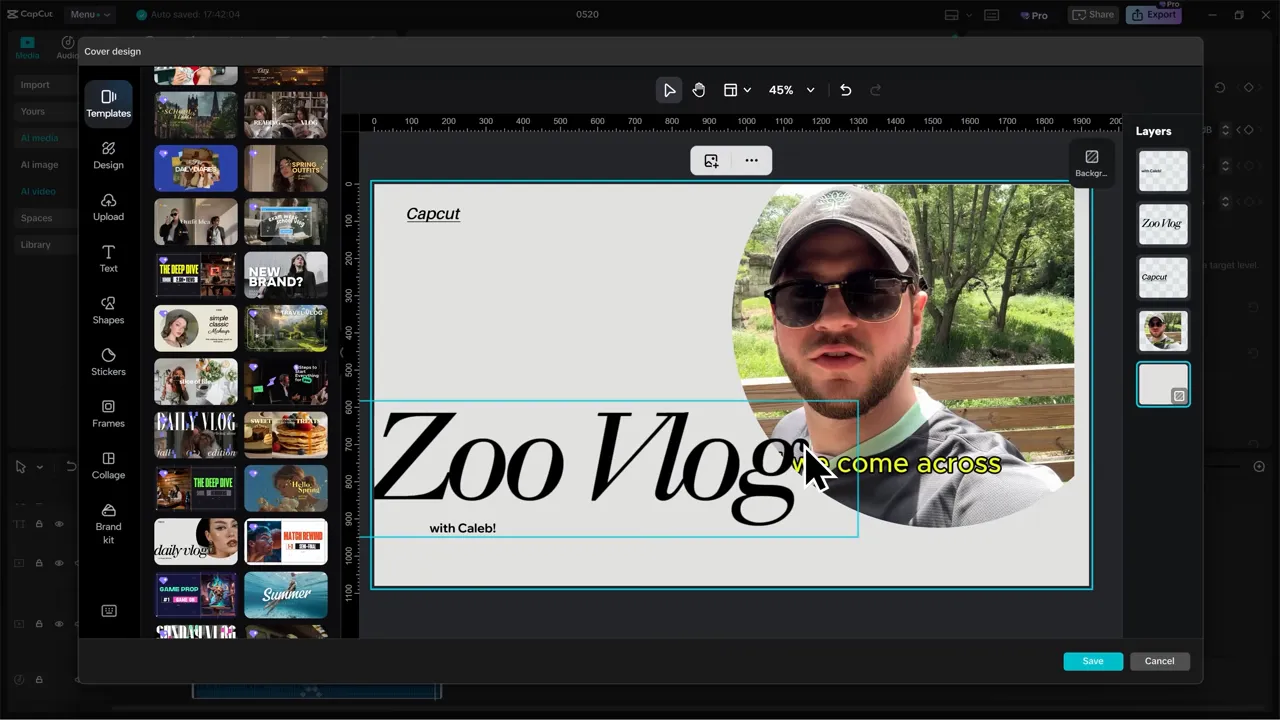
Click Save to keep the cover, then return to the export window and click Export. In this workflow, CapCut exports both the video and the designed thumbnail.
Check the finished result
Once export finishes, CapCut offers direct sharing to TikTok and YouTube. It can also generate a TikTok-sized version, but review that result carefully. Automated cropping may center the wrong part of a shot, so I prefer to make important framing decisions manually.
The finished project now has a clear structure, supporting B-roll, cleaner dialogue, background music, captions, and a cover. More importantly, you have a repeatable workflow: organize first, tighten the timing, clean the audio, then add the finishing touches.
You do not need every effect to make a good edit. Start with those fundamentals, then use keyframes and AI tools where they genuinely improve the result.
Made with VideoToBlog using CapCut Tutorial for Beginners 2026


