ClickUp brings task management, project tracking, documents, and team collaboration into one platform. You can use it to organize your own projects or give an entire team a clear place to manage its work.
The key is to build a structure that makes sense before adding too many tasks. Once you understand where everything belongs, features like custom statuses, calendar views, filters, and dashboards become much easier to use.
I'll use a marketing department as the example throughout this tutorial, with campaign lists, a blog planner, and process documents. You can follow the same setup with your own departments or projects. I recommend building along as you go, because using the tool yourself is the easiest way to get comfortable with it.
What You'll Learn
- Organize your Workspace with broad Spaces, related Folders, project Lists, and actionable Tasks.
- Customize task statuses, subtasks, and fields to match how your work moves forward.
- Use views, filters, templates, and dashboards to manage deadlines and understand project progress.
- Invite members and guests with access tailored to the work they need.
Table of Contents
- 1. Create Your ClickUp Account and Workspace
- 2. Understand the ClickUp Hierarchy
- 3. Create Spaces for Your Main Areas of Work
- 4. Add Lists and Organize Them into Folders
- 5. Add Docs and Whiteboards
- 6. Create and Manage Tasks
- 7. Customize Task Statuses for Your Workflow
- 8. Manage Columns and Add Custom Fields
- 9. Choose Between List, Board, and Calendar Views
- 10. Use Grouping, Filters, and Search to Find Work
- 11. Save Setup Time with Templates
- 12. Build a Dashboard to Visualize Progress
- 13. Invite Team Members and Set Permissions
- Keep Your First ClickUp Setup Simple
1. Create Your ClickUp Account and Workspace
Start by opening the ClickUp signup page and selecting Get Started. It's Free.
- Enter your email address and click Next.
- Add your name, choose a password, and submit the signup form.
- Open your email inbox and copy the verification code.
- Paste the code into ClickUp and answer the onboarding questions.
- Skip inviting teammates for now.
- Name your workspace and finish the setup.
If you're using ClickUp for a company, your company name is a good workspace name. If the workspace is dedicated to a particular project, you can use that project's name instead. I'll use Metics Media.
I recommend setting up the workspace before inviting other people. That gives you a chance to organize everything and decide who should have access to each area.
Do you need a paid plan?
ClickUp offers a Free Forever plan, which is a useful starting point for the workflow covered here. You don't need to begin with a paid subscription just to learn the basics.
The free plan has limits. For example, the setup demonstrated here allows up to five Spaces within a Workspace. Custom Fields, dashboard features, and other tools can also have plan-specific limits, so being available on the free plan doesn't necessarily mean unlimited use.
Start with the free plan and upgrade when you actually need to go beyond its limits. You can check the ClickUp plan comparison for current inclusions. Interface labels and feature allowances may change, so use the ClickUp Help Center if a setting looks different in your account.
2. Understand the ClickUp Hierarchy
Before building out your workspace, it helps to understand the ClickUp hierarchy. This is simply the structure that determines where your projects and tasks live.
- Workspace: The top-level home for your company or project.
- Spaces: Broad areas within the Workspace, such as Marketing or Sales.
- Folders: Optional containers that organize related Lists.
- Lists: The places where you manage tasks for a project or workflow.
- Tasks: Individual pieces of work within a List.
- Subtasks: Smaller steps within a Task, with nested subtasks available for further detail.
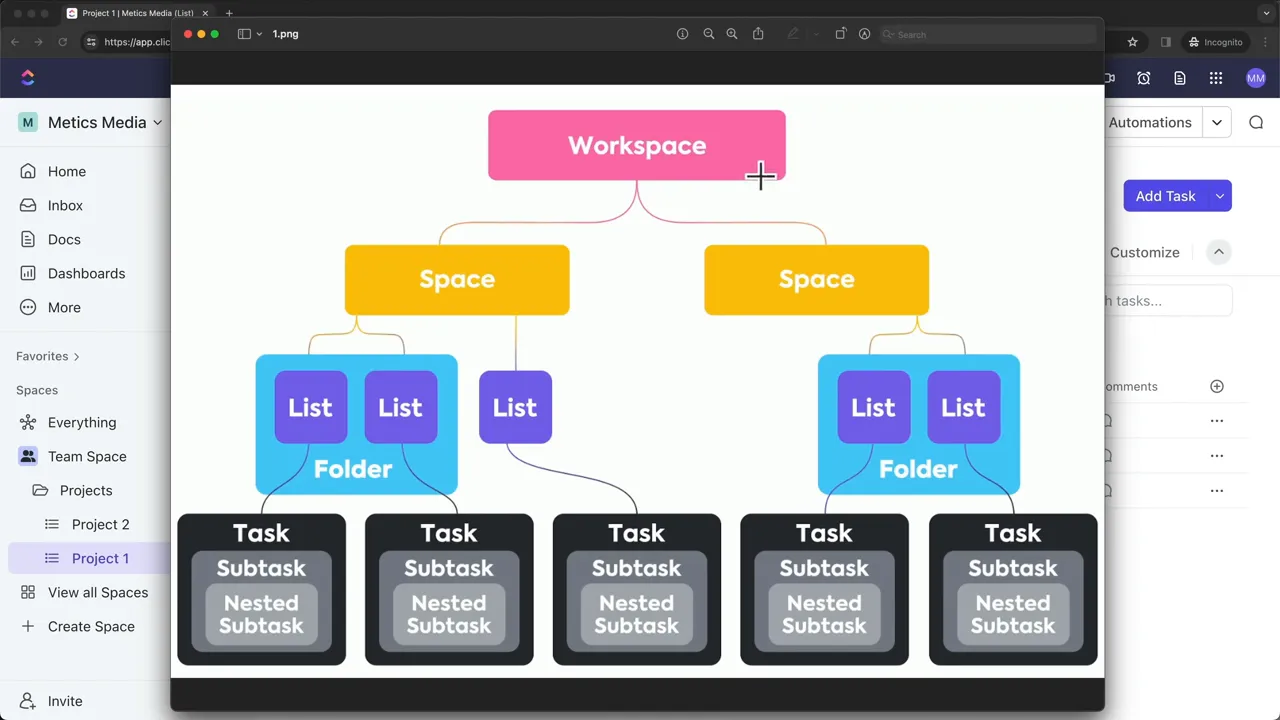
Folders are optional. A List can sit directly inside a Space, or you can place related Lists together in a Folder. I prefer using Folders because the sidebar becomes much easier to manage as the number of Lists grows.
For our example, the structure will look like this:
- Workspace: Metics Media
- Space: Marketing
- Folder: Campaigns
- List: Black Friday Campaign
- Task: Define campaign concept
- Subtasks: The individual steps needed to finish that concept
You can also keep the ClickUp hierarchy reference handy while planning your own structure.
Create separate Workspaces when needed
Your ClickUp account isn't limited to a single Workspace. For example, you might want one Workspace for your company and a completely separate one for personal projects.
To create another, click your Workspace name in the upper-left corner and choose New Workspace. This creates an independent Workspace rather than another area inside the existing one.
3. Create Spaces for Your Main Areas of Work
ClickUp may create a default Space during onboarding, such as Team Space. If you're starting with an unused account and want a clean setup, open that Space's three-dot menu, select Delete, and enter its name to confirm. Only do this with a Space you don't need.
To create your first Space, select Create Space in the sidebar.
- Name the Space. I'll call this one Marketing.
- Add a description if useful. You can skip this initially.
- Choose a color and icon. These help distinguish Spaces in the sidebar.
- Set its visibility. Choose public or private.
- Choose default task statuses. Keep them simple for now.
- Review ClickApps and default views. Leave the defaults until you know what you need.
- Review the setup and click Create Space.
Choose public or private access
A public Space is available to the Workspace's members. It does not mean the Space is published openly on the internet.
A private Space lets you choose which people have access. If you're planning to work with a team, I recommend starting private and adding the appropriate people later. For the Marketing Space, that would be the people in the marketing department.
Keep default statuses simple
During setup, you can define the statuses available to tasks in the Space. A basic workflow uses To Do and Complete. You can add intermediate stages, such as In Progress, or choose a status template.
Personally, I prefer customizing statuses for each List rather than creating one detailed workflow for an entire Space. Campaign work and blog production may need different stages, even though both belong to Marketing.
For now, keep the Space defaults simple. Leave the default ClickApps enabled, move through the view settings, and finish creating the Space. ClickUp also adds an initial List that you can rename or remove later.
Use broad Spaces rather than one Space per project
For this example, I've created five Spaces:
- Marketing
- Sales
- Product Development
- Customer Support
- Events
Your own categories will probably be different. The important point is to keep Spaces fairly general, especially if you want to stay within the free plan's Space limit. Individual campaigns belong in Lists, not in separate Spaces.
Once those Spaces exist, collapse the ones you aren't using. We'll continue inside Marketing.
4. Add Lists and Organize Them into Folders
A List is where you'll manage and track the tasks for a specific project or process.
Open the default List inside Marketing and click its name at the top to rename it. I'll use 1. Black Friday Campaign. I like adding numbers to project names where they help keep things organized.
To create another List, click the plus icon beside the Marketing Space, select List, enter a name, and click Create List.
For this example, add Lists for:
- Black Friday Campaign
- New Year Campaign
- Easter Campaign
- Blog Posts
Group related Lists into Folders
A handful of Lists is easy to manage. But if you keep adding them directly under a Space, the sidebar can quickly become cluttered.
Create a Campaigns Folder to hold the three campaign Lists:
- Click the plus icon beside Marketing.
- Select Folder.
- Name it Campaigns and create it.
- If ClickUp adds an empty default List you don't need, remove that List.
- Drag the Black Friday, New Year, and Easter Lists into the Folder.
Now you can collapse Campaigns whenever you're working on something else.
Next, create a Website Folder and move the Blog Posts List into it. I recommend using Folders consistently, even when a Folder initially contains only one List. It gives related work a clear place to grow.
5. Add Docs and Whiteboards
Lists aren't the only things you can keep alongside your projects. ClickUp also has Docs for written information and Whiteboards for visual planning.
Create a Doc for your processes
For this example, create a Processes Folder in Marketing. Click the plus icon beside it and select Doc.
Name the document SOPs, short for standard operating procedures. You can begin with a blank page and start writing directly in the editor.
Docs support more than plain text. You can add elements such as:
- Checklists and toggle lists
- Buttons
- Columns
- Tables within the Doc editor
You can also add multiple pages inside one Doc. Select Add Page and create a page called Campaign Structure, for example, to explain how your team should organize campaigns.
This lets you build a small process library inside the SOPs Doc instead of scattering instructions across separate locations.
Create a Whiteboard for visual planning
To add a Whiteboard, click the plus icon beside the Processes Folder and choose Whiteboard.
You can start from scratch or use a template for something like a flowchart, brainstorming map, or matrix. Templates provide an initial layout, while a blank Whiteboard gives you an open canvas.
From there, you can add shapes, draw, insert text, and bring in content such as documents, websites, Google Docs, and Google Sheets.
The distinction is simple: Lists track the work, Docs explain the work, and Whiteboards help you plan visually. Folders keep those resources organized.
6. Create and Manage Tasks
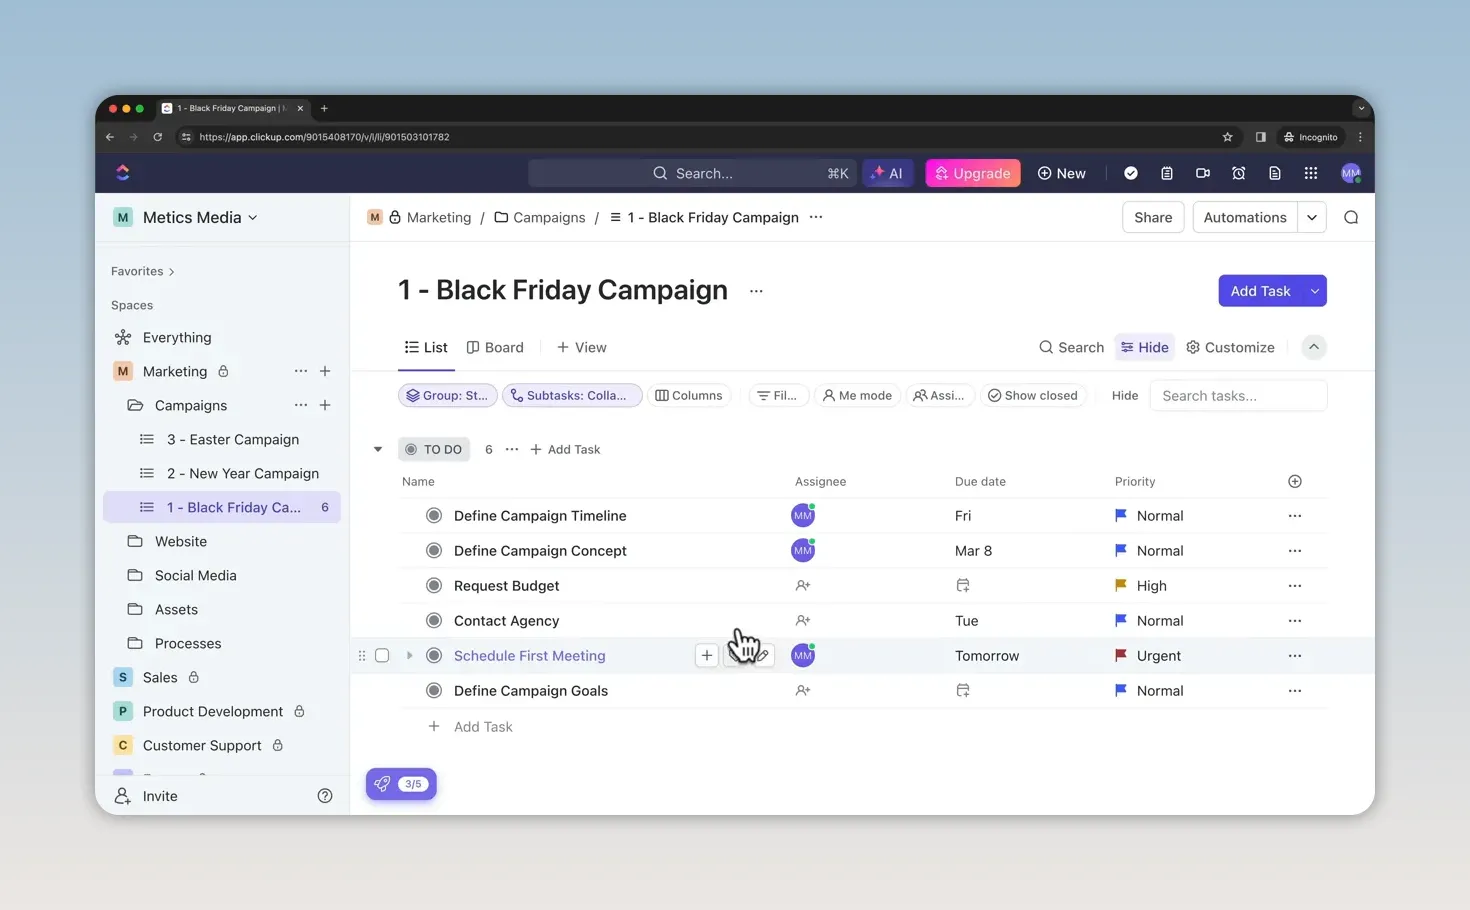
Open Campaigns, then select the Black Friday Campaign List. There are two straightforward ways to add tasks.
Add a task directly in the List
Click the task-entry area, type Define campaign timeline, and press Enter.
You can then fill in its main fields:
- Assignee: The person responsible for the task.
- Due date: When it needs to be completed.
- Priority: Its level of importance.
For this first task, assign it to yourself, set a due date of Friday, and choose Normal priority.
Use the Add Task button
The second option is the Add Task button in the upper-right corner. This opens a form where you can enter the task name and its details before creating it.
Create another task called Define campaign concept. Assign it, choose a due date, set its priority, and add tags if useful. Then click Create Task.
Both methods create a task in the same List. Adding directly is convenient for quickly entering work, while the form lets you fill in several details at once.
Complete tasks and show closed work
With a simple To Do and Complete workflow, clicking the status circle beside a task marks it complete. The task may then disappear from the current view.
That doesn't mean it's been deleted. Enable Show Closed in the view controls to display completed tasks again.
I like keeping closed work at the bottom. Use the Group control to group by Status and reverse the group order if necessary.
Break larger tasks into subtasks
If defining the campaign concept requires several steps, click the plus icon beside that task and add subtasks.
For a simple practice setup, create three steps beneath the parent task. You can expand them to work through the details or collapse them to show only the main task.
Subtasks let you keep those steps together without turning every small action into a separate top-level item.
7. Customize Task Statuses for Your Workflow
To Do and Complete are enough for a basic checklist. For work that moves through several stages, you'll want more visibility.
Open the List's three-dot menu and choose Manage Statuses. Select a custom workflow and create these stages:
- To Do
- In Progress
- In Review
- Complete
Give the statuses distinct colors and save your changes. You can also use a template, but I prefer starting with only the stages the workflow actually needs.
Now clicking a task's status circle opens the available choices instead of immediately completing the task.
For example, move Request budget from To Do to In Progress when work starts. Move it to In Review when it's ready to be checked, then Complete when it's finished.
If the List is grouped by Status, the task moves into the corresponding group each time you update it. This makes it much easier to distinguish unfinished work from work that's actively moving forward.
8. Manage Columns and Add Custom Fields
The List initially shows fields such as Assignee, Due Date, and Priority as columns. You can control which fields appear and add new ones when your project needs more information.
Show or hide existing columns
Click the plus icon at the end of the column headings, then open the Show/Hide tab.
Select the fields you want to display and deselect the ones you don't need. For example, enable Linked Docs to see documents connected to tasks. If no documents are linked yet, that column will be empty.
Create a Custom Field
To add something new, return to the plus icon and stay in the New Column tab. Available field types include dropdowns, text, dates, progress bars, checkboxes, email addresses, and files.
As an example, select a progress field, name it Progress, keep the default settings, and add the column.
In the demonstrated configuration, tasks that haven't started show 0%, completed tasks show 100%, and a task with completed subtasks can show partial progress. With three subtasks, completing one or two can produce approximately 33% or 66% progress.
Use Custom Fields to add useful information, not just extra columns. Start with what you need to manage the project clearly.
9. Choose Between List, Board, and Calendar Views
Views give you different ways to work with the same tasks. You don't need to recreate the project to see it in a different layout.
List view: task details in one place
List view is the default layout we've been using. It displays tasks in rows, with their fields in columns and groups based on settings such as Status.
It's a good choice when you want to review assignments, dates, priorities, and Custom Fields together.
Board view: move work through stages
Click Board at the top of the List. Each status becomes a column, and tasks appear as cards beneath the appropriate stage.
To change a status, drag a card into another column. For our campaign, that means moving tasks between To Do, In Progress, In Review, and Complete.
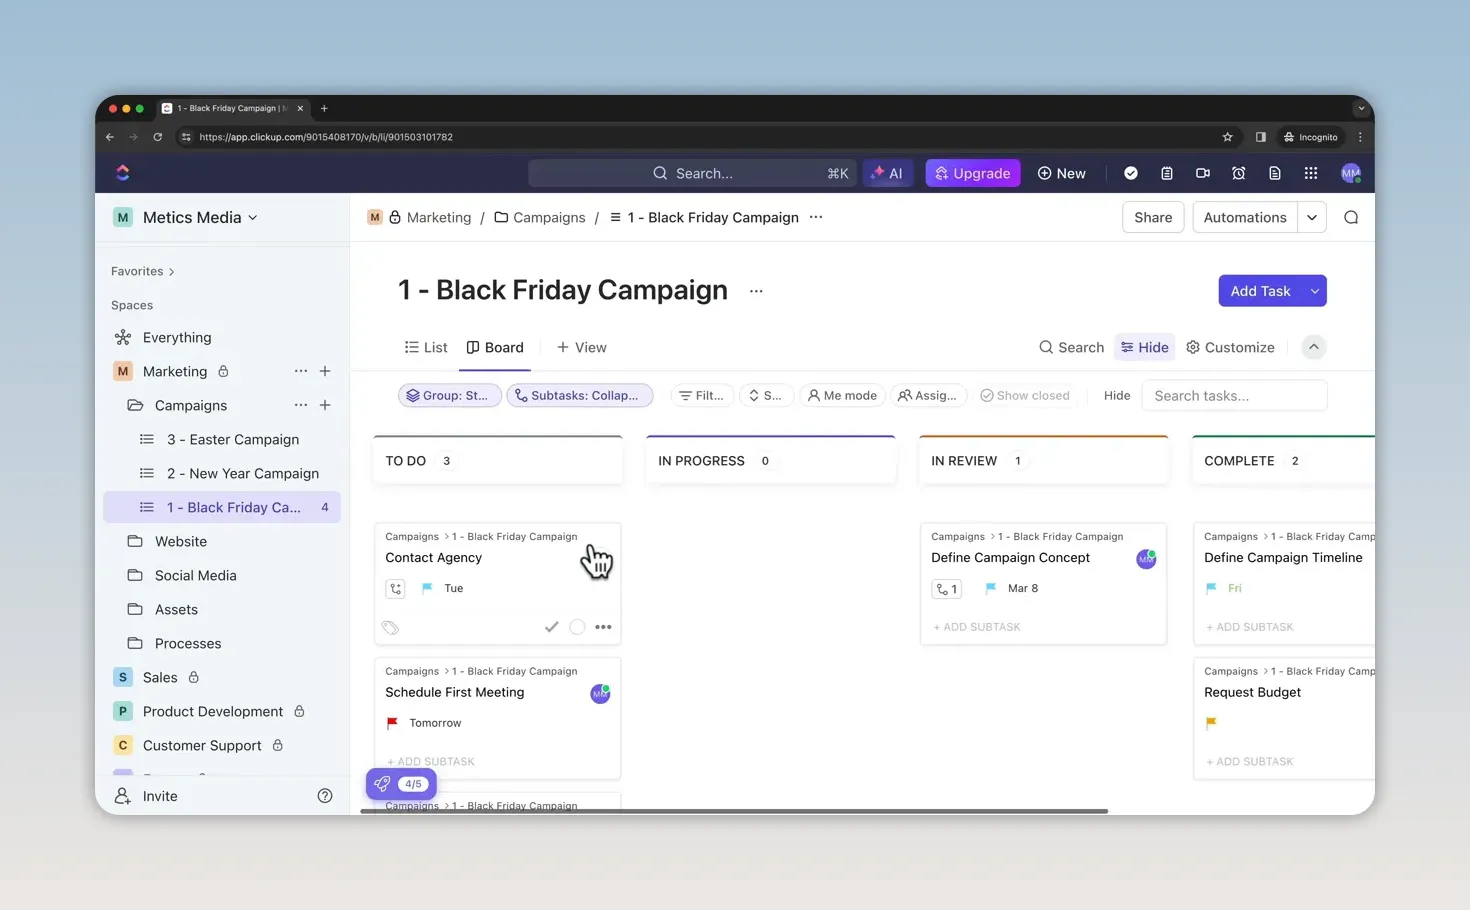
Personally, I like this layout for managing video production. Each piece of content moves through stages such as ideas, content preparation or scriptwriting, recording, editing, and uploading.
Calendar view: see upcoming deadlines
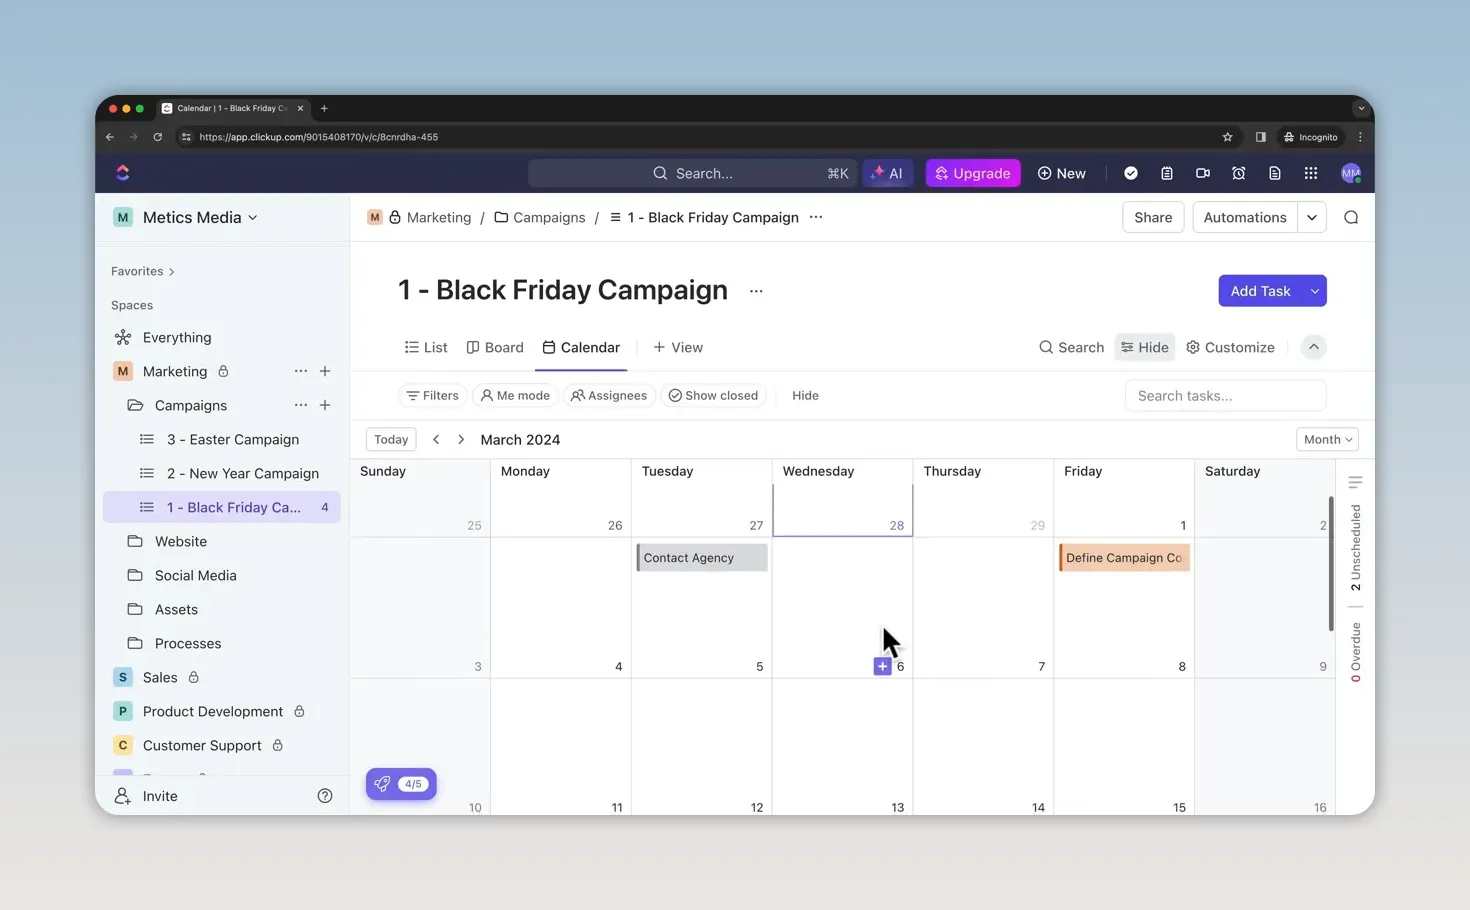
Calendar view is especially useful when your work revolves around deadlines.
- Click + View.
- Select Calendar.
- Click Add Calendar.
Tasks with due dates appear on the calendar. Move between months to review upcoming work, then click a task to open it, add comments, or change its details.
You can switch back to List or Board using the tabs at the top.
10. Use Grouping, Filters, and Search to Find Work
As your task Lists grow, the view controls help you focus on the right work without changing the underlying project.
You can hide the controls to give the List more room and show them again using Filter.
Group tasks by status, priority, or assignee
The Group control determines how tasks are arranged.
- Status: See which stage each task has reached.
- Priority: Bring urgent and high-priority work together.
- Assignee: See who is responsible for each group of tasks.
You can also reverse the group order. For example, keep completed tasks at the bottom when grouping by Status.
Control subtasks and visible fields
The subtask control lets you expand all subtasks at once or collapse them all to show only parent tasks.
The field control gives you another way to manage the List's visible columns and Custom Fields.
Focus on your own tasks or a teammate's work
Enable Me Mode to show tasks assigned to you. This is useful when a shared List contains work for several people and you only want to focus on your responsibilities.
To review another person's tasks, use the assignee filter and select that teammate.
You can also toggle Show Closed depending on whether completed tasks are relevant to what you're doing.
Combine advanced filters
Advanced filters let you narrow the List using specific conditions. For example, to find urgent work due soon:
- Open the advanced filter control.
- Select Due Date.
- Set it to Next 7 Days.
- Add another condition for Priority.
- Set the priority to Urgent.
The List now shows tasks matching those conditions. Remove a condition with its X control when you want to return to a broader view.
Search by a task keyword
If you remember part of a task's name, use the List's search field. Enter a keyword to quickly find the matching task instead of scrolling through the full List.
11. Save Setup Time with Templates
Building a workflow manually helps you understand how ClickUp works, but you don't have to create every project from scratch. The Template Center contains starting points for Spaces, Folders, Lists, Tasks, Docs, and Whiteboards.
To try a blog workflow:
- Open the Website Folder inside Marketing.
- Click its plus icon and select From Template.
- Search for blog in the Template Center.
- Open the Blog Planner template.
- Click Use Template.
- Name it Blog Planner and confirm Marketing as the Space and Website as the Folder.
- Apply the template.
Because we opened the Template Center from a Folder, the List filter is applied automatically. You can change the filters when looking for other types of templates.
The imported Blog Planner includes placeholder content and an existing structure. In this example, posts are grouped by types such as articles, how-to guides, video blogs, and guest blogs.
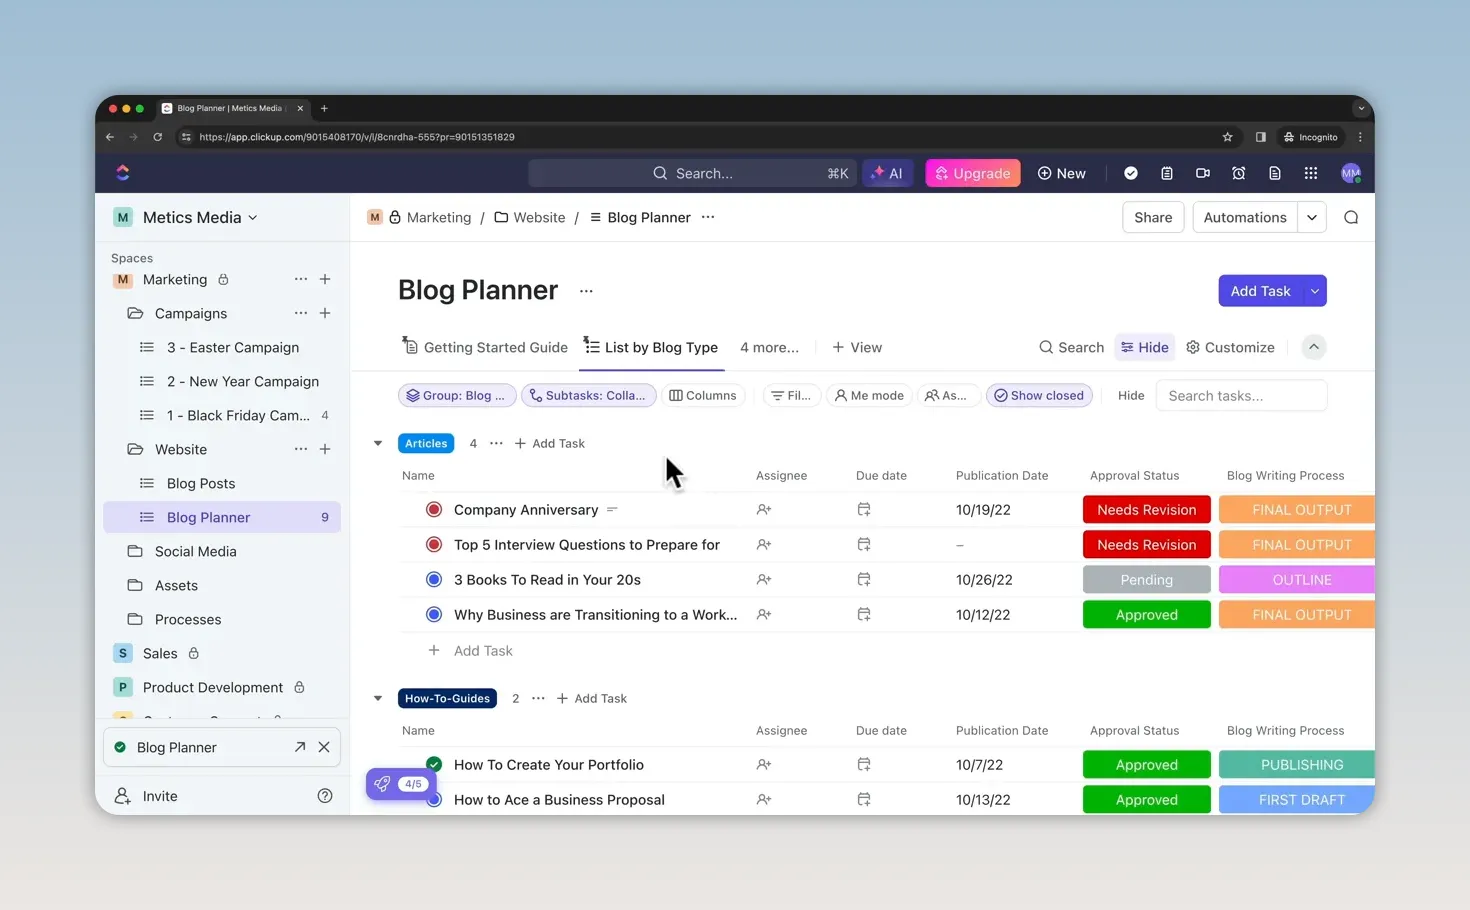
Look for the pinned Getting Started Guide at the top. It explains the template's structure and how to adapt it for your own blog posts.
12. Build a Dashboard to Visualize Progress
Dashboards pull key information from your Workspace into a visual overview. Rather than checking every task individually, you can review counts and charts for the area you're managing.
To create one:
- Open Dashboards from the sidebar.
- Click New Dashboard.
- Start from scratch or choose a dashboard template.
- Select the data source.
- Apply the selection.
For this example, use the Simple Dashboard template and choose the Blog Planner List as its source. You can also select a broader area, such as the entire Marketing Space.
The resulting dashboard can show information such as unassigned tasks, tasks in progress, completed work, open tasks, and workload by status.
Add, resize, and explore dashboard cards
Click Add Card to see the available metrics and charts. Some cards require a paid plan, while others are available within the free plan's allowances.
Add a Workload by Status card to see how many tasks sit in each stage. You can resize cards to customize the layout.
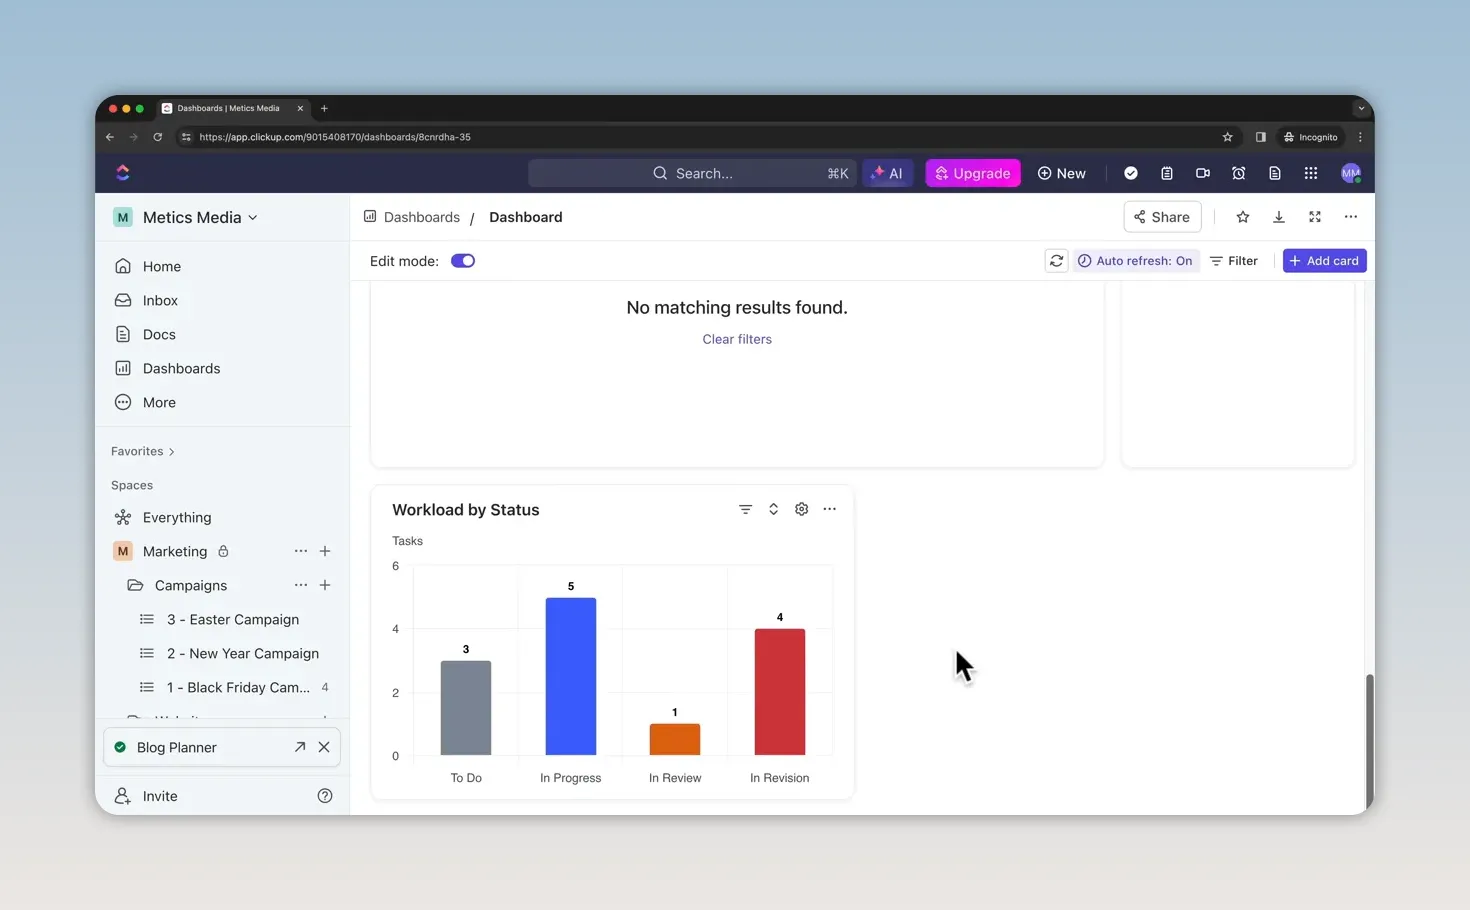
The charts aren't just static summaries. Click a bar, such as In Progress, to open the tasks represented by that value. From there, open an individual task to comment or update its details.
Finally, give the dashboard a descriptive name, such as Blog Post Planner. You can create separate dashboards for other parts of the Workspace rather than trying to fit every metric into one.
13. Invite Team Members and Set Permissions
Once the Workspace is organized, you can bring in your team.
Click the Workspace name in the upper-left corner, select Manage Users, and enter the person's email address.
Choose the appropriate role
- Member: For people working within the Workspace. Members can access public Spaces and private areas shared with them.
- Guest: For people who need access to specific Folders, Lists, or Tasks rather than entire Spaces.
- Admin: For people who need broader Workspace management permissions.
For a marketing employee, select Member and click Invite. If your Spaces are private, choose Marketing when prompted to add them to Spaces.
The person receives an email invitation and can create a ClickUp account to access the work you've shared.
Make a Space available to all members
If a Space contains information relevant to everyone, you may want to make it public within the Workspace.
For example, open the Events Space's three-dot menu, choose Sharing & Permissions, and select Make Public. The lock icon beside the Space disappears once the interface updates.
A shared library of documents that applies to the whole team is another reason you might use a public Space.
Give guests access to specific work
To share a campaign List with a guest:
- Open the List's three-dot menu.
- Select Sharing & Permissions.
- Enter the guest's email address.
- Change the role from Member to Guest.
- Select the appropriate permission level.
- Click Invite.
The sharing options shown include Full Access, Edit, Comment, and View. Choose the level that matches what that person needs to do.
The same approach works for sharing individual Folders or Tasks. Guests receive an invitation to the specific work you've given them access to.
Keep Your First ClickUp Setup Simple
You don't need to activate every feature to build a useful project management system. Start with a clear hierarchy, put related Lists into Folders, and add tasks with an assignee, due date, and priority.
Then customize the workflow where it helps: use statuses to track stages, Board view to move work forward, Calendar view to review deadlines, and filters to focus on what's relevant. Add templates and dashboards once the underlying structure makes sense.
That gives you an organized foundation for managing your own projects or collaborating with a team, without making the Workspace more complicated than it needs to be.
Made with VideoToBlog using ClickUp Tutorial 2026 - How to Use ClickUp for Beginners


