GoDaddy Website Builder is one of the easiest tools I’ve used to create a good-looking website. You choose a template, add your content, and adjust the style without having to design every element from scratch. The builder keeps the layout consistent as you make changes, which makes it a great starting point for beginners.
You can use it for a personal website, a business site, a blog, or an online store. You can also start for free and decide later whether you need paid features, such as connecting a custom domain or accepting product payments.
I’ll use a clothing store called Metics Apparel as the example throughout this guide. The same editing process applies to other types of websites, so choose the category and content that fit your own project.
Before you begin: GoDaddy’s interface, plan names, and feature availability can change. Use the steps below as your workflow, and check the options available in your account before purchasing a plan.
What You'll Learn
- Set your theme, colors, fonts, and buttons before editing individual pages.
- Build pages with reusable sections and review both desktop and mobile layouts.
- Add email marketing, a blog, and store features through the editor and dashboard.
- Test important website actions before publishing, then choose a plan that fits your needs.
Table of Contents
- 1. Create Your GoDaddy Account and Choose a Website Category
- 2. Choose and Customize Your Theme
- 3. Add Pages and Organize Your Navigation
- 4. Build Your Pages with Sections
- 5. Customize Your Homepage Header
- 6. Check the Desktop and Mobile Preview
- 7. Add Store, Chat, and Popup Features
- 8. Review Your Website Settings
- 9. Set Up Email Marketing
- 10. Create a Blog
- 11. Set Up Your Online Store
- 12. Complete Your Legal Pages
- 13. Test and Publish Your Website
- 14. Connect a Custom Domain and Choose a Plan
1. Create Your GoDaddy Account and Choose a Website Category
Start by creating a GoDaddy account. The signup screen offers options such as signing up with Google, Facebook, or your email address. Choose your preferred method, enter your information, and complete the account setup.
You can use my signup link below to get started. It’s an affiliate link, which means I may earn a commission if you purchase through it, at no additional cost to you.
Next, GoDaddy asks what kind of website you want to build. You can select one of the suggestions or search for a category yourself. For example, you might enter:
- Blog
- Photography
- Real estate agent
- Clothing store
This choice helps GoDaddy suggest a suitable starting design. For the example store, I select Clothing Store and click Next.
Then enter your website name. Don’t worry if you haven’t settled on the final name yet. You can change it later in the settings.
If you’re presented with paid plans, choose Continue for Free to start building first. There’s no need to choose a subscription before you know which features your website actually needs.
2. Choose and Customize Your Theme
Once the editor opens, you’ll already have a website with sample images, text, and sections. Before replacing that content, I recommend setting the overall style.
Pick a starting design
- Open the Theme tab on the right.
- Click Try a New Look.
- Browse the themes suggested for your website category.
- Preview the designs and check how their different pages look.
- Click Select on the theme you prefer.
I use the Highlight theme for Metics Apparel. Your choices may look different if you selected another website category.
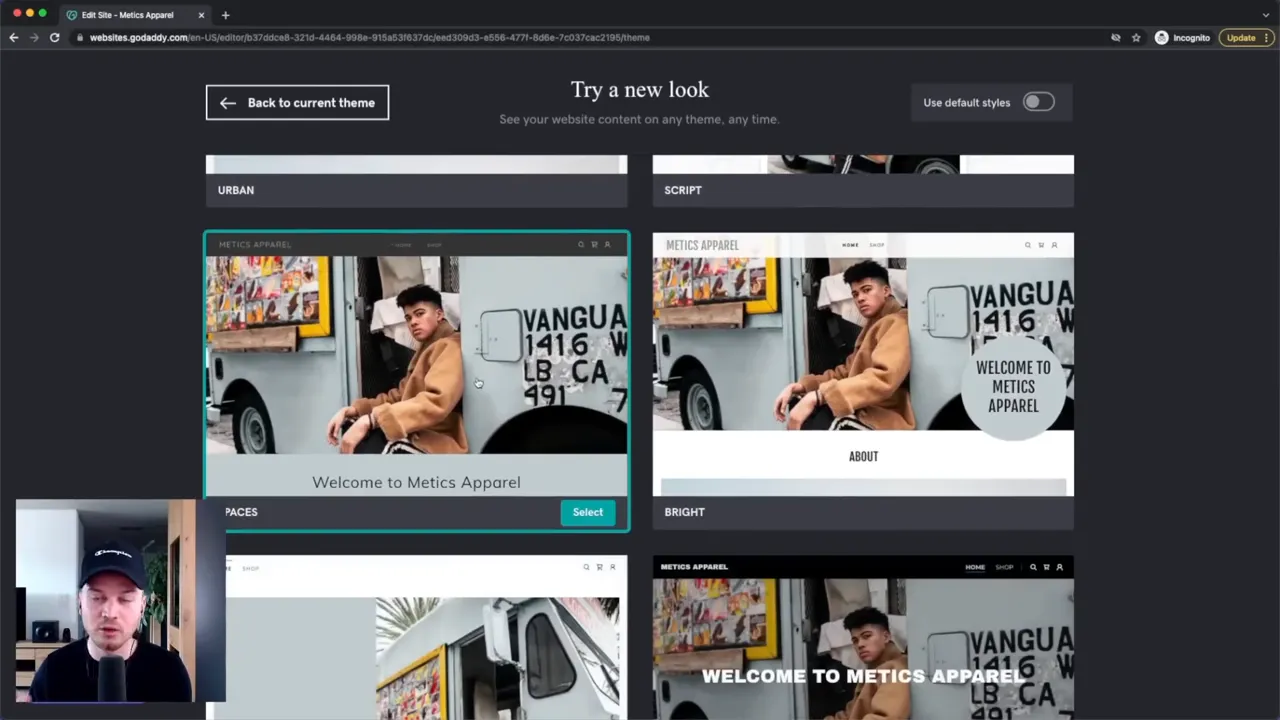
Don’t spend too long trying to make the perfect decision. You can switch themes later, and there are still plenty of settings you can adjust within the theme itself.
Set your colors
Under Theme > Color, choose the main color for your site. As you adjust it, you’ll see elements such as buttons and accents update in the preview.
You can also change the overall tone from a lighter appearance to a darker one. Try a few options and choose what works best for your brand. I keep the example store light and use a colorful accent to make important buttons stand out.
Choose your fonts
Open Fonts to choose your primary and secondary typefaces. You can select them individually or use one of GoDaddy’s suggested font pairings.
The suggested combinations are an easy option if you’re not sure which fonts work well together. Try a few and compare the headings and body text on your actual page.
Style your buttons
Under Buttons, you can customize primary and secondary button styles. Scroll to a section containing a button so you can see the effect of each change.
There are minimal styles as well as more prominent, filled options. I prefer making the main action buttons noticeable because they should be easy to find and click.
Set the global style first, then work on individual pages. That gives you a consistent foundation and saves you from repeatedly revisiting basic design decisions.
3. Add Pages and Organize Your Navigation
Open the Website tab to see your existing pages. The example clothing site starts with Home, Shop, Privacy Policy, and Terms and Conditions.
To add another page:
- Click the plus sign beside the page list.
- Select New Page.
- Choose a blank page or a prepared page template.
- Click Create Page.
GoDaddy includes templates for pages such as About, Contact, and Gallery. For example, choosing an About page gives you a ready-made layout that you can personalize rather than starting from an empty screen.
The new page can also appear in your navigation menu. Use the page-order control to move it up or down in the list and change its position in the menu.
Control where each page appears
Open the settings menu beside a page and select Page Settings. Here you can manage options such as:
- Show in Navigation: Include or remove the page from the main menu.
- Show in Footer: Make the page accessible through the footer.
- Private Page: Restrict access using the available private-page settings.
These options serve different purposes. Removing a page from navigation changes where its link appears; it does not make the page private. Use the privacy settings if access needs to be restricted.
4. Build Your Pages with Sections
Each page is made up of sections. The homepage might contain a large header, an online store section, a photo gallery, an email signup form, and a contact section.
Once you understand how sections work, building the rest of the site becomes much easier.
Add a section
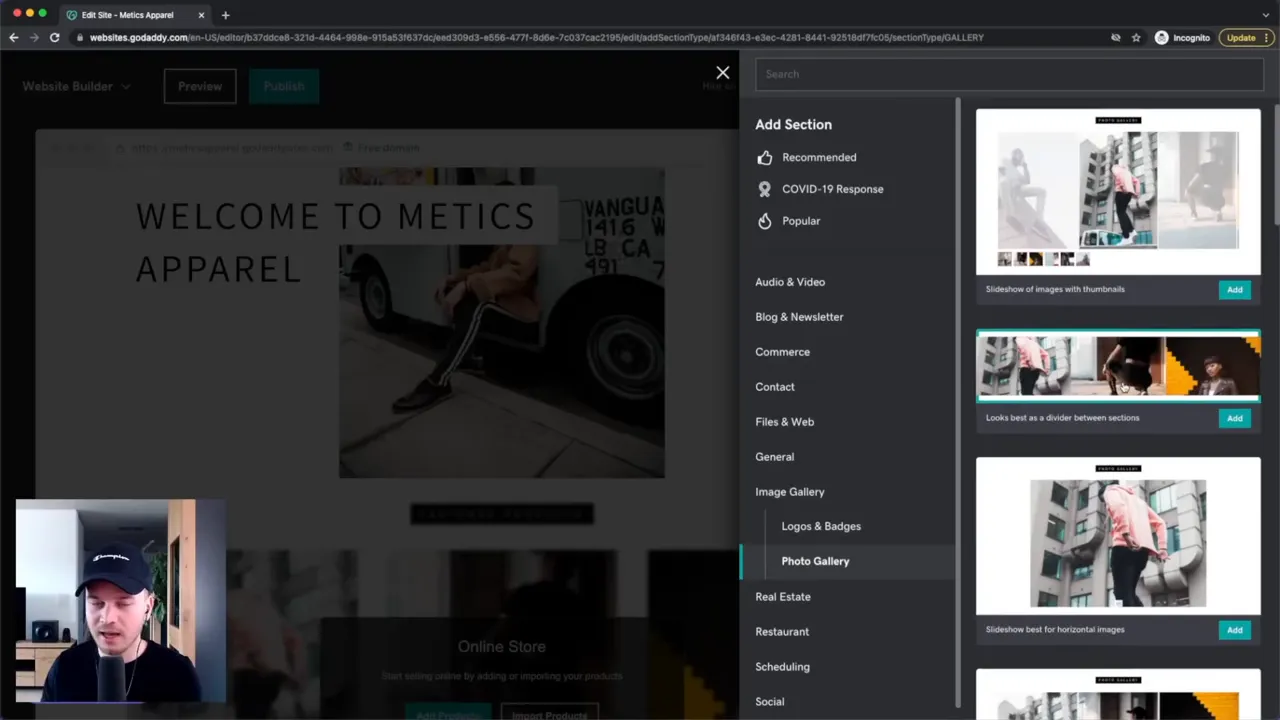
Move to the place where you want new content and click Add Section. Then choose the type of content you want, such as a photo gallery.
GoDaddy shows several layouts for that section type. Select one you like and click Add. The new section uses styling that fits your website’s existing theme.
Delete or rearrange sections
If you don’t need a section, open its three-dot menu, choose Delete Section, and confirm.
To change the order, hover over a section and use the up or down arrows. For example, you might move the email signup section below your gallery or bring your store section closer to the top.
Edit content directly or use the side panel
There are two main ways to change a section:
- Click an element on the page: Select text and replace it directly in the preview.
- Use the right-hand panel: Select the section to reveal its images, layout options, text fields, and other settings.
My approach is simple: select a section and work through its settings from top to bottom. Finish that section, then move to the next one. Repeat the same process on every page.
5. Customize Your Homepage Header
The header is usually the first major section people encounter. It’s where you can introduce your business, show a strong image, and provide a clear next step.
Replace the cover image
- Select the header.
- Open Cover Media.
- Click Change Image.
- Upload your own image or choose one from GoDaddy’s stock library.
- Select the image and click Insert.
For the example store, I search the stock library for fashion imagery. For your own website, you’ll probably want to upload content that represents your business or products.
Try the available display styles, such as Fill, Fit, Blur, or Inset. You can also experiment with a black-and-white treatment.
Add a useful image description where appropriate. Descriptive alternative text helps explain an image’s content. Google’s image SEO guidance provides additional context on writing image descriptions and making images understandable to search engines.
Adjust the headline, paragraph, and layout
Replace the sample headline with your own text. For Metics Apparel, I use the business name and add a short supporting line inviting people to explore the latest collections.
Then check the accent style and text alignment. You don’t have to redesign the whole header. The template handles much of the layout; your job is to add the right content and choose the options that look best.
Add your logo and promotional banner
The header settings let you upload a logo or use a text-based site name. You can also enable a promotional banner at the top of the page, which is useful for displaying a discount or a current offer.
Give the main button a clear destination
I recommend adding an action button near the top of your website so people can take the next step without scrolling.
For the clothing store:
- Open Action Button.
- Enable Show Action Button.
- Change the label to Shop Now.
- Choose a page link and select the Shop page.
- Click Done.
For a service business, the better destination might be an appointment-booking section. Choose the action that moves someone toward becoming a customer, rather than adding a button just for decoration.
Enable social buttons
Open Social Buttons, enable the feature, and enter the profiles you want to display. The corresponding icons can then appear in the header.
Once the header is finished, use the same top-to-bottom editing process for your gallery, contact section, and the remaining pages.
6. Check the Desktop and Mobile Preview
Click Preview at the top of the editor to see the desktop and mobile versions of your website.
GoDaddy’s templates are already designed to adapt to mobile screens, so you’re not building a separate mobile site. Still, check your content in both previews to make sure the images, headings, and buttons look right.
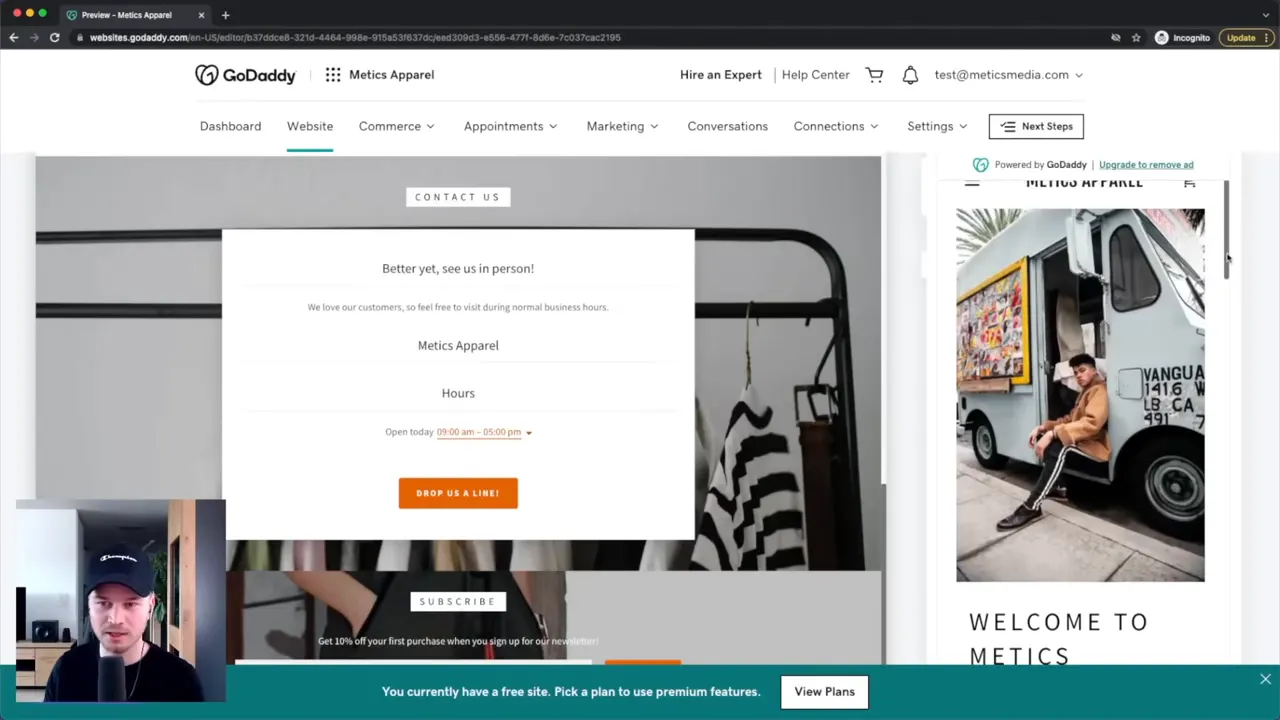
When you’re ready to continue making changes, click Edit Site to return to the editor.
7. Add Store, Chat, and Popup Features
At the bottom of the Website panel, you’ll find Website Add-Ons. These add functionality beyond the standard page sections.
- Store: Adds the tools needed to display products and build an online shop. The clothing-store example already includes it.
- Chat: Adds a chat icon so people can contact you or your team. Settings include greeting messages, confirmation messages, and available automated responses.
- Popup: Displays an announcement or offer, such as a discount code.
Customizing these features works much like editing a section. Select the add-on, enable it if needed, and work through the options in the right-hand panel.
8. Review Your Website Settings
Open Settings in the top-right corner. Again, I like to work through the options from top to bottom.
Basic information and social profiles
Under Basic Information, review your site name, business category, and email address.
The Social Media Links settings let you manage profile URLs centrally so they can update across the website.
Favicon
A favicon is the small icon displayed in a browser tab. Uploading your own replaces the default GoDaddy icon and makes the site feel more complete.
The setup shown uses a square image, with 180 by 180 pixels suggested as an example. Follow the upload guidance displayed in your account.
Search engine settings
Under Get Found on Google, review the available titles and descriptions for your website and pages. Use these fields to describe what each page is about clearly.
These settings help communicate your content, but they aren’t a guarantee of search rankings.
Site history
Site History lets you recover an earlier version of your website. It’s useful if you make changes and later decide you preferred the previous version.
Cookie notifications and tracking
The settings also include a cookie notification option. Review whether your website needs a notification or consent setup based on the tools you use and the rules that apply to your business.
There are also integrations for:
- Google Analytics: Collecting website usage data through the supported tracking setup.
- Facebook Pixel: Supporting advertising measurement and retargeting.
- Facebook and Pinterest meta tags: Adding platform-related tags through the available fields.
- Google AdSense: Configuring the supported integration for displaying ads on your site.
You don’t need to configure every integration to launch a basic website. Add the tools you actually intend to use, and review their privacy implications before enabling them.
9. Set Up Email Marketing
GoDaddy includes tools for collecting email subscribers and creating email campaigns. There are two parts to the setup: the signup section on your website and the email builder in your dashboard.
Add an email signup section
If your homepage doesn’t already have one, click Add Section and choose an email signup or email marketing section.
Customize its image, headline, accent, and supporting text. People can enter their email address through this form, and the address is added to the subscriber area in your dashboard.
For an online store, you can offer a discount as an incentive. In the example, I set up a 10% discount and customize the confirmation message to display a coupon code after signup.
You don’t have to offer a discount. You can simply invite people to receive business updates. An incentive gives them an additional reason to sign up, though, so it’s worth considering what makes sense for your business.
Create and send an email campaign
Click Create an Email from the section settings, or open Marketing > Email Marketing in your dashboard.
- Click Create New Email.
- Choose a template or build your own email.
- Click the content elements to replace the text and images.
- Adjust the background, text styling, and other design options.
- Add a subject line.
- Enter your business’s physical postal address.
- Check the destination of every button.
- Click Save and Continue.
- Select the recipients and continue to the sending options.
- Send immediately or schedule the campaign for later.
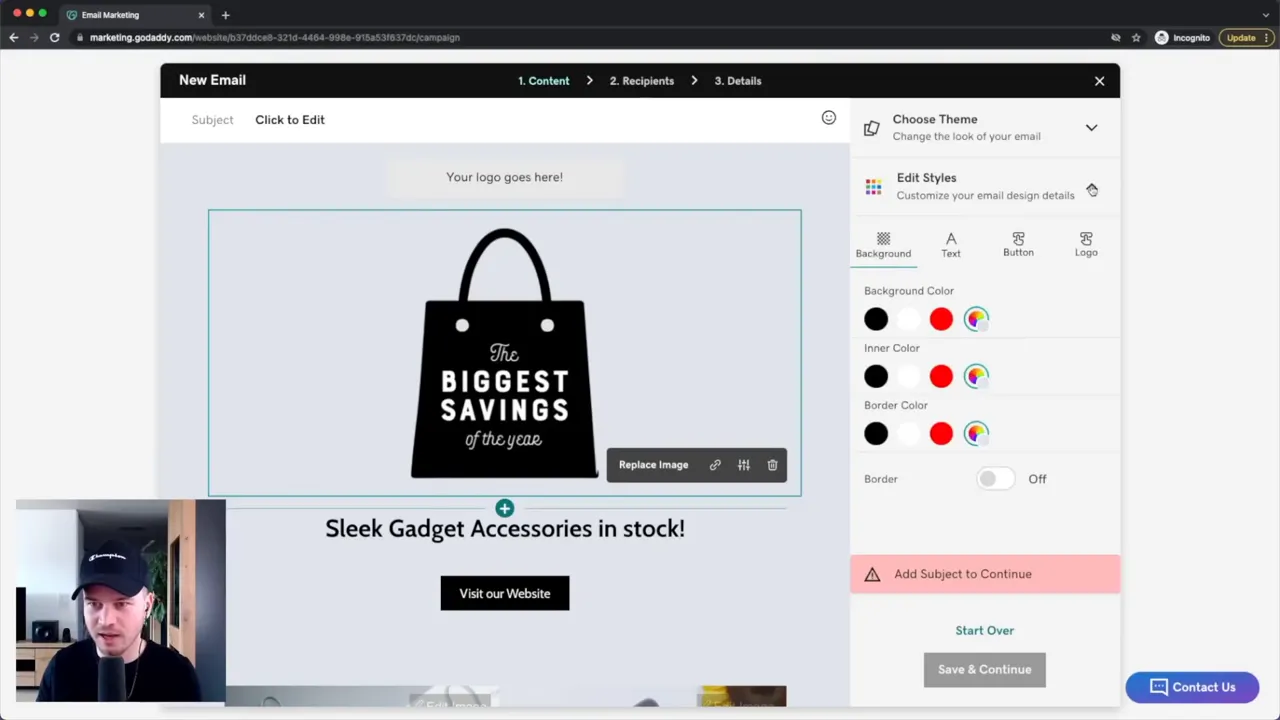
The editing process feels similar to building the website: click an element, change the content, and adjust its appearance.
The physical address is important for email marketing compliance. For additional guidance, the FTC’s CAN-SPAM compliance guide explains requirements for commercial email in the United States.
10. Create a Blog
You can add a blog to your existing website without starting a separate project.
- Open Website and click the plus sign to add a page.
- Select New Page and choose the blank template.
- Create the page and name it Blog.
- Click Add Section.
- Open Blog & Newsletter > Blog.
- Choose a blog layout and click Add.
The blog section will be empty until you create a post. Click Start Writing to open the blog area of your dashboard, then choose Create Post.
Enter a title, add an image, and write the article content. Once it’s ready, click Publish.
Return to the website editor and open the Blog page. Your published post should now appear in the blog section. You can then adjust that section’s styling just like the other content on your site.
11. Set Up Your Online Store
If you want to sell products, you’ll need the Store add-on. If your starting website doesn’t include it, open Website Add-Ons > Store and add it there.
The main setup involves three things: products, shipping, and payment methods.
Add your first product
Open the Shop page and click Add Products. This takes you to the product editor in your dashboard.
Choose whether the product is physical or digital, then complete the relevant details:
- Product images
- Product name
- Regular price
- Optional sale price
- Product category
- Stock keeping unit, or SKU
- Tax category
- Store visibility
- Product description
For the example, I add a T-shirt with a regular price of $30 and a sale price of $25. After saving, the product appears in the storefront with both prices shown.
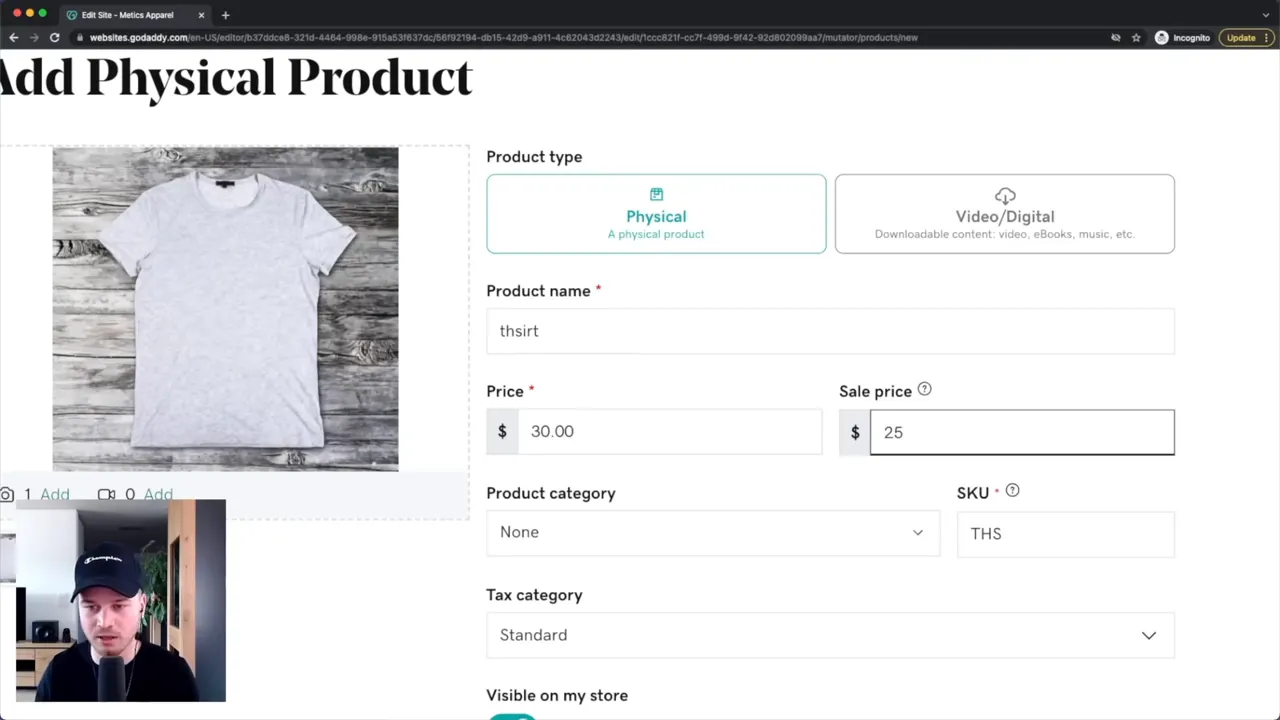
Make sure the product is set to visible if you want customers to find it in the store.
Configure shipping
Back in the editor, select the shop section and scroll down its settings to find the Shipping Settings shortcut. This opens the relevant dashboard page.
Review any default shipping method before leaving it active. You can delete it and add a method that matches your business.
The available examples include:
- A flat rate per order
- A rate based on weight
- Free shipping
For Metics Apparel, I configure free shipping for orders worth at least $50, with a $7 shipping charge for orders below that amount.
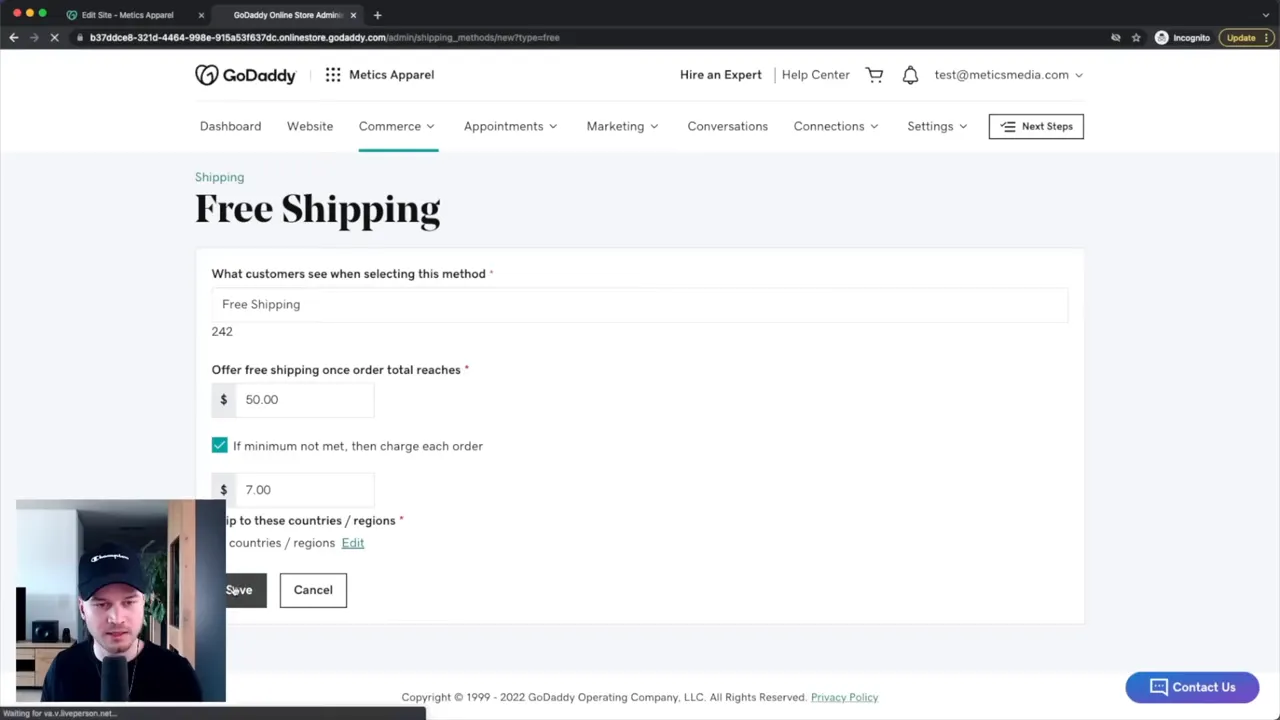
Save the method once the amounts are correct.
Connect payment methods
Use the Payment Settings shortcut in the shop section to open the payment dashboard.
The setup shown includes these options:
- GoDaddy Payments: Lets customers enter card details and have payments processed through GoDaddy.
- PayPal: Review the account connection and whether the method is active.
- Offline payments: Supports arrangements such as invoices or cash payments.
Complete the setup for the methods you want to accept and disable anything you don’t intend to offer. Available providers can depend on your account and location.
Adding products is not the same as having a store ready to take orders. You still need the appropriate plan, working payment settings, and suitable shipping rules.
12. Complete Your Legal Pages
Before publishing, review your legal pages. Depending on your website and business, these may include a privacy policy, terms and conditions, and a refund policy.
The example site already has Privacy Policy and Terms and Conditions links in the footer. Open each page from the Website panel and replace the placeholder content.
Your policies need to reflect how your business actually operates. A template can be a starting point, but simply changing another business’s name to your own does not establish that the policy is appropriate.
If you’re unsure what your website requires, research the rules that apply to your business or get qualified legal help. Don’t assume that having a page with the right title is enough.
13. Test and Publish Your Website
Once the pages are complete, click Preview and work through the site yourself before making it public.
Check the actual paths people will use:
- Open each page from the main navigation.
- Click the homepage action button and confirm its destination.
- Check social profile links.
- Review the contact and email signup sections.
- Open product pages and check the available cart and checkout steps.
- If you offer bookings, check the appointment flow.
- Review the footer and legal-page links.
- Check both desktop and mobile layouts.
After you’ve finished testing, click Publish. On the free setup shown, GoDaddy publishes the site to a GoDaddy Sites address.
Open the published link in a normal browser and review the live result as well. That lets you confirm how the website looks outside the editor.
14. Connect a Custom Domain and Choose a Plan
You can keep the free GoDaddy Sites address if it meets your needs. If you want a custom domain, you’ll need a paid website plan that supports connecting it.
Choose or connect your domain
Click Choose Domain to search for an available name or review the suggestions.
For an international business, I generally prefer a .com domain when a suitable one is available. If you focus on a particular country, a local extension such as .ca for Canada may make sense.
If you already own a domain, choose I Already Own a Domain and follow the connection instructions rather than purchasing another one.
Match the plan to your website’s needs
The plan selection shown includes Basic, Standard, Premium, and Commerce. Rather than picking the largest plan immediately, focus on the features you actually need:
- Free: A starting option if the GoDaddy Sites address and included features are enough.
- Basic: The suggested starting point for a simple website that does not sell products and needs a custom domain.
- Commerce: The plan used in this setup for selling products and accepting online store payments.
- Higher feature tiers: Worth comparing if you need additional capabilities or a larger monthly email marketing allowance.
Check the current feature list before subscribing, particularly for ecommerce, appointments, and email sending limits. You can upgrade later if your needs grow.
The easiest way to build with GoDaddy is to keep the process simple: choose a theme, set the global style, organize your pages, and edit one section at a time. Then add the features your business needs, test the important actions, and publish. You don’t need to have every future feature figured out before getting your first website online.
Made with VideoToBlog using GoDaddy Website Builder Tutorial (Step-by-Step)


