Setting up your first Google Ads campaign can feel intimidating. You are spending real money, and a few careless settings can send that money toward clicks that never become customers.
The goal is not simply to get your ad onto Google. It is to reach people searching for what you sell, send them to a relevant page, and acquire customers for less than those customers are worth to your business.
That comes down to a few connected skills: organizing your account, choosing the right keywords, writing relevant ads, tracking conversions, and using the results to improve your spending decisions.
A quick note on the setup: Google changes its interface and advertising features over time. Some older workflows use expanded text ads, modified broad match, and the term ad extensions. Where those appear below, I explain the underlying strategy and distinguish it from the current setup.
What You'll Learn
- Align keywords, ad copy, and landing pages around the same customer intent.
- Review networks, locations, and budget settings instead of accepting every default.
- Use negative keywords and search term reports to reduce irrelevant advertising spend.
- Track conversions and optimize for profitable customers rather than clicks alone.
Table of Contents
- How Google Search Ads Work
- 1. Create Your Account and Understand Its Structure
- 2. Set Up a Focused Search Campaign
- 3. Set Locations, Language, and Budget Carefully
- 4. Understand Bidding, Ad Rank, and Quality Score
- 5. Add Useful Ad Assets
- 6. Build Ad Groups Around Relevant Keywords
- 7. Write Ads That Match the Search and the Landing Page
- 8. Use Negative Keywords to Reduce Wasted Clicks
- 9. Find More Relevant Searches with Keyword Planner
- 10. Set Up Conversion Tracking Before Spending
- 11. Optimize with Data, Not Guesswork
- The Real Goal: More Profitable Customers
How Google Search Ads Work
Imagine you want to buy a wooden watch for a friend’s birthday. You go to Google and search for “wooden watch.” Google returns results related to that search, including paid advertisements and organic listings.
Advertisers can pay to have their offers appear for relevant searches. Organic listings, on the other hand, are not paid ad placements.
With a typical cost-per-click Search campaign, you pay when someone clicks your ad and visits your website. Your cost per click, or CPC, varies depending on the auction, your bidding settings, and the quality and relevance of your advertising.
The basic math behind a profitable campaign
Here is a simple example:
- You pay $1 per click.
- It takes 50 clicks to generate one sale.
- Those clicks cost $50.
- The sale produces $80 in profit before advertising costs.
- After paying for the advertising, you have $30 left.
That is the basic idea behind profitable paid advertising. The value you generate from customers must exceed what you spend to acquire them.
Notice that the $80 in this example is not revenue. It is the amount available after the product’s other costs, before deducting advertising. Confusing revenue with profit can make an unprofitable campaign look successful.
Why search intent matters
Search advertising is powerful because people tell you what they are looking for.
Someone scrolling through social media might be there to catch up with friends or consume content. An ad interrupts that activity. Someone searching for a specific product or a store selling that product is already expressing interest.
That does not mean every search leads to a purchase. It means you can put your offer in front of people whose searches are closely connected to your business. Your job is to identify which searches actually turn into customers.
1. Create Your Account and Understand Its Structure
Start by creating a Google Ads account using a Google account. For separate businesses or stores, I recommend keeping their advertising organized in separate Google Ads accounts rather than mixing unrelated businesses together.
You can also check whether Google offers a new-advertiser promotion in your country. Availability and eligibility vary, so read the offer terms rather than assuming a particular credit is available.
Before creating ads, understand the account hierarchy:
- Account: The top level containing your business’s advertising setup.
- Campaigns: The level where you organize major advertising initiatives and control settings such as budget, networks, and locations.
- Ad groups: Smaller groups inside a campaign that connect related keywords with relevant ads.
- Keywords and ads: Keywords help determine which searches can trigger your advertising, while ads contain the message people see.
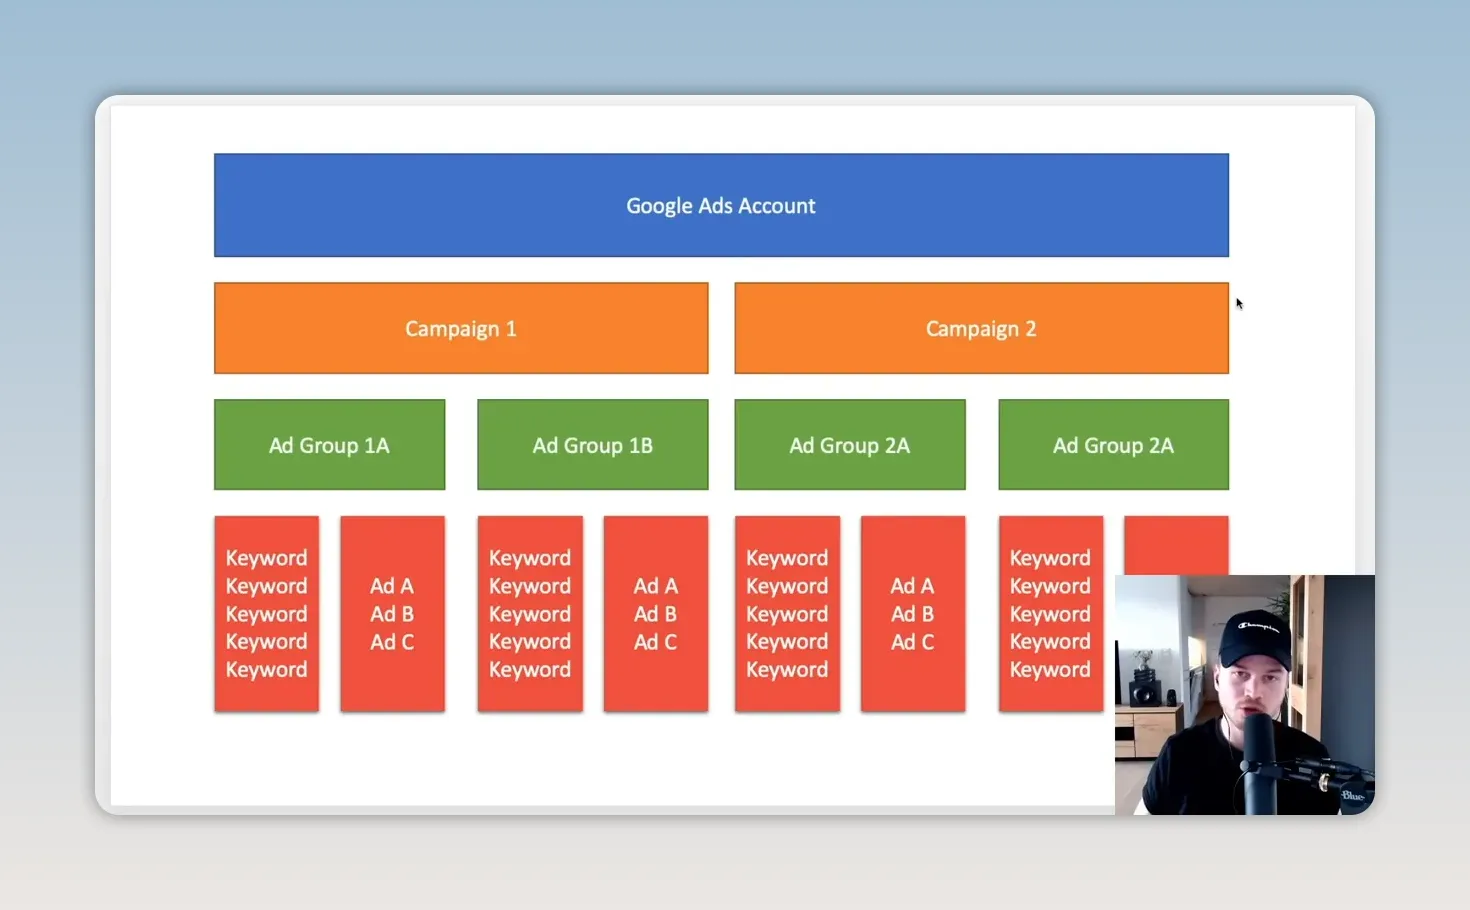
One account can contain multiple campaigns. You might separate different product categories or different advertising formats into different campaigns.
For the examples throughout this guide, I will use an online store selling fingertip pulse oximeters. These are devices that measure oxygen saturation and pulse. I previously advertised this type of product, but the store was not profitable and I closed it. Treat it as a practical setup example, not a promise of results.
2. Set Up a Focused Search Campaign
The campaign type we are focusing on is Search: text-based advertising associated with searches on Google.
Other formats serve different purposes. Shopping ads promote products and involve a Merchant Center setup. Display ads appear across content placements. Video campaigns advertise through video placements, while app campaigns promote apps.
For a beginner trying to connect a specific search with a specific offer, Search is a straightforward place to start.
Choose the full campaign setup
In the older account setup, I selected Switch to Expert Mode and then Create a campaign without a goal’s guidance. The purpose was to access the full settings instead of relying entirely on a simplified setup.
Your account may present a different sequence. The important point is to review the campaign’s settings yourself rather than accepting every recommendation automatically.
- Select a Search campaign.
- Choose the website destination appropriate to your business.
- Enter the landing page you want people to reach.
- Give the campaign a descriptive name.
For a specific product search, I would send people directly to the relevant product page rather than making them find the product again from the homepage. A service business might instead use a page explaining the service and providing a contact or consultation option.
A campaign name such as “Search | Oximeters | V1” is much easier to recognize later than a generic default name.
Keep networks focused at the beginning
For this starting approach, turn off the options to include Google search partners and the Display Network, where those options are available.
The idea is to begin with a focused source of search traffic. If you need more volume later, you can evaluate search partners separately. Display advertising is a different context and should not be mixed into this beginner Search test without a deliberate reason.
Review dates and scheduling
You can set a campaign start date and, if useful, an end date. My usual approach is to manage campaigns actively and pause them manually when necessary.
But that only works if you actually check the account. Do not leave paid advertising running for weeks without knowing whether it is producing sales or leads.
Ad scheduling lets you choose when ads are eligible to run. For the example online store, I left the schedule open because customers could purchase at any time. Choose a schedule that fits how your own business operates.
3. Set Locations, Language, and Budget Carefully
Target places you can actually serve
Your location settings should reflect your customers, not necessarily your own location.
I am based in Switzerland, but the example store sold to customers in the United States. That means the campaign needed to target the United States rather than accepting Switzerland as the default.
If you cannot ship to a country or serve customers there, do not intentionally pay to attract those customers.
Also open the location options. There is an important distinction between people who are in your selected locations and people who have shown interest in those locations.
For this store, I selected the presence-based option for people in or regularly in the targeted locations. That better matched the intention to reach customers in the country where I could ship.
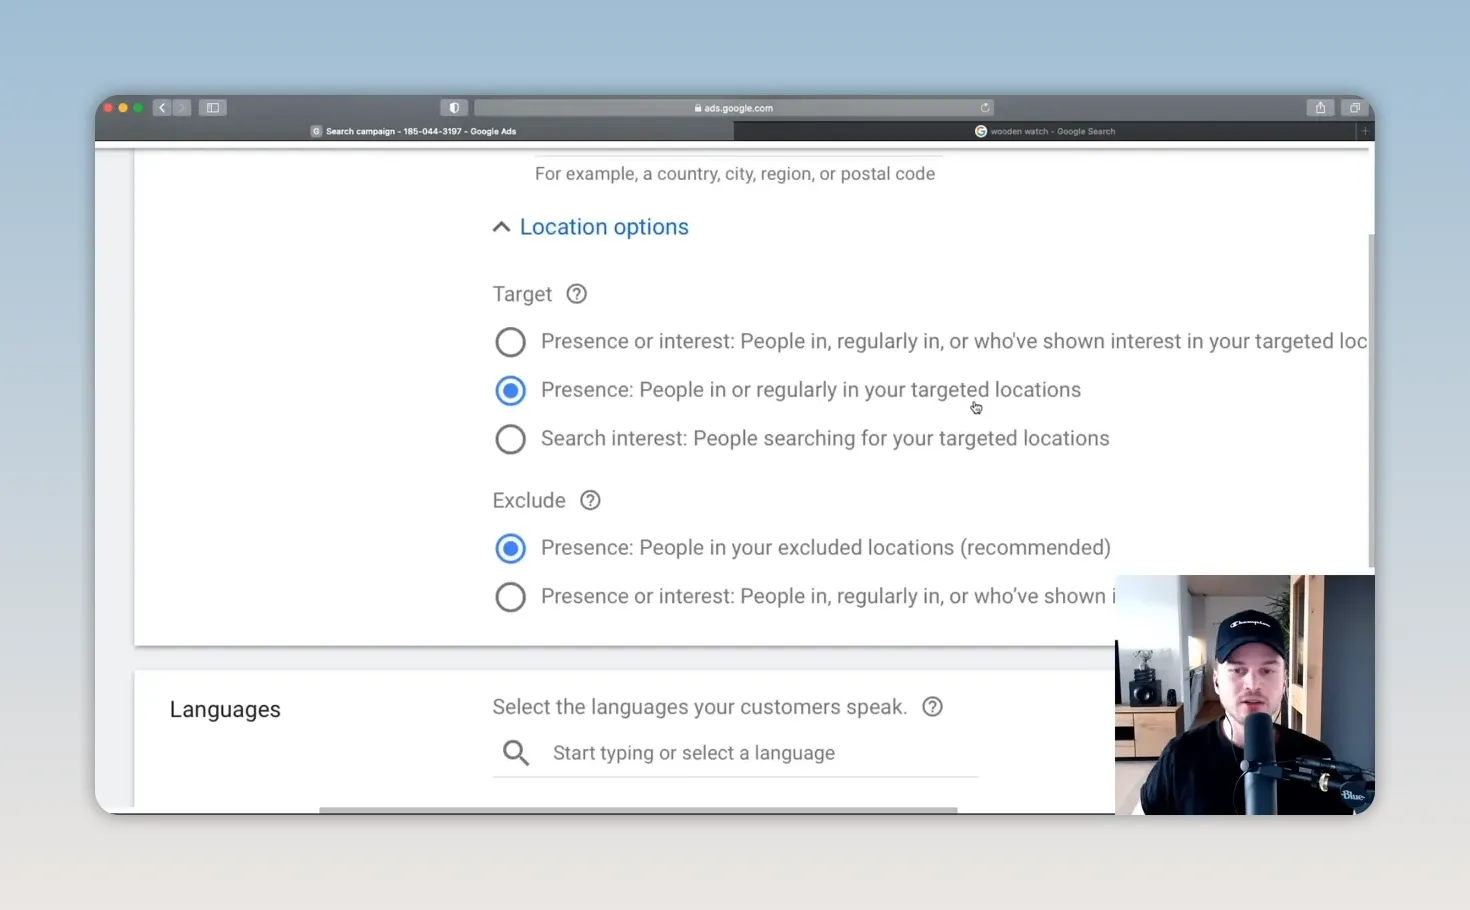
Set the campaign language to match your customers and advertising. For this example, that was English.
Choose the right billing currency
Pay attention to the account’s billing currency during setup. Choose the currency appropriate for how you intend to pay Google, rather than copying the currency used in someone else’s example.
Set a realistic testing budget
The budget is an average daily budget, not a promise that spending will be identical every day. Daily spending can fluctuate. Google explains the applicable limits in its average daily budget documentation.
For the example, I considered $10 per day and then used $20 per day to gather data more quickly. Those are example testing amounts, not universal recommendations.
The trade-off is simple: a very small budget can take a long time to produce enough clicks and conversions to evaluate the campaign. But spending more does not automatically make a campaign better.
Start with an amount you can afford to test. Expect to learn which keywords, ads, and customer segments work rather than assuming the first version will immediately be profitable.
4. Understand Bidding, Ad Rank, and Quality Score
Your daily budget controls overall spending. Your bidding strategy influences how Google competes for individual opportunities to show your ads.
In the example setup, I started with a clicks-focused bidding approach and a maximum CPC limit. The immediate objective was to gather traffic and learn which clicks became customers.
A $1 maximum CPC was the example starting point. It was not a claim that every business can buy useful traffic for $1, and it did not mean every click would necessarily cost that amount.
Once conversion tracking is working, conversion-focused bidding becomes an option. The important distinction is between optimizing for traffic and optimizing for the business actions that traffic produces.
Why the highest bid does not automatically win
It is tempting to think Google simply gives the best position to whoever offers the most money. Quality and relevance matter too.
A useful teaching model expresses Ad Rank as maximum bid multiplied by quality, and estimates CPC using the rank of the advertiser below you divided by your quality, plus one cent.
For example, in that simplified model:
- An advertiser bidding $2 with a quality value of 10 has a rank of 20.
- An advertiser bidding $4 with a quality value of 4 has a rank of 16.
- The first advertiser ranks above the second despite bidding less.
- Using the simplified CPC calculation, the first advertiser pays $1.61.
Use this to understand the principle, not to predict an actual auction. Google’s real Ad Rank calculation includes more factors, and the reported Quality Score is a diagnostic rather than a direct auction input. Google provides the fuller explanation in its Ad Rank guide.
The practical lesson remains valuable: improving relevance and the customer experience can help you compete more effectively without relying only on higher bids.
The three Quality Score components
Google reports Quality Score on a scale from 1 to 10. Its three components give you useful areas to investigate:
- Expected click-through rate: How likely the ad is to earn a click when shown.
- Ad relevance: How closely the ad matches the intent behind the search.
- Landing page experience: How relevant and useful the destination is to the person clicking.
If someone searches for a finger pulse oximeter, an ad clearly offering that product is more relevant than a vague ad for general products. Sending that person to a matching product page continues the same experience.
Click-through rate, or CTR, is clicks divided by impressions. If an ad appears 100 times and receives three clicks, its CTR is 3%.
Do not treat a higher CTR as the final goal, though. You want relevant clicks that become profitable customers, not just more clicks.
5. Add Useful Ad Assets
Ad assets, previously called ad extensions, add information and interaction options to your ads. They can make the ad more useful and give it more space in the search results.
This is a step I would not skip. You have already paid attention to the keyword and headline. Assets give you more ways to explain the offer and help someone choose the right next step.
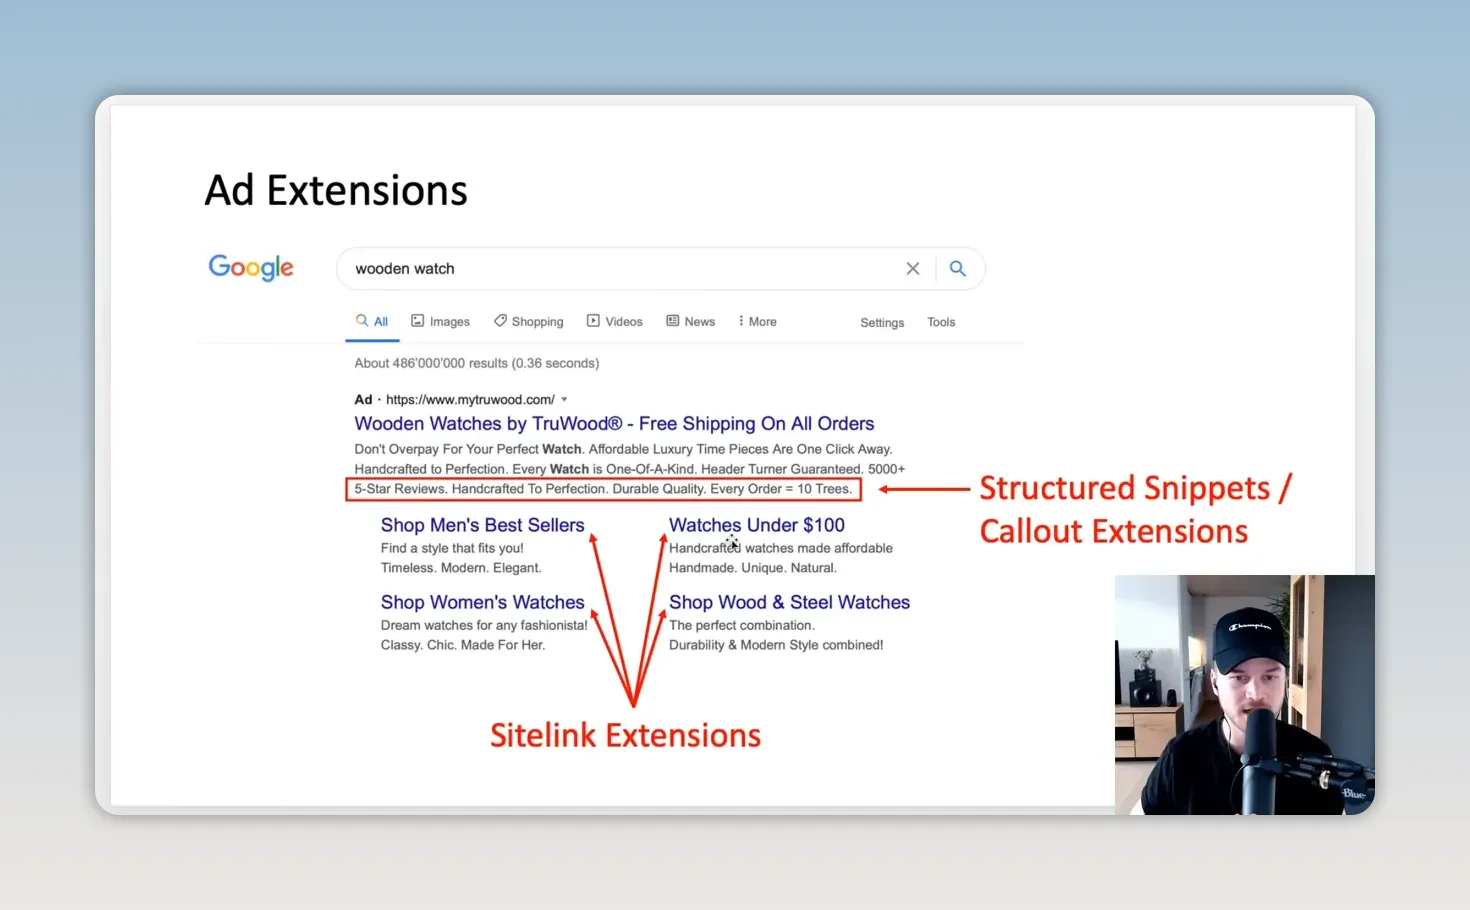
Sitelinks
Sitelinks direct people to additional relevant pages on your website. An online watch store might use links for men’s best sellers, women’s watches, or products under a particular price.
A service business might link to its services page or a consultation page.
Add clear link text, useful descriptions where available, and the correct destination. The destination should fulfill the expectation created by the sitelink. Do not try to bypass validation errors or create repetitive links just to make the ad larger.
Callouts
Callouts highlight short selling points, such as free shipping or a genuine promotional offer.
Specific numbers can help an offer stand out, but only use discounts and claims that are accurate. “50% off” is not a copywriting trick to apply to every business. It must reflect a real offer on the landing page.
Other relevant assets
- Call assets: Add a phone contact option when calls are valuable to your business.
- Structured snippets: Highlight relevant categories or aspects of your offering.
- Price assets: Provide pricing information when appropriate.
- App assets: Support an app-related destination when relevant.
My example approach was to prepare several sitelinks and a range of callouts rather than stopping after one. Google will not show every asset every time. The point is to supply useful options, not irrelevant filler.
6. Build Ad Groups Around Relevant Keywords
The organizing strategy in this example is a single keyword ad group, often shortened to SKAG.
Each ad group focuses on one keyword concept, with ads written specifically for that concept. Multiple match types of the keyword can sit inside the same group.
For example:
- Ad group: Finger pulse oximeter. Ads focus on finger pulse oximeters.
- Ad group: Oxygen monitor. Ads use messaging relevant to oxygen monitor searches.
- Ad group: SpO2 sensor. Ads address that search concept, provided the product genuinely matches it.
The reason for separating these is relevance. Someone searching “finger pulse oximeter” should see an ad that immediately makes it clear you offer what they need.
You do not need to treat the account structure as a magic formula. A separate ad group for every variation is not automatically better. The useful principle is to keep keyword intent and ad messaging closely aligned, rather than putting unrelated searches into one group with generic copy.
Understand keyword match types
Match types determine how broadly Google can connect your selected keywords with actual searches.
- Exact match: Written with brackets, such as [finger pulse oximeter]. It offers the tightest matching, but does not mean only identical wording can trigger the ad.
- Phrase match: Written with quotation marks, such as “finger pulse oximeter.” It provides broader coverage while retaining a connection to the keyword’s meaning.
- Broad match: Written without brackets or quotation marks. It can reach a wider range of related searches.
The older workflow also used modified broad match, with plus signs before words. Modified broad match is no longer a separate match type you can create. Do not copy the old plus-sign syntax into a new campaign expecting the previous behavior.
Exact and phrase matching have also evolved beyond simple word-for-word matching. Refer to Google’s keyword matching options when choosing your setup.
For a tightly controlled initial test, the principle is to avoid expanding reach faster than you can evaluate relevance. Broader reach can produce more traffic, but more traffic is not useful if it does not match your offer.
Also treat the click and cost forecasts shown during setup as estimates, not guarantees. Your actual results are what you will optimize.
7. Write Ads That Match the Search and the Landing Page
Now you are creating the message someone will actually see in the search results.
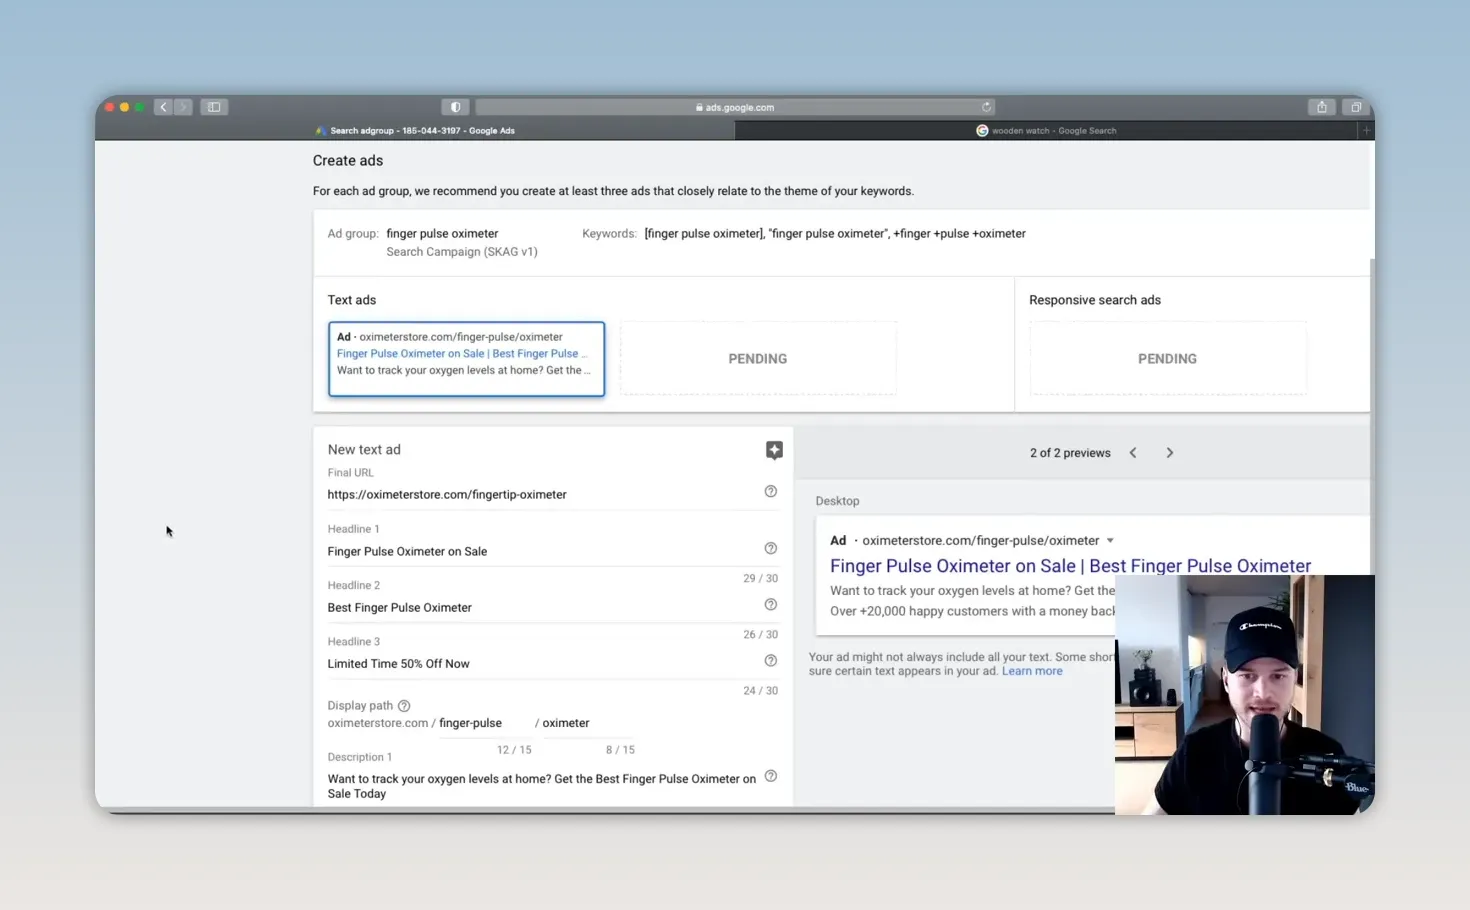
For the finger pulse oximeter ad group, the core product phrase belongs naturally in the copy. The example campaign used headline ideas built around the product, a sale, and a limited-time discount.
The underlying structure is useful:
- Identify the product or service. Make the connection to the search obvious.
- Give a reason to choose your offer. Highlight a relevant benefit or genuine differentiator.
- Explain the next step or promotion. Use accurate details rather than unsupported urgency or superiority claims.
If you use words such as “best” or “number one,” make sure you can support the claim. Repeating the keyword is not a substitute for giving someone a credible reason to click.
Use the display path and descriptions
The display path is the readable path shown with your ad. It does not have to be identical to the page’s actual URL path, but it should accurately describe the destination.
For this example, words related to “finger” and “pulse oximeter” reinforce the relevance of the ad.
Descriptions give you more room to explain the offer. Use the available space to communicate useful details, such as a genuine discount or free shipping when applicable. Do not fill characters simply for the sake of filling them.
Test different messages
The older expanded text ad workflow used three headline fields, and I recommended creating three ad variations per ad group. The purpose was to compare different messages rather than assuming the first version was best.
New Search campaigns use responsive search ads rather than newly created expanded text ads. Carry the testing principle forward by supplying distinct, relevant headlines and descriptions and evaluating the results. Google explains the format in its responsive search ads guide.
Use the desktop and mobile previews to check readability. Then repeat the process for the other ad groups, keeping each group’s copy relevant to its keyword intent.
Complete billing and check approval
Before ads can run, you need to complete the account’s payment setup. Google also reviews ads for policy compliance, so publishing a campaign does not necessarily mean it starts serving immediately.
If an ad remains stuck in review or something appears wrong, check its status and contact Google Ads support when needed. I found support helpful when an early campaign did not progress, but that is not a guarantee of approval or performance.
8. Use Negative Keywords to Reduce Wasted Clicks
Choosing what you want to target is only half the job. You also need to identify searches you do not want to pay for.
Negative keywords help prevent your ads from appearing for unwanted searches.
For example, someone searching “oximeter Amazon” may specifically want to purchase from Amazon. Someone searching for a competing model, a feature your product lacks, or an informational reading chart may have a different intention from buying your product.
Those are searches to investigate, not automatic proof that every such click is worthless.
Create general and product-specific lists
I used two kinds of negative keyword lists:
- A general list: Terms that did not fit the store’s overall offer or customer intent.
- A product-specific list: Irrelevant brands, model numbers, features, and search patterns discovered while advertising oximeters.
Some terms I excluded included retailer names and words related to offers or features I did not want to target. Do not copy those exclusions blindly. A word such as “discount” could be relevant to your store, while “contact” could be very valuable to a service business.
- Find the negative keyword lists area in Google Ads.
- Create a clearly named list.
- Add exclusions appropriate to your business.
- Apply the list to the intended campaigns.
- Confirm the association is active.
Creating a list without applying it to the campaign will not protect that campaign.
Negative keywords have their own matching rules. Do not add plus signs as if you were creating the old modified broad match keywords. Google’s negative keyword guide explains how the exclusions work.
Keep reviewing the search terms report
A keyword is what you choose to target. A search term is what someone actually typed.
Open the search terms report to see the queries associated with your advertising. In the example account, this surfaced competing brands, model names, and searches such as “oximeter reading chart.”
When a query clearly does not match your offer, add an appropriate negative keyword. Keep doing this as new data comes in, especially early in the campaign.
This is one of the most practical ways to reduce wasted spending. You are using actual search behavior instead of trying to predict every irrelevant query before launch.
9. Find More Relevant Searches with Keyword Planner
Google’s Keyword Planner helps you discover related search ideas from terms you already know.
- Open Keyword Planner.
- Select Discover new keywords.
- Enter a few seed terms, such as “pulse oximeter,” “oximeter,” and “oxygen monitor.”
- Request results.
- Check the location, language, search network, and date range.
Those settings matter. Researching Switzerland while planning to advertise in the United States can give you the wrong context for your decisions.
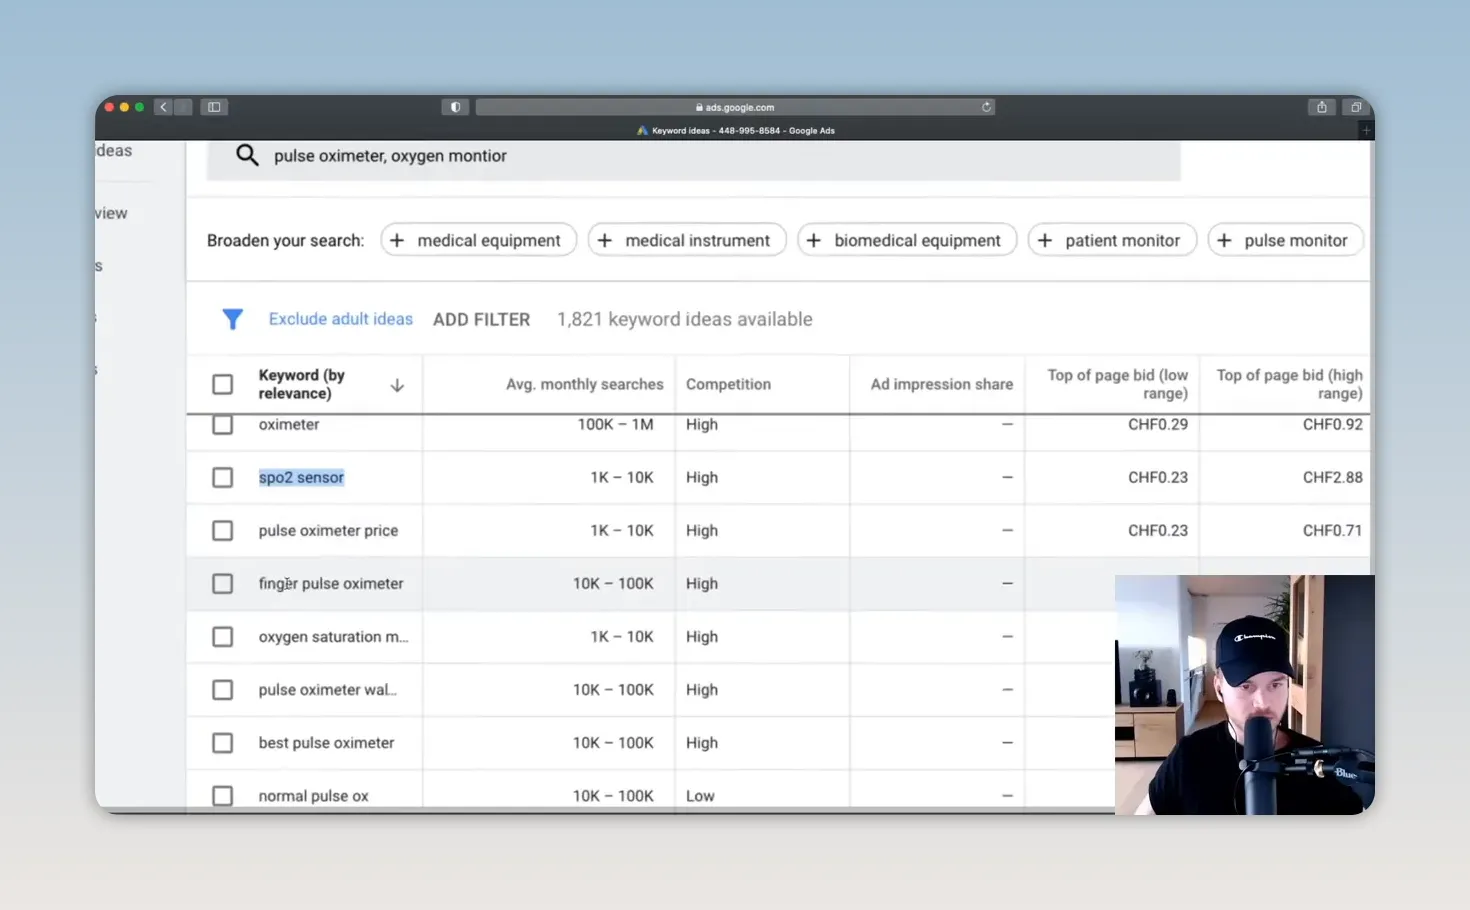
Related ideas might include SpO2 terminology, product-price searches, or more specific product phrases.
Evaluate each idea against what you actually sell. A related term is not necessarily a relevant buying term, and a promising estimate is not proof of profitability.
If an idea deserves a test, add it to an appropriately focused ad group and write matching ads. Then let conversion data show whether it belongs in the campaign.
10. Set Up Conversion Tracking Before Spending
Without conversion tracking, you cannot properly judge whether your advertising is working.
You might know how many clicks you bought, but not which keywords produced sales, leads, or phone calls.
Depending on your business, useful actions to measure include:
- Completed purchases.
- Add-to-cart actions.
- Submitted contact or lead forms.
- Relevant phone calls.
These actions do not all have the same business value. A completed purchase tells you something different from an item added to a cart.
The example workflow uses Google Analytics alongside Google Ads to connect advertising traffic with customer actions. Set up the appropriate conversion measurement before launch and confirm that it records the actions you need. The separate conversion tracking tutorial covers that setup in more detail, though the interface may differ from your account.
Only once you can connect spending with outcomes do bid changes and budget decisions become meaningful.
11. Optimize with Data, Not Guesswork
Your first campaign is a starting point. Optimization is the process of buying traffic, measuring what happened, and using that information to improve the next round.
Depending on your budget, an initial test might involve $50, $100, or $200 of spending. Those are examples, not thresholds that guarantee enough data.
In the example account, one keyword match type had generated a single conversion. That was not enough to confidently declare it a winner. You need enough evidence to distinguish a repeatable result from an isolated event.
Build a useful reporting view
Customize your columns so you can compare the metrics that matter:
- Clicks and impressions.
- Average CPC and total cost.
- Conversions and conversion rate.
- Cost per conversion.
- Search impression share.
- Search lost impression share due to rank, where available.
A conversion is only useful in context. A cost per conversion of 48 Swiss francs was not profitable for the example product. If that cost had been $5 and the economics supported it, the decision could have been very different.
Increase exposure for profitable keywords
If a keyword consistently generates profitable customers, investigate whether you can gain more relevant traffic.
Search impression share compares the impressions you received with the impressions you were eligible to receive. Lost impression share due to rank helps identify missed opportunities related to Ad Rank.
In a manual bidding setup, one possible test is to increase a profitable keyword’s maximum CPC by roughly 20% to 30%, then allow time to evaluate the result. Improving ad and landing page relevance is another part of the same picture.
Do not assume a higher bid automatically improves profit. You are testing whether the additional exposure is worth the additional cost.
Reduce bids or pause poor performers
If a keyword brings sales but costs too much, a lower bid may improve the economics. The example approach was to test a reduction of around 20%, or move closer to the observed average CPC.
If a term repeatedly spends money without producing useful results, pausing it may be the better decision.
These keyword-level bid examples apply when your bidding setup supports that control. Automated bidding strategies work differently, so do not assume every manual adjustment is available or used in the same way.
Review demographics and devices
You can also investigate performance by customer segment and device.
For example, if an age group consistently converts profitably, that may justify more exposure where supported and appropriate. If another segment produces substantial spending without useful outcomes, investigate before continuing unchanged.
The same applies to mobile phones, computers, and tablets. If tablet traffic performs poorly, consider whether the issue is the traffic, the landing page experience, or the economics before changing targeting or bids.
A bid reduction is not the same as an exclusion. Reducing a device bid by 70% does not guarantee that ads will stop appearing on that device.
Give changes time to produce evidence
Check new campaigns actively, particularly for obvious mistakes and irrelevant search terms. But do not completely rebuild the campaign every day because of a few clicks.
My usual rhythm is to make a considered change, allow roughly a week for more data, and then review again. The amount of traffic and conversion activity determines whether that interval is enough.
The cycle is straightforward:
- Check that tracking works.
- Review actual search terms.
- Remove clearly irrelevant traffic.
- Compare costs with business outcomes.
- Test more exposure for profitable areas.
- Reduce or stop spending where the evidence does not support it.
The Real Goal: More Profitable Customers
A well-organized Google Ads account makes it easier to see what is happening. Relevant keywords, ads, and landing pages help connect the right search with the right offer. Negative keywords reduce wasted clicks, and conversion tracking tells you whether the remaining clicks are valuable.
But no account structure or headline guarantees success. The example store itself was not profitable. That is why the measurement and optimization process matters so much.
Start focused, measure the outcomes, and let the data guide where your next advertising dollar goes. The goal is not the most clicks or the highest position. It is acquiring customers at a cost that makes sense for your business.


