Your first Google Ads campaign does not need to be complicated. Start with a Search campaign, choose the locations and keywords that matter to your business, and write ads that closely match what your potential customers are searching for.
We’ll use an online store selling standing desks as our example. The goal is simple: bring relevant visitors to the store while keeping control over targeting and spending.
A quick note about the interface: Google Ads changes over time. Some screenshots show an older setup flow, including text ad formats and keyword options that have since changed. The steps below explain the same campaign structure while pointing out the differences that matter.
What You'll Learn
- Keep your first Search campaign focused with deliberate network, location, language, and scheduling settings.
- Use an average daily budget and bidding controls to manage your initial advertising spend.
- Group closely related keywords so each ad can match a clear search intent.
- Combine relevant ad copy, useful assets, and conversion tracking to build a measurable campaign.
Table of Contents
- 1. Create a Google Search Campaign
- 2. Set Your Campaign Name, Networks, and Schedule
- 3. Choose Your Locations and Languages
- 4. Set Your Budget and Bidding Strategy
- 5. Add Sitelinks and Callouts
- 6. Organize Your Keywords Into Focused Ad Groups
- 7. Write Ads That Match Each Keyword Theme
- 8. Review and Submit Your Campaign
1. Create a Google Search Campaign
If your account opens in a simplified setup flow and offers Switch to Expert Mode, select it to access more campaign settings.
When Google asks you to choose a campaign goal, select Create a campaign without a goal’s guidance if that option is available. For this setup, we want to choose the settings ourselves rather than follow a goal-based recommendation.
Next, select Search as the campaign type. Search campaigns let you place ads in Google’s search results when someone searches for terms related to your business. We’ll define those keywords later.
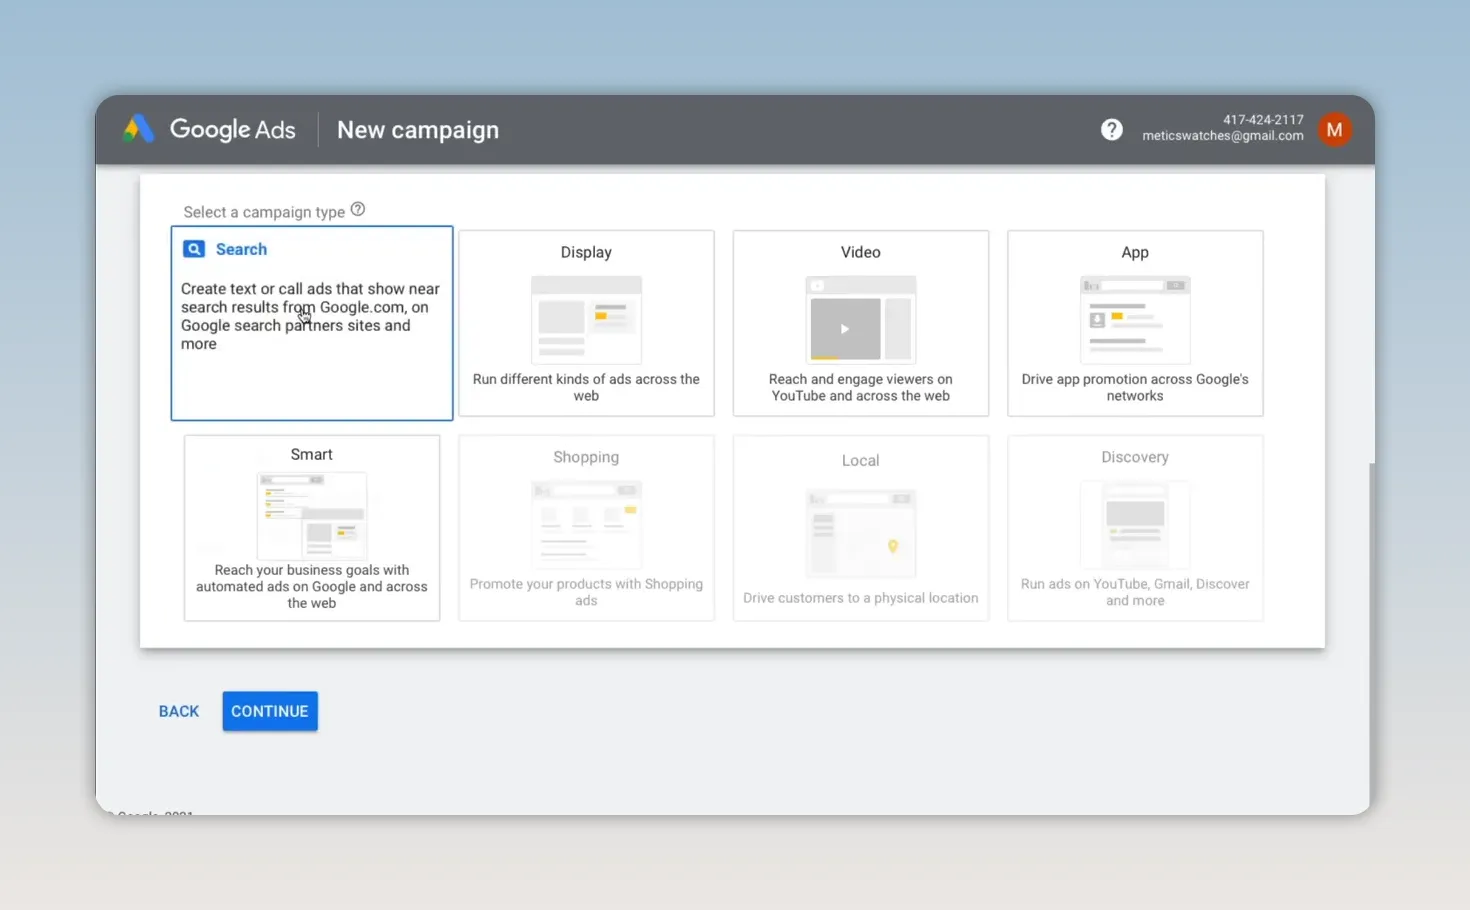
For the standing desk store, choose Website visits, enter the store’s URL, and continue.
It helps to understand the three levels we’ll be working through:
- Campaign: Controls settings such as budget, locations, languages, and networks.
- Ad group: Organizes closely related keywords and their ads.
- Ad: Contains the message people can see in the search results.
2. Set Your Campaign Name, Networks, and Schedule
Choose a descriptive campaign name
Give the campaign a name that makes it clear what you are advertising. In this example, we’ll use Search Campaign Standing Desk.
A descriptive name makes it easier to find the right campaign when you return to adjust settings or add more campaigns.
Keep the initial campaign focused on Google Search
In the network settings, deselect Display Network. For this first campaign, we want to focus on search traffic rather than expand into display placements.
You may also see an option to include Google search partners. I prefer to turn that off at the beginning so the initial campaign stays focused on Google Search itself. You can revisit that decision later.
This is about keeping the first test controlled. Different networks are not automatically bad, but adding more placements makes it harder to isolate what is working.
Review the start date, end date, and ad schedule
Open Show more settings, or the equivalent campaign settings section, to review your dates.
If you do not plan to check the account regularly, set an end date. That gives the campaign a stopping point instead of allowing it to continue spending because you forgot to pause it.
You can also define an ad schedule if you only want the ads to run at specific times of day.
3. Choose Your Locations and Languages
Your ads should reach people you can actually serve. For our standing desk store, we’ll assume that shipping is available only within the United States.
- Open the location targeting section.
- Use Advanced search to find the location you want.
- Select United States and save.
- Open Location options and review how Google interprets that targeting.
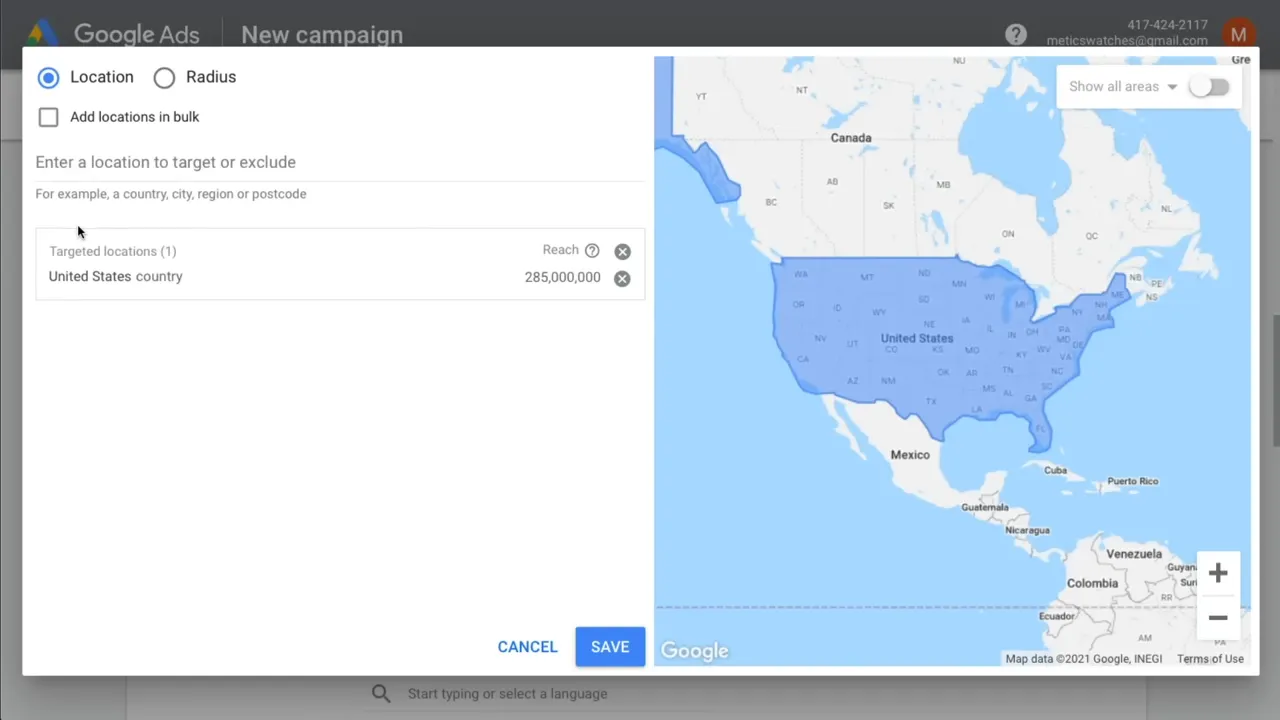
The location options are important. A setting based on presence or interest can reach people outside your selected area who have shown interest in it.
For this example, choose the Presence option, which focuses on people in or regularly in your targeted location. That better matches a store that only ships to that area. Location targeting uses signals rather than a perfect physical-location guarantee, so review Google’s location targeting guidance if your geographic restrictions are especially important.
For languages, select the language your customers use. We’ll choose English.
We’ll leave audience segments unset for this initial campaign. We do not yet have a remarketing audience to use, and the keywords will provide the main targeting structure for this setup.
4. Set Your Budget and Bidding Strategy
Choose an average daily budget
Confirm the currency you will use to pay for advertising, then enter your average daily budget. For our example, we’ll start with $10 per day.
The word average matters. Google may spend more than $10 on some days and less on others as it looks for opportunities to show your ads.
Do not treat $10 per day as a strict $300 monthly cap. For most campaigns, Google calculates the monthly spending limit using 30.4 times the average daily budget. At an unchanged $10 daily budget, that generally means a $304 monthly spending limit. Google explains the details in its budget and spending limit documentation.
You can return to the campaign later and adjust the budget. The important thing at the beginning is to choose an amount you are comfortable spending while you test.
Start with a focus on clicks
For this example, choose a clicks-focused bidding strategy and, where available, set a maximum cost-per-click bid limit of $1.
These settings serve different purposes:
- Average daily budget: Controls the campaign’s overall spending level.
- Maximum CPC bid limit: Limits the amount the strategy can bid for a click.
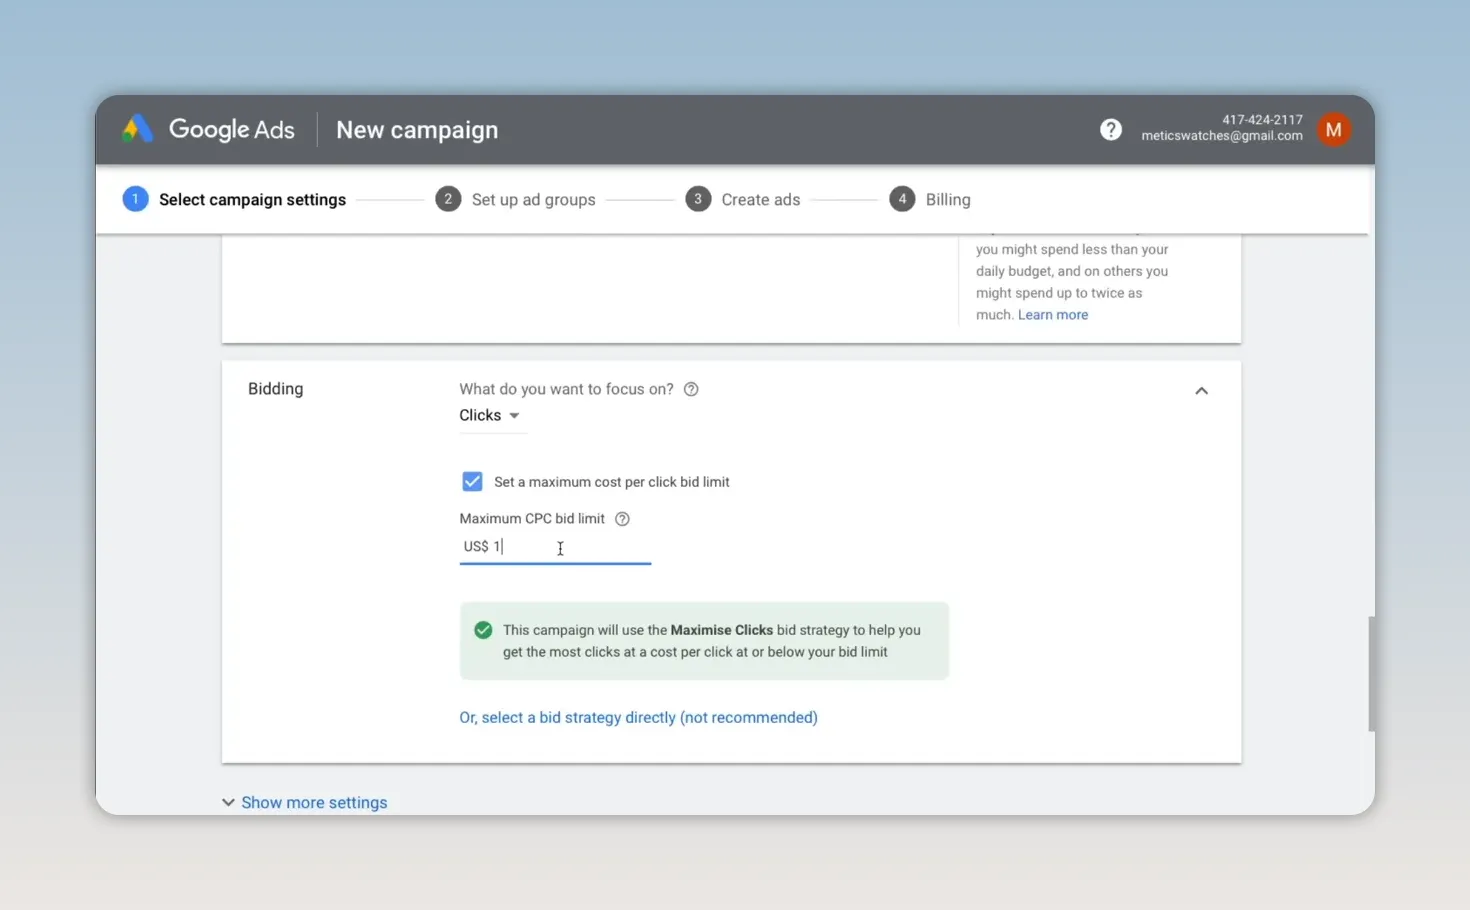
The $1 limit is an example, not a universal recommendation for every product or market.
Set up conversion tracking
I also recommend setting up conversion tracking using Google Analytics. Clicks show that people are reaching the site, but conversion tracking helps you measure the actions you actually want them to take.
That gives you a foundation for evaluating results and later considering a conversion-focused bidding strategy, such as Maximize conversions.
For the setup process, use the Google Analytics conversion tracking tutorial.
5. Add Sitelinks and Callouts
Ad extensions, now generally called assets, let you add useful information beyond the main ad copy. They can make your ad more prominent and give potential customers more reasons to click.
For this campaign, we’ll add:
- Four sitelinks: Additional links leading to different relevant pages on the store.
- Callouts: Short pieces of text highlighting genuine product or store benefits.
Each sitelink needs to lead somewhere useful. Rather than sending every link to the same page, use the opportunity to help customers reach the part of the store that interests them.
Google will not show every asset every time. Still, adding relevant assets gives it more useful information to display when appropriate.
The aim is not simply to make the ad larger. It is to make the extra space helpful. Relevant assets can support a stronger click-through rate, but adding them does not guarantee a particular Quality Score or lower click costs.
6. Organize Your Keywords Into Focused Ad Groups
At the ad group level, you choose the keywords that can make your ads eligible to appear.
I recommend one closely related keyword theme per ad group. This makes it easier to write ads that match the searcher’s intent instead of using one generic message for everything you sell.
For our standing desk store, we’ll create two ad groups:
- Standing Desk: Focused on the keyword theme standing desk.
- Height Adjustable Desk: Focused on the keyword theme height adjustable desk.
These themes describe related products, but separating them lets us reflect each phrase naturally in the corresponding ad copy.
Understand keyword match types
Match types influence how closely a search must relate to your keyword before your ad can appear.
- Exact match: Enter the keyword in brackets, such as
[standing desk]. Exact match can include searches with the same meaning or intent, not only identical wording. - Phrase match: Enter the keyword in quotation marks, such as
"standing desk". This can reach searches that include the meaning of your keyword, with more flexibility than exact match. - Broad match: Enter the keyword without brackets or quotation marks. This gives Google broader scope to match related searches.
Older setup screens may show modified broad match, using plus signs such as +standing +desk. That option is no longer available for new keywords. Do not copy that older syntax into a new campaign. Google’s keyword matching documentation explains the available match types.
For the second ad group, apply the same structure to [height adjustable desk] and "height adjustable desk".
Continue creating focused ad groups for the main keyword themes you want to target. You do not need to include every possible keyword before launching. More ad groups and keywords can be added later.
Keeping keywords and ads closely aligned supports relevance. That is the goal, rather than expecting a particular account structure to guarantee the highest Quality Score or the lowest CPC.
7. Write Ads That Match Each Keyword Theme
Now create the message that people can see when they search for your targeted terms.
Start with the Standing Desk ad group and keep that theme consistent across the ad.
Use the keyword naturally in your headlines
Include standing desk in relevant headlines so the connection between the search and the ad is immediately clear.
The older text ad form shown here uses three headline fields. Current Search campaign creation generally uses responsive search ads, where you provide multiple headlines and descriptions for Google to combine. The same principle applies: write relevant, distinct options rather than repeating the same message.
Understand the final URL and display path
The final URL determines where someone goes after clicking your ad.
The display path is the descriptive text shown as part of the ad’s visible URL. It does not determine the destination page.
For this ad, a display path such as standing-desk reinforces the keyword theme. Make sure the actual destination also matches what the ad promises.
Write useful descriptions
Use the keyword naturally in your descriptions and make good use of the available character space. Explain the product and relevant reasons to choose your store.
The goal is to give customers useful information, not fill every character with repeated keywords.
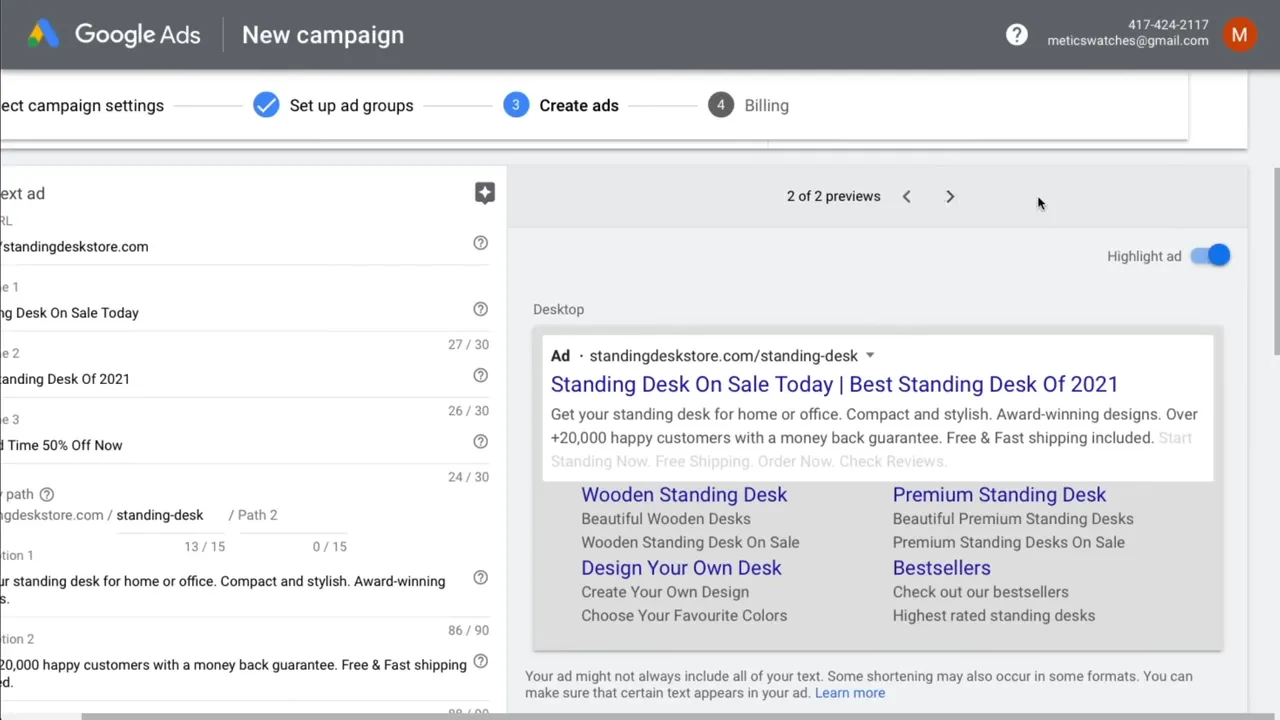
Check both the mobile and desktop previews. This helps you see how the message reads in different layouts, although the exact combination shown in a preview is not guaranteed to appear every time.
Test different messages
For the older text ad format, my approach was to create three different ads per ad group to find the strongest message.
With responsive search ads, carry that testing mindset into the headline and description options you provide rather than treating the old three-ad workflow as a requirement.
Then repeat the process for Height Adjustable Desk. Adapt the wording to that theme instead of simply reusing generic standing desk copy.
8. Review and Submit Your Campaign
Before saving and continuing, check the settings that have the biggest effect on relevance and spending:
- The campaign uses Search with your intended network options.
- The locations, location options, and languages match your customers.
- The budget and bidding settings reflect what you are comfortable spending.
- An end date or ad schedule is set if you need one.
- Each ad group has a clear keyword theme.
- The ads, display paths, and destination pages match that theme.
- Sitelinks and callouts contain accurate, relevant information.
- Conversion tracking is part of your measurement setup.
Complete the remaining account setup requirements and submit the campaign. Google will review the ads before they can run.
The foundation is straightforward: control where you advertise, group related keywords together, and write a relevant message for each group. Once the campaign begins collecting results, you can return to adjust the budget, expand your keywords, and improve the ads.
For a deeper explanation of bidding, keyword match types, and campaign setup, continue with the complete Google Ads tutorial.
Made with VideoToBlog using How To Use Google Ads | Google Ads Tutorial [FOR BEGINNERS]


