A useful AI agent should do more than answer when you open a chat window. It should remember how you like things done, handle repeatable work, and get your attention when it finds something worth knowing.
That is what we are building with Hermes Agent: an assistant running around the clock on a small cloud server, reachable through Telegram and the desktop app, with persistent memory, reusable skills, and scheduled jobs.
The way I like to think about it is that you are hiring your first AI employee. We will give it a place to work, a brain, a way to contact you, some training, and a schedule. The basic setup takes about 30 minutes and does not require coding experience.
AI software changes quickly, so a few buttons or labels may move over time. Follow the overall flow rather than expecting every screen to stay identical.
What You'll Learn
- Run Hermes on a cloud server so scheduled tasks continue when your computer is asleep.
- Connect Telegram and the desktop app to the same agent through its server gateway.
- Save preferences and reusable skills, then schedule checks that send useful updates automatically.
- Control model spending with API-key limits and troubleshoot problems through server logs and restart controls.
Table of Contents
- What Is Hermes Agent?
- 1. Choose Where Your Hermes Agent Lives
- 2. Deploy Hermes on a Hostinger VPS
- 3. Open the Hermes Web Dashboard
- 4. Connect OpenRouter and Choose an AI Model
- 5. Connect Hermes to Telegram
- 6. Give Your Agent a Real Job
- 7. Connect the Desktop App to Your Existing Server
- 8. Teach Hermes Preferences That Survive a New Chat
- 9. Build an Automation That Messages You First
- 10. Understand the Running Costs
- 11. Troubleshoot Hermes Without Getting Lost
- 12. Expand Your Agent With Sub-Agents, Channels, and Profiles
- Start With One Task Worth Delegating
What Is Hermes Agent?
Hermes Agent is a free, open-source AI agent from Nous Research, the team behind the Hermes family of open AI models. Its code is available under the MIT license in the official GitHub repository, so you can inspect it, run it, and see how it works.
The Hermes software itself costs nothing. For the setup here, you pay for two things: the server it runs on and the AI model it uses.
Three features make this more useful than a basic chat window:
- It can work on a schedule. Instead of waiting for you to ask, it can run a check and send you the result.
- It keeps persistent memory. Facts and saved preferences can carry across conversations and connected devices.
- It can save procedures as skills. After working out a task, it can write down the process and reuse it later.
That last point is worth being clear about. A learned skill is a saved procedure, not the underlying AI model retraining itself. The agent becomes more useful by retaining instructions and workflows it can call again.
1. Choose Where Your Hermes Agent Lives
You have two beginner-friendly options: run Hermes on your own computer or give it a rented cloud server.
The desktop-only option
The official desktop app is the quickest way to try Hermes locally. If all you want is to chat with an agent on your laptop, that may be enough.
The catch is simple: when your computer goes to sleep, the local agent stops working. It cannot reliably run a check at four in the morning if the machine it lives on is shut.
If you prefer using your own hardware, the official installation documentation covers that route. Running on existing hardware avoids the rented server bill, although model access may still cost money depending on your configuration.
The always-on server option
For an agent that checks things while you are away, a small cloud server makes more sense. The starting server used here is about $6 per month, with pricing dependent on the billing term and offer available.
You do not have to choose between a server and a nice desktop interface. Later, we will connect the desktop app to the server so both interfaces reach the same agent.
Why I prefer a separate machine for this setup
Hermes can write files, execute code, and browse websites. Those abilities are useful, but they also deserve some care.
A page the agent reads could contain malicious instructions intended to make it do something you did not ask for. That is called prompt injection. Running the agent on a separate server keeps its working environment away from the personal documents on your laptop.
That separation is a safety measure, not a guarantee that nothing can go wrong. The agent still has access to whatever files, credentials, and services you give it. Permission prompts for risky operations are another safety rail, so read them rather than approving everything automatically.
2. Deploy Hermes on a Hostinger VPS
We are using Hostinger because its one-click template installs Hermes without requiring a terminal-based setup. In my testing, the smallest KVM 1 plan comfortably handled one agent.
If you expect heavy browser activity throughout the day, the next plan up gives it more room. You can upgrade later without reinstalling the agent, so starting small is a reasonable approach.
The offer used for this setup adds an extra 10% discount on eligible billing terms. This is an affiliate link, which means we may earn a commission at no extra cost to you.
Choose your plan and billing term
- Open the Hermes hosting offer and select Choose plan.
- Select KVM 1.
- Choose a billing period that fits your budget.
- Review the add-ons and order total before continuing.
Longer billing terms reduce the monthly equivalent but require more money up front. In the checkout flow used here, the automatically applied discount required at least 12 months, so the one-month option did not qualify. The offer also included a 30-day money-back guarantee. Check the current terms before paying.
Uncheck the ready-to-use AI add-on. In this setup, it added about $12 of credits for a separate AI service. We are bringing our own model access through OpenRouter, so we do not need it. Leave the other unnecessary add-ons off as well.
Create your Hostinger account using an email address, Google, or GitHub, then enter your billing and payment details.
Save the Hermes administrator credentials
After payment, you should arrive at the Hermes deployment form.
- Keep the default administrator username, hermes.
- Use the eye icon to reveal the generated administrator password.
- Save both credentials in a password manager.
- Leave the optional paid-service fields empty.
- Select Deploy.
Those credentials are important. You will use them for the browser dashboard and later to connect the desktop app.
Deployment can take a few minutes. A Deploying status is normal while the container is being created. Wait until the application shows Running with a green check.
If the Hermes onboarding form does not appear
Occasionally, Hostinger sends you to the general server dashboard instead. You can launch the same deployment manually:
- Open VPS in the Hostinger sidebar.
- Finish the VPS setup if necessary, or select Manage for your existing server.
- Open Docker Manager.
- In the Docker application area, select Compose, then One-click deploy.
- Search the catalog for Hermes and choose Hermes Agent.
- Complete the deployment form using the credential-saving steps above.
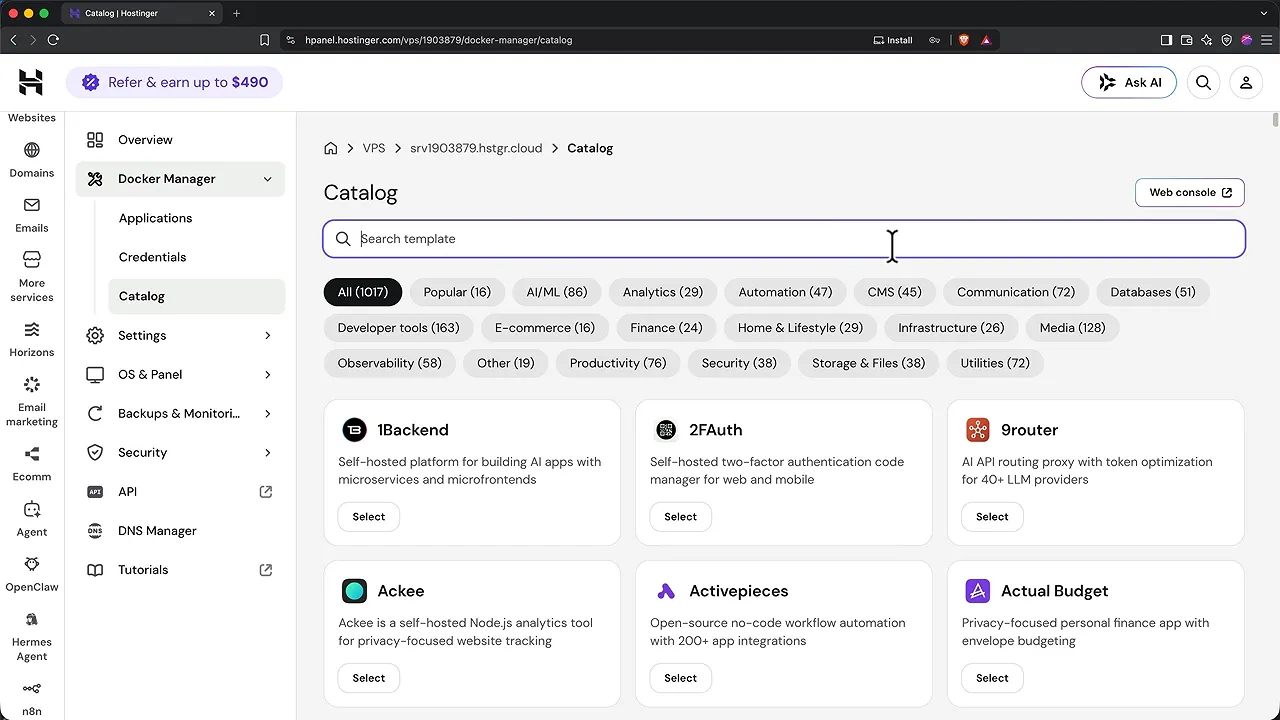
To find an agent you have already deployed, return to VPS, then Docker Manager, then Applications. You may also see a Traefik reverse proxy alongside Hermes, which handles the encrypted connection to the application.
3. Open the Hermes Web Dashboard
Find the running Hermes application in Docker Manager and select Open. Sign in with the administrator username and password you saved.
This dashboard is your agent's control room. The main areas to recognize are:
- Sessions: Conversations from the different interfaces connected to your agent.
- Models: The AI model that handles reasoning and tool use.
- Cron: Scheduled jobs that run without you sending a new message.
- Skills: Reusable procedures available to the agent.
- Keys: Credentials for model providers and other services.
- Channels: Connections to messaging platforms such as Telegram.
If you open Chat now, you may see a terminal-style interface and an error saying no provider or model is selected. That is expected. The agent is installed, but it does not yet have a model to think with.
You should also see a gateway status in the sidebar. The gateway is the part that carries messages between Hermes and connected interfaces, including your phone.
4. Connect OpenRouter and Choose an AI Model
We will use OpenRouter for model access. It gives you access to models from multiple companies through one account, with usage-based billing.
Create an API key and add a small balance
- Create an OpenRouter account.
- Choose an individual or business account as appropriate.
- Copy the API key provided during onboarding and save it securely.
- Add your billing information and a payment method.
- Add a small amount of credit to begin testing.
An API key is effectively a password that lets software use your account. Anyone who has it may be able to spend your credits, so do not share it or paste it into public messages.
I recommend starting with $5 in credits using the custom amount field. On the inexpensive model used here, that was enough for weeks of testing at my usage level. Your own usage will depend on the work you give the agent.
Set a spending limit before you start
In OpenRouter, open API Keys, find your new key, and use its three-dot menu to select Edit.
Give it a recognizable name, such as Hermes Agent, then set a credit limit and reset interval. For example, a $10 weekly limit gives this key a weekly spending ceiling.
The credit balance and key limit do different jobs. The balance funds your requests; the key limit adds a guardrail to that particular connection.
Add the key to Hermes
- Return to the Hermes web dashboard.
- Open Keys.
- Expand OpenRouter and select Set.
- Paste the API key into the value field and save it.
Next, open Models and select Change beside the main model. Choose OpenRouter as the provider.
For this setup, I used DeepSeek V4 Flash because it was inexpensive, fast, and suited to tool use. Select it from the available models, choose Switch, and reload when prompted.
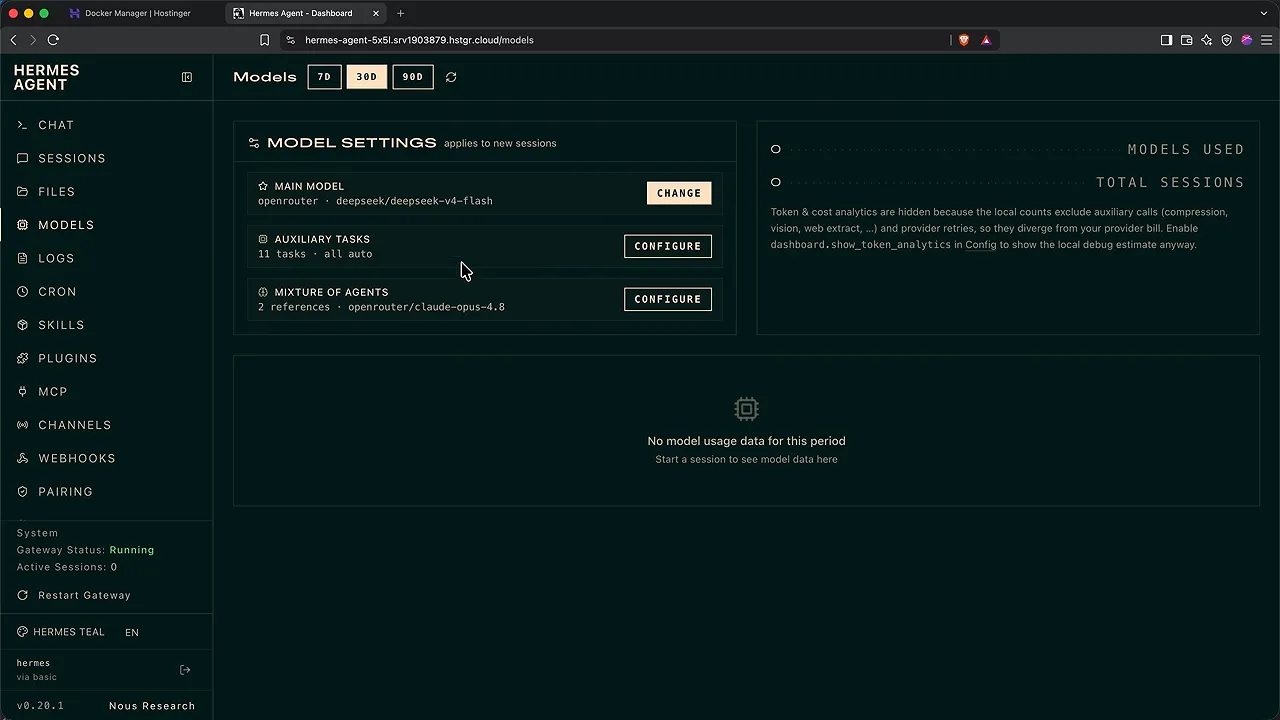
Model names, availability, and prices change. The important starting point is an affordable model that can use the agent's tools well.
The subscription alternative
Hermes also offers Nous Portal, presented in this setup as a flat-rate subscription starting at about $20 per month, without managing API keys. You can find its login under Keys.
I prefer starting with a small OpenRouter balance because you can learn how much you actually use before committing to another subscription.
Send your first test message
Return to Chat and send a greeting or simple question. The missing-provider error should be gone.
If the existing chat fails immediately after changing the model, create a New chat and try again. That cleared the initial response error in my setup.
5. Connect Hermes to Telegram
Telegram gives your agent a way to reach you when you are away from the dashboard. Hermes supports more than 20 communication platforms, but Telegram's QR-code setup makes it a convenient first channel.
Before generating the code, install and sign in to Telegram on your phone. Keep it nearby because the QR code expires after about three minutes.
- In the Hermes browser dashboard, open Channels.
- Under Telegram, select Create with QR.
- Scan the QR code using your phone camera.
- Open the link and allow it to switch to Telegram.
- Follow the bot-creation dialog, giving the bot a custom name if you want.
- Return to the desktop browser dashboard and select Save and restart.
Do not skip the restart. Creating the bot is not enough by itself. The gateway needs to restart before Telegram becomes reachable.
During the restart, Telegram may show Gateway stopped. Wait for the sidebar gateway status to return to Running, then refresh the page. Telegram should now show Connected.
Send a message and set your home channel
Open the bot on your phone and tap Start. The /start message opens the conversation, but you should follow it with an ordinary message asking whether the agent is connected.
If Hermes warns that no Telegram home channel is set, use the /sethome link it provides.
The home channel is where proactive reports go. Scheduled job results and other messages generated while you are away need a destination, and this sets it.
Check who is allowed to use the bot
The QR flow used here adds your Telegram account to the allowlist. Someone else finding the bot should not receive a response unless they are authorized.
If you want another person to use it, repeat the supported QR authorization process with that person's phone. Keep access intentional, especially if the agent has credentials or paid model access.
Telegram is another way into the same server-based agent, not a separate assistant. Saved memory is shared across the connected interfaces. You can also use Telegram on your desktop without configuring the bot again.
6. Give Your Agent a Real Job
Before adding automations, ask Hermes which tools it currently has available. That is a useful way to discover what this particular installation can do.
In my setup, its answer covered web search, browser control, files, code execution, image generation, voice, scheduled jobs, and helper agents called sub-agents. Some capabilities may need additional configuration or service access.
For a first task, ask it to research three leading standing desks and produce a one-paragraph comparison.
The useful part is the process. Hermes can search, open pages, read the material, and return a comparison rather than just handing back a list of search results. Browser-based research can take a little time, so give it a chance to finish.
If a task involves a consequential action, such as installing a package or deleting sensitive files, Hermes may stop for approval. Read the request and approve it only if it matches what you intended.
7. Connect the Desktop App to Your Existing Server
The browser dashboard works well, but it is still a tab you have to find. The desktop app adds a native interface, keyboard access, and voice features.
The key is to connect it to the agent you already built rather than configuring a second local agent.
Install the app
- Open the official Hermes Agent website and download the desktop app for your operating system.
- Run the installer. On macOS, drag Hermes into the Applications folder.
- Launch the app and approve the operating system's opening prompt if required.
- Select Install Hermes and allow the guided setup to complete.
- When the app asks for an AI provider, select I'll choose a provider later.
The installation shown here used an 11-step guided process covering prerequisites, the Python environment, the gateway service, and the app build. It can take a few minutes.
Choose a remote gateway
- Open the app's settings using the gear icon. On Mac, you can also use Command + comma.
- Select Gateway, then Remote gateway.
- Return to the browser dashboard and copy its base address, without a page-specific path after the hostname.
- Paste that base address into the remote URL field.
- When the app detects username-and-password authentication, select Sign in.
- Enter the same Hermes administrator credentials used for the web dashboard.
- After the sign-in confirmation, select Save and reconnect.
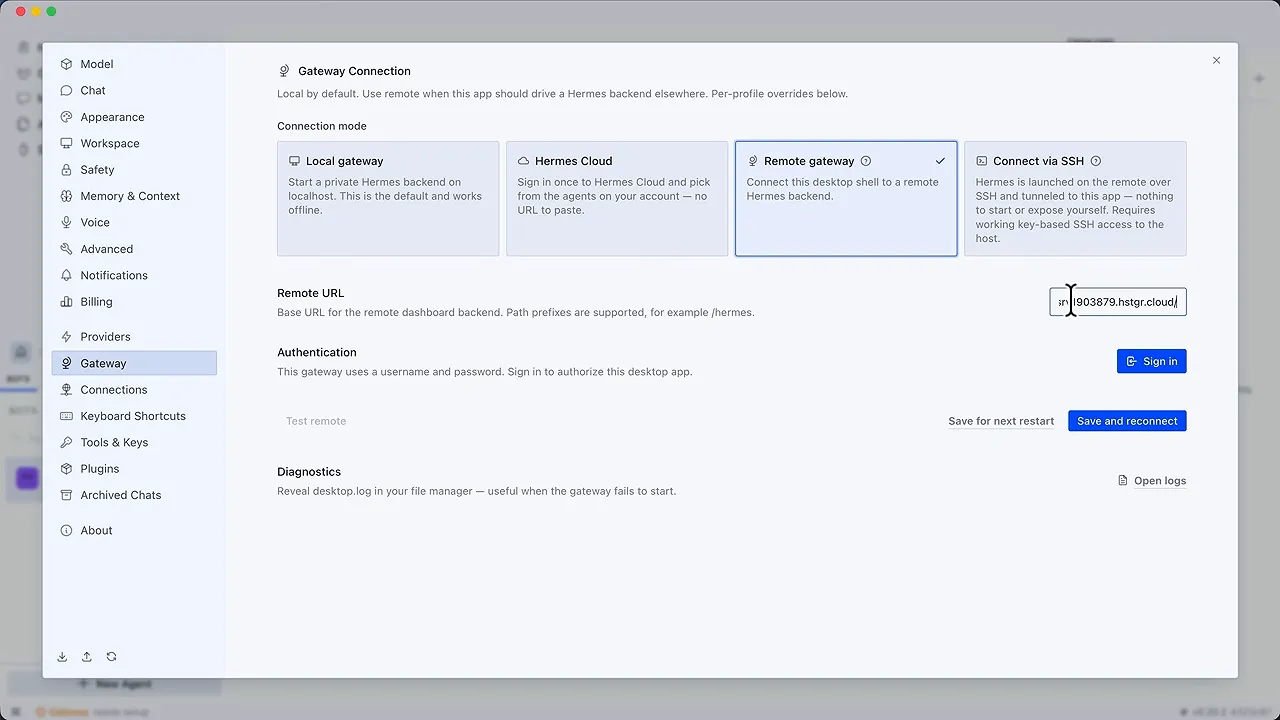
Once reconnected, the app should show your server's sessions, including the Telegram conversations, and the selected model. Those are good checks that you reached the existing agent.
You now have several interfaces to one agent: the web dashboard, Telegram, and the desktop app.
Use the floating composer and voice features
On Mac, Command + Shift + H switches Hermes into a floating heads-up display, or HUD. It gives you a compact composer that can sit over your current window and fade when idle.
The app also provides voice dictation, voice conversations, spoken replies, and an optional wake word. With the wake word enabled, saying Hey Hermes can activate it without touching the keyboard.
Use Exit HUD mode to return to the full app. Windows follows a similar flow, generally using Control where the Mac instructions use Command; check the shortcut labels in your installed version.
8. Teach Hermes Preferences That Survive a New Chat
Correcting one response is easy. The more useful test is whether the correction survives a completely new conversation.
Start by asking Hermes for a short post about productivity habits for remote workers. Suppose it returns bold headings, bullets, and more explanation than you want.
Instead of opening a settings page, give it a clear instruction in the conversation:
Keep my short posts punchy and limit them to three paragraphs. Leave out headings and bullet points, and save this as my writing preference.
Hermes should use its memory tool to save the preference and can then revise the answer.
Asking for another post in the same conversation only tests whether it can follow the current context. To test persistent memory, open a new session and ask for an unrelated short post, such as European destinations for a beach-focused trip.
In my test, the new response still followed the saved format: short prose, no headings, no bullets, and no more than three paragraphs.
That is the habit to build: when a correction should apply beyond the current answer, explicitly ask the agent to save it as a preference.
Understand memory, skills, and identity
These are related, but they do different jobs:
- Memory retains facts and preferences about how you want work done.
- Skills contain procedures for completing particular tasks.
- SOUL.md holds instructions about the agent's identity and behavior.
These files live on your server. That gives you access to the saved material, although requests to an external model provider still use that provider for processing.
In the desktop app, open Capabilities to explore skills, tools, and MCP connections. The browser dashboard separates these into individual pages.
You can inspect skills in plain text. As Hermes saves procedures from its work, some may appear with a Learned label.
Browse additional skills
At the bottom of Capabilities, find Skills Hub and select Browse the full hub. The skills directory lets you search or browse by category.
For example, searching for calendar-related capabilities can help you identify a relevant integration. In the installation shown here, a Google Workspace skill was already included, so downloading another skill was unnecessary. Check what is already available before adding more.
9. Build an Automation That Messages You First
This is where the server, model, memory, skills, and Telegram connection come together.
Open a new session and describe an ongoing outcome. For example:
Monitor YouTube for new AI productivity trends. Create a reusable skill for the research, remember which results you have already sent, and repeat the check every few hours. Notify me here only when you find something new.
That request gives the agent several connected jobs:
- Work out how to research the topic.
- Save the process as a reusable skill.
- Keep a record of previously reported results.
- Create a recurring schedule.
- Send a message only when there is a useful update.
In my test, Hermes installed a dependency it needed, searched YouTube, created the skill, and scheduled the job to run every four hours. It also returned an initial report.
Review any permission prompts that appear while it builds the workflow.
Inspect the scheduled job
Open Scheduled jobs in the desktop app or Cron in the browser dashboard. You should be able to inspect the interval, the next run time, and the prompt the job will use.
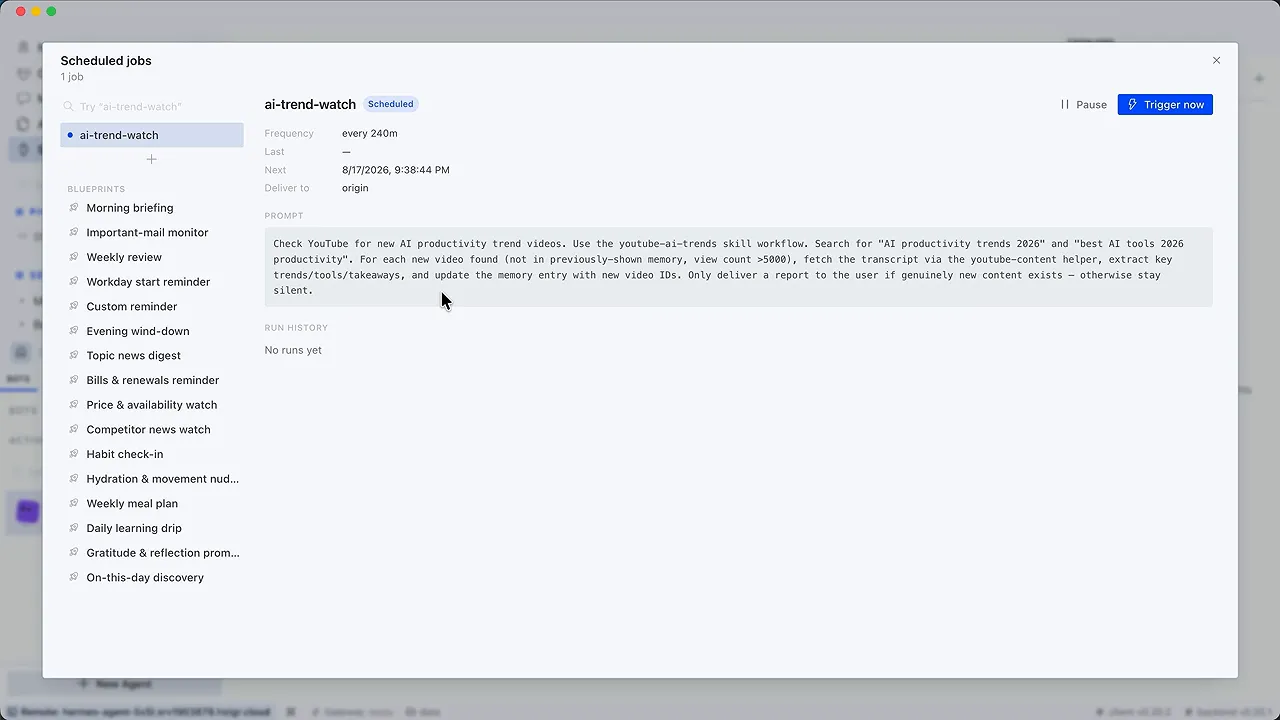
You can pause the job or trigger it manually. Check the generated schedule rather than assuming that “every few hours” became exactly the timing you wanted.
When the example job ran, it sent a Telegram report with eight newly qualifying videos, a combined takeaway, and links to the source material.
The same general pattern can be adapted to price checks, competitor research, or topic monitoring where there is an accessible page or feed. Start with one useful job and inspect its output before adding more.
10. Understand the Running Costs
There are two bills to keep separate:
- Server cost: The recurring hosting charge, starting at about $6 per month in this setup.
- Model cost: Variable spending based on the model and the work it performs.
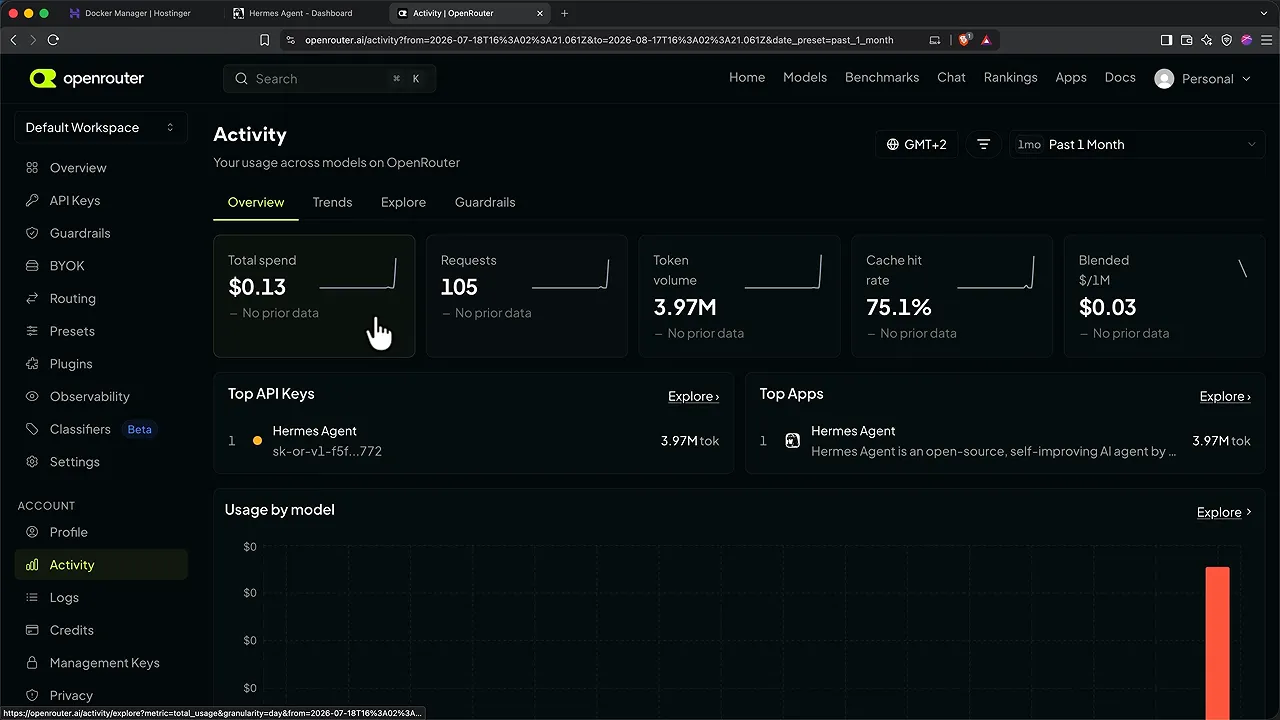
To see actual model spending, open OpenRouter's account menu and go to Activity.
During my setup and demonstrations, the account recorded 105 requests costing about $0.13, with nearly four million tokens processed.
Why a short message can use so many tokens
The agent sends more than the sentence you type. Its requests can include instructions, saved memory, tool definitions, and conversation history.
That material is the model's context. In this test, the average was roughly 38,000 tokens per request, even though many of the messages I typed were short.
About three quarters of the input came from a cache. The provider recognized repeated material and charged less to process it again. I did not have to configure that behavior for this test.
At that observed rate, a $5 balance would cover roughly 4,000 similar requests. Treat that as an illustration, not a guaranteed allowance. Longer tasks, different models, changing cache behavior, and recurring jobs can produce a different bill.
Use an inexpensive default and switch when needed
You are not locked into one model. Keep an affordable model for everyday work and switch to a stronger, more expensive one when the task justifies it.
OpenRouter also lists free models, though they are rate-limited and better treated as an experimentation option than an assumption for dependable scheduled work.
Use the model selector in the desktop or browser interface to change models. In Telegram, enter /model, choose the provider, and then select a model.
The model bill is the variable to monitor. Keep the API-key limit in place and check Activity again after adding automations or changing models.
11. Troubleshoot Hermes Without Getting Lost
Most troubleshooting starts in the browser dashboard because that is where the server's controls and logs live.
Check the logs
Open Logs in the sidebar. You do not need to understand every line. Start by filtering for the messages most likely to explain the problem:
- Error: A failure that needs attention.
- Warning: Something potentially problematic, but less severe.
- Info: Routine status messages.
- Debug: More detailed diagnostic information.
A page full of routine log messages does not automatically mean something is wrong. Look for failures that line up with the time the problem started.
Restart the gateway first
If your bot stops responding, select Restart gateway in the dashboard sidebar and confirm. Wait a few seconds for its status to return to Running, then test again.
This is the first restart I would try because it targets the messaging connection without restarting the entire application.
Restart the application if necessary
If the gateway restart does not help, return to Hostinger's Docker Manager. Find the Hermes application, open its three-dot menu, and select Restart.
This restarts the whole application. Being signed out of the dashboard afterward is normal; wait for it to come back and sign in again.
Run a health report when you need more detail
Docker Manager also has a web console. If you need deeper diagnostics, open the appropriate console and run hermes doctor to generate a health report.
You do not need terminal commands for the normal setup. It is simply useful to know that a more detailed diagnostic tool exists.
12. Expand Your Agent With Sub-Agents, Channels, and Profiles
Split larger tasks across sub-agents
Sub-agents let Hermes divide a job into smaller pieces and work on them in parallel.
For example, ask it to plan three days in Lisbon with separate helper agents researching:
- Which neighborhood to stay in.
- Where to eat.
- A worthwhile day trip.
- How to get around.
Then ask the main agent to combine the research into one itinerary.
Instead of doing each research task sequentially, the main agent coordinates several helpers at once. That can shorten larger jobs while keeping the final answer in one place.
Add more communication channels
Open Messaging in the desktop app or Channels in the browser dashboard to explore Discord, Slack, WhatsApp, email, and other supported connections.
The idea stays the same: add another way to reach the agent you already have, rather than rebuilding the setup for each platform.
Separate work and personal environments
The desktop app also supports profiles. Select the plus button next to Home, enter a profile name and any relevant details, then choose Create profile.
This creates an independent environment, which is useful if you want to keep personal projects separate from work.
Bring over an OpenClaw configuration
If you are moving from OpenClaw, ask Hermes to guide you through importing your configuration.
It may ask whether you want to bring over settings, import skills and workflows, or use OpenClaw as a tool. Clarify which outcome you want, then follow the guided process.
Start With One Task Worth Delegating
You now have the pieces of an always-on assistant: a server, model access, Telegram delivery, a desktop interface, persistent preferences, reusable procedures, and a schedule.
The next step is not to create ten automations just because you can. Tell the agent what your job involves and what a typical week looks like. Ask it to propose one recurring task it could take off your plate.
Choose something small enough to inspect. Check the first result, correct it, save the preference, and review the cost. That is how you turn an interesting agent into something you can actually use.
Made with VideoToBlog using Hermes Agent - Full Tutorial & Setup Guide (For Beginners)


