Hermes Agent is an AI assistant that runs on its own server, around the clock. You can message it from your phone or computer, give it a job, and let it work through the steps. Your computer can be turned off, and the agent can still keep going.
The really useful part is that it does not always need you to start the conversation. Give it a recurring task, and it can check on a schedule and message you when something changes.
This setup takes you from nothing to a working, self-hosted AI agent with a model, a Telegram bot, and its first scheduled job. You do not need to write code or install anything manually.
What You'll Learn
- Deploy Hermes Agent on a VPS without writing code or installing the application manually.
- Connect Nous Portal and choose an inexpensive model for your first tasks.
- Link a Telegram bot and set a home channel for proactive updates.
- Create a reusable monitoring skill and verify its recurring schedule in Cron.
Table of Contents
- What Makes Hermes Agent Different?
- What You Need and What It Costs
- Step 1: Get a Server with Hermes Agent Preinstalled
- Step 2: Open Your Hermes Dashboard
- Step 3: Connect an AI Model Through Nous Portal
- Step 4: Connect Hermes Agent to Telegram
- Step 5: Give Your Agent Its First Scheduled Job
- Step 6: Learn the Dashboard Pages You Will Use Most
- Step 7: Know Where to Manage Your Server
- Your Hermes Agent Is Ready to Work
What Makes Hermes Agent Different?
In a typical AI conversation, you ask a question, get a response, and then the conversation waits for your next message. Hermes Agent adds tools and a persistent workspace around the AI model so it can work toward a goal.
Those tools let it search the web, read and write files, and build reusable ways of completing tasks. It can also remember preferences about how you want things done.
There are three important differences to understand before setting it up:
- Choice of model: Hermes can connect to models from different providers rather than tying your agent to one company's model lineup. That gives you room to use an inexpensive model for everyday work and a more powerful one for harder tasks.
- Control over the software: Hermes Agent is free, open-source software running on a server you manage. You have more control over the application than you do with a hosted chat service, although your server and model provider still have their own costs and limits.
- A connection to your messaging apps: With Telegram connected, your agent becomes a contact you can message from your phone. It can also send task results and updates to that chat on its own.
The model is the part that reasons through a task. Hermes is the system around it that provides tools, skills, scheduling, and messaging. You need both pieces before the agent can do useful work.
What You Need and What It Costs
Hermes Agent itself is free. For the setup here, there are two paid components:
- A small server: A virtual private server, or VPS, gives the agent a place to stay online. The entry-level hosting used here costs a few dollars per month, depending on the plan and billing term.
- AI model access: This walkthrough uses the $20-per-month Nous Portal subscription, which includes monthly credits for model and tool usage.
You will also need a free Telegram account. You can complete the Telegram steps on a phone or in the desktop app.
Prices, promotions, and available models can change, so check the details at checkout before paying.
Some links are affiliate links. If you make a purchase through them, we may earn a commission at no extra cost to you.
Step 1: Get a Server with Hermes Agent Preinstalled
I recommend Hostinger for this beginner setup because its Hermes Agent template handles the installation for you. Instead of setting up the application by hand, you choose a plan, save your login details, and deploy it. Restarts and application management are also available from its dashboard.
The Hermes Agent VPS offer includes an exclusive 10% discount. Open the offer page to start with the one-click template.
Choose your plan and billing period
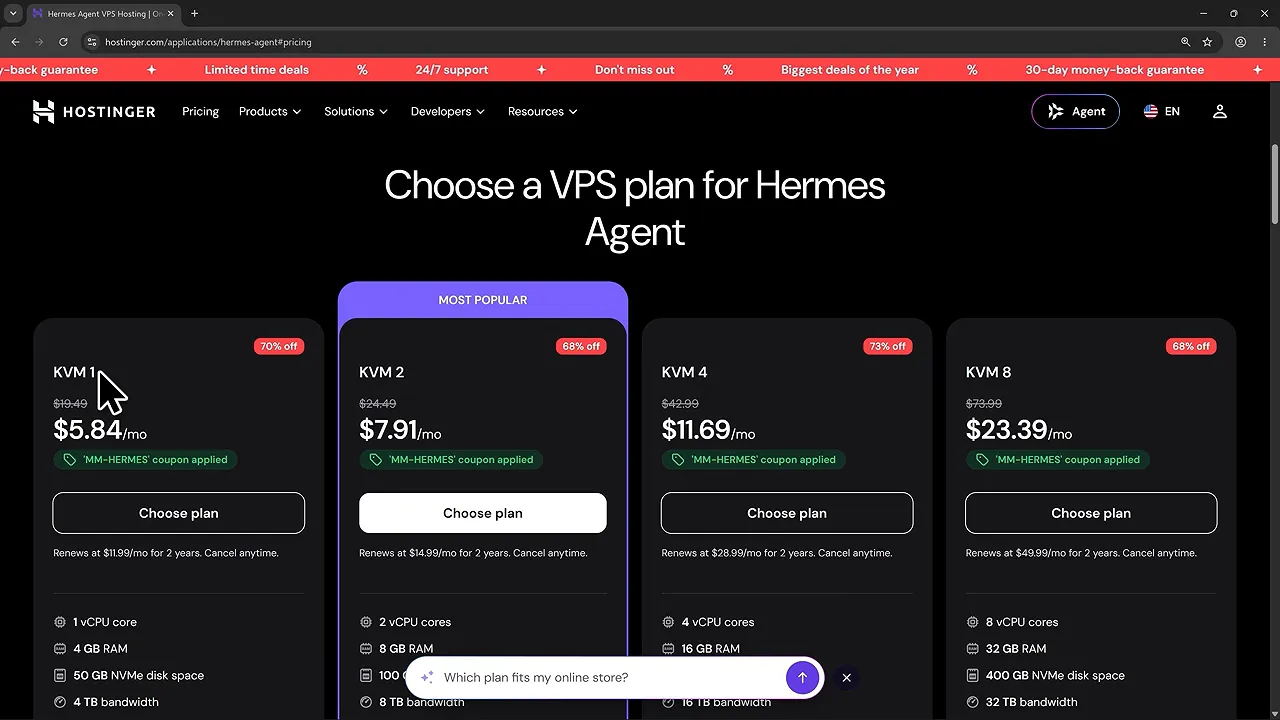
- On Hostinger's Hermes Agent page, click Choose plan.
- Select KVM 1. It is the smallest option and is enough for the single-agent setup here. You can upgrade later if you need more resources.
- In the cart, change the billing period from the default 24 months to 12 months if you want a shorter initial commitment. This is the option I recommend.
- Check that the promotional discount has been applied.
Turn off the AI add-on
Scroll down to the add-ons in the cart. Ready-to-use AI is selected by default in this setup. Uncheck it because we will connect our own model provider through Nous Portal.
You can leave the remaining options as they are for this walkthrough. Hostinger also suggests a server location automatically, which you can keep.
Click Continue, create your Hostinger account, and complete checkout with your billing and payment details. You can register using Google, GitHub, or an email address.
Save your Hermes login details and deploy
After payment, Hostinger opens the Hermes Agent Configuration page.
- Skip the button to generate a key for AI models. We will connect a model separately.
- Keep the prefilled admin username, hermes.
- Use the eye icon to reveal the admin password, then copy it into a password manager or another safe place.
- Hide the password again after saving it.
- Leave the optional Oxylabs field empty.
- Click Deploy.
Hostinger now sets up the server and the application. This takes a few minutes.
Once you reach Docker Manager, skip the optional survey if it appears. Your Hermes application may initially show a status of Created. Wait until that changes to a green Running status.
You will also see a separate Traefik service, which helps secure the connection to the application. Leave that service alone.
Step 2: Open Your Hermes Dashboard
In Docker Manager, find the Hermes Agent row and click Open under Access. The Hermes login page opens in a new tab.
Keep the Docker Manager tab open. We will return to it when connecting Telegram.
- Bookmark the Hermes dashboard login page so you can find it again.
- Enter the admin username from the configuration page.
- Paste the password you saved.
- Click Sign in.
If a banner asks whether you want to share usage information with Nous, you can select No, thanks, as I did.
Your agent is now installed and running. It does not have an AI model yet, though, so the next step is to connect the service it will use to reason and respond.
Step 3: Connect an AI Model Through Nous Portal
For this setup, I use Nous Portal, which comes from the same team behind Hermes Agent. The subscription shown here provides access to more than 200 models, hosted tools, and $22 in monthly credits.
Create your Nous Portal account
Open the Nous Portal invite page. The offer used here gives you $15 off your first month.
- Click Claim your invite.
- Create an account using email, Google, Microsoft, or GitHub.
- If you use email, enter the six-digit verification code sent to your inbox.
- At checkout, check that the first-month discount is applied.
- Enter your payment and billing information, then click Subscribe.
After payment, your Nous Portal account should show the included $22 credit balance. You can now return to the Hermes dashboard.
Authorize Hermes to use your subscription
- In the Hermes sidebar, scroll down and click Keys.
- Find Nous Portal and click Login.
- In the new Nous Portal tab, click Connect to let Hermes use your plan.
- Return to Hermes and confirm that Nous Portal now shows Connected.
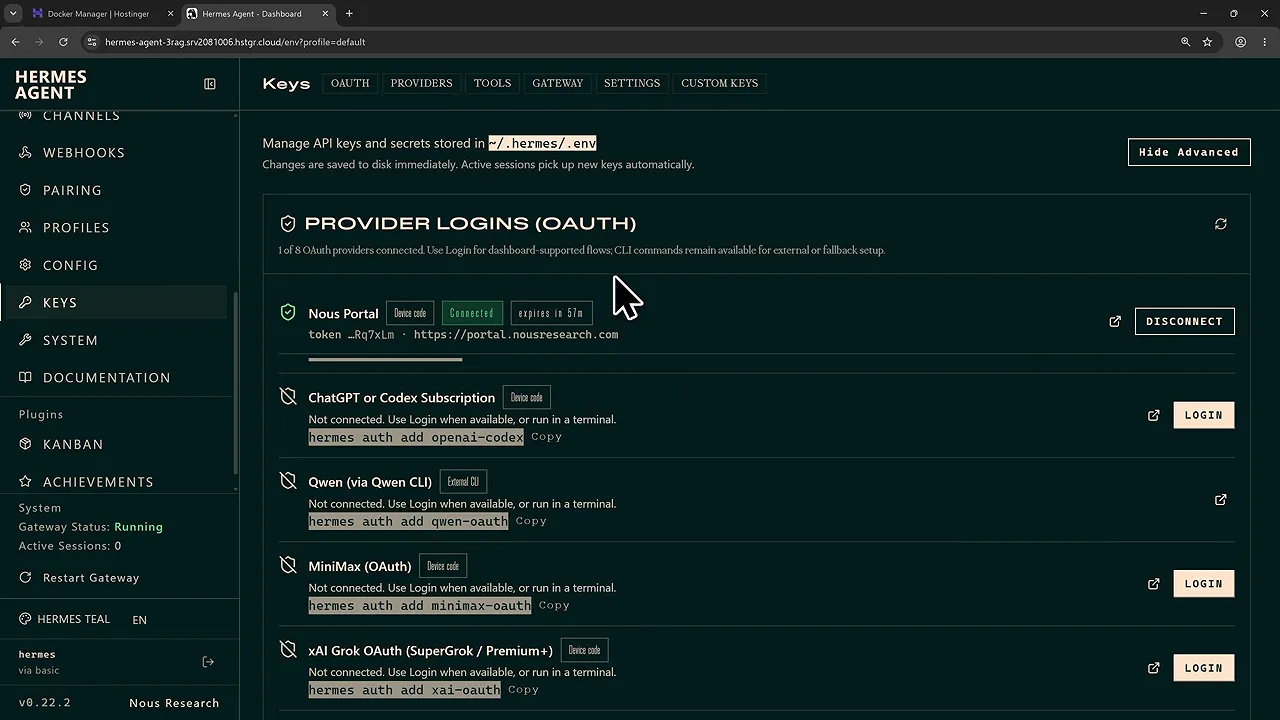
The Keys page is where Hermes keeps the account connections it can use. Connecting the provider gives the agent access, but you still need to choose a model.
Choose your main model
- Click Models in the sidebar.
- Next to Main model, which initially says Unset, click Change.
- Keep Nous Portal selected as the provider.
- Search for DeepSeek.
- Select DeepSeek V4.1 Flash, with no extra suffix. If a newer DeepSeek Flash version is available, choose the newest version in that lineup.
- Click Switch, then click Reload when prompted.
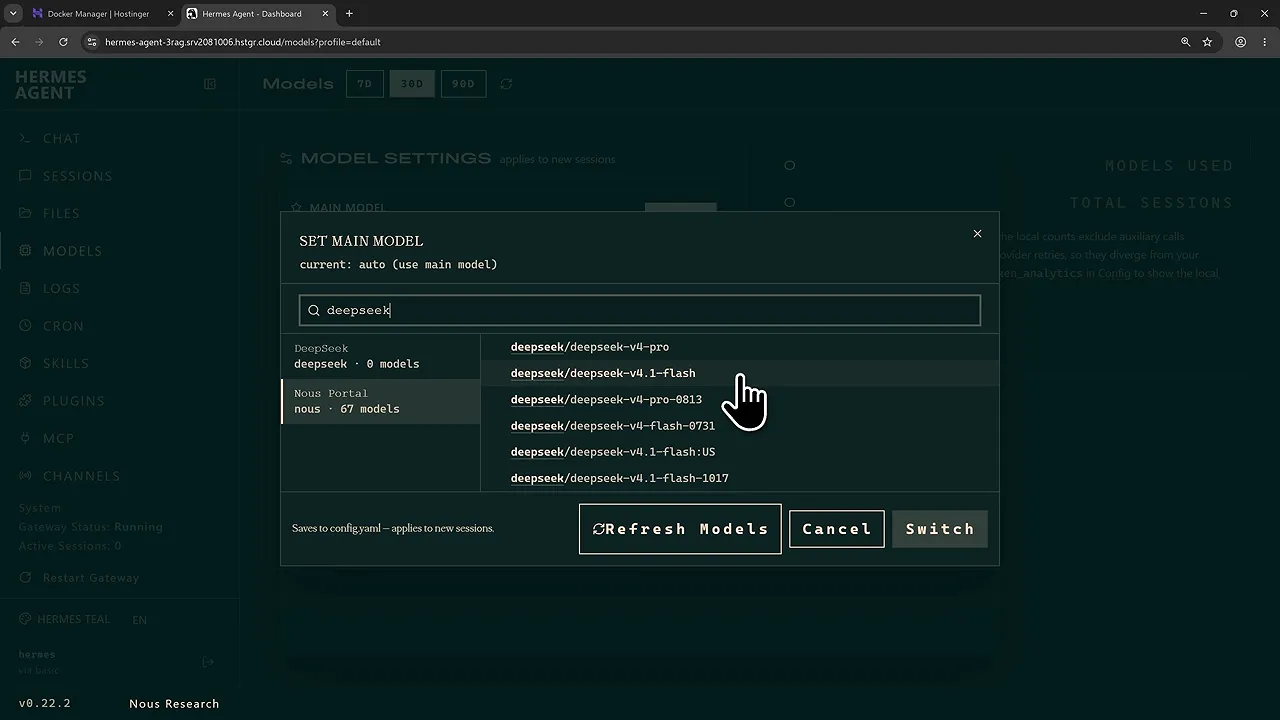
I recommend the Flash model as a starting point because it is fast, works well with tools, and is inexpensive to use. The simple messages shown in this setup cost a fraction of a cent. A longer job with repeated searches and tool calls is more work than a single chat message, so keep the monthly credit balance in mind as you experiment.
Test it in the dashboard
Open Chat, click New chat, and give the session a few seconds to start. Type a short greeting and send it.
The first response can take around 20 seconds. Once you get a reply, the model connection is working.
You can already use the agent from this browser tab. Next, we will make it available through Telegram so you do not have to keep coming back to the dashboard.
Step 4: Connect Hermes Agent to Telegram
If you do not have Telegram yet, install it from the official Telegram apps page and sign in. The setup works on both a phone and a computer.
Create a Telegram bot using the QR setup
In Hermes, open Channels. This is where you connect the agent to messaging apps.
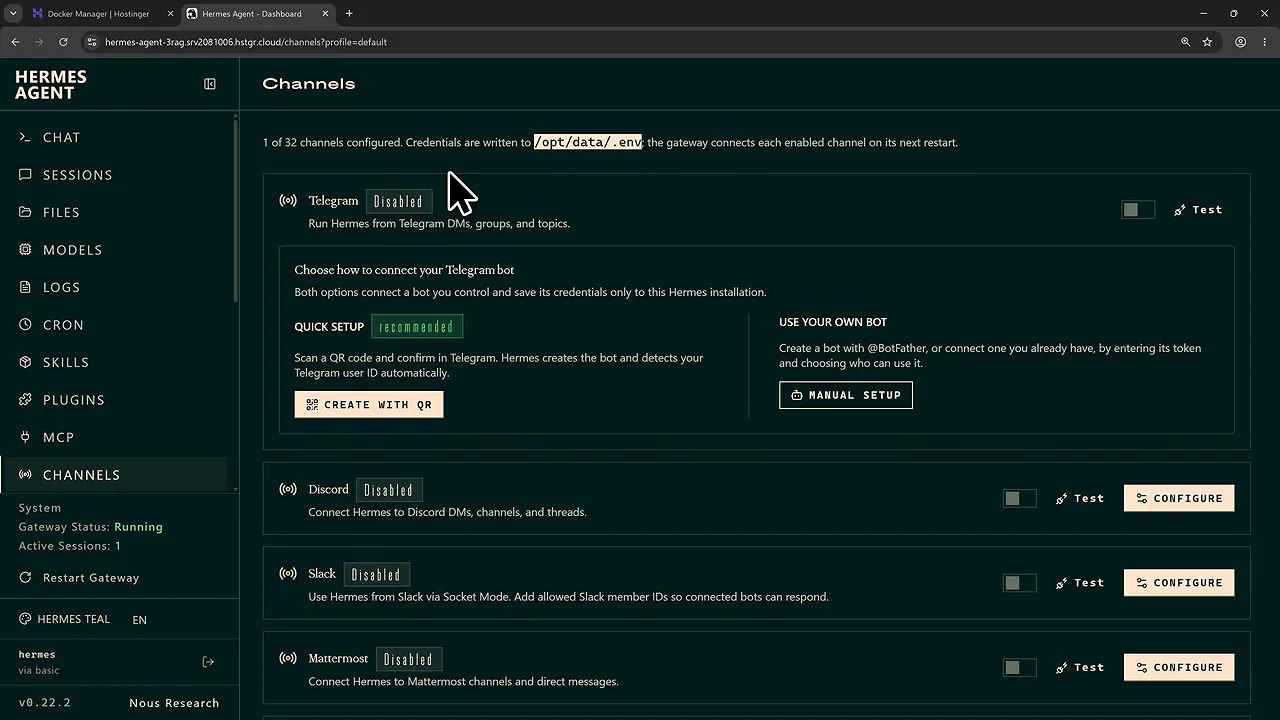
- Under Telegram's Quick setup, click Create with QR.
- On a phone, scan the QR code using your camera. On a computer, click Open Telegram and approve the browser prompt to open the desktop app.
- In the Hermes setup bot chat, click Start.
- Click Create bot.
- Keep the suggested bot name or choose another, then click Create.
The QR code stays valid for 30 minutes. If it expires before you finish, you will need a fresh setup code.
Creating the bot opens a conversation with your new bot, but it is not connected to your server yet. Go back to the original Hermes setup bot chat and click Connect to this bot.
When Telegram confirms the bot is connected, return to the Hermes dashboard to save the configuration.
Save the connection and restart the application
Back in Hermes, the bot should show as ready. Under Allowed users, you should see your Telegram ID. That restriction means only your account can talk to the bot.
- Click Save and restart.
- Switch to the Hostinger Docker Manager tab.
- Open the three-dot menu on the Hermes Agent row.
- Click Restart.
- Wait about a minute for the application to finish restarting.
The Hermes Channels page may display Gateway stopped after saving, and it can sometimes keep showing that message even after the restart. Do not rely on that label alone. The practical test is whether your own bot replies in Telegram.
Test your bot and set its home channel
Find your new bot's username in the setup bot's confirmation message. Search for that exact username in Telegram and open the conversation.
- Click Start in the new bot chat.
- Send an actual message, such as asking whether it can hear you. Clicking Start by itself is not enough to test the model response.
- Allow some time for the first reply.
- If you receive a message saying no home channel is set, click or send
/sethome.
The home channel is the chat where the agent sends proactive updates, including the results of scheduled jobs. When it confirms Home channel set, this conversation is ready to receive those messages.
Step 5: Give Your Agent Its First Scheduled Job
Your agent now has a server, a model, and a connection to your phone. A good first task is a watcher: a job that checks something regularly and only sends a message when there is something new.
For example, I set up a watcher for round-trip flight prices from Austin to Orlando in December. The important part is not just asking it to look up prices once. You also want it to save a repeatable process, remember what it has reported, and schedule future checks.
Give it a complete instruction
Here is a prompt you can adapt in the Telegram chat:
Monitor round-trip flights from Austin to Orlando for December. Create a reusable skill for checking fares and keep a record of the results you have already sent me. Run the check every few hours, and notify me here on Telegram only when you find something new.
That instruction gives the agent four pieces of information:
- The goal: Monitor flight prices for a particular route and month.
- The reusable process: Build a skill so it can repeat the check consistently.
- The memory requirement: Track earlier reports so it does not keep sending the same results.
- The schedule and notification rule: Check every few hours and send a message only when there is something new.
After sending the request, give it time. The agent needs to search the web, work out how to perform the check, create the skill, and put the job on a schedule. My initial setup for this task took about half an hour.
When it finished, it reported what it was monitoring, the cheapest fares it had found so far, and the checking interval. In my case, it chose to run every three hours.
Confirm that the job is scheduled
Return to the Hermes dashboard and open Cron. This page lists the agent's scheduled jobs. The term comes from cron, a task scheduler used to run work at recurring times.
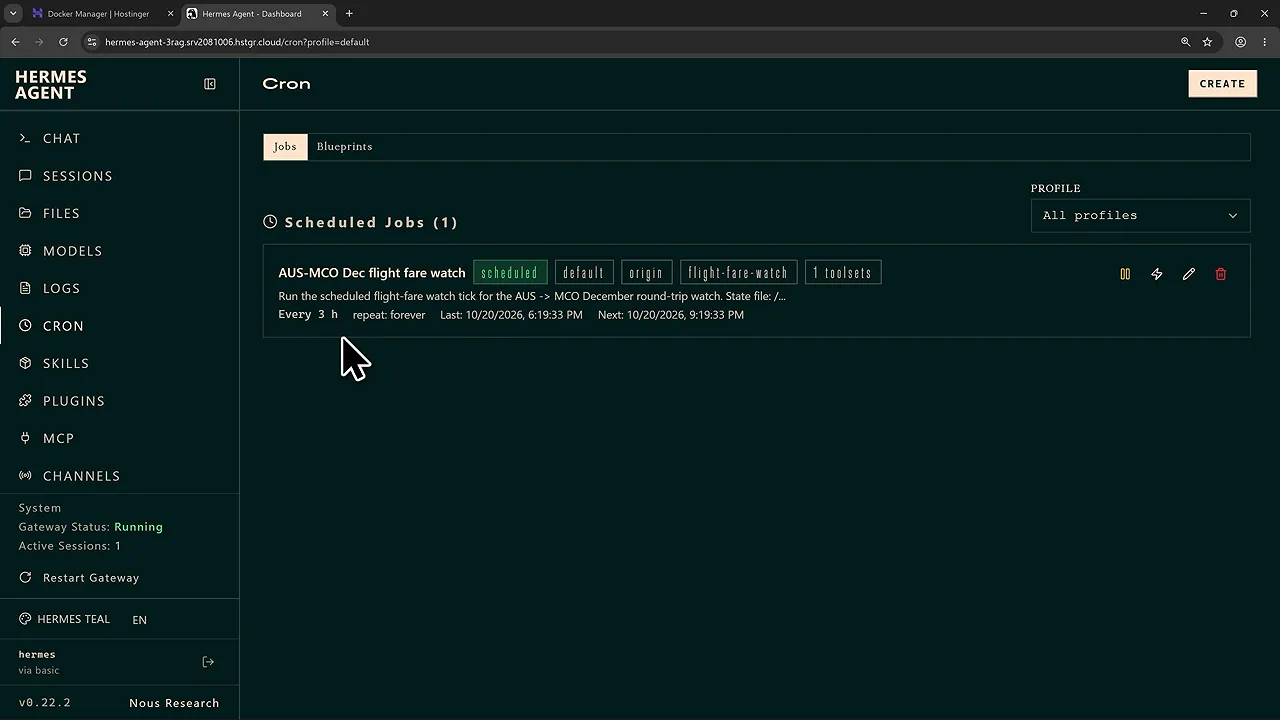
Find the flight fare job and check its interval and next run time. Seeing it here confirms that the agent created a recurring task rather than simply answering your message once.
From this point on, it can keep checking from the server and send new results to your Telegram home channel. You do not need to keep your browser or computer open.
Step 6: Learn the Dashboard Pages You Will Use Most
You do not need to learn every setting right away. These are the main pages worth knowing as you start using the agent:
- Chat: Talk to the agent directly from your browser.
- Sessions: Find past conversations with the agent.
- Skills: See the reusable instructions and processes the agent knows, including the flight monitoring skill it created.
- Cron: Review recurring jobs, their schedules, and their upcoming runs.
- Channels: Manage Telegram and other messaging connections.
- Models: Change the model your agent uses.
- Keys: Manage the provider accounts available to the agent.
- Logs: Inspect what the agent has been doing when something does not seem right.
The sidebar also includes gateway status information. It is useful for checking the messaging connection, but remember that a successful Telegram reply is a better confirmation than a status label that may not have refreshed.
Step 7: Know Where to Manage Your Server
There are two dashboards in this setup, and they have different jobs. Hermes manages the agent's work. Hostinger manages the server and application running it.
In Hostinger, open Overview to see the Hermes application and the server underneath it.
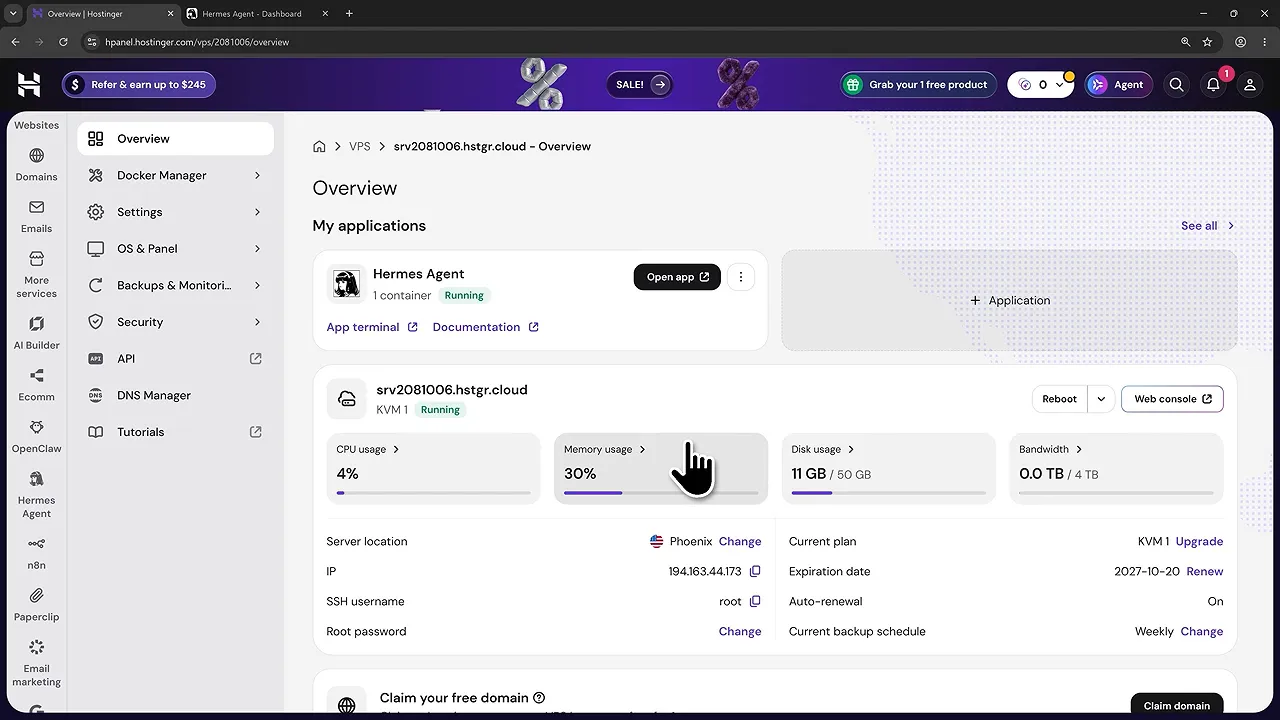
The server overview shows CPU, memory, and disk usage, along with your plan and renewal information. These are the details to check when you want to understand how much of the server's resources are being used.
You will also find:
- Docker Manager: The place to manage the Hermes application and restart it, as we did during Telegram setup.
- Backups and Monitoring: Where the server's backups are kept.
- Hostinger's AI assistant: Open Agent near the top right if you need help finding a setting or understanding where to go next.
For a problem with a task, start with the Hermes logs. For an application restart or server-level check, return to Hostinger.
Your Hermes Agent Is Ready to Work
At this point, you have a self-hosted AI assistant running independently of your computer. It has an AI model to reason with, a Telegram chat where you can reach it, and a scheduled job that can send updates without waiting for you to ask.
Start with that one recurring task and get comfortable checking its skill, schedule, and results. The useful shift is simple: instead of repeatedly asking an AI for the same information, you can give your agent a clear process and let it bring new information to you.


