A chatbot answers your question, then waits for the next one. An AI agent can keep working after you put your phone down.
Give it something to check, tell it what matters, and it can run that check on a schedule. When something changes, it sends you a message. You do not need to write code or build a giant workflow to get started.
We’ll use Hermes Agent, put it on its own server, connect an AI model, and give it a Telegram bot so you can reach it from your phone. Then we’ll create a first job: checking Barcelona to London flight prices and sending updates only when there is something new.
The setup is designed to take about 20 minutes. The first automated job can take longer to build. My flight-price example needed roughly 30 to 45 minutes to finish its initial setup.
Disclosure: Some links are affiliate links. If you purchase through them, we may earn a commission at no extra cost to you. Prices and promotions described here reflect the setup demonstrated and may change.
What You'll Learn
- Deploy Hermes on a separate VPS so scheduled jobs can run while your laptop is closed.
- Connect Nous Portal and choose an inexpensive model for your first experiments.
- Set Telegram as your home channel to receive scheduled-job results on your phone.
- Create a recurring check that remembers previous results and sends only new information.
Table of Contents
- What Makes an AI Agent Different From a Chatbot?
- Step 1: Choose Hermes Agent
- Step 2: Give Your Agent a Home on a VPS
- Step 3: Connect an AI Model Through Nous Portal
- Step 4: Connect Hermes to Telegram
- Step 5: Give Your Agent Its First Scheduled Job
- How Much Does a Self-Hosted AI Agent Cost?
What Makes an AI Agent Different From a Chatbot?
The simplest way to use AI is to type a question and get an answer. An agent adds three things around that same kind of AI model:
- Tools: It can search the web, read and write files, and run programs on its computer.
- Goals: You describe an outcome, and it works out the steps. It can repeat the job on a schedule while you are away.
- Memory: It can retain preferences and useful information instead of treating every task as a fresh start.
The model is the brain. The agent is the software around that brain that lets it take action, remember things, and keep working.
That distinction matters because installing the agent does not automatically give it intelligence. We need to supply a model account separately.
Step 1: Choose Hermes Agent
Hermes Agent is free, open-source software from Nous Research. You pay for the machine it runs on and the AI model it uses, not for the agent software itself.
ChatGPT and Claude already offer useful features such as memory, scheduled tasks, and integrations. If those cover everything you need, you may not need a separate agent. The reason I use Hermes is the extra flexibility.
Choose different models for different jobs
Rather than staying inside one AI company’s model lineup, Hermes connects to models from different providers. You can use an inexpensive model for routine checks and a more powerful model for difficult work, all within the same agent setup.
Control the software and its environment
Hermes runs on a server you control. That gives you more control over its files, configuration, and software than a hosted chatbot subscription does.
You still depend on your hosting company and model provider, including their pricing and limits. Self-hosting gives you control over the agent, not independence from every service it uses.
Use the messaging apps you already have
Hermes can connect to Telegram, WhatsApp, Slack, Discord, and other platforms. That means your agent can reach you outside a browser dashboard.
It also builds reusable skills: step-by-step notes for doing particular tasks. Instead of recreating the process every time, the agent can save what it learns and reuse it for your work.
Step 2: Give Your Agent a Home on a VPS
Your agent needs a computer to live on. For a first setup, I recommend a virtual private server, or VPS. It is a rented computer in a data center that stays on even when your laptop is closed.
There are three reasons to use one:
- It stays awake. Scheduled checks and overnight messages depend on the machine running.
- It keeps experiments separate. An agent can install software, run commands, and create or delete files. A fresh server keeps that activity away from your personal computer.
- It is reachable from different devices. Your phone, laptop, and tablet can all connect to the same agent.
Think of it as a practice workshop. You want somewhere you can experiment without your personal photos, sensitive work documents, passwords, or banking sessions sitting beside the tools.
You can install Hermes locally, but it will only work while that computer is awake. For a beginner, the separate server is the simpler starting point.
Why use Hostinger for this setup?
Many VPS providers would require you to install Hermes through a terminal. Hostinger has a one-click Hermes template that handles the installation, secure web access, and login page. It also provides backups, one-click updates, and a restart button.
Software changes quickly, so menu labels and button positions may look different over time. Follow the purpose of each step rather than worrying about an exact visual match.
Choose your plan and checkout options
The Hostinger offer used for this setup adds an extra 10% discount to eligible sale pricing. Check the applied discount and current terms before paying.
- Select Choose plan to see the VPS options.
- Choose KVM 1. It is the smallest plan and the recommended starting point for one agent. You can upgrade later without reinstalling everything.
- Select your billing period. Longer terms reduce the monthly equivalent, but require a longer commitment. The demonstrated discount required at least 12 months.
- Untick Ready-to-use AI. That adds a separate AI service, and we are connecting our own model provider.
- Leave the other optional add-ons unchanged, review the total and discount, then continue.
- Create an account with Google, GitHub, or email. Complete the billing and payment steps.
The checkout demonstrated also included a 30-day money-back guarantee. Confirm the current guarantee and renewal terms for your purchase.
Deploy Hermes and save your credentials
After payment, Hostinger should take you into the Hermes setup form.
- Keep the admin username as hermes, or choose your own.
- Reveal the generated admin password with the eye icon.
- Save the username and password in a password manager. Avoid leaving them in an unsecured text file.
- Click Deploy.
- Wait until the application shows a green status indicator and Running.
Deployment can take a few minutes. You may also see an optional survey that you can complete or skip.
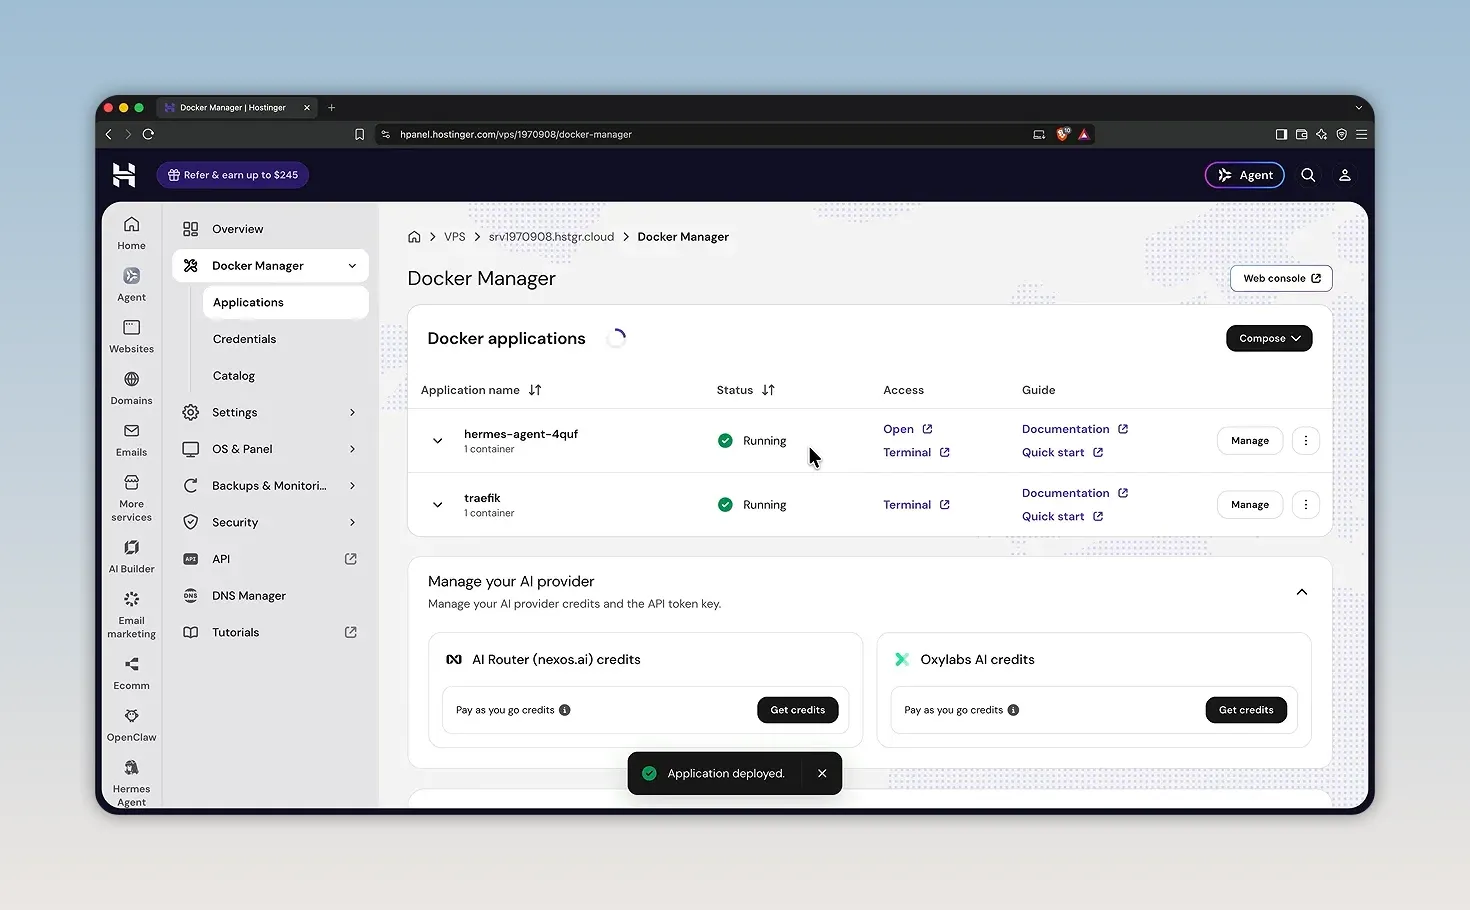
In Hostinger’s Docker Manager, you should see Hermes Agent and Traefik. Hermes is the agent application. Traefik handles the secure connection to it. You do not need to configure either through a terminal for this installation route.
Open the Hermes dashboard
Find Hermes Agent in Docker Manager and click Open in its access column. Bookmark that address, then sign in with the credentials you saved.
This is your agent’s control room. The main areas to know are:
- Sessions: Conversations across devices, with access to the agent’s shared memory.
- Models: The AI model used for the agent’s thinking.
- Cron: Scheduled jobs that run while you are away.
- Chat: The browser-based conversation interface.
- Gateway: The messaging connection between Hermes and external platforms.
If you send a message now, you may see No inference provider configured. That is expected. The agent is installed, but we have not connected its model yet.
Step 3: Connect an AI Model Through Nous Portal
We’ll use Nous Portal, from the same team behind Hermes. It is built into the dashboard, so you can connect by signing in rather than manually copying an API key.
The service demonstrated offered access to more than 200 models, plus tools for web search, reading pages, image generation, browsing, and speech.
At the time of setup, the plan cost $20 per month and included $22 in credits. The Nous Portal introductory offer took $15 off the first paid month, making that first month $5 while still including $22 in credits. Verify the current offer before checkout.
Create and authorize your model account
- Open the invitation page and select Claim your invite.
- Create an account using one of the available sign-in methods.
- If requested, enter the six-digit verification code sent to your email.
- Review the discount and complete checkout.
- Confirm that your account has received its credits.
Now return to the Hermes browser dashboard:
- Open Keys in the left navigation.
- Find Nous Portal and click Login.
- In the authorization page, click Connect to allow Hermes to use the plan.
- Return to Hermes and confirm that Nous Portal shows as connected.
Start with DeepSeek Flash
While learning, you will send plenty of test messages. Start with a fast, inexpensive model rather than spending more than necessary on those experiments.
My recommendation for this setup is DeepSeek Flash, because it is inexpensive and works well with tools.
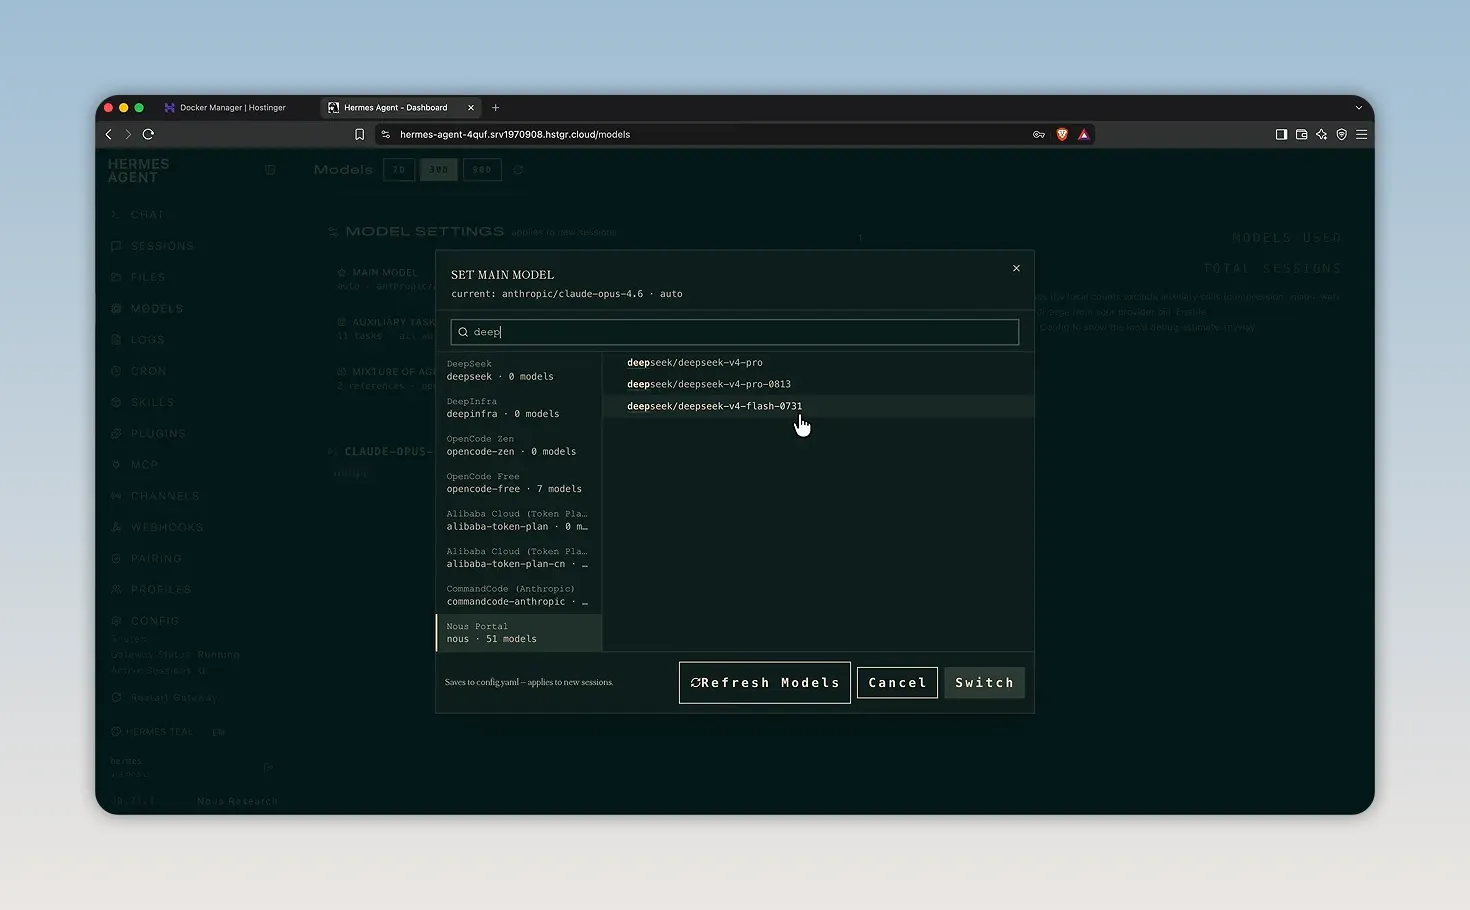
- Open Models.
- Click Change beside the main model.
- Search for DeepSeek.
- Select the newest available Flash version.
- Click Switch, then accept the reload prompt.
The demonstrated model was labeled DeepSeek V4 Flash 0731. Model names and versions change, so focus on finding the Flash option rather than matching that exact version number.
Test the connection
Return to Chat and send a simple greeting. Once the agent responds, ask it to list the tools available in your installation.
In my setup, that included browsing, terminal commands, file operations, code execution, web search, delegation to subagents, memory, and scheduling.
Your agent can now respond and use tools. Next, it needs a way to reach your phone.
Step 4: Connect Hermes to Telegram
Telegram is a convenient first messaging connection because the Hermes setup uses a QR code instead of requiring you to copy bot tokens manually. You can keep text, files, photos, and voice notes together in one thread.
Install Telegram from the official Telegram apps page if you do not already have it, sign in, and keep your phone nearby.
Enable the Telegram channel
- In Hermes, open Channels.
- Find Telegram and turn its toggle on.
- Click the restart button to apply the change.
- Wait for the gateway to restart. If the status has not updated after a few minutes, refresh the browser.
At this point, Telegram may be enabled while still showing that no bot token is configured. That is normal. The QR connection comes next.
Create and connect your bot
- Click Create with QR in the Telegram channel settings.
- Scan the QR code with your phone’s camera and open the link.
- In Telegram, the demonstrated flow opens the Nabu Casa Hermes bot. Tap Create bot, then confirm with Create.
- Telegram may open your new agent’s conversation before the connection is complete. Go back to the setup bot’s chat. If you cannot find it, scan the QR code again.
- Tap Connect this bot.
- Check the Hermes dashboard. It should now show the bot name and your Telegram user ID as the allowed user.
- Click Save and restart, then wait for the gateway to return to running status.
If the page seems stuck after the restart, give it a few minutes and refresh. You want Telegram to show as connected and the gateway to show as running.
Send a message and set your home channel
Open your new bot’s username in Telegram and tap Start. Then send an actual message, such as a greeting asking whether it can respond. Tapping Start alone does not trigger the normal conversation in this flow.
You may receive a notice that no home channel is set. Send or tap /sethome in that conversation.
This is an important step: the home channel is where Hermes delivers scheduled-job results and cross-platform messages. Setting Telegram as home tells the agent where to send its updates.
Keep the connection safe
The connection process adds your Telegram account to the allow list. Other people who find the bot should not be able to use it unless you authorize them.
However, Telegram bot chats are not end-to-end encrypted. Do not send passwords, banking information, or other secrets through the conversation. Telegram’s explanation of Secret Chats and cloud chats provides more context about its encryption model.
Your agent now has a server, a model, and a messaging connection. It is ready for a real job.
Step 5: Give Your Agent Its First Scheduled Job
A great first job is a watcher. It checks something on a schedule, remembers what it has already reported, and messages you only when something changes.
That last part matters. You do not need a notification every few hours saying nothing happened. You want an update when there is something worth knowing.
Describe the outcome in plain language
Start a new session in the browser or send a message through Telegram. I used a desktop app connected to the same agent, but a separate desktop installation is not required for this task.
For the flight-price example, send an instruction like this:
Track flight-price trends between Barcelona and London. Create a reusable skill for checking them, remember which results you have already sent me, and run the check every few hours. Send updates to Telegram only when you find new information.
This gives the agent five clear requirements:
- A subject: Barcelona to London flight prices.
- A reusable process: Save a skill for future checks.
- State tracking: Remember what has already been reported.
- A schedule: Repeat the check every few hours.
- A delivery rule: Send new information to Telegram without repeating old results.
Allow time for the initial build
My first flight watcher took around 30 to 45 minutes. The agent researched how to do the job, built the checking process, created a skill, saved information for tracking previous results, and scheduled future runs.
You are not writing the code yourself, but the agent may still need to create scripts and files to do the work. No-code setup does not mean there is no work happening underneath.
Verify the schedule and notification
Open Cron or the scheduled-jobs area and confirm that the task exists. My Barcelona to London flight-price job was scheduled to run every six hours.
Then check that the results reach Telegram. In my example, the agent later sent an unprompted flight-price update from a scheduled run.
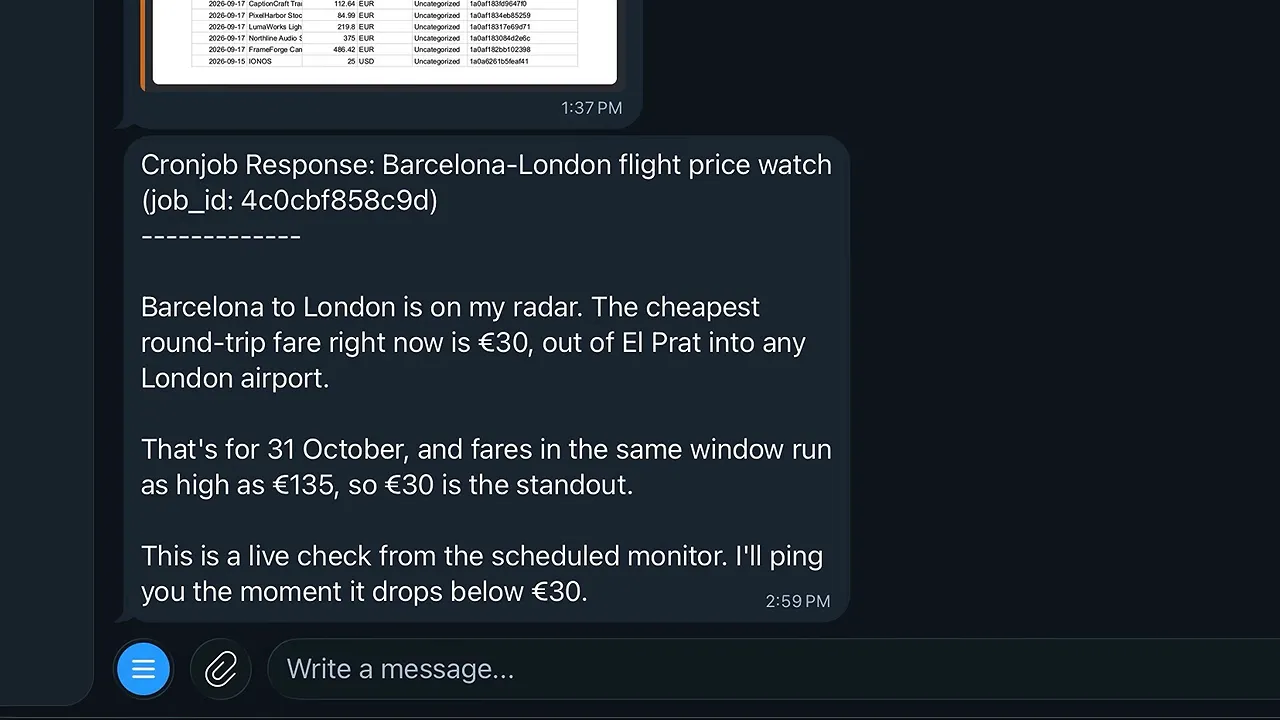
The useful shift is simple: you describe the outcome once, and future updates come to you.
Use the same approach for other recurring tasks
Flights are just one example. You can ask a watcher to follow a product price, news about a topic you care about, or tomorrow’s weather.
My own agent runs more than 20 jobs. They include a Monday bookkeeping check, birthday reminders with early gift research, twice-daily research for a trip, and follow-up work on a negotiation.
Start with one clear task. If a website blocks automated access, ask the agent to find another source rather than assuming the whole job is impossible.
How Much Does a Self-Hosted AI Agent Cost?
There are two separate costs, and keeping them separate makes the whole setup easier to understand.
- The VPS: A fixed hosting charge for keeping the agent’s computer running. The monthly equivalent depends on your plan, billing period, and promotional terms.
- The model and tools: Usage consumes credits through your model account. The total varies with the model and the amount of work you ask it to do.
Hermes Agent itself is free. In the Nous Portal plan demonstrated, $20 per month purchased $22 in credits. That is a credit allowance, not unlimited AI usage.
DeepSeek Flash kept individual message costs very low in this setup. On the first day I set up my agent, model usage came to a little over eight cents. That is an example, not a guaranteed daily cost. Your model choice, message volume, and scheduled work will affect consumption.
Use the Usage page in Nous Portal to see what you have actually spent. It is especially useful while experimenting with new jobs.
You now have the foundation: an agent running on its own server, an AI model connected, Telegram ready for messages, and a scheduled task that can bring new information to you. The next step is not a giant automation system. It is giving that first job a chance to run, checking its results, and improving the instructions as you learn what works.


