Higgsfield AI can help you make a short film, put yourself into a ridiculous house party, recreate a social media trend, or generate product and lifestyle photos for your store. But getting a great result usually takes more than typing a sentence and hitting Generate.
The real difference comes from knowing how to write your prompts, choosing a model that fits the job, and keeping your characters and locations consistent. Just as importantly, you need a way to experiment without burning through all your credits.
I like to approach Higgsfield in five levels: generating, casting, remixing, directing, and automating. Each level builds on the previous one, starting with a single image and ending with a workflow that can create entire scenes from a conversation with Claude.
What You'll Learn
- Test video motion in low-resolution drafts before spending credits on final-quality generations.
- Save characters, locations, and props as elements to improve consistency across scenes.
- Connect Claude to Higgsfield to generate and revise scenes through a single conversation.
- Combine selected takes with music and sound effects in a traditional editor for a polished result.
Before You Start: Set Up Higgsfield and Claude
You need two accounts for this workflow:
- Higgsfield: You need a plan with credits to generate content.
- Claude: This will help turn your ideas into detailed prompts. A free account is enough to get started with prompt writing.
Higgsfield’s plans, offers, and model availability change frequently. The plan options demonstrated here are Starter, Plus, and Ultra, with monthly and yearly billing. I used Ultra, but you can follow most of this workflow on a lower plan. Pick what works for your budget and check which models and features are included before committing.
You can check the current offer through this Higgsfield link. This is an affiliate link, which means we may earn a small commission if you purchase through it, at no extra cost to you.
Install Claude Desktop and the Higgsfield Skill
Download the Claude desktop app and sign in with your Claude account. Choose the best model available to you. Higher effort settings can be useful, but they also consume more of your usage, so you do not need to push everything to the maximum.
Next, download the free Higgsfield skill. This gives Claude instructions for the prompting and production workflow we will use.
- Click the plus icon beside Claude’s message box.
- Open Skills, then select Browse skills.
- Click Add, then Upload skill.
- Drag in the downloaded skill file and click Upload.
Once installed, Claude can use the skill when you ask about Higgsfield. You do not need to attach it to every message.
I usually use Claude’s microphone feature to describe an idea out loud. You can ramble a little, explain the vibe, and talk through what should happen. Claude then turns that into a more structured prompt. Typing works just as well if you prefer it.
Level 1: Generate Your First Image, Video, and Voiceover
Get Comfortable With the Workspace
Higgsfield opens on the Explore tab, which is essentially a showcase of new and popular tools. Do not worry about learning everything on that page at once. The main navigation you need initially is Image, Video, and Audio.
The folder icon opens your Assets, where your generated content is saved. Your profile area shows your plan and remaining credits. Since Higgsfield releases features frequently, the exact layout and promotional cards may look different over time.
Set Up Your First Image
Open Image > Create image. Your results appear in the main workspace, and the generation controls sit along the bottom.
Here is what those controls do:
- References: The plus icon lets you upload an image for the AI to work from, such as a logo, product, outfit, or room.
- Elements: The @ control accesses saved characters, locations, and props. We will build these in the next level.
- Model: This is the AI generating the image. Different models can produce different styles and handle different tasks better.
- Aspect ratio: This controls the image’s shape. I use 16:9 for the first example because I want to turn it into a widescreen video.
- Quality and resolution: These control the output settings.
- Batch size: This determines how many images you generate from one prompt.
Check the credit cost before every generation. In the demonstrated setup, one image costs 6.5 credits, while a batch of four costs 26. Those are example costs, not fixed pricing, but the principle matters: more options also mean more credits.
Use Claude to Turn an Idea Into a Prompt
For the first image, I want a monkey in a black cloak and helmet, holding a glowing red lightsaber at a house party. People around him are cheering with red cups, and there are dogs wearing sunglasses. It should feel like somebody snapped a real party photo, not like a polished illustration.
That description gives Claude the important ingredients:
- The main subject and what it is wearing.
- The location and surrounding activity.
- The important prop.
- The visual style and level of realism.
Ask Claude to turn that idea into a Higgsfield image prompt. Copy the result, paste it into Create image, and click Generate. GPT Image 2 works for the first example, but use an available model if your options differ.
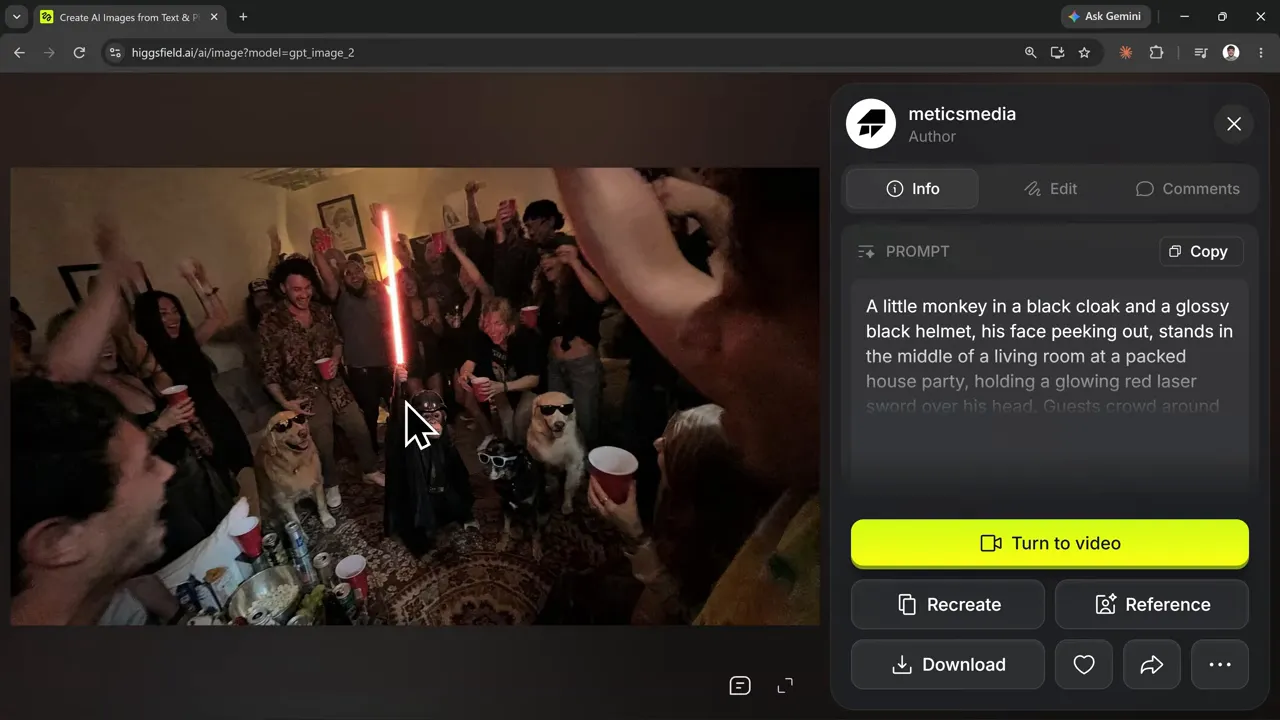
If you like the composition but not the style, try the same prompt with another image model. You do not necessarily need to rewrite the whole idea. For this example, I liked the slightly older phone-camera look, so I downloaded the image and moved on.
Turn the Image Into a Video
Open the image and click Turn to video. Higgsfield takes you to the video generator with the image already attached. You can also reach that workspace through Video > Create video.
For this workflow, I use Seedance 2.5 where available. If it is not included in your plan, choose an available general-purpose video model and experiment.
Now give Claude the image too. This helps it understand the actual starting frame rather than relying on a description of what you hoped to generate.
Ask for a five-second clip in which the monkey swings the lightsaber overhead while the crowd cheers and raises its cups. Describe the camera style as handheld phone footage with the flash on.
An image prompt establishes what a scene looks like. A video prompt also needs to explain what moves and how. The action, crowd reactions, and camera behavior all matter.
You can generate video without a starting image as well. Leave the reference area empty and describe the scene from scratch. Using a starting frame simply gives you an existing visual foundation.
Save Credits by Generating Drafts First
This is one of the most useful habits you can build: test the motion before paying for the final-quality version.
For the first clip, I use:
- Model: Seedance 2.5 Draft.
- Duration: 5 seconds.
- Aspect ratio: 16:9.
- Resolution: 480p.
- Bitrate: High.
The draft is lower quality, but it lets you judge the things that matter at this stage: the movement, timing, and overall action.
My first attempt looked stiff. The monkey was moving the lightsaber, but not in the circular, energetic way I had imagined. I could have generated another draft with the same prompt. Instead, I gave Claude specific feedback:
- Make the crowd react more and move around the frame.
- Have the dogs spread out and move away from the monkey.
- Make the lightsaber movement more circular.
- Add some jumping and more energetic movement from the monkey.
The revised draft felt much more natural. That is the point of the process. You are not trying to find a magic sentence that guarantees perfection. You are giving direction, checking the result, and making useful adjustments.
Once you are happy with the draft, click Generate in 1080p to create the higher-quality version. Then download the approved clip.
Generate a Voiceover
Open Audio > Text to speech. The audio workspace has three useful modes:
- Text to speech: Generates spoken audio from a written script.
- Voice change: Changes the voice in an existing recording while retaining its words.
- Translate: Changes the language of an existing recording.
There are also media upload and custom voice options. For this example, I prefer an available ElevenLabs model and select the Killian voice after previewing it.
The idea is a playful movie-trailer voiceover introducing a world where monkeys carry lightsabers and a party is about to become complete chaos. I want something that sounds more like a comedy trailer than an overly dramatic action announcement.
Paste in your script, generate it, listen back, and download the version you like. The audio and video download as normal files, so you can combine them in a traditional editor later.
To find everything you have made, open Assets. You can filter by media type, including images, rather than searching through all your generations at once.
Level 2: Build a Cast That Stays Consistent
Generating a great monkey once is fun. Getting that same monkey into five different shots is a different problem.
If you rerun the original image prompt, Higgsfield may produce a different face, helmet, outfit, or room. The words are the same, but the model interprets them again.
Casting solves this by saving the things that need to stay consistent as elements. There are three categories:
- Characters: People, animals, or imagined creatures.
- Locations: Rooms, offices, houses, or other environments.
- Props: Products, briefcases, and other objects used in a scene.
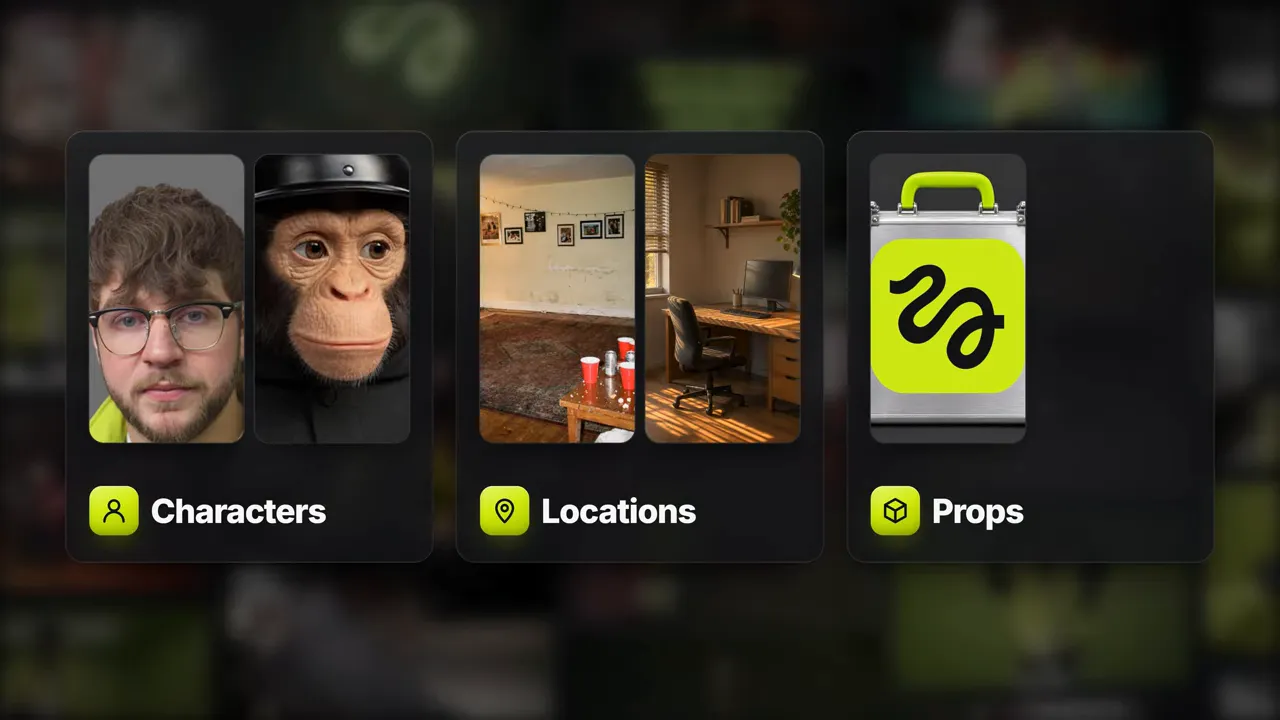
For my example, the cast includes a silver Higgsfield briefcase, the cloaked monkey, a house-party living room, and an AI version of me wearing a lime green puffer jacket.
Create and Save a Prop
Start by asking Claude for separate prompts for your prop, character, and location. Explain that you are building reusable elements, not just standalone images.
For the prop, I describe a silver briefcase with a lime green handle and the Higgsfield logo. Because the logo needs to match, I upload it as a reference through Plus > Upload media.
This is what makes references so useful. You can provide your own logo for a product photo, an actual room for a location, or an existing photo when you need the model to work from something specific.
For the briefcase, I use the GPT image model Claude recommends for the logo task and a 1:1 aspect ratio. After generating an image I like, I save it as an element:
- Open the generated image.
- Click the three-dot menu.
- Select Create element > Image element.
- Give it a clear name, such as Briefcase.
- Set the category to Prop and click Create.
Create a Character Sheet
For the monkey, I remove the logo reference, paste in the character prompt, and use Flux.2 Pro as recommended in this example.
Here, generating four options is useful because I am choosing the character’s ongoing appearance. Some results look too cartoonish, while another feels much closer to the realism I want.
The important detail is that the prompt produces a character sheet with multiple views, rather than one action shot. Those views give Higgsfield more visual information to reference as the character changes position.
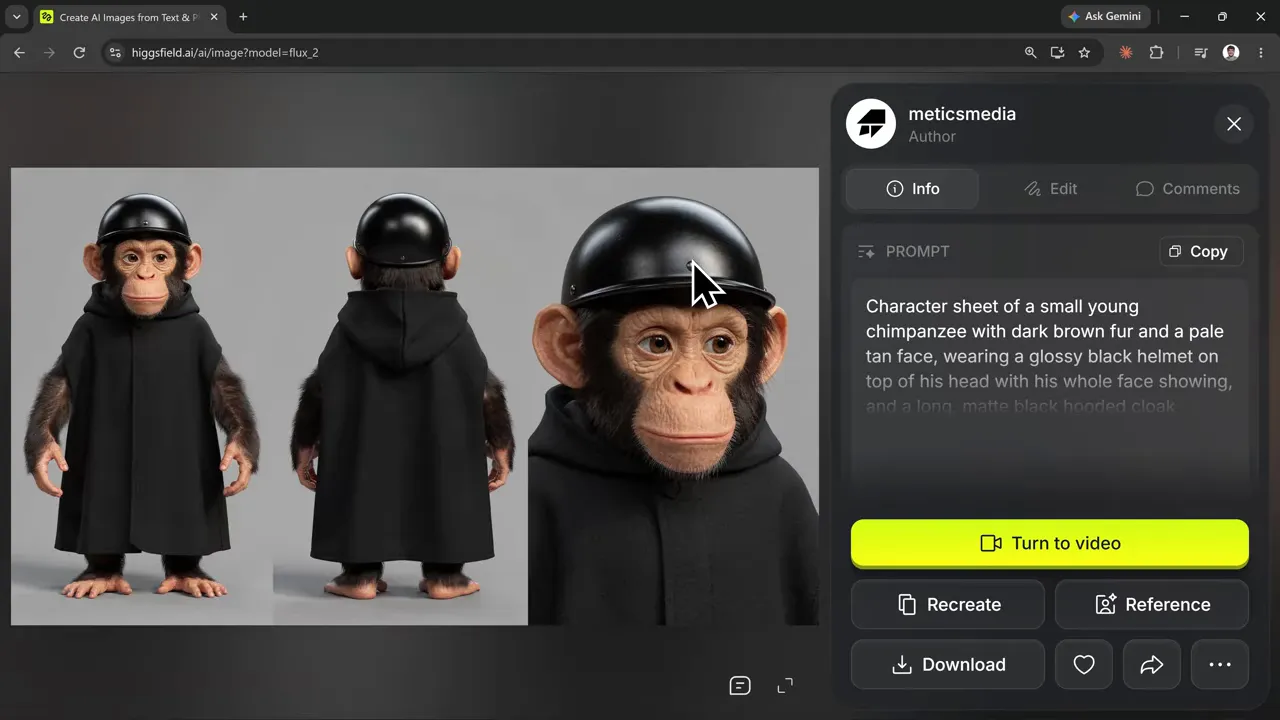
Choose your favorite result, open the three-dot menu, and save it as an image element in the Character category. I name mine Monkey.
Create a Location Element
Next, generate the house-party living room. I keep the same image model used for the monkey because characters and environments generated with different models can sometimes feel stylistically mismatched.
That is a useful default, not a rule you can never break. The briefcase used a different model because accurately handling the logo was the priority.
I generate four room options, choose the angle and flash-lit look I like, and save the image as a Location element named House Party.
Make an AI Version of Yourself With Soul ID
For a real person, Higgsfield offers a more specialized starting point: Soul ID.
- Open Image > Soul ID Character.
- Click Create character.
- Read and agree to the media upload agreement.
- Upload at least 20 photos of the person.
- Name the character and click Create.
Use varied face angles, including straight-on and side views. I pulled images from my own existing footage. The goal is to give Soul ID enough information to represent the face accurately.
Once it is ready, hover over the Soul ID and click Generate. This returns you to Create image with the identity selected.
There is one more step if you want a consistent outfit. Soul ID represents your identity, but a character element establishes the full look you want to reuse.
I give Claude a photo of myself and ask for a character-sheet prompt using my Soul ID, with a lime green puffer jacket. After generating several options, I choose the one with the best face and jacket, then save it as a Character element called Caleb Jacket.
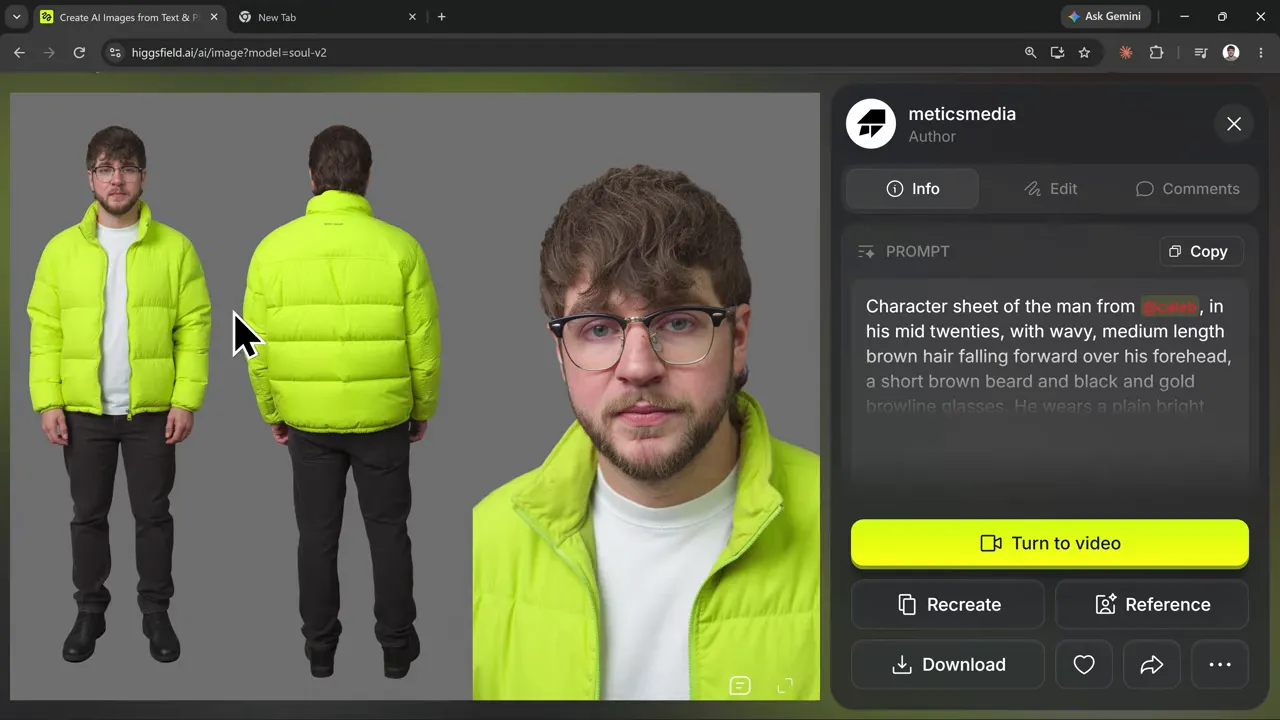
Now I have a reusable reference for my face, outfit, and full-body appearance.
Put the Whole Cast Into a Video
With the elements saved, I ask Claude to plan a 15-second scene: I enter the house party carrying the briefcase, drop it, pull a lightsaber from my jacket, and fight the monkey. The visual style is grainy found footage from an older camcorder, with a 4:3 frame and direct flash.
Give Claude the exact names of your elements. Higgsfield uses @ mentions to connect the prompt to those saved assets. If Claude guesses the wrong name, the reference may appear in red rather than linking correctly.
To fix an unresolved mention, delete it, type @, and select the correct element from the list.
For this scene, I use Seedance 2.5 Draft, 480p, a 15-second duration, and a 4:3 aspect ratio. After reviewing the result, I can either rerun the prompt for another take or generate the selected draft in 1080p.
The exciting part is that the room, monkey, briefcase, and jacket are now coming from the saved cast instead of being reinvented from scratch. You can find that cast again under Assets > Elements and reuse it in future projects.
Level 3: Remix a Trending Video With Your Character
Once you have a character, you can use Genjutsu to put it into an existing motion template. This is one of the simplest ways to make short-form content in Higgsfield.
Genjutsu has two main tools:
- Motion transfer: Uses movement from a source video with your characters and props.
- Object swap: Replaces one thing in a video while leaving the rest of the scene.
The motion library includes categories such as lifestyle, fun, pets, and music videos, along with trending and recent clips.
Apply a Trend to Your Character
I choose a trend featuring someone showing off a lot of cash. It is a pretty funny fit for the character who has just pulled off a briefcase heist.
- Select a clip in the motion library.
- Click Recreate.
- Remove the existing character reference.
- Open Generations and select your character sheet.
- Adjust the prompt if the template includes one that needs to match your character.
- Generate a preview.
For many templates, replacing the reference image is enough. You do not need to write a long prompt just because the field is there.
I use Standard mode and 480p for the first pass, then check whether the identity, clothing, and movement look right.
Upscale the Clip to 1080p or 4K
Not every tool includes the same Generate in 1080p button used by Seedance. For those clips, use the dedicated upscaler:
- Open Video > Create video.
- Select Edit video, then Upscale.
- Click Add a video to upscale.
- Open Generations and select the approved clip.
- Choose the upscale model and output resolution.
- Click Generate.
I prefer Topaz Starlight Precise based on my results. It also offers a route to 4K if you want to upscale an existing 1080p generation. For this short-form example, 1080p is enough.
Download the completed clip, and you have a file ready for TikTok, Instagram Reels, YouTube Shorts, or another short-form platform.
Level 4: Direct a Story in Cinema Studio
Create video is useful when you need an individual clip. Cinema Studio is where I organize a larger story, such as a short film, ad, or music video, with related generations kept inside one project.
For this example, I build two connected heist scenes. First, my character enters a vault and steals the briefcase. Next, he escapes across a rooftop and falls into a dumpster in an alley.
Before starting, prepare your character, prop, and the locations the story needs.
Create a Project and Choose Your Settings
Open Video > Cinema Studio, then click New project. I name the project Heist.
If your saved elements do not immediately appear in the project’s element picker, open the picker and choose My elements. The project may not have its own elements yet, but your existing library is still available.
For this workflow, I switch from the default Cinema Studio model to Seedance 2.5 Draft. The default model has interesting directing controls, but I found it less consistent for these examples. If Draft is unavailable, try Seedance 2.5 Flash or another model included in your plan.
My starting settings are:
- Aspect ratio: 16:9.
- Resolution: 480p for drafts.
- Duration: 15 seconds.
- Batch size: Two takes.
I like building stories in 10 to 15-second sections. Shorter clips are fine too. I would avoid pushing beyond about 20 seconds for this approach because longer generations can become harder to control.
Plan the First Scene With Claude
Tell Claude that you are working in a Cinema Studio project, identify the selected video model, give the scene length, and supply the exact element names.
For the first scene, the action is:
- My character drops from an overhead air vent into a vault.
- He lands beside a glass display containing the briefcase.
- He breaks the glass and takes the case.
- He attaches an explosive charge to the vault door.
- He takes cover, opens an escape route with the blast, and runs through the smoke.
Claude turns this into a scene breakdown and prompt. Paste the prompt into Cinema Studio, confirm that the character, location, and prop references resolve correctly, and generate two drafts.
Choose Takes for Pacing and Continuity
Compare both versions rather than automatically choosing the first. In this example, I prefer the first take because its pacing and movement feel more natural.
Generate the selected take in 1080p. Once the final version is ready, I remove the unused previews from the project so it stays easy to navigate.
You also do not need to treat a take as all or nothing. If one has a great opening and another has a better ending, download both and combine those sections in your editor.
Add Your Own Voice to a Scene
Generated dialogue is straightforward: tell Claude what the character should say and have it include that direction in the prompt.
Using your actual recorded voice takes an extra step in this workflow. I found that attaching a regular MP3 did not carry the voice through properly, but exporting the recording as a video with a black screen worked.
- Record the line in your editing software.
- Place it over a black screen.
- Export it as a video file.
- Attach that video to the Higgsfield prompt.
- Check its reference name, such as @Video 1.
- Tell Claude which attachment contains the dialogue and when it should be used.
This is a workaround from my testing, not an explanation of why the tool behaves that way.
Continue Into the Second Scene
The rooftop escape picks up immediately after the vault scene. My character bursts through a door with the briefcase, reaches the roof edge, and makes a nervous comment about the drop below.
He then jumps toward a ladder on the next building. The ladder tears away, he falls into an open dumpster, climbs out, and runs down the alley past two people.
I give Claude that full sequence, the new location name, the existing character and briefcase names, and the reference for my recorded line.
After generating two takes, I check more than whether the action is exciting. In one version, a single door becomes a double door as it opens. That makes the opening unsuitable, even though the dialogue and jump look good. The other version has a better entrance and a more convincing ladder break, so that is the take I choose for 1080p.
Look for continuity errors, not just impressive moments. Doors, props, clothing, and physical interactions can reveal which take will actually work in the finished sequence.
From here, keep building one scene at a time. Describe what happens next, generate options, choose the useful material, and add new elements as the story needs them.
Level 5: Automate Higgsfield Through Claude
So far, Claude has written prompts while you have operated Higgsfield manually. That is worth learning because it makes the settings, references, and generation process much easier to understand.
Now you can connect the two tools so Claude can carry out generation tasks directly.
The skill and the connector do different jobs. The skill gives Claude workflow instructions. The connector gives it a way to interact with your Higgsfield account.
Connect Higgsfield to Claude
- In Higgsfield, open MCP and choose Claude.
- Click How to connect and copy the connector URL provided there.
- In Claude, open Customize > Connectors.
- Click Add > Add custom connector.
- Name it Higgsfield and paste in the URL.
- Continue through the setup, add the connector, and click Connect.
- Complete the account connection prompts.
Return to your conversation and ask Claude to verify the connection. In my setup, it can identify the account, check credits, and retrieve the elements I created earlier.
Create a Whole Scene From One Conversation
To test the workflow, I describe the same 15-second vault heist and ask Claude to use the saved vault location, green-jacket character, and briefcase prop.
Claude prepares a plan that includes the shot sequence, model, format, and credit cost. It proposes generating a Seedance 2.5 draft first and moving to 1080p after approval.
Review that plan before telling it to proceed. Once approved, Claude starts the generation and returns the result in the chat.
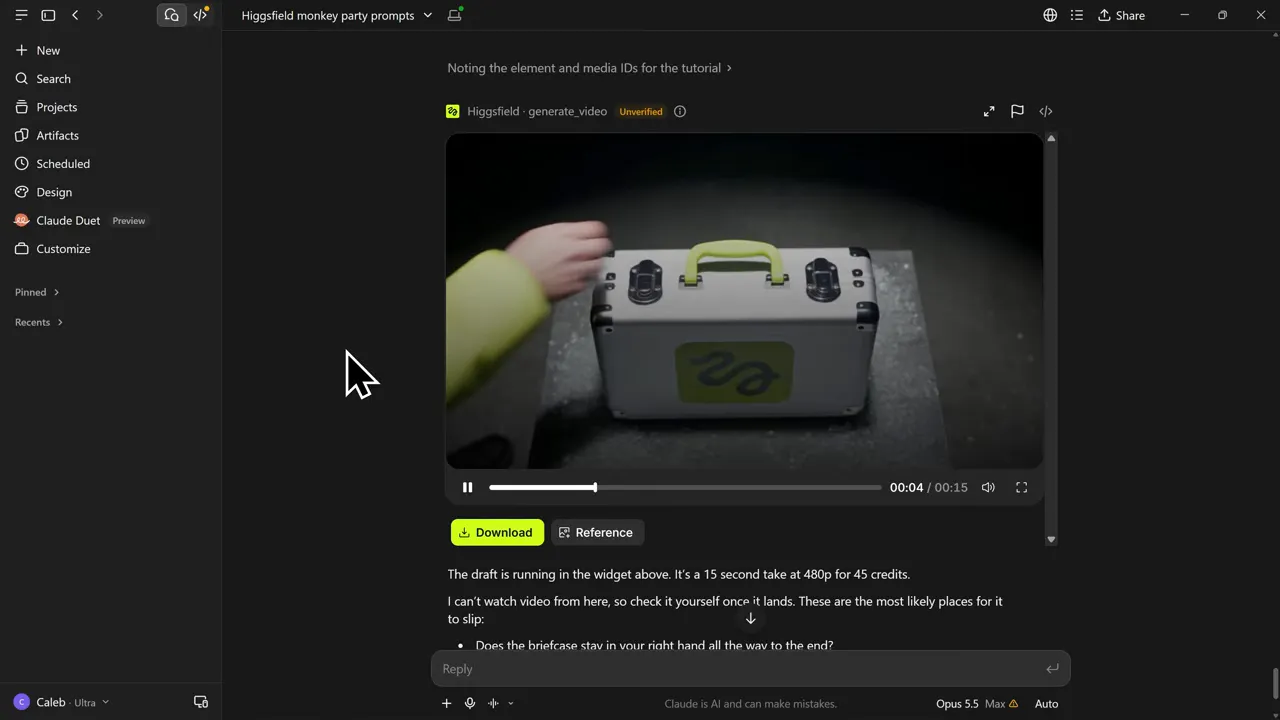
If the take does not work, ask for another draft or explain what needs to change. If it does work, request the full-quality 1080p version, download it, and continue to the next scene.
You are not limited to existing elements. You can also ask Claude to generate new characters, props, and locations, show you the options, and save the approved choices for the story.
References can go directly into the conversation too. Attach a source image or recorded voice clip, explain what it is for, and Claude can upload it as part of the Higgsfield workflow.
This is my favorite way to work with the two tools together. I can stay focused on the idea, compare results, and give feedback instead of constantly moving between interfaces. The creative decisions are still mine, but much of the setup becomes conversational.
Finish the Film in a Traditional Video Editor
Automating generation is the first big workflow improvement. The second is editing the generated material into a finished production.
I bring my approved clips into Premiere Pro, but the same approach works in CapCut or DaVinci Resolve.
- Arrange the selected scenes in story order.
- Trim weak openings, awkward pauses, or unusable endings.
- Combine the strongest sections from different takes where useful.
- Layer voiceovers over the appropriate clips.
- Add music and sound effects to shape the energy of the sequence.
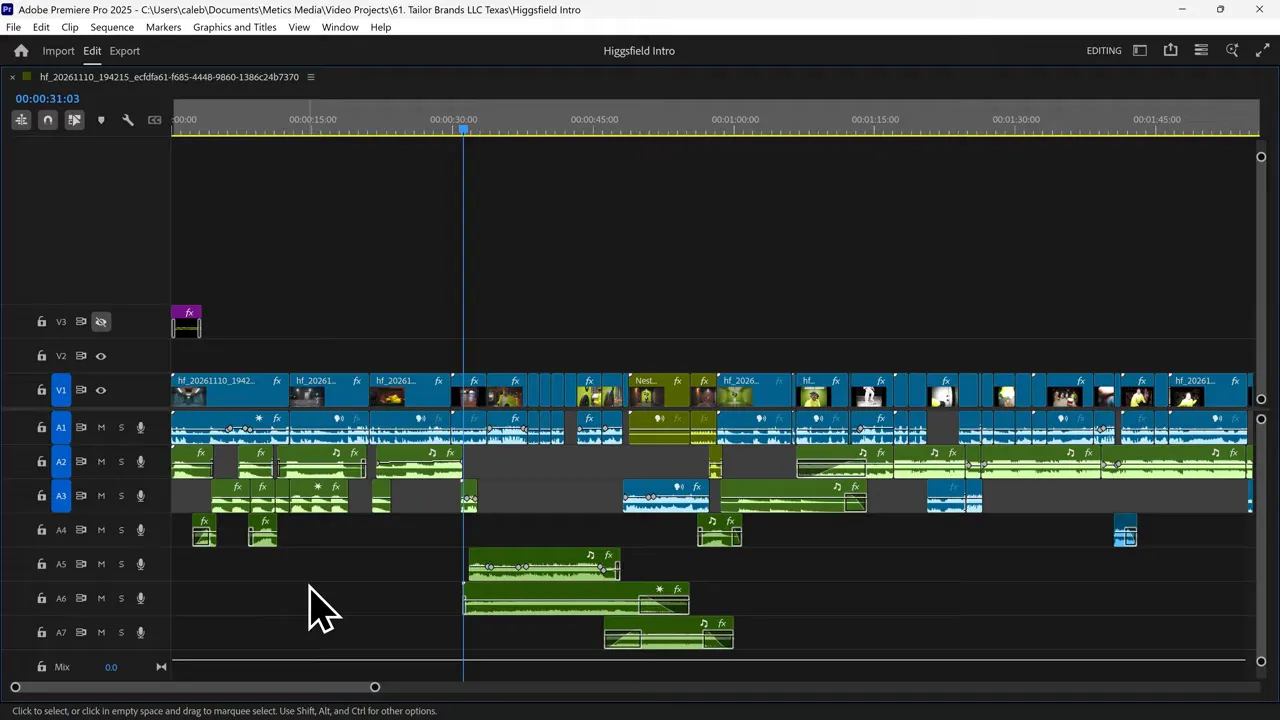
Higgsfield can generate sound effects with its video, but adding your own sound design and music gives you much more control. It helps the action feel more intense, the comedy land better, and the whole project feel more deliberate.
A polished AI film does not have to come from one perfect generation. It can come from a consistent cast, several good takes, and careful choices about which moments make the final cut.
Start with one image. Turn it into a short draft. Build the elements you want to reuse, then create the story scene by scene. Once you understand that process, let Claude handle more of the setup and use your editor to bring everything together.
That is how you move from experimenting with Higgsfield AI to actually directing something of your own.


