Hostinger’s AI website builder can create the first version of your website from a description of your business. From there, you can adjust the design, add your own content, set up a blog or store, and publish everything on your own domain.
You don’t need website-building experience to get started. The key is to treat the AI-generated site as a starting point, not a finished product. AI handles the initial layout and placeholder content, while you make the decisions that turn it into a website for your business.
I’ll use a photography travel business called Shutter & Summit as the example, including tours, photography prints, and a contact form. The same process works for other businesses and personal projects.
What You'll Learn
- Generate a useful first draft by describing your business, required pages, and preferred website style.
- Customize page elements, global styles, navigation, and mobile layouts using the visual editor.
- Set up optional blogs, products, appointments, payments, and contact forms for your business.
- Review SEO settings, verify your domain, and publish again whenever you want updates to go live.
Table of Contents
- 1. Choose a Hostinger Plan and Create Your Account
- 2. Generate Your Website with AI
- 3. Customize the Website Design
- 4. Add Sections and Appointment Listings
- 5. Check and Adjust the Mobile Layout
- 6. Customize the Header, Logo, and Footer
- 7. Add Pages and Organize Navigation
- 8. Adjust Global Website Styles
- 9. Add a Blog and Create Posts
- 10. Set Up an Online Store
- 11. Configure Your Contact Form
- 12. Review Each Page’s SEO Settings
- 13. Connect Your Custom Domain
- 14. Publish Your Website and Keep It Updated
1. Choose a Hostinger Plan and Create Your Account
Start by choosing a plan that includes the features you need. In the setup shown here, Premium is an option for a simpler website, while Unlimited includes more storage, faster speeds, unlimited websites, additional AI builder credits, the AI logo maker, and ecommerce features.
I recommend the more complete option if you want the full set of AI tools or expect to sell products later. Plan names, limits, and offers can change, so check the features listed at checkout before purchasing.
The Hostinger discount offer linked below applies an additional discount during signup. Check that the discount appears in your order summary before continuing.
Disclosure: This is an affiliate offer. If you purchase through it, we may earn a small commission at no extra cost to you.
Once you’ve selected a plan:
- Choose your billing period. The 48-month option shown offers the largest savings, but you can select a shorter period. The 12-month option shown still includes a free domain for one year.
- Review the order summary. Confirm the billing period and applied discount, then click Continue.
- Create your account. Enter an email address and password, then click Register.
- Add your billing details. Enter your billing address, continue to payment, and submit your payment when ready.
You may be offered a domain during checkout. You can leave that for later and build on a temporary domain first.
Complete the initial onboarding
After signup, choose Create a new site, select Hostinger AI Builder, and click Next.
Your onboarding options may look slightly different. For this walkthrough, choose the Manual building method. You’ll still use AI to generate the website and help with content, but you’ll also learn how to make your own adjustments in the editor.
When asked for a domain, choose the temporary-domain option. That lets you get the website ready before selecting your final address.
2. Generate Your Website with AI
Hostinger offers two starting points: professional templates or an AI-generated website. Templates are useful if you already see a layout you like. The AI builder is a faster way to get a first draft tailored to your business or project.
Instead of choosing someone else’s layout and replacing everything, describe what you want Hostinger to create.
Write a detailed website description
Your description should cover three things:
- What your business does. Explain your main products, services, or purpose.
- Which pages you need. List the pages you want included.
- How the website should look. Describe the visual direction you have in mind.
For my example, I explain that the business runs photography travel tours, list the pages I want, and describe the style I’m aiming for. The more useful detail you provide, the better the first draft is likely to be. If you’re struggling to organize your ideas, ChatGPT or Claude can help you turn them into a clearer description.
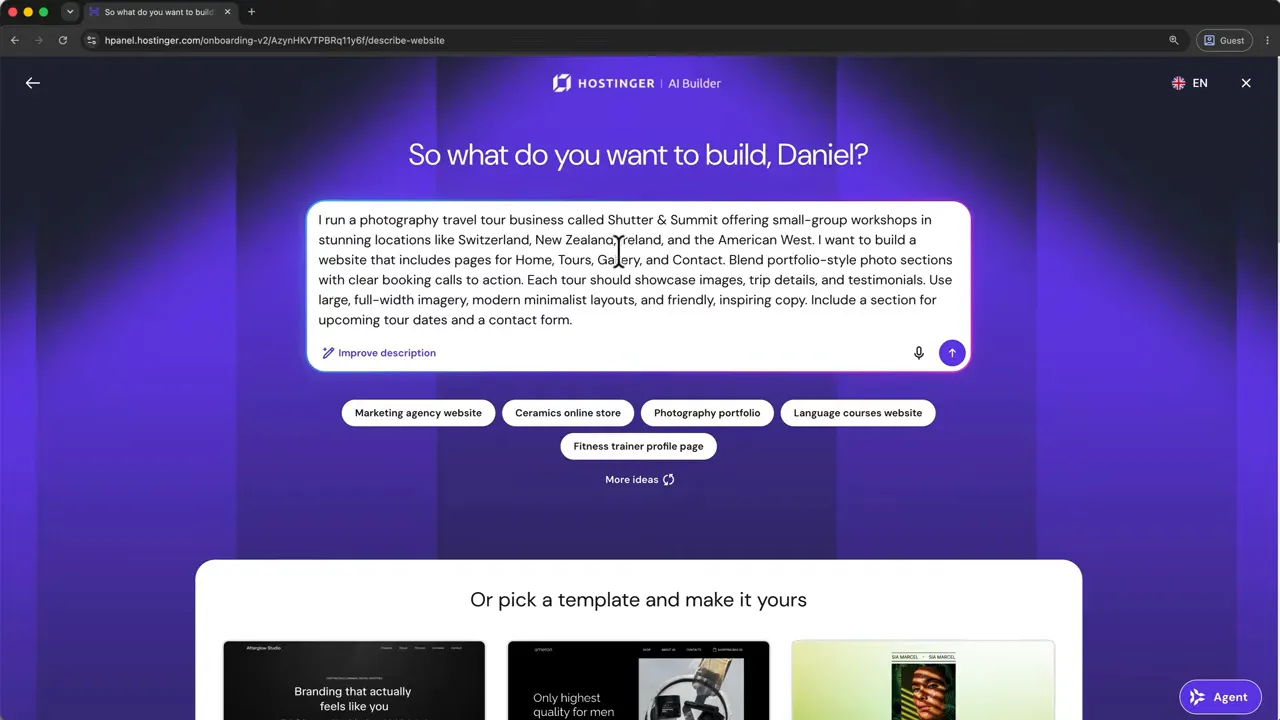
Submit the description and wait while Hostinger prepares the site. Once it loads, scroll through the generated pages and use the desktop and mobile previews to check the result.
If the overall direction is wrong, click Edit your idea to revise the description. If it’s reasonably close, click Continue to open the editor. You don’t need a perfect result at this stage because you can customize it from here.
3. Customize the Website Design
The editor’s left-hand toolbar gives you access to elements, pages, styles, and AI tools. The website itself follows a simple structure:
- Pages contain the content for each part of your website.
- Sections divide a page into larger blocks.
- Elements are the individual text boxes, buttons, images, and other items inside each section.
Once you understand that structure, most editing follows the same pattern: select something, open its editing options, and make your changes.
Edit text and buttons
To change text, click it and select Edit text. Type your replacement copy, then use the floating toolbar to adjust its style, font, and size.
For a button, click it and select Edit button. Change the label, then use Link to to choose what happens when someone clicks.
For the photography site, I change the main button to “Join a tour” and link it to a page on the website. Under the button’s Style tab, I change its fill color to match the orange used in the heading.
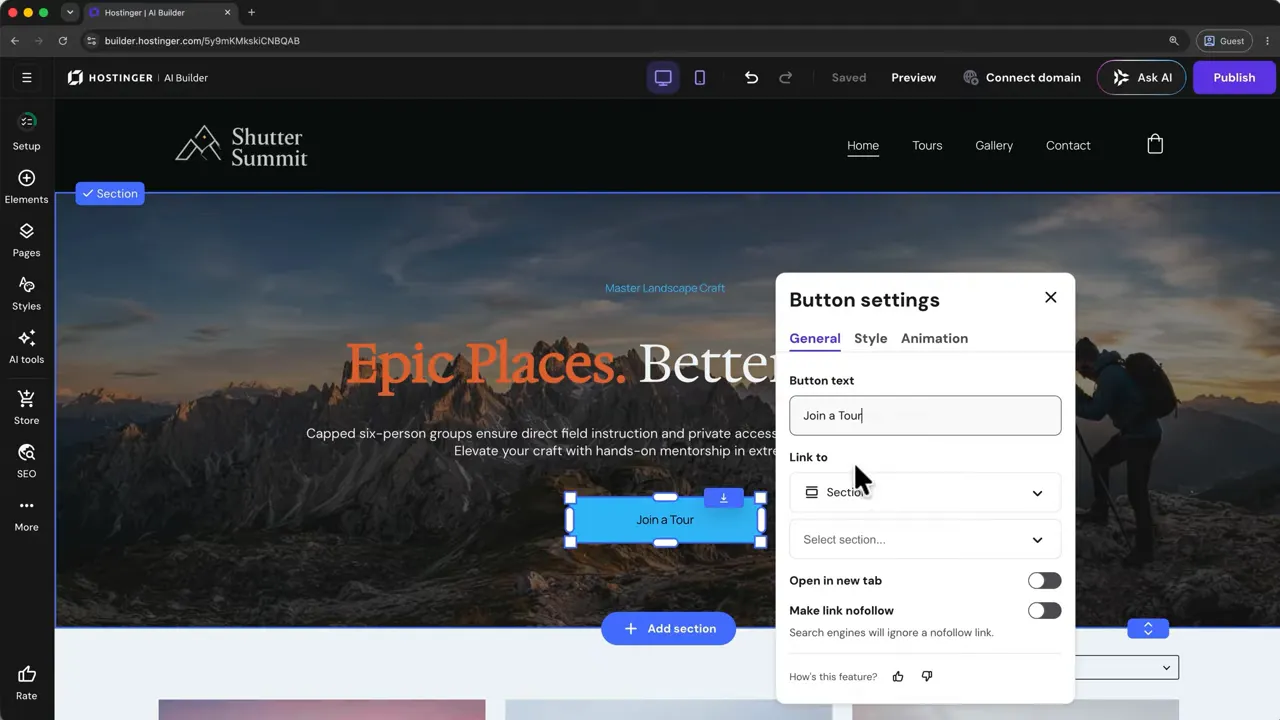
To move an element, click and drag it. Alignment guides appear in the background to help you keep the layout organized.
Replace images or generate new ones
For a regular image, select it and click Edit image. You can replace it with a file you upload or choose an image from the media library.
You can also generate an image with AI:
- Open the image’s generation option.
- Describe the image you want.
- Review the result.
- Revise the description and generate again if needed.
- Click Use image when you find a suitable result.
Generated images are saved in the media library, alongside your uploaded files.
Some images belong to special content blocks rather than ordinary image elements. For example, the tour images in my appointments section are managed through the appointment listings. If an image doesn’t offer the usual replacement controls, check the management options for that section.
Add, remove, and resize content
Click the plus icon in the toolbar to open the elements panel, then drag an element onto the page. To remove an element, select it and click the trash icon.
To make a section taller or shorter, hover over its bottom edge until Section height appears, then drag the boundary. If you make a mistake, use the undo button at the top of the editor.
Use AI Writer to refine your copy
Select a text element and open AI Writer to see the available actions. For example, you can shorten a paragraph, cycle through the suggested versions, and apply the one you prefer.
Even if you don’t intend to publish much AI-written content, these tools can help you fill out the design quickly. It’s easier to judge a layout when it contains realistic text instead of empty space. You can refine the wording afterward.
Change section backgrounds
Select a section, click Edit section, and open the Background tab. You can choose a color, an image, or a video.
If you don’t have a suitable hero image, you can generate one from a description. Once you have an image you like, adjust its position in the section settings. The overlay opacity control is especially useful when text sits over the image because it helps make that text readable.
Work through the rest of your pages in the same way, replacing generated copy and images with content that fits your business.
4. Add Sections and Appointment Listings
You’re not limited to the sections AI created. Hover between two existing sections and click Add section. From there, you can:
- Generate a section from a prompt.
- Add a blank section and build it with elements.
- Choose a ready-made section template.
A services or product template can give you a simple way to display your offers. However, if you want actual appointment management, use the Special section category and choose Appointment list.
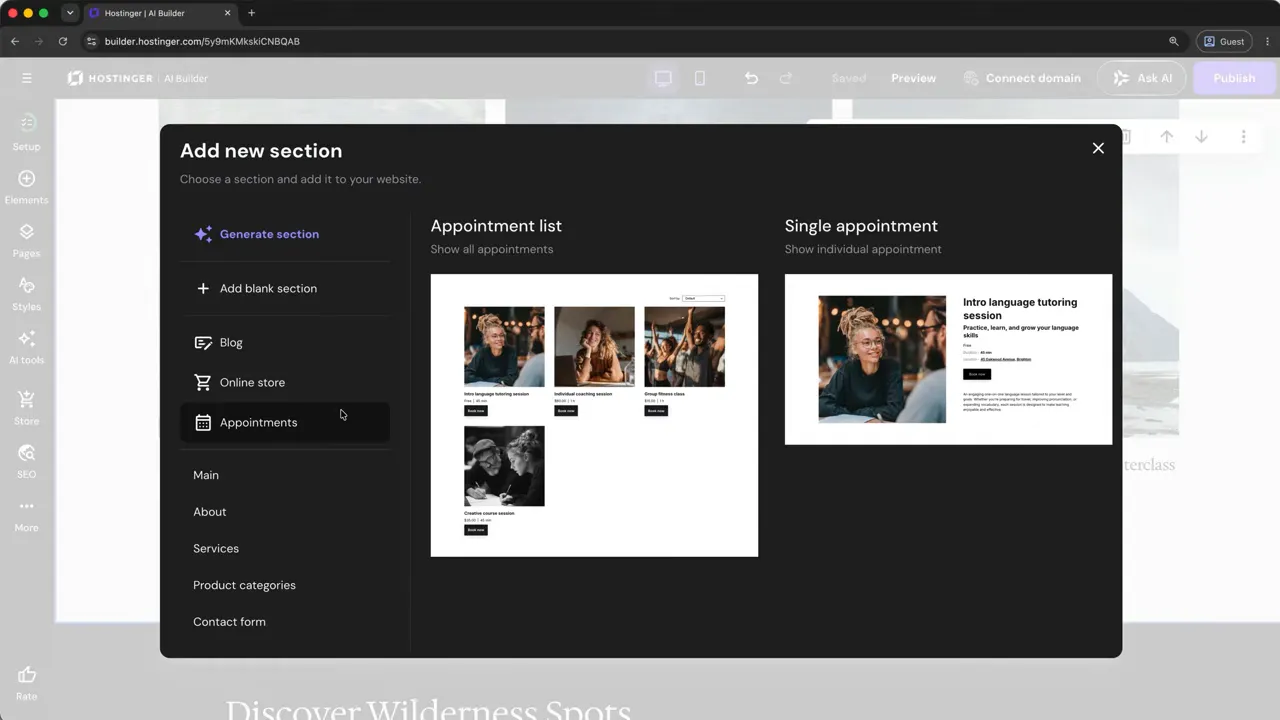
After adding the appointment list, use Edit section to change its appearance and layout. Use Manage appointments to change the actual listing details.
Under List of appointments, you can manage the individual offers. I’ll cover availability and booking settings in the store setup section below.
To remove an unused section, select it and click Delete.
5. Check and Adjust the Mobile Layout
Before going further, click the phone icon in the top bar to switch to mobile editing.
The mobile layout adjustments shown here let you improve spacing and positioning without changing the desktop layout. Go through the page and check that headings, paragraphs, images, and buttons fit comfortably on the smaller screen.
You can drag elements into better positions and adjust section heights. If a section works well on desktop but becomes too long on mobile, select it and use the hide/show controls to turn it off for mobile.
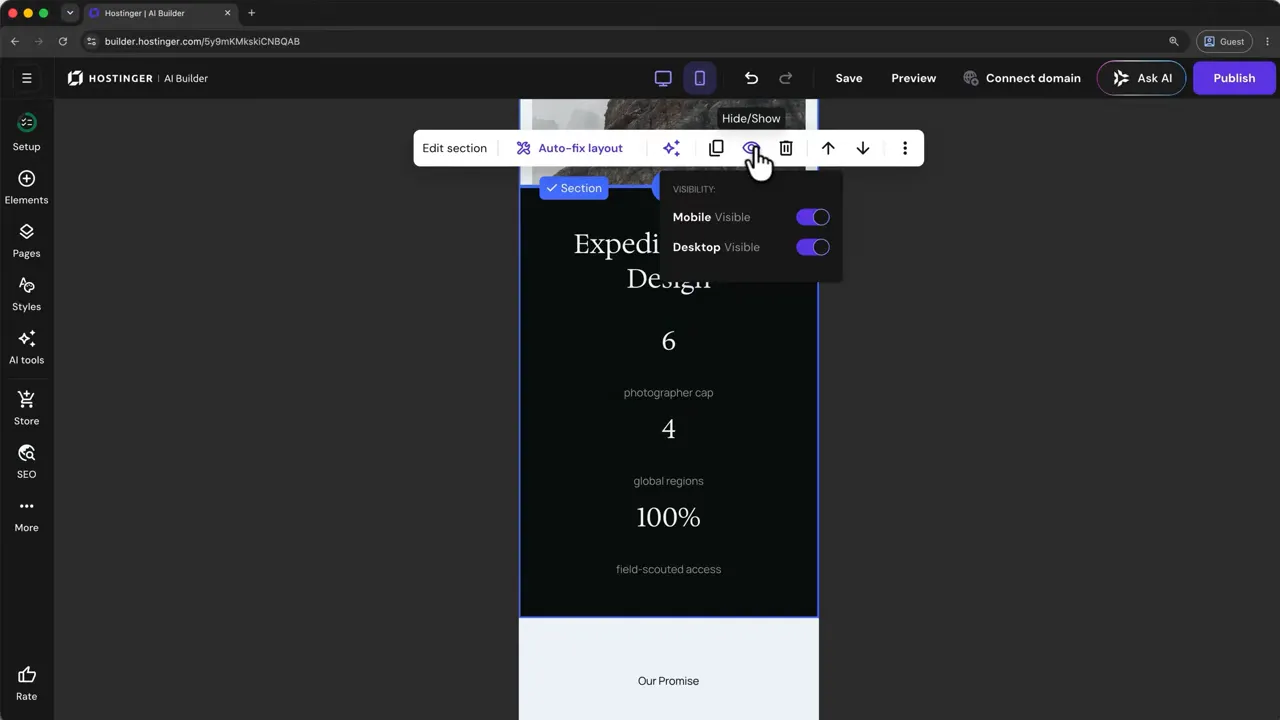
For example, I keep a statistics section on desktop but hide it on mobile because it takes up too much vertical space.
Keep an eye on the save status. Autosave will likely be enabled, but if it isn’t, use the save button to make sure your work is stored.
6. Customize the Header, Logo, and Footer
The header and footer appear across your website, so it’s worth checking them carefully.
Set up the header
Return to desktop editing, scroll to the top, select the header, and click Edit header.
- Layout: Choose the placement of your logo and navigation, adjust spacing, and enable a sticky header if you want it to remain visible while people scroll.
- Elements: Show or hide the logo, enable social icons, edit social links, or add a button.
- Logo: Replace the existing image with your own logo and adjust its width.
- Style: Change the navigation font, header background color, or transparency.
I use a transparent header for the photography site because it works well over the large hero image.
Create a logo if you don’t have one
You can access the AI logo maker from the logo settings or through AI tools. It opens an agent chat where you provide details about your brand, choose a visual direction, select a logo type, and specify colors.
One thing to keep in mind is that the logo maker uses credits. You may only have a few attempts before needing more.
An alternative shown here is to experiment with the regular AI image generator. Describe a logo and refine the prompt until you have some useful ideas. In this workflow, that allowed more experimentation without using the logo maker’s credits. Check the allowances shown in your own account.
The generated designs appear in the media library, but they may need cleanup in Canva, Photoshop, or another image editor. For my logo, I remove the background and change the image proportions before uploading the finished version.
A transparent background and suitable aspect ratio make the logo easier to place in the header. Once uploaded, adjust its width until it fits comfortably beside the navigation.
Review the footer
Scroll to the bottom, select the footer, and click Edit section. You can change its background color, layout, and anchor settings.
Edit footer text just as you would elsewhere on the website. Most importantly, check that the contact details and links are correct rather than leaving generated placeholders in place.
7. Add Pages and Organize Navigation
Open Pages in the left-hand toolbar to see your site’s page list. Drag pages into a different order to rearrange the navigation menu.
Each page has a three-dot menu with options to:
- Rename the page.
- Duplicate it.
- Hide it from navigation.
- Make it the homepage.
- Delete it.
To create another page, click Add page. As with sections, you can generate a page with AI, start with a blank page, or select a template.
If the templates don’t match what you have in mind, try generating a page from a description. You may need a few prompt revisions, but even an imperfect result can give you a useful layout to edit.
8. Adjust Global Website Styles
The Styles panel lets you change the look of the entire website rather than editing every element separately.
Under Colors, you can see the colors used throughout the site and how often each appears. Select a color, choose a replacement, and Hostinger updates the places where that color was used.
The other style tabs include Fonts, Buttons, and Animations. These also apply changes across the website.
Global styles are useful for broad branding changes, but use them carefully. If you only want one button or heading to look different, edit that element instead. And remember that undo is there if a site-wide change doesn’t work out.
9. Add a Blog and Create Posts
Not every website needs a blog. But if you want to publish articles or business updates, you can add one directly in the builder.
- Open Pages and click Add page.
- Select Blog and choose the available template.
- Give the page a navigation name and custom slug.
- Click Save.
You can then manage articles through Blog in the left-hand toolbar. The template includes sample posts, which you can edit, unpublish, or delete through their three-dot menus.
Write a post or use AI for a first draft
Click Add new post. If you use AI generation, choose the tone of voice, select the content length, and enter a prompt before clicking Generate content.
For the best content, I’d still recommend writing the articles yourself. The AI option can provide a starting point, but review the result and edit anything that doesn’t fit.
Once the post is ready, use the status control at the top to make it public. Open Post settings to manage the post details, scheduling, and featured image.
10. Set Up an Online Store
If you want to sell products or services, Hostinger’s built-in store lets you create listings, set prices, and connect payment methods.
Click Store in the left-hand toolbar. AI may already have created one based on your original website description. In my case, the photography tour appointments are already part of the store.
If your site doesn’t have a store, click Add store. Hostinger creates the store page and adds a shopping bag icon to the header.
If you don’t need ecommerce, use the store panel’s three-dot menu and choose Remove store. If you only want to hide the shopping bag icon, open Edit header > Elements and turn off Show shopping cart.
Connect payments and enter your business details
The store panel may show a setup checklist. Clicking a checklist item opens the store manager. You can also open it by selecting Settings at the bottom of the panel.
In the store manager, go to Settings > Payments. Connect an available provider, such as Stripe or PayPal. Hostinger displays options based on your location.
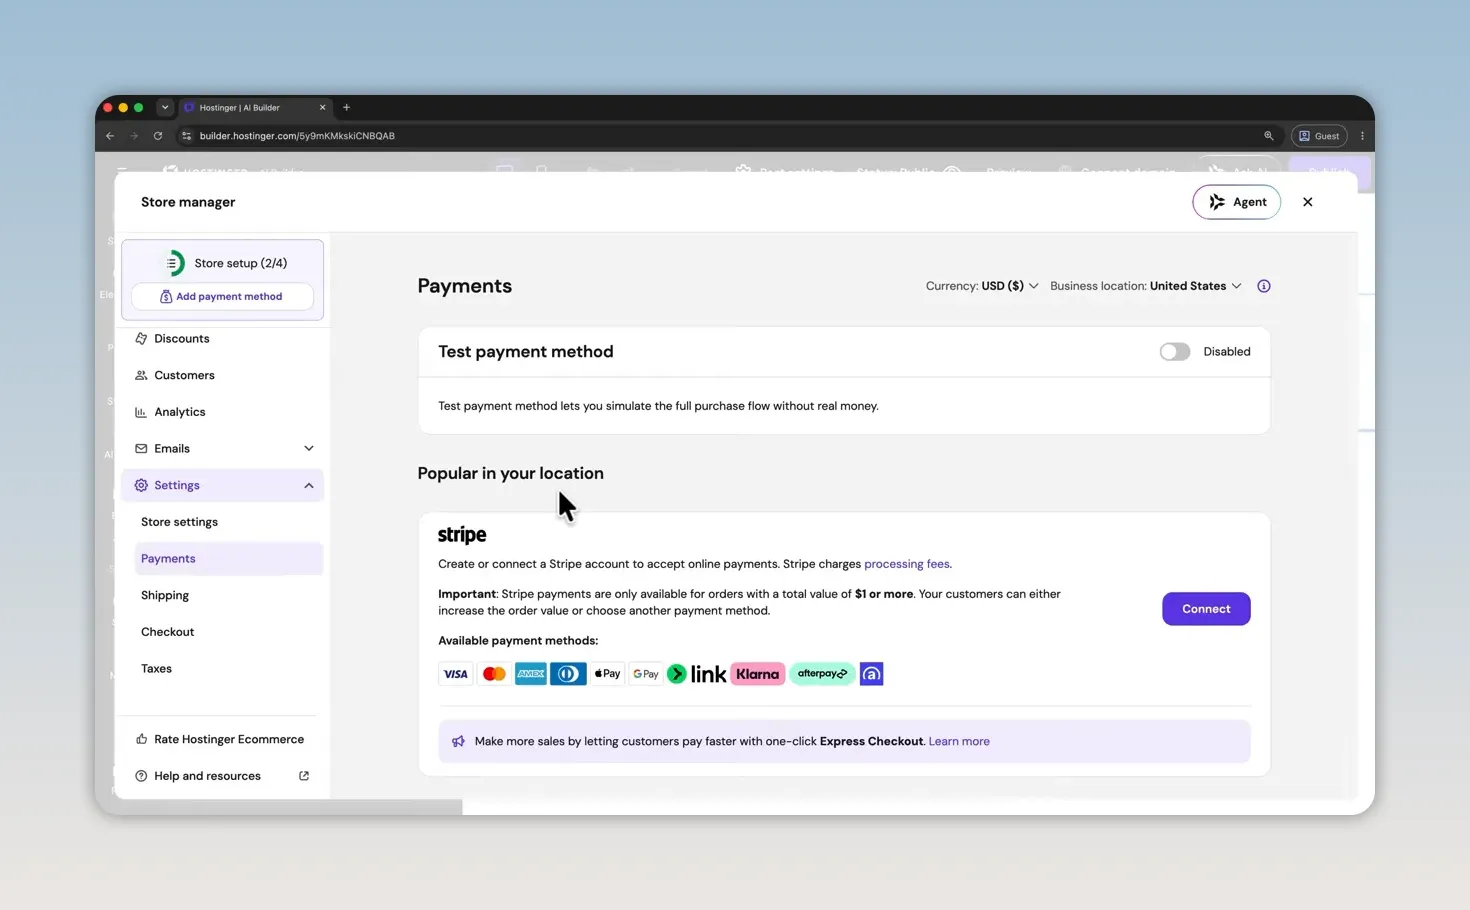
The test payment method is useful for simulating a full purchase before launch.
Next, open Store settings and complete your business identity, regional settings, contact information, and addresses. These details appear on customer invoices, so take time to enter them correctly.
Add a physical product
Open Products. Existing items can be edited, duplicated, or deleted through their three-dot menus.
To create a new listing:
- Click Add product.
- Choose the product type. For photography prints, I choose a physical product.
- Upload the product images.
- Enter a title, subtitle, and optional ribbon to help the item stand out.
- Add the product description.
- Complete the pricing and other relevant information.
- Click Save.
After uploading an image, you can use AI to generate product details from it, or fill in the fields yourself. The description field also includes AI Writer.
Manage appointments and availability
To manage bookable services, open Appointments > List of appointments. Use an appointment’s three-dot menu to edit or delete it.
The appointment tabs also let you set your availability and adjust booking settings. This is where you manage the offers displayed in appointment sections on the website.
The store manager also includes tools for discount codes, customer lists, analytics, and the emails sent by your store.
Configure shipping and taxes
For physical products, go to Settings > Shipping. Start by creating a shipping zone, then define the regions you ship to and the rates you charge.
Under Taxes, you can add tax rules. The correct setup depends on where you live and what you sell, so it’s worth speaking with a tax professional.
Add the store to your navigation
If the store doesn’t appear in your menu, return to the website editor and open Pages > Add page > Online store.
Choose a single-product layout or a product list, give the page a name, and save it. For my site, I call the page “Buy.” The product list includes the print I added along with the existing appointments.
If you don’t want that store page in the menu, open its three-dot menu and choose Hide from navigation.
11. Configure Your Contact Form
Even if you aren’t taking payments online, a contact form gives potential clients a way to reach you.
If AI created a contact page, open it, select the form, and click Edit form. Otherwise, add a new page or insert a section from the Contact form category.
Choose how submissions are collected
In the form’s general settings, you can use a standalone form or a connected form. A standalone form works well for a simple setup. Connected forms are useful when you have several forms and want their submissions collected into one list.
Give the form a recognizable name and check the email address used for submission notifications.
Edit fields and styling
Open the Fields tab to manage what appears on the form. You can:
- Drag fields into a different order.
- Change a field’s label and placeholder text.
- Choose its field type.
- Make it required.
- Add new fields.
The Button tab controls the submit button. You also have styling and animation options.
Back under General, click the submission-list button to review incoming entries. Once submissions arrive, you can download them as a CSV file.
12. Review Each Page’s SEO Settings
Before publishing, open SEO in the left-hand toolbar. Your pages appear in a list, with warnings highlighting areas that could be improved.
Select a page to review its recommendations. The AI SEO assistant can generate initial SEO information by guiding you through a few questions. Repeat the process for each page rather than only optimizing the homepage.
You also have manual control over the search preview, keywords, SEO title, and meta description.
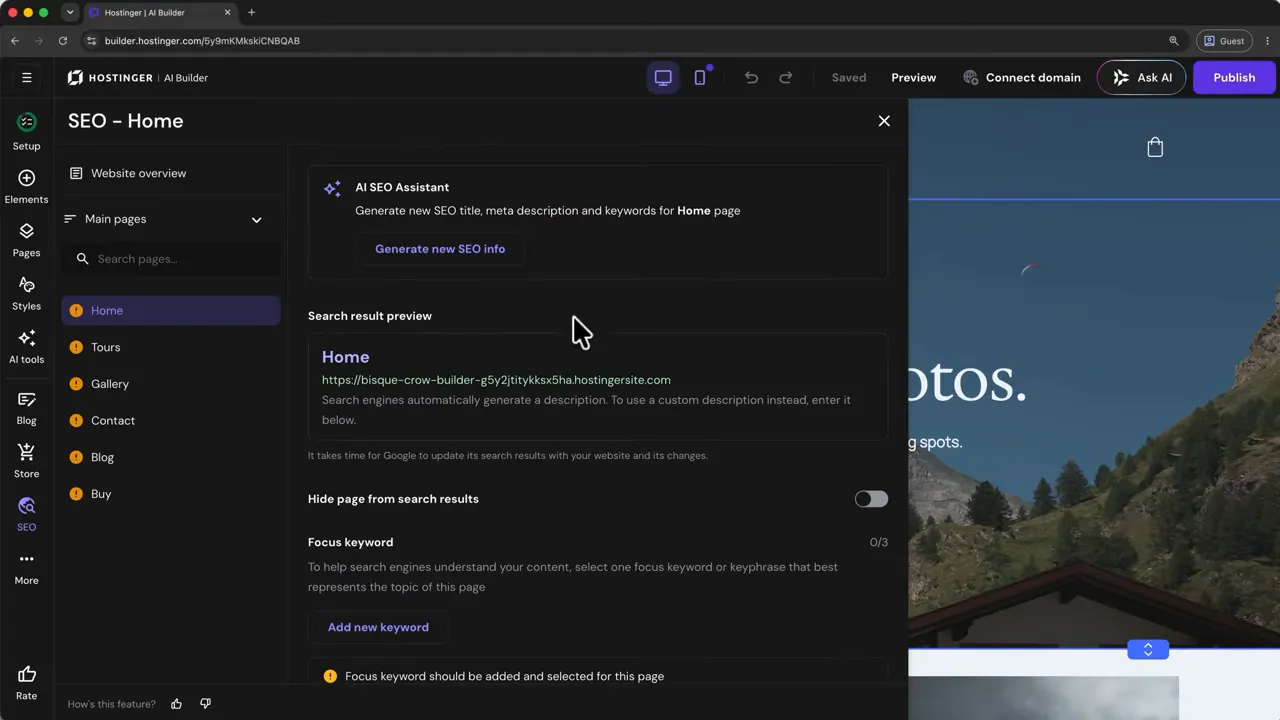
Use the generated information as a starting point, then make sure it accurately describes the page. If you want more background on search optimization, Google’s SEO Starter Guide is a useful reference.
13. Connect Your Custom Domain
Once you’re happy with the website, replace the temporary address with your own domain.
- Click Connect domain at the top of the editor.
- Choose Get domain to search for a new address.
- Search for an available name and select it.
- Click Next.
- Complete the domain owner details and click Register.
Choose something short and memorable. I prefer a .com when it’s available, and for this example I search for the Shutter & Summit business name.
The plan used here includes a free domain for one year. Check the domain offer associated with your own plan before registering.
Don’t skip email verification. In this setup, Hostinger requires you to verify your email address within 14 days to keep the domain active. Open the message from Hostinger and click Verify email.
Return to the setup flow, click Continue, and check that the domain appears in the builder. Processing can take a little time. In my case, it completed within minutes.
14. Publish Your Website and Keep It Updated
With the domain connected, save your work and click Publish in the upper-right corner. Hostinger processes and optimizes the website during publishing.
Once publishing finishes, open the live site on your new domain and check the finished result.
Before considering the setup complete, work through these final checks:
- Review the desktop and mobile layouts.
- Check navigation links and button destinations.
- Confirm that contact details and form notifications are correct.
- Remove unused sections and sample blog posts.
- If you have a store, check payments, availability, shipping, and tax settings as applicable.
- Confirm that domain email verification is complete.
Your website doesn’t have to stay exactly as it is today. Return to the editor whenever you want to update text, replace images, add articles, or change your offers. Save your edits, then click Publish again to make those updates live.
That’s the full process: use AI to create the first draft, customize it to fit your business, connect the features you need, and publish it on your own domain.


