Building an online store does not have to mean coding pages from scratch or connecting a dozen different services. With Hostinger, WordPress, and WooCommerce, you can set up your hosting and domain, customize a ready-made storefront, add your products, and start taking orders.
I’ll use a gaming gear store called Vortex as the example, but the same process works for handmade jewelry, clothing, skincare, coffee, or whatever you want to sell. The products and branding will change. The setup is largely the same.
We’ll use the free Astra theme, a free Starter Templates design, and WooCommerce. You do not need a paid theme or page builder to follow along. Hosting is the main upfront purchase in this setup, though domain renewals and any applicable payment processing fees are separate ongoing considerations.
What You'll Learn
- Build a WooCommerce storefront using Hostinger, Astra, and a free block editor template.
- Customize your branding and pages, then add simple, variable, and grouped products.
- Configure payments, shipping zones, automated taxes, and coupons before testing your checkout.
- Manage products and orders in WordPress, and handle hosting and domains in hPanel.
Table of Contents
- 1. Choose Your Hostinger Plan and Domain
- 2. Install WordPress and Verify Your Domain
- 3. Install Astra and a Free Store Template
- 4. Set Your Logo, Colors, Fonts, and Navigation
- 5. Edit Your Homepage with the WordPress Block Editor
- 6. Add and Edit Your Other Store Pages
- 7. Add Your First Simple Product
- 8. Create a Variable Product with Color or Size Options
- 9. Group Related Products into a Set
- 10. Show Your Products on the Homepage
- 11. Set Up Your Payment Methods
- 12. Enter Your Store Details and Selling Locations
- 13. Configure Shipping Zones and Rates
- 14. Enable Automated Tax Calculation
- 15. Create Your First Coupon Code
- 16. Take Your WooCommerce Store Live and Test It
- 17. Manage Your Orders
- 18. Know Where to Manage Your Store After Launch
1. Choose Your Hostinger Plan and Domain
Hosting is what keeps your store online so customers can shop at any time. Your domain is the address they use to reach it.
Our Hostinger offer provides an additional 10% discount on top of the promotional pricing shown through the offer. Check the checkout page for the current price, renewal terms, and domain eligibility before purchasing.
Disclosure: Our Hostinger link is an affiliate link. If you purchase through it, we earn a small commission at no extra cost to you.
On the Hostinger setup page, click Start now to see the hosting options. The setup used here offers an Unlimited plan and a larger Cloud Startup plan.
I’d choose Unlimited for this example store. It includes fast storage, daily backups, and room for additional websites. Cloud Startup is the larger option for higher-traffic sites, so it is more than we need for this initial setup.
Select a billing period
Click Choose plan, then review the billing period. The checkout may default to 48 months, but you can also choose shorter terms, including 24 months, 12 months, or one month.
I’d recommend at least 12 months if you are comfortable with that commitment. In the offer demonstrated here, that qualifies for savings and a free domain for the first year.
Claim your domain
- Enter the domain name you want in the domain search field.
- Check its availability and select it. I’d generally choose a .com domain when possible.
- Review the domain registration period separately from the hosting period.
- Check the order summary, discount, initial charge, and renewal pricing.
The domain term may default to two years. If you only want to claim the included free year, change it to one year. In this example, that brings the first-year domain charge to $0, with a displayed renewal of $20 per year afterward. Your actual renewal price will depend on the domain and current offer.
Continue to registration, enter your email address, create a password, and add an optional phone number if you want to. Then complete your billing address and payment information.
2. Install WordPress and Verify Your Domain
After payment, Hostinger takes you into onboarding. Follow these steps:
- Select Create a new site.
- Choose Build on WordPress and click Next.
- Select the domain you claimed.
- Review the domain registration details and click Register.
- If asked about a data center, review the suggested location. I left the recommended default in place.
- Review your WordPress administrator email and password.
- Click Build from scratch.
In this onboarding flow, the WordPress login fields are initially populated with the same email and password used for Hostinger. You can change them before continuing. Keep track of these details because WordPress is where you will manage the store.
Hostinger will install WordPress for you. Give it a few minutes to finish.
Complete domain email verification
Once WordPress opens, you may see a notice saying your domain is pending email verification. Open the inbox you used during registration, find Hostinger’s domain confirmation email, and click Verify email.
Return to WordPress and refresh the page. The domain status should update once verification has been processed.
Clean up your dashboard
The first screen may be Hostinger’s onboarding area inside WordPress rather than the main WordPress dashboard. Click Dashboard in the left sidebar to open your main admin area.
If it feels crowded, dismiss the welcome notices and open Screen Options at the top. You can hide dashboard widgets and re-enable only the ones you find useful. This does not delete store content. It simply makes your workspace easier to use.
3. Install Astra and a Free Store Template
A theme controls the foundation of your website’s appearance, including its layout, fonts, and colors. A template gives you a ready-made set of pages and sections to customize.
Install the Astra theme
- Go to Appearance > Themes.
- Click Add Theme.
- Search for Astra.
- Click Install, then Activate.
Astra is the free theme we’ll use throughout this setup. Activating it gives us the foundation, but we still need the store pages and layouts.
Start with a clean plugin list
On this brand-new installation, I removed the preinstalled Hostinger plugins to start with a clean slate. You can do that under Plugins by selecting the unwanted plugins, choosing Deactivate from Bulk Actions, and clicking Apply. Then select them again and use Delete.
Only remove plugins you do not need. This cleanup is for a fresh installation, not a recommendation to delete everything from an existing website.
Import a Starter Templates design
- Go to Plugins > Add Plugin.
- Search for Starter Templates.
- Install and activate it.
- In onboarding, choose WordPress Block Editor as your page builder.
- Filter the library through E-Commerce > Online Shop.
I often use Elementor for other websites, but for this setup I prefer the WordPress block editor. Some of Elementor’s WooCommerce features require a paid plan, and we’re keeping this build free outside the hosting purchase.
Templates marked Premium cost money. Choose one without that label if you want to follow the free approach.
I’m using Plant Shop. Don’t worry that it starts with plants rather than gaming products. Choose a template for its layout and overall feel, not its demo photos. We’ll replace the text, images, fonts, and colors.
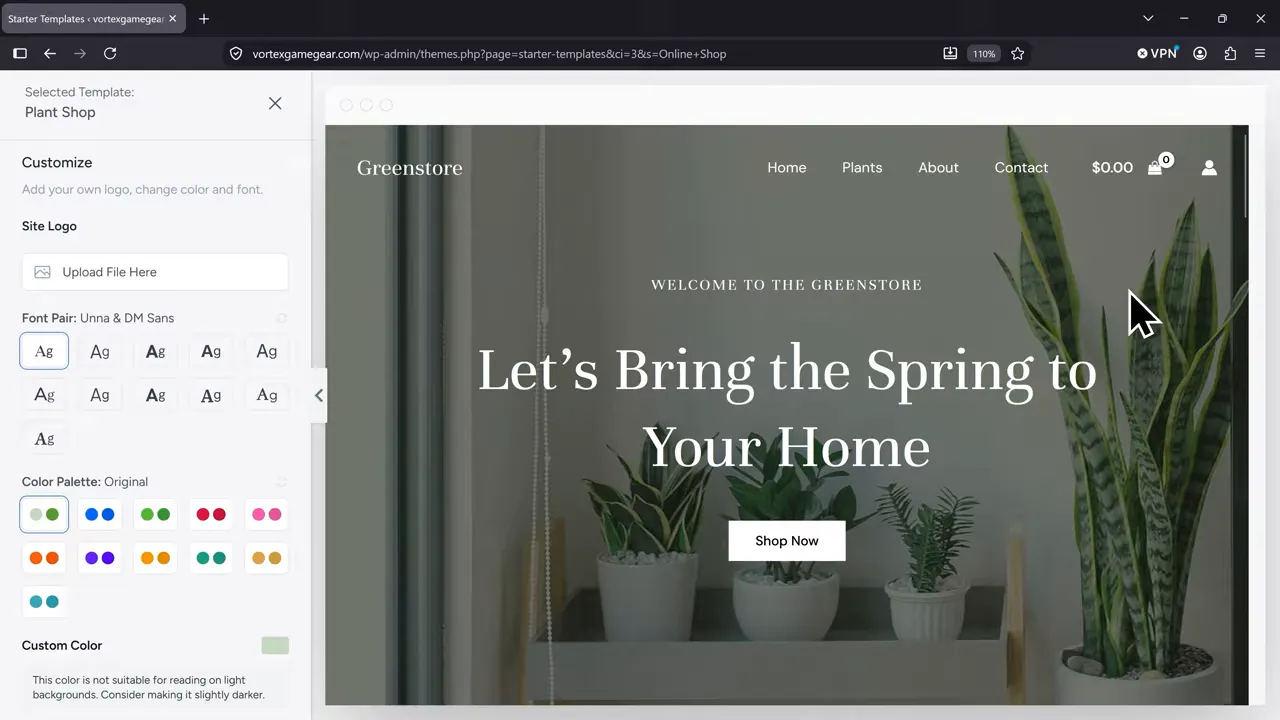
You can upload a logo and adjust fonts and colors during import, but I’ll handle those together later. Click Continue, then make sure these features are enabled:
- Page builder for editing the layouts.
- Contact form for customer inquiries.
- E-commerce to install the store functionality.
You may also see optional SEO and cookie consent features. Review those choices, continue, and click Submit and build my website.
Once the import finishes, click View your website. You now have a homepage, shop page, product pages, cart, and checkout, with WooCommerce installed as part of the setup.
Remove optional cart extensions
This template also installs several extra plugins that we do not need for the standard cart and checkout used here. Open the WordPress dashboard in another tab, go to Plugins, and deactivate and delete these if they were installed:
- Cart Abandonment Recovery
- CartFlows
- Modern Cart Starter
- Power Coupons
- Variation Swatches
Leave WooCommerce and the plugins supporting your chosen page layout active.
4. Set Your Logo, Colors, Fonts, and Navigation
Open your storefront and click Customize in the admin bar. This is where you change theme-level settings that apply across the site.
Upload your logo and set the store name
- Open Header > Site Title and Logo.
- Click Change Logo and upload your file.
- Select the image and crop it if needed, or choose Skip Cropping.
- Adjust the Logo Width slider until it fits the header.
- Enter your store name in the Site Title field.
For this example, the store name is Vortex. The site title helps identify the store in places such as the browser tab.
If the homepage still shows a different logo, open Customize Transparent Header and turn off Different Transparent Logo. That makes the transparent header use your main logo.
Add your site icon
The site icon is the small image shown in the browser tab. Return to Site Title and Logo, scroll to Site Icon, and upload the icon you want to use. Review the preview before selecting it.
Customize the global style guide
Click the paintbrush icon near the top of the Customizer to open the style guide. Here you can experiment with your global colors, typography, and button styling.
For Vortex, I’m using a dark background, purple accents, and a strong heading font. It suits the gaming products, but your store might work better with a completely different palette.
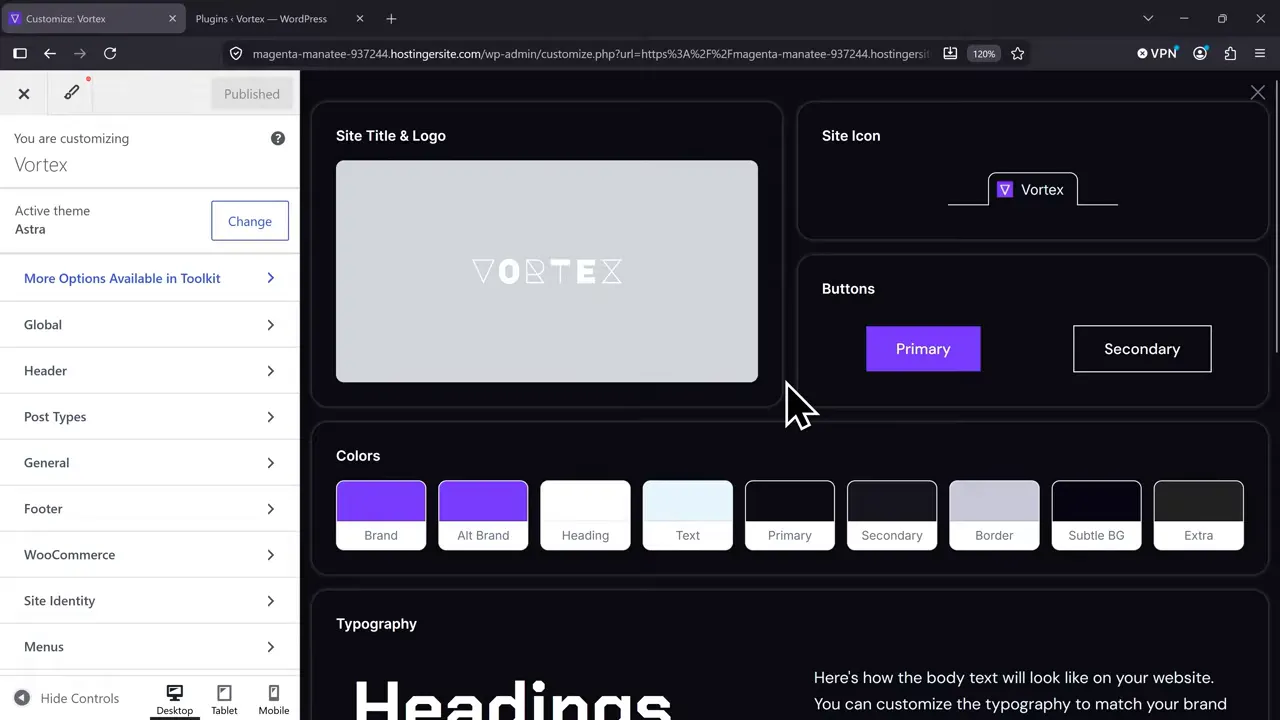
While you are in the Customizer, open WooCommerce > Single Product. If the template uses a full-width product layout, I’d switch it to Normal for this design.
Update the primary menu
Click the pencil icon beside the header navigation, choose Configure menu from here, and edit your primary menu.
- Drag menu items to change their order.
- Expand an item to change its navigation label.
- Use Add Items to include additional pages.
The imported shop link is labeled “Plants,” so I’m changing that navigation label to Shop. This updates the menu text. We’ll also rename the actual page shortly.
Click Publish to save your theme changes, then close the Customizer.
5. Edit Your Homepage with the WordPress Block Editor
From your homepage, click Edit Page. The WordPress block editor opens with your imported design.
The main idea is simple: pages contain sections, and those sections contain blocks. A heading is a block. A button is a block. A container holds several blocks together.
Click a block to edit it and see its settings in the right sidebar. To make larger structural changes, select the container holding those blocks.
Replace the hero text and button link
The hero is the large section at the top of the homepage. Click the existing text, highlight it, and type your own wording.
For this store, I’m using a short gaming-focused introduction and a headline about gear that keeps up with the customer. The main button becomes Shop All.
Changing the button text is not enough. You also need to set its destination:
- Select the button.
- Click the link icon in its toolbar.
- Click the pencil to edit the link.
- Remove the placeholder #.
- Enter /shop or select your actual shop page.
- Confirm the link.
Now the button has somewhere useful to send customers.
Replace the hero background image
To change the background, select the whole hero container rather than one of the headings inside it.
- Open List View using the three horizontal lines near the upper left.
- Select the Hero container.
- Open its Style settings in the right sidebar.
- Find the background image and click Replace.
- Upload and select your own image.
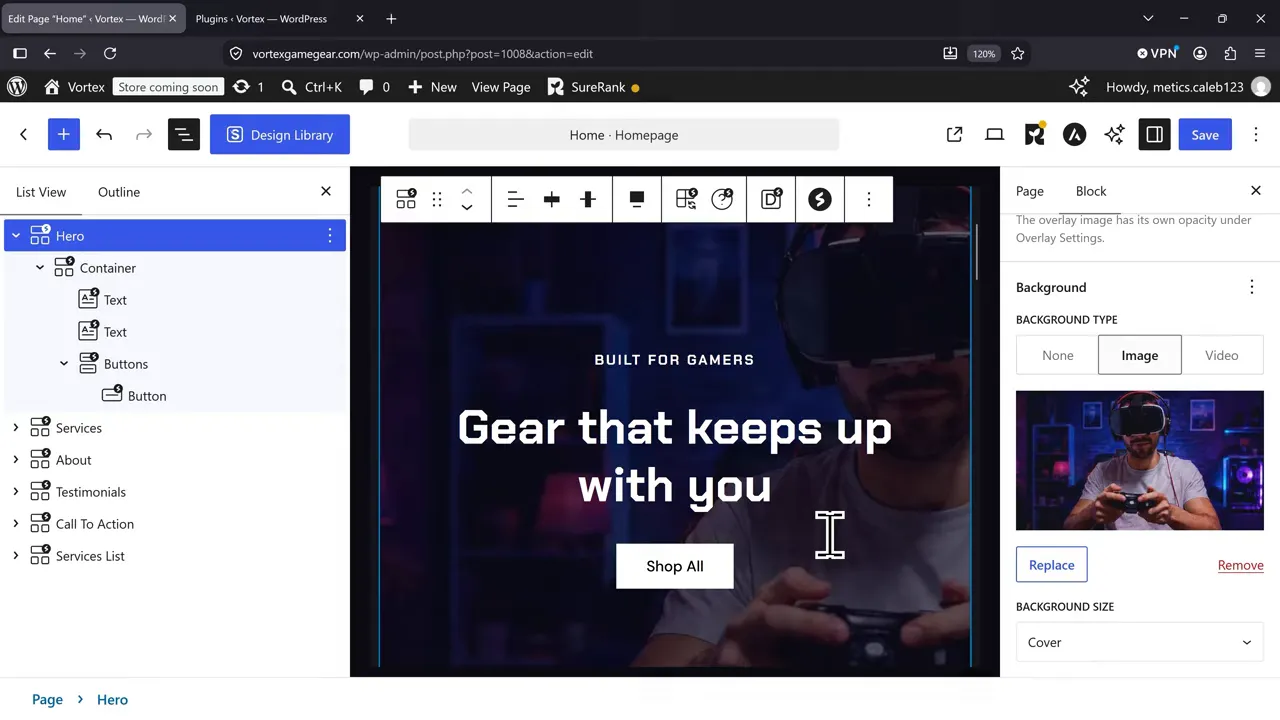
The image may look slightly different inside the editor than it does on the storefront. Save and inspect the actual page before deciding whether the positioning needs adjusting.
Customize or remove the remaining sections
Change the imported product section heading from “New Plants” to something appropriate, such as New Arrivals, Best Sellers, or Featured Products.
You may see a white box containing a shortcode below it. That is not an error. The shortcode becomes a product grid on the storefront. We’ll update its product categories after adding our own products.
This template also includes About, Testimonials, a promotional section, and a services list. For my homepage, I’m removing the first three and keeping the services list.
To delete a section, find it in List View, open its three-dot menu, and choose Delete. If you keep a section, replace its demo text and images with your own.
You can also rename containers in List View. My product section was internally labeled “Services,” so I renamed it “New Arrivals” to make future edits easier.
Finally, update the services list text and review its icons. If an icon looks wrong, select it, click Change Icon, search the icon library, and insert a replacement. I replaced a clipped-looking lock icon with a shield.
Click Save, then View Page to check the result.
6. Add and Edit Your Other Store Pages
Go back to the dashboard and open Pages. This lists both the pages imported by the template and the functional pages created for WooCommerce.
- Template pages: Home, About, and Contact.
- Store pages: Shop, Cart, Checkout, and My Account.
If your shop page is still named “Plants,” hover over it, click Quick Edit, change the title to Shop, and click Update.
To customize an About or Contact page, click Edit and use the same block-editing process as the homepage. Replace the demo copy and imagery so those pages match your business.
To create another page, click Add Page. Starter Templates may offer ready-made page layouts, or you can close that library and start with a blank page.
Publishing a page does not automatically put it in your header menu. If you want it there, return to the Customizer and add it to your primary menu.
7. Add Your First Simple Product
Open Products in the WordPress dashboard. The imported plant products are only there to demonstrate the layout, so remove them before adding your real catalog.
Select the demo products, choose Move to Trash from Bulk Actions, and click Apply. The demonstrated list displays 20 products per page, so repeat the process if more remain.
Then click Add New Product.
Enter the product content and photos
My first item is an Aurora RGB mechanical keyboard. Start with these fields:
- Product name: The title customers will see.
- Product description: The longer explanation of what the product does and why someone would want it.
- Product image: The primary photo used across the store.
- Product gallery: Additional product photos.
You can write the description yourself or use a tool such as ChatGPT or Claude to help draft it. Make sure the finished copy accurately describes your product.
Choose your strongest photo as the main product image. Upload additional angles or detail photos through Add Product Gallery Images.
Set pricing, inventory, and shipping details
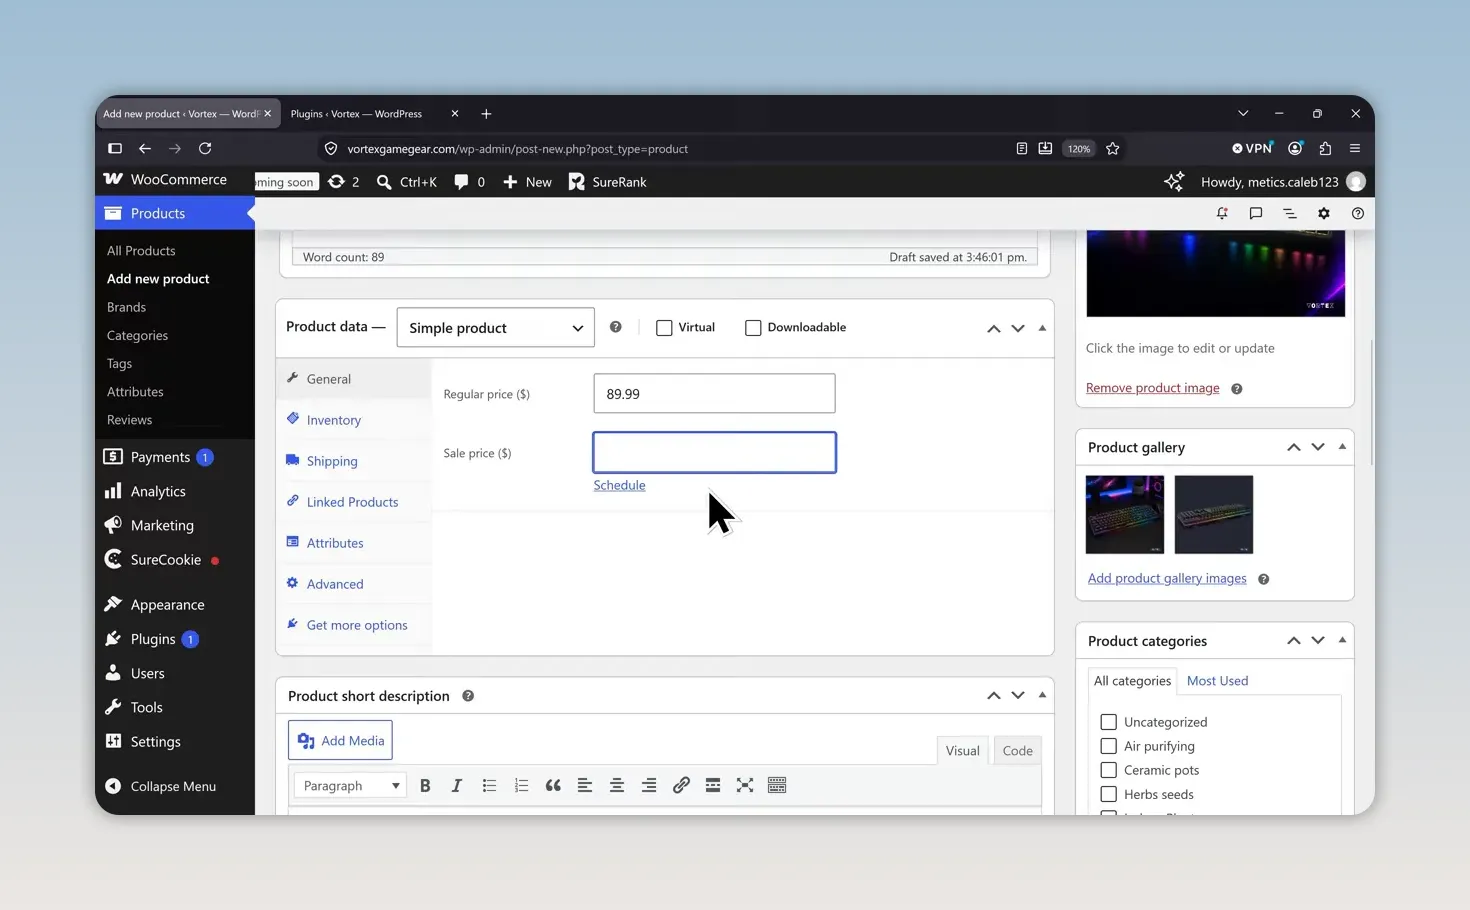
In the Product Data section, leave the type set to Simple Product. This is the straightforward option for an item without customer-selectable variations.
For the keyboard, I’m entering:
- Regular price: $89.99.
- Sale price: $74.99.
You can click Schedule beside the sale price to set sale dates. The other Product Data tabs let you manage stock under Inventory and enter weight and dimensions under Shipping.
Add a short description and category
The Product Short Description is a brief summary displayed near the top of the product page. One or two useful sentences work well here.
Next, assign a product category. Categories organize your catalog around how customers shop. For Vortex, that means Keyboards, Mice, Headsets, and Accessories. A clothing store might use Tops and Bottoms instead.
Click Add New Category, enter Keyboards, and add it. Make sure the new category is selected for the product.
Product tags are optional. I’m keeping the initial setup simple and using categories as the main way to organize the store.
Click Publish to make the product available in your catalog.
8. Create a Variable Product with Color or Size Options
A variable product lets customers choose options such as color, size, or flavor. Each variation can have its own photo, price, stock quantity, and shipping details.
For this example, I’m adding a wireless gaming mouse in White, Pale Lime, and Pink.
- Click Add New Product and enter the name and description.
- Change Product Data from Simple Product to Variable Product.
- Open the Attributes tab.
- Name the attribute Color.
- Enter the values separated by pipe symbols: White | Pale Lime | Pink.
- Ensure the attribute is available for variations, then click Save Attributes.
The attribute is the choice the customer makes. For T-shirts, you might name it Size. For coffee, it could be Flavor.
Generate and configure the variations
Open Variations and click Generate Variations. WooCommerce creates a variation for each color.
Edit each variation and add:
- The photo showing that specific color.
- A price. I’m using $59.99 for the mouse variations.
- Any variation-specific stock or shipping information you need.
Click Save Changes when you finish. Then set the main product image, assign the product to a Mice category, and publish it.
The main product image represents the item in places such as the homepage grid. The variation images appear when customers choose an option on the product page.
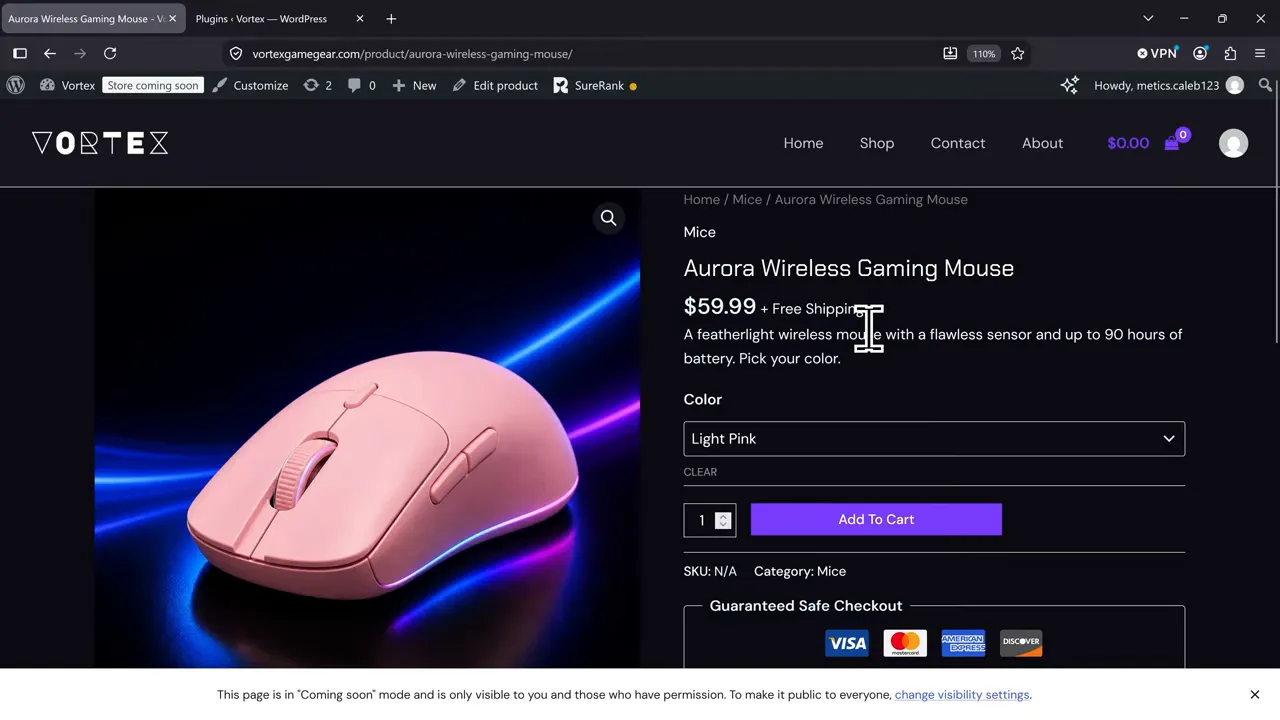
Open View Product and test every option. Selecting White, Pale Lime, or Pink should display the matching image and the correct product details.
9. Group Related Products into a Set
A grouped product presents related items together on one page. For Vortex, I’m grouping the keyboard and mouse as a gaming set. A clothing store could use the same approach for a matching top and bottom.
The individual products remain separate, and customers choose which items to purchase. A grouped product is not automatically a discounted bundle. It is a way to present complementary products together.
- Add a new product and enter the set’s name and description.
- Change the product type to Grouped Product.
- Open Linked Products.
- Search for the keyboard and mouse in the Grouped Products field and select them.
- Upload an image representing the set.
- Create and assign a Bundles category.
- Click Publish.
Open the product page to inspect the result. Customers can choose quantities for eligible items, while products requiring variation choices may direct them to select their options on the individual product page.
10. Show Your Products on the Homepage
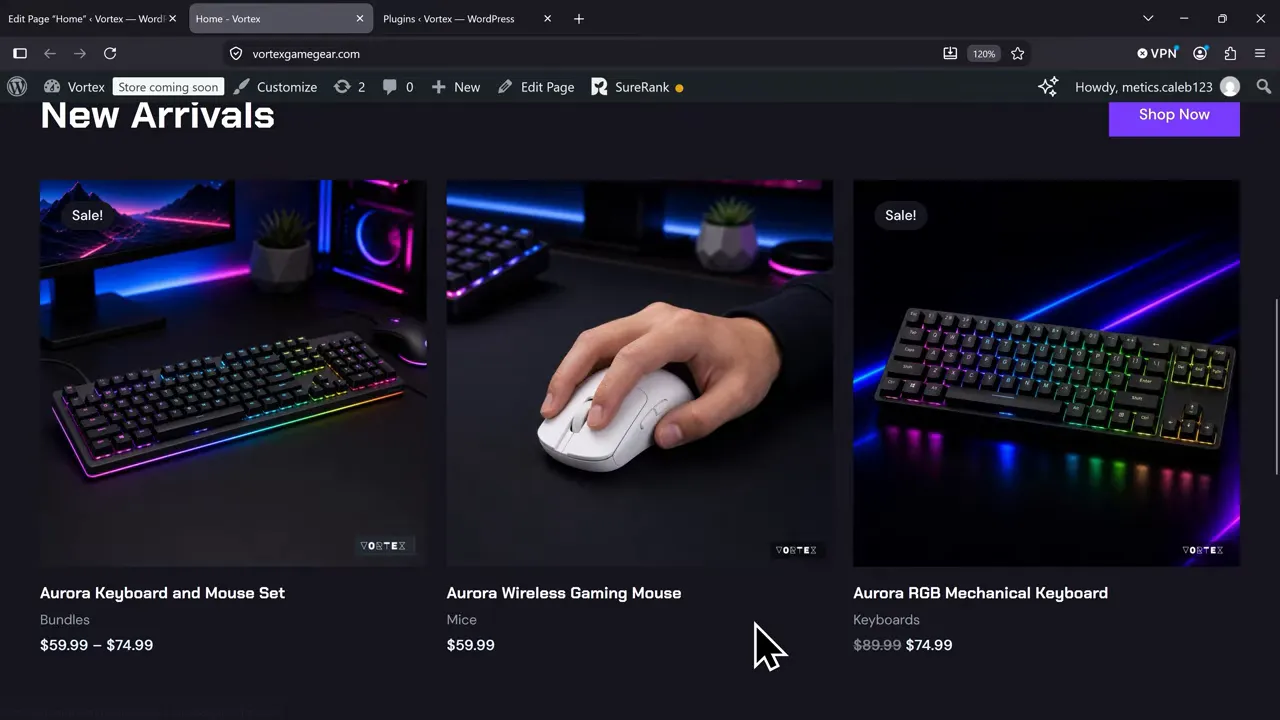
Return to the homepage, click Edit Page, and find the product shortcode under New Arrivals.
The shortcode is a compact set of instructions telling WooCommerce what to display. In this template, its settings include:
- Limit: Six products.
- Columns: Three products across.
- Ordering: Newest products first.
- Category: The product categories included in the grid.
The category setting still points to the template’s plant categories. Replace those values with your own category slugs, such as keyboards,mice,bundles.
Separate category slugs with commas. For multiword categories, use the actual slug, which commonly contains hyphens rather than spaces. You can check these under Products > Categories.
If you want to adjust the grid further, the WooCommerce product shortcode documentation explains the available settings.
Also check the Shop Now button beside the grid. Replace any placeholder link with your actual shop page, save the homepage, and open the page to confirm your products appear.
11. Set Up Your Payment Methods
Your products are in place, but you still need a payment provider before customers can pay.
Open Payments in the dashboard. For a straightforward setup, I’d start with WooPayments, which supports major cards and payment methods such as Apple Pay where available.
Click Complete Setup and follow the provider’s onboarding prompts. The available options depend on your store’s location and eligibility.
If you also want PayPal, click Install beside its option and complete that setup. Expand the additional payment options if you need another provider.
Choose the methods that make sense for your business and customers. Installing a payment plugin alone is not the same as finishing its account connection and activation.
12. Enter Your Store Details and Selling Locations
Go to WooCommerce > Settings > General. Enter your store address, which WooCommerce uses as part of the shipping and tax configuration.
Then review:
- Selling locations: Where customers are allowed to buy from you.
- Shipping locations: Where you will deliver orders.
- Enable taxes: Turn this on for the tax setup below.
- Currency: Choose the currency your store uses.
The initial settings may allow sales to all countries. For my example, I’m selecting Sell to specific countries and choosing the United States. With shipping set to the countries I sell to, this keeps the initial store limited to US orders.
I’m leaving the currency as US dollars. Click Save Changes when your settings are correct.
13. Configure Shipping Zones and Rates
Open the Shipping tab. A shipping zone is a group of destinations with its own shipping methods and rates.
For this store, we’ll create a United States zone with a $10 flat rate and free shipping for orders meeting a $75 minimum.
Create the shipping zone
- Click Add Zone.
- Name it United States.
- Set the zone region to United States, rather than leaving it as everywhere.
- Click Add Shipping Method.
The available methods include Free Shipping, Flat Rate, and Local Pickup.
Add a flat rate
Select Flat Rate, click Continue, and enter the shipping cost. I’m using $10 as the flat charge for this example. Save the zone and method.
Add free shipping with a minimum order amount
- Click Add Shipping Method again.
- Choose Free Shipping.
- Set the requirement to Minimum Order Amount.
- Enter $75.
- Save the zone and method.
A free shipping threshold can encourage customers to add another item, but choose a minimum that works with your margins and actual shipping costs. You do not need to copy these example amounts.
If you ship to additional countries or regions, create the appropriate zones and rates for those destinations as well.
14. Enable Automated Tax Calculation
For this setup, we’ll use WooCommerce Tax to calculate applicable taxes automatically.
- Go to Plugins > Add Plugin.
- Search for WooCommerce Tax.
- Install and activate the plugin.
- Click Finish Connecting.
- Connect or create the requested WordPress.com account.
- Return to WooCommerce > Settings > Tax.
- Change Automated Taxes to Enable Automated Taxes.
- Click Save Changes.
Automated tax calculation uses the store configuration and customer location to calculate taxes at checkout in supported locations. Check the WooCommerce Tax documentation for availability and setup requirements.
Tax calculation is separate from determining your legal tax obligations. Confirm where you need to collect tax and whether your configuration fits your business before accepting orders.
15. Create Your First Coupon Code
Open Coupons in the dashboard and click Add New Coupon.
For a simple 10% discount:
- Enter a code such as 10off.
- Add an optional internal description.
- In Coupon Data, select Percentage Discount.
- Enter 10 as the coupon amount.
- Review usage restrictions and usage limits.
- Click Publish.
You can set a minimum spend or limit how many times the coupon can be used. The code’s name does not control the discount. The discount type and amount do.
16. Take Your WooCommerce Store Live and Test It
Your store may still be in Coming Soon mode, which means customers cannot shop normally yet.
- Go to WooCommerce > Settings.
- Open Site Visibility.
- Select Live.
- Click Save Changes.
Now work through the shopping experience from the storefront:
- Click Shop All and confirm it opens the shop.
- Open a product and check its images, descriptions, and price.
- For a variable product, select each option.
- Add a product to the cart.
- Apply your coupon and verify the discount.
- Enter a shipping address and check the available shipping rates.
- Review tax calculation and available payment methods.
In this example, the coupon applies correctly in the cart. Continue checking the full checkout flow rather than assuming everything works because the storefront looks finished.
17. Manage Your Orders
When orders start coming in, open WooCommerce > Orders. Click an order to see its details.
The order screen includes the customer’s name, billing address, shipping address, purchased items, and current order status.
The main field to pay attention to during fulfillment is Status. In the example order, it starts as Processing. Once the order has been shipped and fulfilled, change it to Completed and click Update.
If an order needs to be canceled or refunded, WooCommerce also provides tools for those situations. Use the appropriate action for what actually happened, rather than simply marking the order completed.
18. Know Where to Manage Your Store After Launch
There are two dashboards to remember:
- WordPress: Your day-to-day store workspace for products, orders, pages, design changes, and WooCommerce settings. You can access the login by adding /wp-admin to your domain.
- Hostinger hPanel: Your hosting workspace for the hosting plan, domain, and billing.
You can open your hosting account through Hostinger hPanel. If you need help there, the Ask AI option opens Hostinger’s assistant, and support can join the chat when further help is needed.
Your store now has its own branding, real products, shopping pages, payment setup, shipping rules, tax configuration, and a coupon. From here, keep using WordPress to add products, fulfill orders, and refine the store as your business grows.


