You can build a professional WordPress website without writing code or buying a stack of premium plugins. The key is choosing the right starting point, setting up your design properly, and learning which tool controls which part of your site.
We’ll build a wedding photography website for Marissa Hail Photography as an example. The same process works for a service business, personal brand, portfolio, or other straightforward business website. By the end, you’ll have the skills to customize your pages, collect inquiries, publish blog posts, connect your own domain, and keep everything updated.
The setup uses Hostinger for hosting, the free Blocksy theme, Elementor’s visual page builder, and WPForms Lite. All the themes and plugins used here are free. Hosting is the main purchase, while domain and email renewal costs depend on the offer you choose.
One thing before you start: Hostinger, WordPress, and Elementor update regularly. A button may move or a label may change. Follow the purpose of each step rather than expecting every screen to look identical.
What You’ll Learn
- Choose an eligible hosting term and build WordPress from scratch for this Blocksy and Elementor workflow.
- Set global colors, typography, and widget defaults before customizing individual pages.
- Test mobile layouts, navigation, and contact form delivery before sharing your custom domain.
- Keep WordPress updated, confirm backup availability, and reactivate caching after the initial build.
Table of Contents
- 1. Choose a Hostinger Plan Without Overpaying
- 2. Install WordPress Using the Right Setup Path
- 3. Clean Up the Preinstalled Plugins
- 4. Install Blocksy and Import a Free Website Template
- 5. Understand the Elementor Editor
- 6. Set Global Colors and Fonts Before Editing Details
- 7. Make New Elementor Elements Match Your Design
- 8. Edit Text, Headings, Buttons, and Links
- 9. Replace Images and Backgrounds
- 10. Fix Spacing and Layout
- 11. Add New Sections and a Photo Gallery
- 12. Make the Website Mobile-Friendly
- 13. Build and Test a Contact Form With WPForms
- 14. Add a New Page and Put It in Your Menu
- 15. Customize the Header and Footer in Blocksy
- 16. Write Your First WordPress Blog Post
- 17. Set the Site Title and Favicon
- 18. Connect Your Custom Domain
- 19. Claim Your Included Business Email
- 20. Keep Your WordPress Website Updated and Backed Up
1. Choose a Hostinger Plan Without Overpaying
Hosting is the server space where your website’s files and WordPress installation live. Your domain is the address people use to reach that website. Hostinger brings both into one account, along with email and tools for installing WordPress.
For a first website, I recommend starting with Premium rather than paying for more capacity than you need.
- Premium: The plan demonstrated includes up to three websites, weekly backups, and a free domain for the first year with an eligible annual or longer subscription.
- Unlimited: Worth considering if you already know you’ll build many websites. The offer demonstrated also includes daily backups.
- Cloud Startup: Not necessary for the beginner website we’re building.
You can upgrade later. You don’t need to buy for every possible future version of your business today.
Compare the upfront total and renewal price
At checkout, you’ll choose a subscription period ranging from one month to 48 months. A longer term generally reduces the introductory monthly equivalent, but you pay for a longer period upfront.
- 12 months: The lower upfront commitment recommended here for a tight budget, while still qualifying for the demonstrated domain offer and discount.
- 48 months: The lower monthly equivalent and a longer period before the renewal rate begins.
- One month: A much higher monthly price in the demonstrated checkout, without the same free domain or coupon eligibility.
For context, the checkout example showed a 48-month introductory rate of $2.69 per month, a 12-month total of $43.09 with the discount, and a displayed renewal rate of $11.99 per month. These are examples, not guaranteed current prices. Country, promotion, term, and plan can all affect your total.
Check the amount due today, the renewal rate, and the included benefits before paying. Hostinger also displayed a 30-day money-back guarantee. Review the applicable terms at checkout.
Our Hostinger partnership link offers an additional 10% discount on eligible plans and terms, on top of applicable promotions. The reduced price should appear automatically. This is an affiliate link, which means we may earn a commission at no extra cost to you.
Complete your account and checkout
- Select your plan and subscription period.
- Leave domain selection for later if you haven’t decided on a name.
- Create your Hostinger account using email, Google, or GitHub.
- Use a secure password.
- Enter your billing information and complete payment using an available payment method.
There’s no need to let the domain decision hold up the build. We’ll use a temporary address first.
2. Install WordPress Using the Right Setup Path
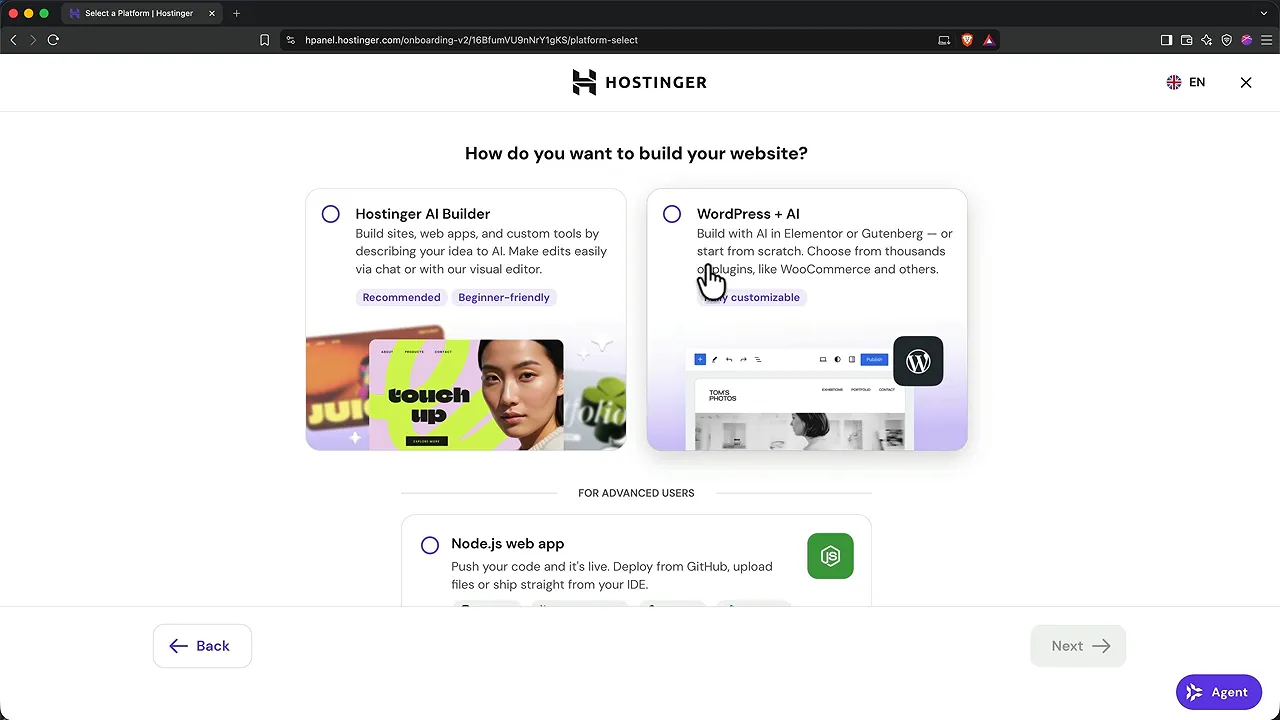
After checkout, Hostinger opens its onboarding flow. This is the first place where choosing the correct option really matters.
- Choose to create a new website.
- Select the option that explicitly says WordPress, which may be labeled WordPress plus AI.
- Do not choose Hostinger’s separate AI Website Builder for this workflow.
- Select Use temporary domain unless you’re ready to connect your permanent address.
Choose a server location
If Hostinger asks where to host the website, choose a location close to the majority of your expected visitors. A shorter distance to the server can reduce latency.
For the photography example, the audience is mainly in the United States, so a US location makes sense. If this screen doesn’t appear, continue with the default selection.
Create your WordPress login
Your WordPress account is separate from your Hostinger account. Hostinger manages the hosting. WordPress has its own administration area for managing the website.
Check the administrator email and set a secure WordPress password. Your browser may fill in saved Hostinger credentials, so make sure the values are the ones you actually want.
When you reach the choice between an AI-generated site and a manual setup, select Build from scratch.
That gives us a clean WordPress installation where we can choose Blocksy and import an Elementor-compatible template. The AI-generated route demonstrated uses Hostinger’s own theme, which is not the foundation for this build and can make later theme changes more complicated.
Know how to get back into WordPress
Once installation finishes, you’ll arrive in the WordPress dashboard. There are two useful ways to return:
- Direct login: Add
/wp-adminto the end of your website address, then enter your WordPress credentials. - Through Hostinger: Open hPanel, find your website under Websites, and click its WP Admin button.
Use Visit Site in the WordPress toolbar to open the public-facing website. At first, it will be a basic default site. That’s fine. We’re about to replace that starting design.
3. Clean Up the Preinstalled Plugins
Plugins add features to WordPress, a little like apps on a smartphone. Hostinger may install several automatically, but we don’t need all of them for this website.
Open Plugins in the WordPress sidebar. For the installation demonstrated:
- Remove Hostinger Reach if you’re not using its marketing service.
- Remove Hostinger Easy Onboarding so it stops directing the site toward the AI setup flow.
- Keep Hostinger Tools for convenient hosting integrations and access to hPanel.
- Temporarily deactivate LiteSpeed Cache while building.
To remove multiple plugins, select their checkboxes, choose Deactivate under Bulk Actions, and click Apply. Select them again, choose Delete, and confirm.
Deactivation comes first. WordPress won’t let you delete an active plugin through this workflow.
Why turn caching off temporarily?
Caching stores a copy of your website to help it load faster. During editing, that stored copy can make it look as though your changes haven’t worked.
For this beginner workflow, temporarily deactivating LiteSpeed Cache removes that source of confusion. Don’t delete it. We’ll reactivate it after the build.
4. Install Blocksy and Import a Free Website Template
A theme provides the design foundation: sitewide typography, colors, header, footer, and layout behavior. A starter template provides ready-made pages and content built on that foundation.
We’re using Blocksy because its free version includes a useful header and footer builder, strong global color and typography controls, and modern starter designs. Astra is another good theme, but Blocksy is the foundation for the steps below.
Install the theme
- Go to Appearance > Themes.
- Click Add Theme.
- Search for Blocksy.
- Click Install, then Activate.
- Install and activate Blocksy Companion when prompted.
Blocksy Companion gives you access to the starter site library.
Filter templates before browsing
Open Blocksy > Starter Sites. Set the plan filter to Free and the builder filter to Elementor.
This avoids choosing a paid design or a template made for a different editor. You can also filter by business category, but don’t feel restricted by the category name.
For the wedding photography example, I prefer the bold Persona template over a more traditional wedding design. We’re choosing the layout and personality, not committing to its placeholder photos or original profession.
Use Preview to explore a template’s pages before importing it.
Import the starter site
- Click Import on your chosen template.
- Select Elementor rather than Gutenberg when asked which builder to use.
- Import the supplied pages, posts, menus, and other starter content.
- For this brand-new installation, select Clean Install to replace the existing starter content.
- Allow the importer to install required plugins, including Elementor and any form plugin the design uses.
- Click Install and wait for the completion message.
Use the clean install option only when replacing the contents of a fresh site. It is not an option to casually select on a website containing work you need to keep.
Click View Site when the import finishes. Your temporary address now displays the imported website.
The black administration bar at the top only appears because you’re logged in. Open the address in a private browser window to see the normal visitor experience. Remember that a temporary address is still a live address, even if you haven’t shared it.
5. Understand the Elementor Editor
Open a page and click Edit with Elementor. Before changing anything, understand the three layers you’re working with:
- Pages: The complete page, such as Home, Services, or Contact.
- Containers: Layout blocks that hold content. A container can also hold other containers.
- Elements or widgets: Individual headings, paragraphs, images, buttons, galleries, and other components.
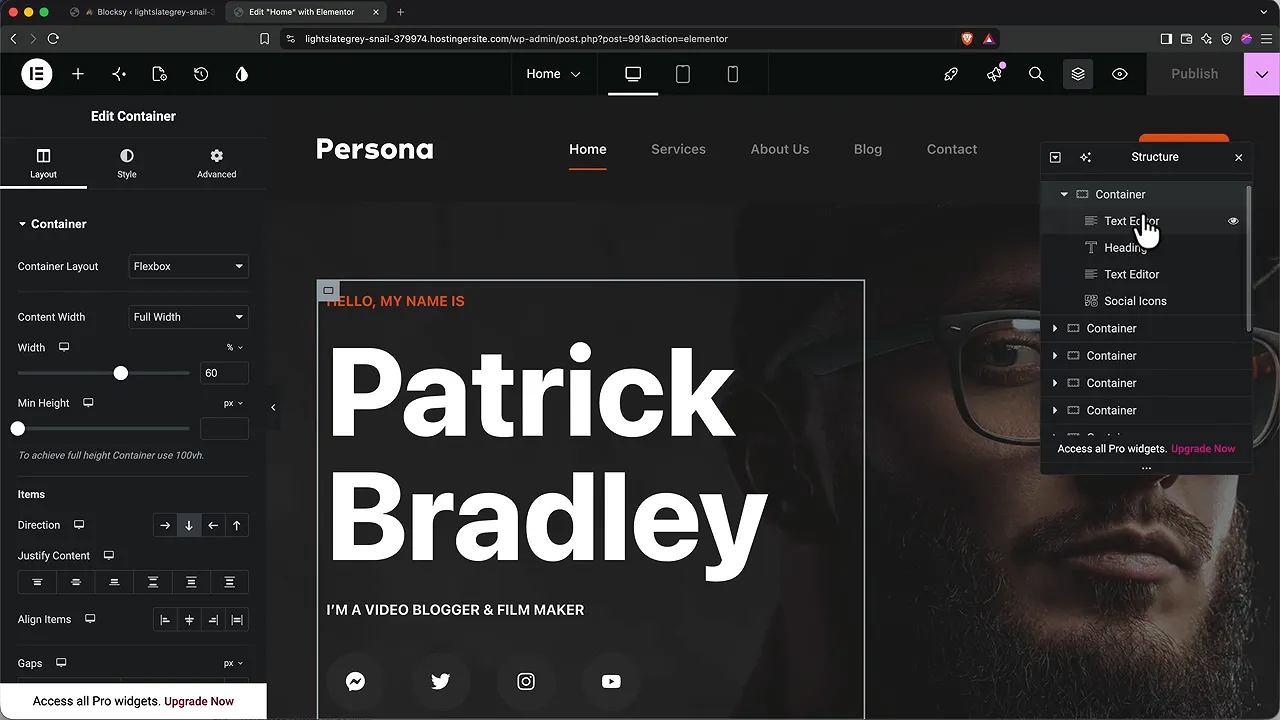
The Structure panel shows this hierarchy. Open it using the layers-style icon, or use Command + I on Mac or Control + I on Windows.
Click an item in the page preview or Structure panel to select it. Its controls appear in the left inspector:
- Content: What the element says or displays.
- Style: How it looks.
- Advanced: Spacing, layout adjustments, responsive controls, and other settings.
Undo, history, and revisions
You don’t need to be afraid of experimenting. If you move or delete the wrong item, use Command + Z or Control + Z to undo.
Elementor’s History panel also lists recent actions. Its Revisions tab can provide saved versions of the page that you can return to. These tools are useful for recovering editing changes, though they serve a different purpose from a full website backup.
Switch between pages
Use the page dropdown in Elementor’s top bar to open another page. Save your work before leaving.
If a page is missing from that dropdown, exit to WordPress, return to the dashboard, and open Pages. Hover over the page and choose Edit with Elementor.
6. Set Global Colors and Fonts Before Editing Details
Make the big design decisions once, then fine-tune individual elements. Otherwise, you’ll spend far too much time recoloring buttons and changing headings one at a time.
Your repeated colors and typography form a simple design system. When elements reference those shared settings, changing one global value updates all the places using it.
Find where your template stores its colors
- Open the Elementor menu in the upper left.
- Choose Site Settings > Global Colors.
- Look for colors that match the imported website.
If the colors match, edit them there. If you see generic colors that don’t match, or no useful palette, the theme is likely holding the design settings instead.
For Persona, return to WordPress and open Blocksy’s color customization shortcut. You can also reach the theme customizer through Appearance > Customize.
Choose and refine a global palette
In Blocksy’s Colors panel, open the palette menu to explore presets. Try a few and scroll through the page to check how each affects backgrounds, text, links, and buttons.
For the photography example, a cooler palette gives the site a bold but softer feel than the original orange accents. You can then adjust individual palette colors or enter your own brand’s hex codes.
Click Publish in the customizer to save the changes.
Choose readable typography
Open the customizer’s Typography section. You’ll find controls for the base font, heading levels H1 through H6, buttons, quotes, captions, and fallback fonts.
Instead of scrolling through hundreds of font names in a narrow dropdown, use Google Fonts to compare them. Type your own business name into its preview field so you can judge the letters you’ll actually use.
Then search for the chosen font by name in Blocksy.
For this example, a handwritten heading font adds personality, but using that same font for navigation and body copy makes the site harder to read. A better combination is:
- A handwritten accent font for the main heading levels.
- Inter as a simple, readable base font for paragraphs, navigation, and other practical text.
One or two fonts are plenty. Start simple. Give any second font a clear job rather than scattering different styles around the site.
Adjust more than the font family
You can also control:
- Size: How large the text appears.
- Weight: How thick or bold the letters are, depending on the weights available for that font.
- Line height: The distance between lines.
- Letter spacing: The spacing between characters.
- Text transform: Uppercase, lowercase, or capitalized styling.
Keep a clear heading hierarchy. Use H1 for the main page heading, H2 for major sections, and H3 for subsections.
Set a sensible fallback font family as well. If a custom font can’t load, the browser still needs something to display. A sans-serif fallback avoids decorative strokes, while a serif fallback includes them.
Publish your typography changes before leaving the customizer.
7. Make New Elementor Elements Match Your Design
A template can look consistent until you drag in a new button. Then, suddenly, that button looks completely different.
There are two reasons this can happen: the template may use individually styled elements, and Elementor may offer both older widgets and newer atomic elements.
Recognize older widgets and atomic elements
In the Elementor version demonstrated, newer atomic elements have an atom icon in the element picker. Their Style controls include a Classes section.
Older widgets don’t have that marker and use Elementor’s older Theme Style system.
For this build, keep the rule simple: duplicate an existing element that already looks right, or choose the widget without the atom icon. You can read Elementor’s V4 explanation if you want to explore the newer variables and classes system separately.
Set button defaults in Theme Style
Open Elementor menu > Site Settings > Theme Style > Buttons.
Use an existing button as your reference. The larger content button in the example uses:
- Border radius: 8 pixels.
- Top and bottom padding: 20 pixels.
- Left and right padding: 60 pixels.
- Typography: The default font family, with uppercase text.
- Background: A shared theme palette color.
The globe icon beside a setting lets you select a global value. Choose the theme’s actual palette colors rather than unrelated generic defaults.
Check both Normal and Hover states. A button can accidentally change its corner radius on hover if those values don’t match.
Use the chain icon to link or unlink the four spacing values. Unlink them when you need different horizontal and vertical padding.
Save the site settings, then drag in a fresh older-style button to confirm it picks up the defaults. Existing buttons with individual overrides may still need separate cleanup.
8. Edit Text, Headings, Buttons, and Links
Personalize the hero section
The hero is the opening section that tells people what a page is about. For our example, the imported introduction becomes Marissa’s name and a clear statement that she is a wedding photographer.
Select text directly in the preview or through Structure. You can type into the page or edit the Content field on the left.
Headings and regular text are different widgets:
- Heading widgets have an HTML heading level and should reflect the page’s structure.
- Text Editor widgets support paragraphs, bold, italics, lists, and inline links, much like a word processor.
Keep headings and body copy in separate elements. That makes both editing and the page’s structure clearer.
If centered text doesn’t appear centered on the whole page, inspect its parent container. Text alignment applies within the text box, and that box may occupy only part of the layout.
Connect buttons to real destinations
Imported buttons often contain a placeholder # instead of a useful destination. Select each important button and check its Link field.
- Internal page: Start typing the page name, such as Contact, and select it from the suggestions.
- External destination or downloadable file: Paste its full URL.
I generally keep internal navigation in the same tab. For an external destination, you can use the gear icon to enable Open in a new window.
Change the button label in the Text field. For this photography brand, Reach out feels warmer than a plain Contact label, while still making the action clear.
Add links within paragraphs
Highlight the words you want to link, then click the link icon or use Command + K or Control + K. Paste a URL or select an existing page.
To remove the link later, select it and use the unlink control.
Duplicate styled elements
Right-click an element and choose Duplicate, or use Command + D or Control + D.
Dragging directly in the preview works well within a section. For a long move between sections, Structure is usually easier. In our example, we duplicate the contact button, move it into the hero, and remove the social icons that previously occupied that space.
9. Replace Images and Backgrounds
Elementor handles images in two main ways. Knowing the difference saves a lot of frustrated clicking.
Replace an image widget
- Select the image.
- Click Choose Image in Content.
- Select an existing file from Media Library, or open Upload Files > Select Files.
- Add a useful media title and appropriate alt text.
- Click Select.
The media title helps you organize and find assets. Alt text describes the image’s purpose or content for people who can’t see it and can appear when an image fails to load.
For example, a portrait in the contact section might use a description such as “Marissa Hail using a computer.” Keep descriptions relevant rather than filling them with keywords. The W3C alt text decision tree is useful when you’re unsure how an image should be described.
Replace a background image
If clicking the photograph doesn’t select an image widget, it may be a container background.
- Select the container, using Structure if its on-page handle is difficult to reach.
- Open Style > Background.
- Click the image preview and choose its replacement.
Choose photos that work with the layout. Our hero places text on the left, so an image with quieter space on that side and visual interest on the right is easier to use.
After replacing it, publish the page and use the preview icon to check the result outside the editor.
If a replacement image overflows or sits strangely, don’t assume the upload failed. The original template may have used a transparent cutout, negative margins, or other styling intended for a different image.
10. Fix Spacing and Layout
Three concepts explain most basic spacing controls:
- Margin: Space outside an element.
- Padding: Space inside an element’s boundary, around its content.
- Border: The edge surrounding the element, which can have a visible thickness and color.
A button is an easy example. Padding creates breathing room around its label. Margin separates the whole button from nearby content.
Correct inherited negative margins
The original portrait in our template overlaps the top of its section. Its image widget uses a negative top margin of 100 pixels to create that effect.
After replacing the transparent portrait with a rectangular photo, that same setting looks wrong. Select the image, open Advanced, and change the negative margin to zero.
The photo now fits inside its container. You can add 20 pixels of top and bottom margin if you want some outside breathing room.
Control width and alignment
Elementor offers default, full-width, inline, and custom width options. For a custom width, percentages are often more flexible than a fixed pixel value.
An image set to 50% takes half the width of its parent container. That’s different from half the entire browser window unless the container itself spans that width.
Alignment controls position the item within the available space. Try start, center, end, or stretch and check how the parent container affects the result.
Use visual effects carefully
Under Advanced, you may find Transform controls for rotation, offset, scale, skew, flips, and anchor points. These are useful to recognize, especially when a template already uses them.
You can also set different Normal and Hover transforms. For example, a hover scale of 1.05 creates a subtle enlargement. Small adjustments tend to work better than dramatic movement.
Other useful controls include:
- Border width and color: Add a visible frame around an image.
- Border radius: Soften corners.
- Mask: Display an image in an oval or another available shape.
Recreate the transparent portrait effect
If you like the original cutout portrait look, use remove.bg to remove the photo’s background. The example uses its free preview-size download.
Upload the resulting transparent image, replace the rectangular version, and reintroduce an appropriate negative top margin. With the background removed, the portrait can overlap the section edge without bringing an obvious rectangular photo background with it.
11. Add New Sections and a Photo Gallery
Before adding content, think through the order a potential customer needs it.
For a wedding photographer, a sensible homepage flow is:
- An introduction explaining who you are and what you do.
- A gallery showing your work.
- Services explaining what someone can hire you for.
- Testimonials providing social proof.
- A clear way to make contact.
The template is a starting point, not a list of sections you’re obligated to keep.
Create a new container
Hover over a container to reveal its pink handle. The six dots select or drag it, the plus adds a nearby section, and the close control removes it.
Add a section below the hero, then choose a layout:
- Flexbox: Organizes items primarily in one direction, horizontally or vertically.
- Grid: Organizes items across rows and columns together.
Start with Flexbox unless you need that two-dimensional structure. For this gallery section, choose a simple vertical container.
Add the gallery widget
- Open the Elements panel with the plus icon.
- Find the older-style Basic Gallery widget.
- Drag it into the new container.
- Click its image selector and upload your portfolio photos as a batch.
- Create the gallery, reorder images if needed, and insert it.
The initial thumbnail setting may make the photos look too small. Increase the image resolution and adjust the column count.
Our example contains nine photos, so three columns produces a balanced 3 by 3 arrangement instead of four columns with a single image left over.
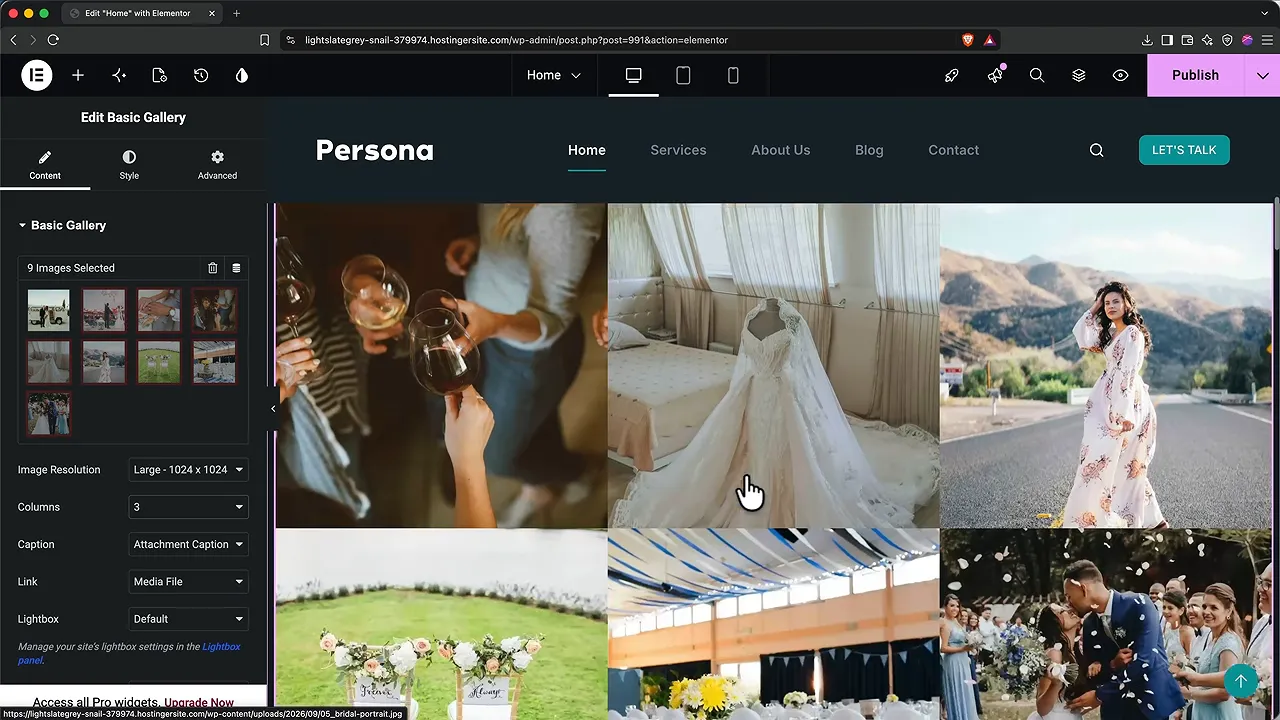
Enable Lightbox if you want people to open photographs in a larger overlay. That’s especially useful for portfolio images. Captions are optional; we leave them off for this layout.
Use prebuilt blocks to save time
You don’t have to build every new section from an empty container.
- Save the page and return to WordPress.
- Go to Plugins > Add Plugin.
- Search for Starter Templates by Brainstorm Force.
- Install and activate it.
- Exit its full-site onboarding flow. We only need its section library.
- Return to Elementor and click the new Starter Templates icon in an empty section.
- Switch to Blocks and filter by the type of section you need.
For our example, remove the irrelevant video portfolio and company-logo client section, then import a testimonial block.
Choose a block for its layout and content structure, not its exact colors. We can adapt those to the design system we already created.
Make imported blocks feel like part of your site
Check the imported section’s width setting. If it appears boxed in, that may be its layout mode rather than margin. Enable its full-width option if that’s the intended design.
Then replace the background, remove unnecessary placeholder elements, add the real testimonial and customer name, and connect colors to your global palette.
For text over an image, a background overlay helps maintain contrast. At zero opacity, you see the image without the color overlay. At full opacity, the color hides the image. The example lands around 77%, but choose the value that keeps your own text readable.
Background attachment also changes the effect:
- Scroll: The image moves with its section.
- Fixed: The content moves in front of an image that stays fixed behind it, producing a parallax-like effect.
Finally, remove redundant labels. A section doesn’t need both a small Testimonials label and a large heading communicating the same thing.
12. Make the Website Mobile-Friendly
A desktop layout is only part of the job. Use Elementor’s desktop, tablet, and mobile icons to inspect each version.
The content generally stays the same between devices. What changes is its presentation: width, spacing, font size, alignment, and visibility.
Make device-specific adjustments
Look for a device icon beside a setting. It indicates that the control supports responsive values.
For example, select the hero heading in mobile mode and adjust its typography size so Marissa’s name fills two lines. Return to desktop mode to confirm that the desktop heading still uses its original layout.
Hide sections that don’t work on a small screen
If a section becomes awkward when stacked vertically, select it and open Advanced > Responsive. You can hide it on desktop, tablet, or mobile.
In our example, the horizontal proof bar doesn’t translate well to mobile, so we hide it there. Elementor shows it grayed out in the editor so it remains available for editing. It won’t appear to visitors on the selected device size.
Check the public page at several sizes
Publish your changes and open the site in a private browser window. In a Chromium-based browser, open Developer Tools and enable the device toolbar to test different phone dimensions.
This gives you more size options than Elementor’s three basic previews. Scroll the entire page, check the gallery, inspect the navigation, and confirm hidden sections are actually hidden.
13. Build and Test a Contact Form With WPForms
A contact form lets someone send an inquiry without requiring you to publish your email address directly on the page.
Your template may already include a form. Select it in Elementor to identify its plugin. Our example uses WPForms.
You can edit an existing form through WPForms in the WordPress dashboard. If Elementor’s embedded form-editing popup keeps loading, skip it and use that dashboard route instead.
Install WPForms Lite if necessary
- Go to Plugins > Add Plugin.
- Search for WPForms and identify the plugin with the bear logo.
- Install and activate WPForms Lite.
- Open WPForms > Add New.
- Choose the Simple Contact Form template.
The basic template gives you name, email, and message fields. That’s enough to start.
Understand fields, labels, and placeholders
Each piece of information someone can enter is a field. Its label tells them what the field is for. Its placeholder is temporary text displayed inside the input.
You can drag fields to reorder them, duplicate them, or delete them. Select a field to open its General and Advanced options. Add more using the available Standard Fields.
Keep the form short enough that it doesn’t feel like a chore. Ask for enough information to respond helpfully, not everything you might eventually need from a client.
For Marissa’s photography business, we use:
- Name.
- Email address.
- Desired type of photography: Wedding day photography, engagement shoot, portrait shoot, or something else.
- A message: A friendly question asking what the person is planning and how Marissa can help.
A project-type dropdown is more useful here than the imported budget dropdown because the type of shoot provides context for a later proposal.
Update placeholder text as well as labels. Otherwise, you can end up with a photography-services dropdown still displaying an old budget range. A neutral prompt such as Select your service makes the next step clear.
Set required fields and button text
A red asterisk indicates a required field. Use the Required toggle in its General options to change that setting.
Name and email are important for responding. Decide which other information is essential before making it mandatory.
Under Settings > General, customize the submit button label. Something like Send your note adds warmth without making the action unclear.
Configure notification delivery
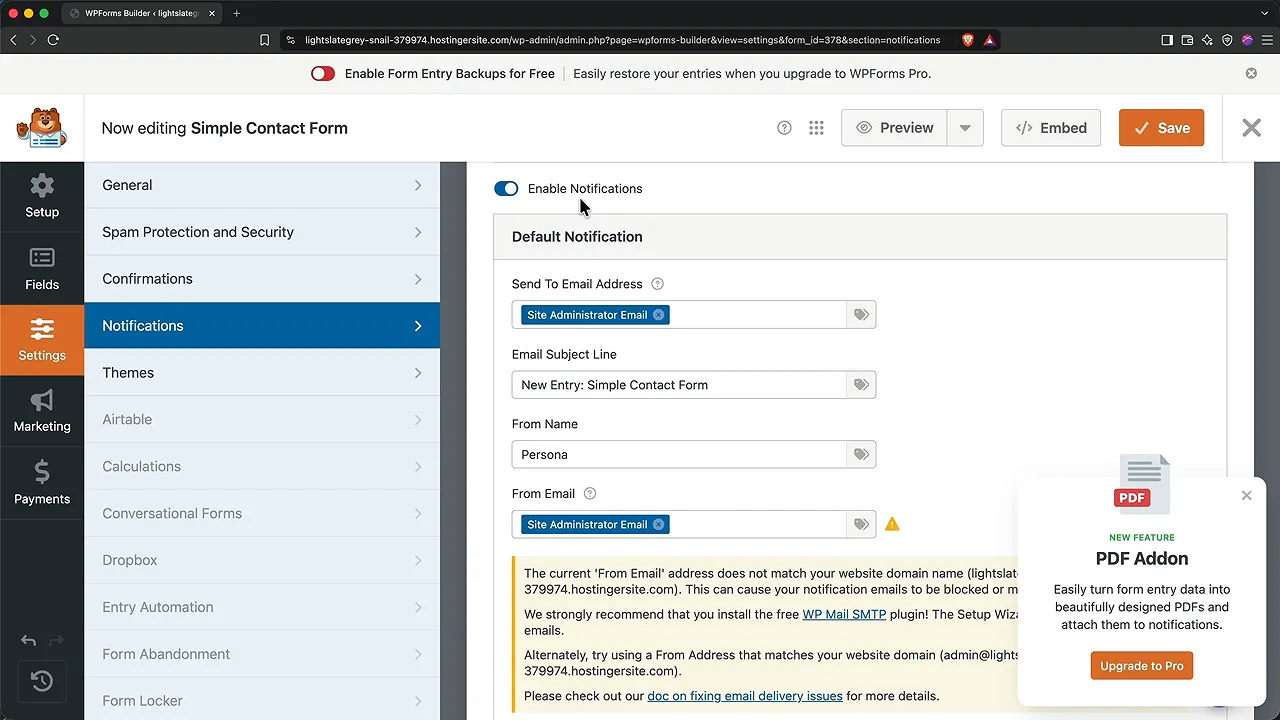
Open Settings > Notifications and check these values carefully:
- Enable Notifications: Leave this on.
- Send To Email Address: The inbox that should receive inquiries. The default may be the WordPress administrator email.
- Email Subject Line: Use a recognizable subject that identifies the website or inquiry.
- From Name: Replace the template’s name with your business name.
- Reply-To: Reference the visitor’s email field so replying to a notification addresses the person who submitted it.
- Email Message: Keep the all-fields content initially so you receive the submitted information.
Customize the confirmation
Open Settings > Confirmations. A basic message is enough for this website.
Thank the person and explain what happens next, such as letting them know you’ll respond to discuss their upcoming shoot.
A redirect to another URL is also available if you later need a dedicated thank-you page or a more advanced workflow. It isn’t necessary for a simple contact form.
Embed the form in Elementor
- Save the form and close the form builder.
- Open the Contact page with Elementor.
- Find the WPForms widget in the Elements panel.
- Drag it into the desired section.
- Select your form from the dropdown.
- Publish the page.
You can then clean up the surrounding template content. In our example, we remove the old contact-details section, move the form higher on the page, change the heading to suit wedding inquiries, and replace the placeholder portrait.
Send a real test submission
A form is not finished just because it looks good. Open the public page, fill it out, and submit it.
Confirm that:
- The labels, dropdown choices, and placeholders make sense.
- The confirmation message appears.
- The notification reaches the intended inbox.
- The email contains the submitted fields.
- Reply-To points to the email address entered in the form.
If the message doesn’t arrive immediately, give it a few minutes and check Spam or Junk. If it lands there, mark it as not spam and add the sender to your contacts as appropriate.
When you correct a form setting in WPForms and save it, the embedded form updates without needing to rebuild the Elementor widget. Navigate away and return to inspect it rather than accepting a browser prompt to resend a previous submission.
14. Add a New Page and Put It in Your Menu
Create the page
Use New > Page from the WordPress toolbar, or add a page from the dashboard. Give it a title, save or publish it as needed for your workflow, and click Edit with Elementor.
You can also use Elementor’s page dropdown and choose Add New Page.
For the photography site, we create a dedicated Gallery page.
Check Page Settings > Page Layout:
- Elementor Full Width: Keeps the theme’s header and footer while giving Elementor the page content area.
- Elementor Canvas: Removes the header and footer for a standalone layout.
Use Full Width for the gallery so people can continue navigating the website. Add its content with widgets or imported blocks using the same editing skills you’ve already learned.
Add the page to navigation
- Return to WordPress and open Appearance > Menus.
- Select the main menu if multiple menus exist.
- Find the new page under Most Recent, View All, or Search.
- Select it and click Add to Menu.
- Drag it into the desired order.
- Click Save Menu.
Pay attention to indentation. An item aligned with the others is a top-level link. Dragging it slightly right nests it under the item above, creating a submenu.
Submenus make sense for individual service pages under a Services overview. Our gallery should remain a top-level item.
Expand a menu item to change its Navigation Label. This can differ from the page title. “Photo Gallery” is clear and concise.
You can also remove a menu item there. Removing it from the menu does not delete the page. For example, I remove Home to save space because the logo already provides a familiar route back to the homepage.
15. Customize the Header and Footer in Blocksy
The header and footer repeat across the site, so we edit them at the theme level instead of rebuilding them on individual Elementor pages.
Open Appearance > Customize, or click Customize from the public site while logged in.
Work with the header builder
Choose Header. Blocksy’s builder uses rows and draggable elements. The template places a logo on the left, a menu in the middle, and search and a button on the right.
You can move items between positions and rows, remove unnecessary items, or drag in available elements. For our small photography website, the search function isn’t essential, so we remove it.
Use a logo or a text site title
A clean business name in text can look perfectly professional. You don’t need to delay launching because you haven’t commissioned a logo.
Select the Logo element and either enable the site title or upload your logo. A transparent PNG works well for the example because it avoids a rectangular background around the wordmark.
Adjust Logo Height to fit the header. The desktop example uses about 63 pixels, but the right size depends on your logo and layout.
Understand transparent and sticky states
A transparent header can sit over the opening page image. A sticky header remains available in the viewport as someone scrolls.
Blocksy provides options for which rows remain sticky and how the header appears:
- A default state change.
- Slide down.
- Fade.
- Auto hide and show, where the header hides while scrolling down and returns when scrolling up.
You can use different logo files for transparent and sticky states. For example, a white logo might work over a dark hero image, while a dark logo is needed if the sticky header has a light background.
Check desktop, tablet, and mobile previews. Adjust logo size separately where the controls support it.
Clean up the footer
Return to the customizer menu and open Footer. The same general builder approach applies.
Replace the template logo, remove placeholder text, and keep only sections you actually use. In our example, there’s no newsletter, so the newsletter section goes.
The footer is a useful place for secondary navigation, contact details, social links, and supporting pages that don’t belong in the main menu. Reorder content within widget areas as needed, then click Publish.
16. Write Your First WordPress Blog Post
Pages are the lasting parts of your site, such as Services and Contact. Posts are dated content, such as helpful guides, updates, and announcements.
You don’t need a blog for every website, but useful articles give you a way to answer customer questions and build out relevant content.
Remove demo posts and create your own
- Open Posts in WordPress.
- Select unwanted demo posts.
- Choose Move to Trash under Bulk Actions and apply it.
- Click Add Post.
For our photography example, a useful first article could explain how to choose a wedding photographer.
Write the post in WordPress’s default Gutenberg editor. It’s well suited to article content: type paragraphs, add heading blocks, and use the plus button for images and other content.
Set post-wide details
- Featured image: Provides the thumbnail on the blog listing and may be used in link previews, depending on your site’s sharing setup.
- Category: Organizes related articles. Our example uses Helpful Guides.
- Status: Controls whether the post is still being prepared or available publicly.
Common status and visibility options include Draft, Pending Review, Private, Scheduled, and Published. You can also make a post sticky or password-protect it.
Save a draft and preview before publishing. The example theme already displays the featured image above the article, so adding the same photo as the first image block creates an unnecessary duplicate.
When the post is ready, publish it and check the public page in a private browser window. It should appear automatically on the blog listing.
Set a professional author name
If your email address appears as the author, open Users, edit your profile, and set a suitable nickname and Display name publicly as value.
Click Update Profile. Each author on a multi-user site can have their own public name and profile information.
17. Set the Site Title and Favicon
Open Settings > General and replace the temporary site title with your actual website or business name. Add a tagline if you want one.
Then choose a Site Icon, also called a favicon. This is the small mark shown in browser tabs and bookmarks.
Use a square image at least 512 by 512 pixels. If you need to create one, favicon.io can generate an icon from an image, text, or an emoji.
If your existing logo contains both an icon and a wordmark, WordPress’s cropping tool can isolate the icon:
- Click Choose Site Icon.
- Select the logo image.
- Position the square crop around the icon.
- Crop the image and save the settings.
Check the browser tab to confirm the new icon appears.
18. Connect Your Custom Domain
Once the site is ready to share, return to Hostinger hPanel. You can use the Hostinger Tools plugin’s hPanel shortcut or sign in directly.
- Open Websites and find the site using the temporary address.
- Click its Connect Domain prompt.
- Search for the full domain you want, including its extension.
- Select an available domain covered by your plan’s first-year offer, if eligible.
- Enter accurate registration and contact information.
- Complete registration.
If you already own a domain elsewhere, enter it instead. Hostinger will provide instructions for pointing it from your existing registrar to the website. Those steps vary by registrar, so follow the instructions provided for your situation.
Verify your registration email immediately
Don’t leave domain verification for later. The setup shown requires email verification within 14 days to keep the domain active.
Open the verification email, click its verification button, and confirm completion before moving on.
Allow time for the domain to connect
Your website may appear at the new address quickly, but domain propagation can take 24 to 48 hours.
If it still isn’t working after that period, use Hostinger’s support chat or its Kodee assistant to help diagnose the connection.
Your WordPress login now lives at your custom address followed by /wp-admin. Being asked to sign in again after the domain change is normal.
19. Claim Your Included Business Email
In hPanel, open Emails. If your plan includes an email offer, look for the prompt to claim it.
- Click the free email setup option.
- Select your connected domain.
- Choose the free plan rather than a paid upgrade if it meets your needs.
- Review the trial duration and future charges.
- Choose a mailbox name, such as hello, contact, info, or your own name.
- Create a secure password and click Create Mailbox.
- Open the inbox to send and receive messages.
The offer demonstrated is a 12-month free email trial, not a promise of permanently free email. Check the renewal terms and limits shown in your account. The example also allowed one additional mailbox during the trial.
20. Keep Your WordPress Website Updated and Backed Up
A website isn’t something you launch and forget. A small maintenance routine helps prevent problems and gives you a recovery path when something goes wrong.
Check WordPress updates
Open Dashboard > Updates. Check WordPress itself, your theme, and your plugins. The page shows what needs attention and lets you run available updates.
Confirm your backup schedule
In Hostinger, open the website’s hosting dashboard and find Backups.
The Premium plan demonstrated provides weekly backups. If you need more frequent recovery points, review the daily backup option.
Check the available backup history rather than assuming there’s already a usable copy. A brand-new site may not yet have completed its first scheduled backup.
If you need to restore the site, this is where you select an available backup and use the restore option.
Reactivate LiteSpeed Cache
Return to WordPress > Plugins, find LiteSpeed Cache, and click Activate.
We turned it off to make editing easier. Now that the initial build is complete, caching can help deliver a faster experience. Open the public site in a private window for one final check.
Final launch checklist
- Replace or remove remaining placeholder text, photos, and demo posts.
- Check every important button and navigation link.
- Inspect desktop, tablet, and mobile layouts.
- Submit the contact form and confirm its email arrives.
- Check your header, footer, site title, favicon, and author name.
- Confirm the custom domain works and its email verification is complete.
- Review updates, backup availability, and caching.
You now have more than a customized template. You know where your website’s design settings live, how its pages are structured, how to add content, and how to keep it running. That’s the foundation that makes future changes much easier.


