Most AI tools wait for you to open them. OpenClaw can run around the clock, connect to your apps, carry out tasks, and message you when something needs your attention.
That could mean a morning briefing on Telegram, a calendar reminder with useful background research, or several research agents working on different parts of a project. The important difference is that it can take action, not just produce answers.
You can build a useful beginner setup without writing code. But deployment is only the beginning. The parts that make it reliable are security, clear permissions, persistent memory, sensible automations, and model routing that keeps API costs under control.
What You'll Learn
- Deploy OpenClaw on a VPS and secure access before connecting messaging channels or personal apps.
- Configure Telegram, Google Workspace, and persistent memory to build a useful personal assistant.
- Separate scheduled jobs from heartbeat checks and route routine work to inexpensive models.
- Use logs, spending limits, backups, and tested fallbacks to keep the assistant manageable.
Table of Contents
- What Is OpenClaw?
- 1. Choose Where to Run OpenClaw
- 2. Deploy OpenClaw and Protect Your Credentials
- 3. Secure the Setup Before Connecting Apps
- 4. Have the First Conversation and Set the Assistant’s Identity
- 5. Connect OpenClaw to Telegram
- 6. Find and Evaluate OpenClaw Skills
- 7. Connect Google Workspace with GOG and OAuth
- 8. Understand Memory, Identity, and Workspace Files
- 9. Automate with Cron Jobs and Heartbeat
- 10. Understand OpenClaw Costs Before Scaling Up
- 11. Add Model Providers Securely
- 12. Configure Smart Model Routing and Fallbacks
- 13. Diagnose Missing Replies and Errors
- 14. Enable Voice Messages and Spoken Replies
- 15. Use Sub-Agents for Parallel and Sequential Work
- 16. Update OpenClaw and Prepare for Recovery
- Start Small, Verify, Then Expand
What Is OpenClaw?
OpenClaw is an open-source AI assistant framework that runs on a computer you control. It connects to language models through APIs, uses tools to interact with other services, and stores instructions and memory in its workspace.
You may also come across its earlier names, Clawdbot and Moltbot. OpenClaw is the name used here.
There are three useful ways to think about what it does:
- Models and memory: A language model handles reasoning, while workspace files preserve your preferences, instructions, and important context.
- Always-on operation: Scheduled tasks and periodic checks let it work even when you are not chatting with it.
- Tools and actions: Integrations connect it to services such as Telegram, Gmail, Google Calendar, Drive, Slack, and Discord.
For example, you could have it check your calendar and urgent email every morning at 7 a.m., then send your priorities to Telegram. Another workflow could identify an upcoming interview, research the company and role, and prepare notes using your resume.
Those workflows depend on the tools and permissions you configure. Installing OpenClaw does not automatically give it access to every app, and that is a good thing.
1. Choose Where to Run OpenClaw
You have three main options. For most beginners who want an assistant available 24/7, I would start with a VPS.
Your personal computer
This is inexpensive to try because you already own the hardware. The catch is that the assistant stops when the computer sleeps or shuts down.
There is also a bigger concern: depending on its permissions, the agent may be able to access personal files and other sensitive information on that machine. A mistake happens on your everyday computer rather than in an isolated environment.
A Mac mini or spare computer
Dedicated hardware separates the assistant from your main machine and can stay on continuously. If you already have a suitable spare computer, this may be worth considering.
Buying hardware can mean spending $500 or more upfront. You also take responsibility for power, internet reliability, and any remote-access networking your setup requires.
A VPS
A virtual private server is a separate computer in the cloud. It stays online, has a predictable hosting bill, and keeps the installation away from your personal machine.
If the environment becomes badly broken, you can restore a backup or rebuild it. That isolation is useful, although it does not protect any external accounts you have authorized the agent to use.
Choosing a Hostinger plan
I use Hostinger here because its OpenClaw template handles deployment without requiring you to work in a terminal or understand Docker first. The demonstrated template also includes authentication and a randomized gateway port. Those are starting protections, not a complete security setup.
- KVM 1: A reasonable starting point for API-based models and a few automations.
- KVM 2: More room to grow. The demonstrated plan includes two CPU cores, 8 GB of RAM, and 100 GB of storage.
- KVM 4 or larger: Worth considering for local models, but the actual requirement depends on the model you choose.
You can start small and upgrade when additional skills, multiple agents, or local inference justify it.
The Hostinger offer used here provides an extra 10% discount on eligible VPS plans with a term of at least 12 months. Check the current checkout terms before purchasing. This is an affiliate offer, so we may earn a commission at no extra cost to you.
Configure the order
- Select the OpenClaw template and your VPS plan, then click Deploy.
- Choose a billing period. The demonstrated checkout offers one, 12, and 24 months, with longer terms reducing the advertised monthly rate.
- Turn off the optional ready-to-use AI add-on if you want to connect your own model provider.
- Consider daily backups. OpenClaw can change its own configuration, so a restore point is genuinely useful.
- Select a server location with low latency to you.
- Create your account and complete billing.
In the demonstrated checkout, daily backups cost about $3 per month, and the basic annual order without them came in below $70. Treat those as examples, not current price guarantees.
2. Deploy OpenClaw and Protect Your Credentials
After checkout, you will reach the OpenClaw configuration page. Hostinger changes this interface regularly, so field positions may differ. The two essentials are your gateway token and your model-provider credentials.
Save the gateway token
Your gateway token is the master password for the OpenClaw dashboard. Someone with access to it may be able to control the assistant and its connected capabilities.
Copy it into a password manager. Do not put it in an ordinary chat, screenshot, or loose text file.
Connect a language model
I use Anthropic Claude for the initial setup, but OpenClaw also supports other providers, including OpenAI and Gemini. You can configure more than one provider later.
For Claude, open the Anthropic API platform, create an account or sign in, and complete onboarding.
- Add API credits. The demonstrated account starts with a $5 minimum credit purchase.
- Check your rate limits. Initial setup can involve large requests, and a low account limit can interrupt it.
- Set a monthly spending limit. Choose an amount you are comfortable losing if a task behaves unexpectedly. The example uses $100.
- Decide whether to enable auto-reload. Leaving it off means the assistant stops when prepaid credits run out rather than automatically buying more.
- Create an API key. Give it a recognizable name such as OpenClaw and save it in your password manager.
- Paste the key into the matching provider field in Hostinger, then deploy.
I chose a $40 initial credit purchase to give the setup more room. However, do not assume a particular purchase automatically unlocks a particular usage tier. Provider thresholds, account requirements, and model-specific rate limits can change. Check what your own dashboard actually shows.
The API key may only be displayed once. Treat it like a password because it authorizes usage against your account.
Open the gateway
In Hostinger, go to VPS, select your instance, and click Manage. From the overview, open OpenClaw and sign in using the saved gateway token.
You should now have the gateway dashboard available, including its chat interface.
3. Secure the Setup Before Connecting Apps
OpenClaw can run commands, access files, browse websites, and send messages. Those capabilities are why it is useful. They are also why security cannot be an afterthought.
A malicious web page or skill can contain instructions intended to redirect the agent. This is often called prompt injection: untrusted content tries to act like an instruction from you.
Protect dashboard access
If your browser labels the dashboard Not secure, the connection is using HTTP rather than HTTPS. Avoid using an exposed HTTP dashboard for sensitive administration, particularly on public Wi-Fi.
For a longer-term setup, use an appropriate HTTPS reverse proxy or a private-access approach such as Tailscale. These guides cover a reverse proxy and SSL setup and a security-first VPS configuration.
A standard consumer VPN is not a substitute for HTTPS or a private tunnel all the way to your server.
Audit against the official security documentation
Open the OpenClaw gateway security documentation. You can give that page to your assistant and ask it to review the installation, explain the recommended changes, and verify the resulting configuration.
A useful request is:
Review my setup against the official security documentation. Explain the changes you recommend, ask before changes that could affect access, and run a security audit afterward.
The demonstrated HTTP setup temporarily retained allowInsecureAuth to preserve browser access. Treat that as a setup-specific exception, not a security recommendation. Plan secure access before changing authentication settings so you do not lock yourself out.
The gateway may briefly disconnect while applying changes and restarting. Reconnect and check the audit results rather than assuming that a successful restart means everything is secure.
Set permissions and approval gates
Give the assistant clear boundaries from the start:
Draft messages on my behalf and get my approval before sending them. Ask before deleting files or making network requests. Save these rules in the workspace.
This follows the principle of least privilege: give the agent only the access it needs. Written instructions help guide behavior, but use actual permission controls and approval settings where available. A rule in a Markdown file is not the same as an enforced security boundary.
Add financial and runtime limits too:
If a task fails three times, stop and report the problem. Do not run tasks indefinitely. Limit each task to 10 minutes unless I explicitly approve more time.
Start with Telegram and perhaps one or two skills. Do not immediately connect your primary email, banking services, financial accounts, or password manager. Build confidence with low-risk tasks first.
4. Have the First Conversation and Set the Assistant’s Identity
In the gateway chat, send a simple greeting. On a fresh installation, this starts the first-run interview associated with BOOTSTRAP.md.
The assistant will ask questions such as:
- What should it call you?
- What should its own name be?
- What tone and personality should it use?
- What time zone are you in?
- What kind of work will you do together?
Do not rush through this with one-word answers. Specific context makes the assistant more useful.
I named mine Greg the Great and gave it a direct, dry personality: concise answers, no corporate fluff, and no filler. I also provided my time zone, work context, and preferences for how I like help delivered.
After onboarding, OpenClaw stores the identity and user information in its workspace. In the demonstrated setup, it then removed the bootstrap file because that first-run process was complete.
If the assistant suddenly stops replying, check API credits and rate limits first. A blank response is not automatically a broken installation.
5. Connect OpenClaw to Telegram
Telegram is a convenient first messaging channel because its bot setup is straightforward. Ask OpenClaw to help configure Telegram. If you enabled approval for network requests, expect it to ask before consulting the documentation.
Create the Telegram bot
- Open the official Telegram BotFather conversation.
- Select Start, then send
/newbot. - Choose a display name for your assistant.
- Choose a unique username ending in
bot. - Save the bot token securely.
The bot token authorizes access to your Telegram bot. Keep it private, just like the gateway token and your model-provider keys.
Complete the token configuration through the method supported by your installation. Prefer a dedicated configuration or secret field when available rather than leaving credentials in conversation history.
Pair your own Telegram account
Open your new bot using the link BotFather supplies and select Start.
The initial response may say that access is not configured and include your Telegram user ID and a pairing code. Return that pairing information to the OpenClaw setup conversation so your account can be approved.
This adds your account to an allowlist. Verify that only approved users can communicate with the assistant, then send a greeting in Telegram to test it.
To find the Telegram conversation in the gateway, refresh the chat interface and use the session dropdown. The Telegram session is separate from the initial web chat session.
OpenClaw also supports channels such as WhatsApp, Discord, and Slack. Add those later, once the first connection works reliably.
6. Find and Evaluate OpenClaw Skills
A skill teaches OpenClaw how to use a capability or follow a particular workflow. Think of it as a plugin-like package, although some skills contain only instructions and metadata rather than executable code.
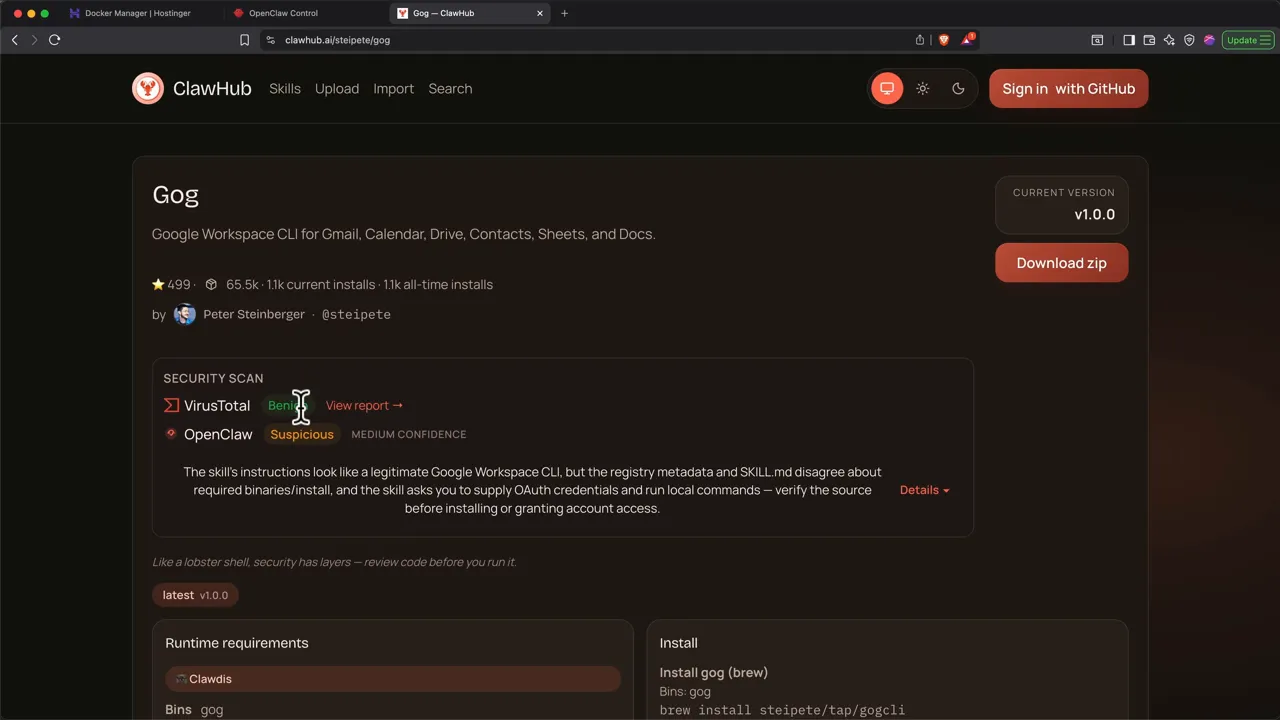
You can browse the ClawHub skills library or use the ClawHub command available through your assistant. In Telegram, type a slash and look for the ClawHub command, then ask it to search for the skill you need.
Popularity does not establish safety. Malicious skills have been reported in the ecosystem, so do not install something simply because its download count is high.
Before installation:
- Read the skill description and inspect its files.
- Check the security scan and VirusTotal report where available.
- Compare requested permissions with the skill’s actual purpose.
- Ask the assistant to review the contents for suspicious behavior.
- Avoid unexplained scripts, executables, or requests for unrelated access.
A clean scan or an AI review is useful evidence, not a guarantee.
The first integration used here is GOG, a Google Workspace skill covering Gmail, Calendar, Drive, Contacts, Sheets, and Docs. The inspected version contained instructions and metadata rather than hidden executable scripts.
7. Connect Google Workspace with GOG and OAuth
Only move to this step after you are comfortable giving the assistant access to Google data. A separate account is a sensible place to experiment before connecting anything important.
Ask OpenClaw to install GOG. Then tell it exactly where it is running:
This installation runs on an Ubuntu VPS, not macOS. Use setup instructions appropriate for this environment and walk me through Google OAuth configuration.
That detail matters. In my setup, the initial instructions suggested Homebrew, which was not the installation path I needed for this Ubuntu environment.
OAuth is the authorization process that lets the integration access your Google account. Expect this to be the most tedious part of the setup. There are several screens, but each has a specific job.
Create a Google Cloud project and enable APIs
- Sign in to the Google Cloud Console.
- Open the project selector and choose New project.
- Name it something recognizable, such as OpenClaw, and create it.
- Select the new project.
- Open APIs & Services, then Enabled APIs & services.
- Click Enable APIs and services, search for the API you need, and enable it.
Repeat the final step for the services you intend to use: Gmail, Google Calendar, Drive, Sheets, Docs, and People for contacts. Enable only what your intended workflows require.
Configure the OAuth consent screen
- Open OAuth consent screen and select Get started.
- Enter an app name and your support email.
- Choose External for the audience in this personal test setup.
- Add your contact email, accept the terms, and create the configuration.
- Open Audience and add your own Google email as a test user.
Create the OAuth client
- Go to APIs & Services → Credentials.
- Select Create credentials → OAuth client ID.
- Choose Desktop app.
- Name the client and click Create.
- Download the client credentials JSON file.
Provide the credentials through the integration’s supported configuration process. The demonstrated flow attached the JSON file to the assistant’s Telegram conversation, but credential files deserve careful handling. Prefer a secure configuration or file-transfer method where your installation supports one.
Tell the assistant which Google account you want to connect. It should generate an authorization URL.
Complete authorization on a headless VPS
Open the generated URL and select your Google account. You may receive an unverified-app warning because this is your own test OAuth application. Continue only after confirming that it is the project you created.
Review the requested permissions before approving them.
In the demonstrated desktop-client flow, the browser then redirects to a local address and displays a connection error. That is expected in this particular headless VPS workflow: the authorization process needs the redirect information returned to the integration.
Follow the assistant’s instructions for securely returning the full redirect URL. Treat it as sensitive because it contains temporary authorization information. If the integration reports a passphrase or keyring problem, resolve it and repeat authorization using a fresh URL.
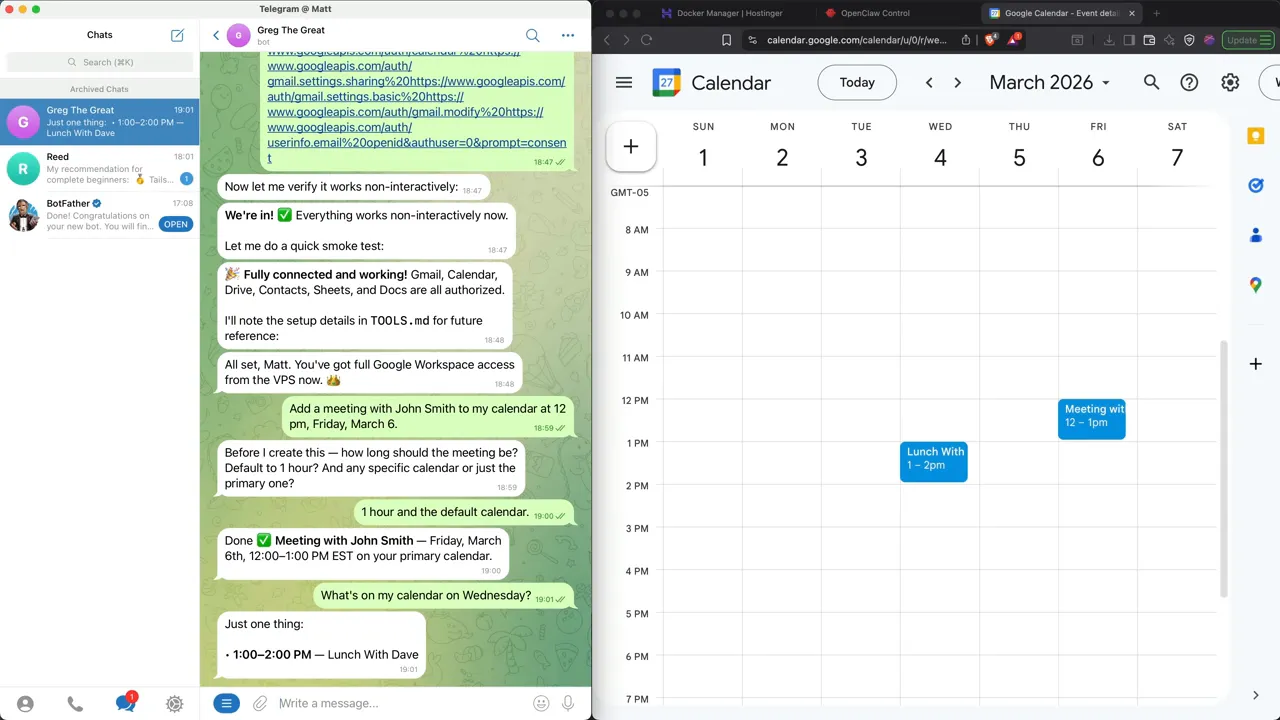
Test both reading and writing
Do not stop at a “connected” message. Verify actual behavior:
- Write test: Ask it to create a one-hour meeting with John Smith at noon on a specified Friday, using your default calendar.
- Read test: Manually add a lunch with Dave on a Wednesday, then ask what is on that day’s calendar.
Check the results in Google Calendar, including the date, duration, and time zone.
8. Understand Memory, Identity, and Workspace Files
One of OpenClaw’s most useful features is that its core instructions and personal context are readable files. You can inspect and edit them rather than treating the assistant’s memory as a mystery.
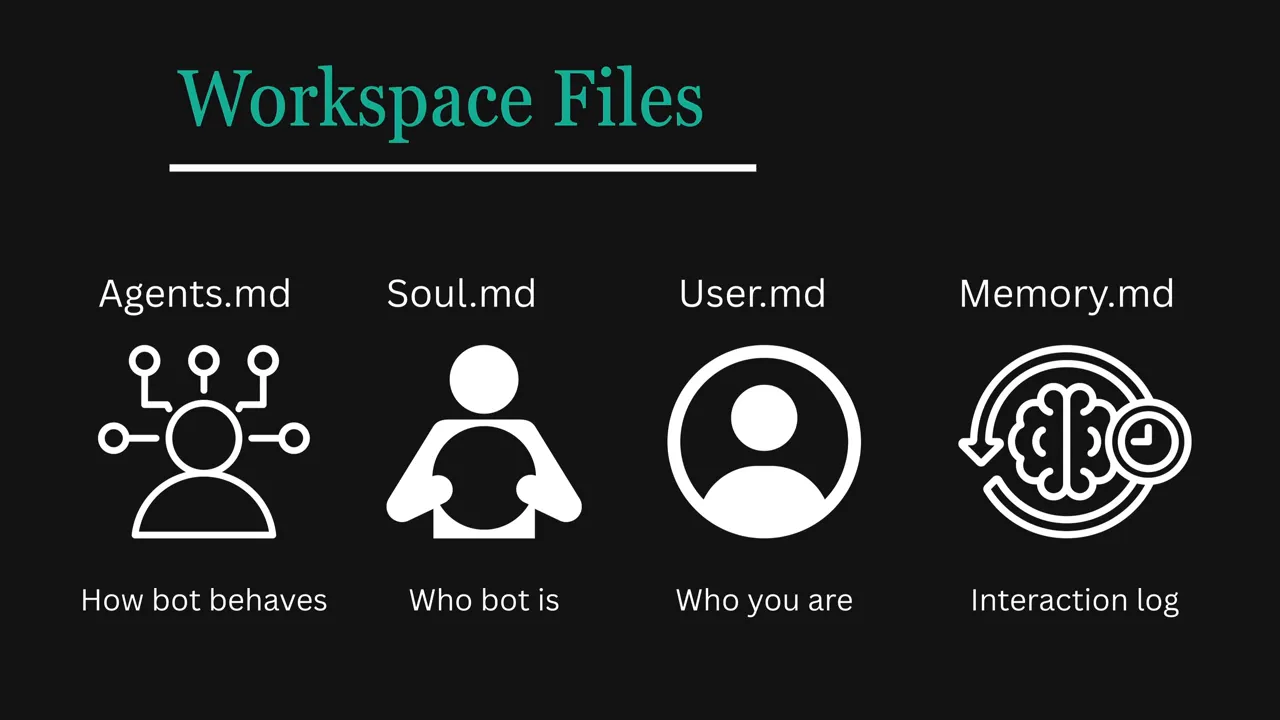
Four parts matter most:
AGENTS.md: How the assistant should behave, including stable instructions, approval requirements, and response preferences.SOUL.md: Who the assistant is, including its personality, tone, and working style.USER.md: Who you are, including your name, time zone, work context, and preferences.- Memory files: Daily notes and curated long-term information, including
MEMORY.mdin the demonstrated setup.
Specific instructions beat vague ones. “Be helpful and friendly” does not tell the assistant much. A more useful personality definition asks it to be direct, skip filler, point out weak assumptions, and avoid corporate language.
You can make changes conversationally:
Add a rule to AGENTS.md requiring my approval before sending emails.
Or update simple personal details directly:
My time zone is Eastern time. Update my user profile accordingly.
For something harder to define, ask it to interview you about your communication preferences and save what it learns. That can produce better instructions, but a long interview also consumes more tokens than a quick edit.
You can add rules against disclosing private workspace content or credentials, too. Just remember that written confidentiality instructions supplement access controls; they do not replace them.
Enable memory preservation features
Ask the assistant to check and enable the supported settings for compaction, memory flush, and session memory.
- Compaction reduces conversation context when it becomes too large.
- Memory flush helps preserve important details to disk before compaction.
- Session memory helps relevant context remain available across conversations.
Ask it to show what was saved and where. Persistent memory is most useful when you can verify it, correct it, and keep it focused.
9. Automate with Cron Jobs and Heartbeat
This is where OpenClaw starts behaving like an assistant rather than a chat window. The key is choosing the right automation mechanism.
Use cron jobs for scheduled work
A cron job runs at a specified time. Daily briefings, weekly reviews, and scheduled reminders belong here.
For example:
Create a daily job for 7 a.m. in my time zone. Check the weather in Paris, review today’s Google Calendar events, scan Gmail for urgent items, and send a concise Telegram briefing with my top priorities. Run a test now before enabling the schedule.
Review the test output. Confirm that the information is useful, the time zone is correct, and the message goes to the right Telegram conversation.
For unattended jobs, explicitly approve the narrow recurring actions they need. Otherwise, a broad rule requiring permission before every network request may prevent the automation from completing.
Use heartbeat for periodic monitoring
Heartbeat wakes the assistant at intervals to check whether something needs attention. For example, it might look for an urgent email or an approaching calendar event and notify you only when necessary.
Do not turn heartbeat into a dumping ground for every unfinished task. Repeatedly loading context and performing checks can consume a lot of tokens.
The practical distinction is simple:
- A specific time: Use a cron job.
- A condition checked periodically: Use heartbeat.
Ask OpenClaw to configure the heartbeat schedule and HEARTBEAT.md instructions, then verify what it will check. Keep the list short and route routine checks to an inexpensive model.
A 30-minute schedule means 48 scheduled wake-ups per day. Running all of those on an expensive flagship model is an easy way to create an unnecessary bill.
10. Understand OpenClaw Costs Before Scaling Up
OpenClaw itself is free and open source. The two main costs are the computer running it and the models it calls.
- VPS hosting: Roughly $5 to $12 per month in the demonstrated plans and billing terms.
- Budget-model API usage: An illustrative range of $5 to $20 per month.
- Midrange-model API usage: An illustrative range of $30 to $80 per month.
- Flagship-model API usage: Potentially $100 to $300 per month or more.
These are planning examples, not fixed packages. Usage, context size, caching, model pricing, tool calls, and retries determine the actual API bill.
A short message can trigger a much larger request because the assistant may include workspace instructions, tool definitions, memory, and conversation history. A complex task can involve multiple model calls, not just one.
In a large-context workflow, a task on a flagship model can cost several dollars. Heavy use can reach hundreds of dollars per month. That is why model selection matters more than shaving a dollar off the server bill.
Avoid the three biggest cost traps
- Using the most expensive model for everything. Routine checks rarely need the same reasoning power as complex planning.
- Allowing unlimited retry loops. A stuck task can continue spending while accomplishing nothing.
- Running frequent heartbeat checks on a flagship model. Small recurring costs compound quickly.
The guiding principle is straightforward: use a strong model for difficult thinking and an inexpensive model for routine execution. Keep permissions restrictive regardless of which model is running.
11. Add Model Providers Securely
Add new API keys through your hosting configuration rather than pasting them into a conversation.
- Open Hostinger’s Docker Manager.
- Open Projects and manage the OpenClaw project.
- Expand the Environment section.
- Add the provider’s required environment variable, such as
OPENAI_API_KEY. - Paste the secret into its value field.
- Click Save and deploy.
Environment variable names are case-sensitive. Use the exact name expected by the integration.
After deployment, ask the assistant to confirm that the provider is configured without revealing the key. Then make a small test request using that provider.
If the new provider does not appear
Do not assume that a green container indicator means every process has picked up the new configuration.
- Confirm the variable was added to the correct project with the correct spelling.
- Verify that deployment completed.
- Restart the gateway if required.
- If the installation remains stalled, use the VPS overview’s Reboot VPS control.
- Return to Docker Manager and verify that the project is running.
A VPS reboot interrupts everything on that server, so use it deliberately rather than as the first response to every error.
12. Configure Smart Model Routing and Fallbacks
Think in model categories rather than memorizing a list that will soon change:
- Flagship reasoning models: Complex planning, difficult analysis, and demanding coding work, such as an appropriate Claude Opus model.
- Balanced models: General daily work, such as Claude Sonnet or a suitable OpenAI model.
- Budget models: Routine summaries, simple execution, and periodic checks, such as Claude Haiku or an available mini model.
- Free-access or local models: A possible final fallback, subject to availability and hardware requirements.
Remove broken fallbacks first
A fallback is the model OpenClaw tries when the primary model is unavailable. A placeholder pointing to an unconfigured provider does not help.
Ask the assistant to show the current model configuration and remove fallbacks that lack valid credentials or working access. Test the models you keep.
Set routing rules
A useful routing policy could be:
Use Claude Sonnet for normal work, with a configured OpenAI model as fallback. Use Opus for complex reasoning and demanding coding. Use Haiku for routine tasks and heartbeat checks, with an inexpensive configured fallback. Delegate straightforward execution to cheaper sub-agents when appropriate. Tell me which model handles each task and save these preferences permanently.
Ask it to confirm both the actual configuration changes and the instructions saved in AGENTS.md. A written preference alone does not prove every task category has a working route.
Restart the gateway if required. In Telegram, use /model to inspect the current session model, browse configured providers, or switch models manually. After a test, switch back to your intended default.
Add a final fallback
A model from a separate provider can help when the primary provider runs out of credits, hits a rate limit, or has an outage.
The demonstrated free-access option is Kimi K2.5 through NVIDIA. Availability and free-access conditions can change, so verify them before relying on it. The Kimi setup walkthrough covers that configuration path.
The basic process remains the same: obtain credentials, add them securely to the environment, configure the provider, test it, and put it at the end of the fallback chain.
A working fallback may at least allow the assistant to report a problem rather than leaving you with silence. It cannot rescue a stopped server or a broken gateway.
Consider Ollama only when the hardware fits
Ollama lets you run models locally. That avoids per-token provider charges for local inference, but the hardware and electricity are not free.
Choose a model that supports tool use and fits your available memory and compute resources. You can ask OpenClaw to evaluate the server’s specifications and recommend an appropriate option.
A small API-focused VPS is not automatically suitable for local models. Ollama also requires additional installation and container configuration, so I would treat it as a later upgrade rather than a prerequisite.
13. Diagnose Missing Replies and Errors
Telegram does not always show the full result of a tool run or configuration change. A long structured response may appear in the gateway but not arrive cleanly in the messaging app.
If that happens, ask for a concise, Telegram-friendly version and inspect the gateway session.
For a silent or inconsistent assistant, work through this order:
- Check provider billing: Look for exhausted credits or spending limits.
- Check rate limits and model access: Confirm the requested model is available to your account.
- Check the project: Verify that the container and gateway are running.
- Inspect the relevant session: The gateway shows tool activity and errors that may be missing from Telegram.
- Open Settings → Logs: Review the latest entries for the actual failure.
- Try a fresh session: In Telegram,
/newcan clear a session-specific problem after the underlying configuration is fixed.
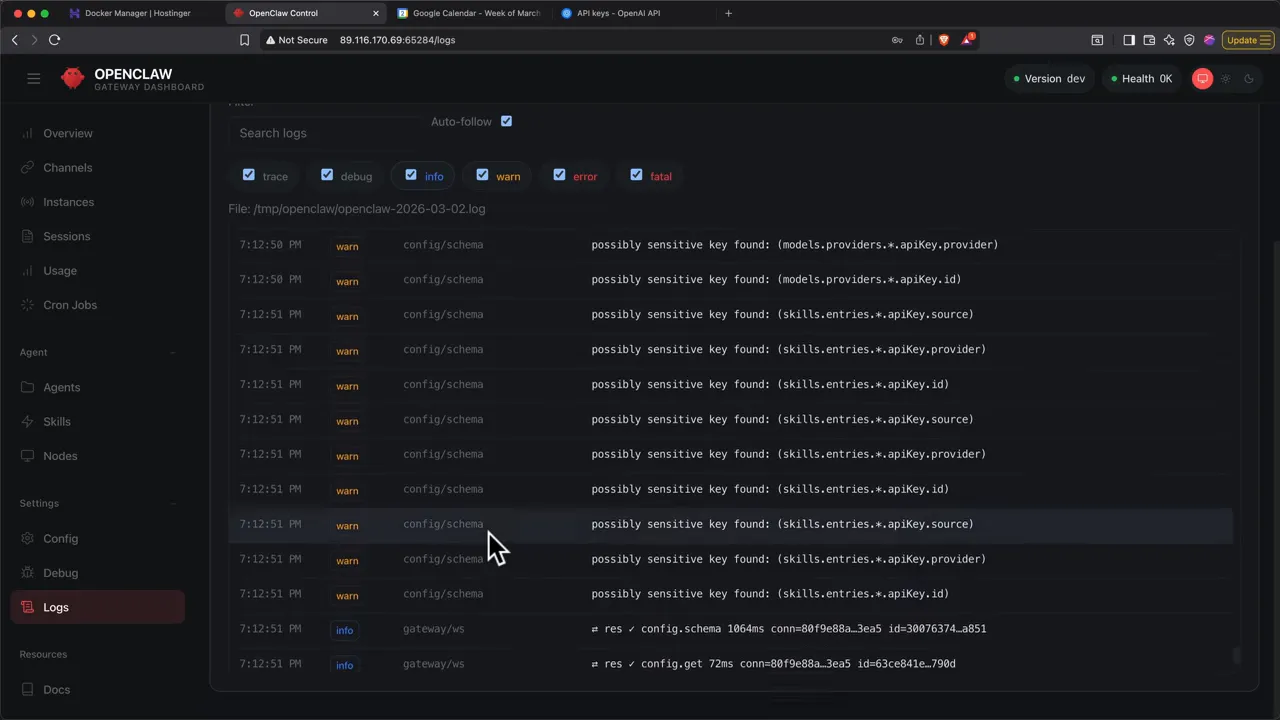
In my setup, adding a provider involved a restart, a VPS reboot, and eventually a new conversation session before normal replies resumed. The lesson is not to repeat those steps blindly. Check the logs and distinguish a configuration failure from a stale conversation.
14. Enable Voice Messages and Spoken Replies
Voice mode has two separate parts: understanding your audio and generating audio responses.
Enable speech-to-text
Ask OpenClaw to configure audio transcription so it can understand Telegram voice notes. In the demonstrated setup, it used OpenAI Whisper.
If you use another supported transcription route, have the assistant explain its requirements. FFmpeg can help process audio, but it is not itself a speech-recognition model.
Restart if needed, then send a short voice note and confirm that the recognized text is accurate.
Enable text-to-speech
For spoken replies, the demonstrated setup uses Edge TTS. Ask the assistant to configure it and respond with audio when you send a voice memo.
Restart, send another voice message, and test the response. You may want to refine the voice instructions afterward. Mine read its crown emoji aloud, which was funny once and probably unnecessary forever.
15. Use Sub-Agents for Parallel and Sequential Work
Sub-agents let OpenClaw split a larger job into smaller assignments. They can work in parallel or pass results through a sequence.
A simple parallel example is researching n8n, Zapier, and Make:
Research n8n, Zapier, and Make using three sub-agents in parallel. For each platform, identify what it does, its pricing, and one major limitation. Compile the findings into a single readable comparison with separate sections for each platform.
In my setup, that request exposed a missing dependency: web search was not configured yet. Sub-agents still need the tools required to do their work.
Add Brave Search access
- Create a Brave Search API account.
- Configure billing and select the appropriate Search subscription.
- Set a usage limit you are comfortable with.
- Create an API key.
- Add it to the OpenClaw environment as
BRAVE_API_KEY. - Save, deploy, and verify that the assistant can use search.
The demonstrated plan included $5 in monthly credits, and I set a matching $5 usage limit. Check current plan terms and how the provider applies those limits rather than assuming the same arrangement is still available.
Once search works, ask the assistant to resume the research project.
Inspect progress and collect the result
Refresh the gateway session dropdown to find the individual research sessions. You can inspect each one to see whether it completed its work or encountered a problem.
A sub-agent finishing does not always mean the main agent has already collected and delivered the result. Give it time to report back, then ask the main assistant to compile the final output if necessary.
You can also build sequential workflows: one agent researches competitors, another analyzes the findings financially, and a third prepares an investor report.
Start with a clearly scoped task and explicit deliverables. More agents mean more activity and potentially more API spending, not automatically better work.
16. Update OpenClaw and Prepare for Recovery
OpenClaw changes frequently. Keep the installation current, but have a recovery path before allowing major updates or configuration changes.
Update the installation
You can ask the assistant to check for updates and follow its supported update process. Alternatively, open the OpenClaw project menu in Hostinger Docker Manager and use Update.
Restart when required, then test a normal message, a connected tool, and an important automation.
Know how to stop it
If the assistant starts doing something unexpected, escalate deliberately:
- Ask it to stop all active tasks. This may be enough for a cooperative, responsive agent.
- Stop the OpenClaw project in Docker Manager. Use the project’s three-dot menu and select Stop.
- Revoke relevant API keys if necessary. This cuts off access through those credentials.
Revoking one model-provider key does not stop every possible process, especially if other providers or tool credentials remain available. Stopping the running project is the more direct way to halt the assistant itself.
Restore a backup or snapshot
In Hostinger, open Backups & Monitoring → Snapshots & Backups. Select an available backup and use Restore to roll back the server.
Before a risky change, create a fresh snapshot. It gives you a restore point immediately before that change rather than forcing you to rely on an older scheduled backup.
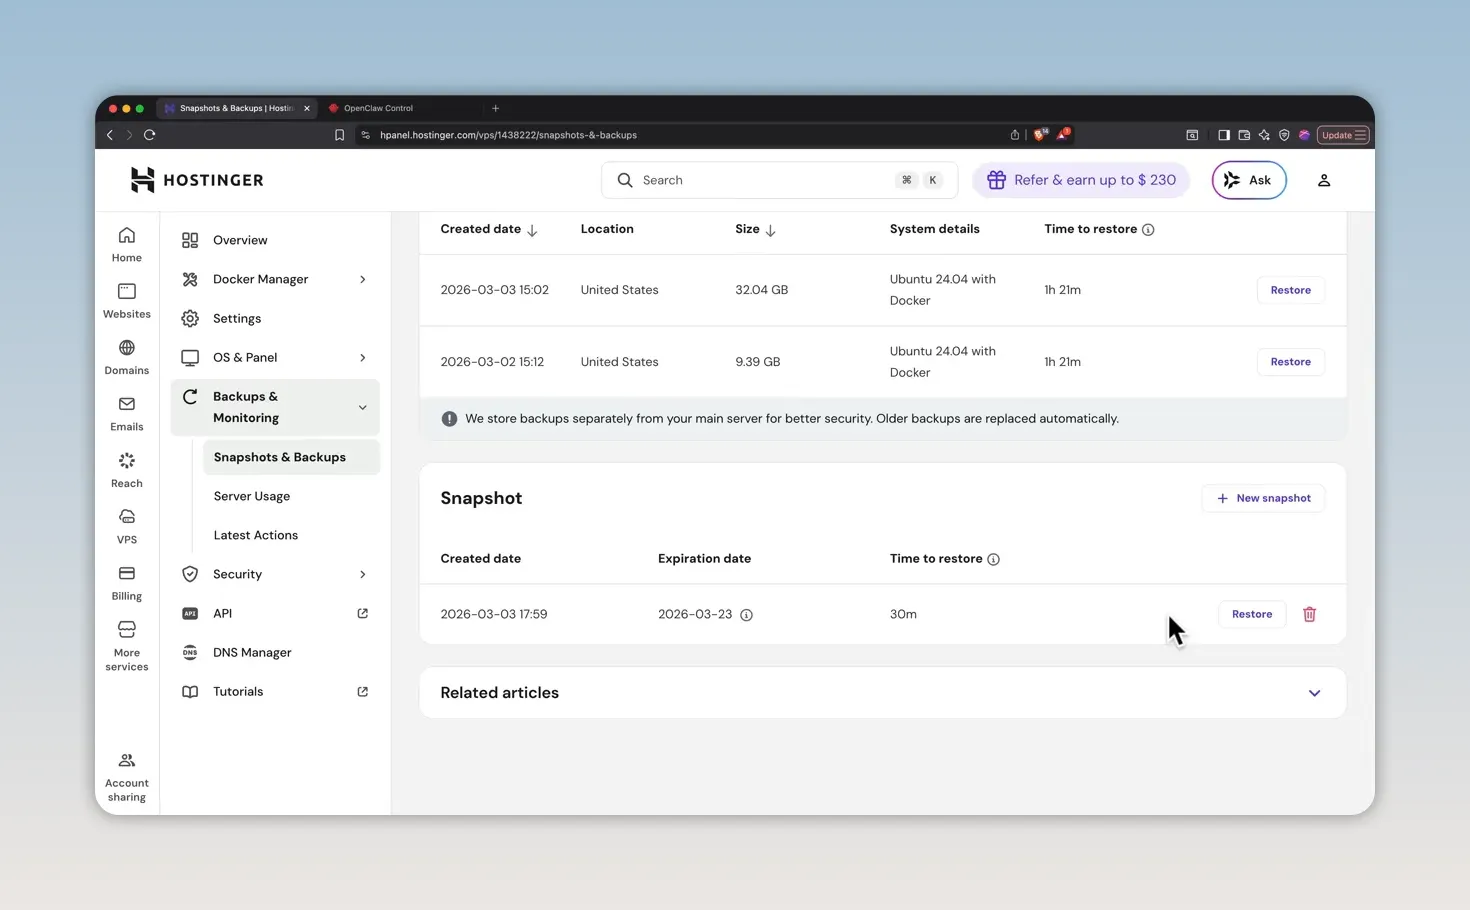
Remember that a server restore can undo local configuration changes, but it does not automatically reverse messages already sent or changes already made in external services.
Start Small, Verify, Then Expand
A useful first OpenClaw setup does not need every skill, every model, and access to your entire digital life.
Start with a secured server, one working model, Telegram, and a small task you can verify. Add a carefully reviewed integration, test reading and writing, then create one scheduled automation. Only after that should you expand into heartbeat monitoring, more providers, voice, and sub-agents.
The goal is not maximum autonomy on day one. It is an assistant that works consistently, stays inside clear boundaries, and earns more responsibility over time.
Made with VideoToBlog using The Ultimate Beginner’s Guide to OpenClaw


