Creating a Shopify store is only one part of starting an online business. You also need a product people actually want and a way to bring potential customers to your store.
The store itself is usually the easiest part to figure out. Finding a good product, choosing a reliable supplier, and learning how to market your offer are where most of the work happens.
Here’s how those pieces fit together, from opening your Shopify account to adding products, designing your storefront, and getting your first sales.
Some links below are affiliate links. If you purchase through them, I may earn a small commission at no additional cost to you.
What You'll Learn
- Shopify provides the storefront, but you still need products and a customer acquisition strategy.
- Add your own inventory manually or import supplier products through a dropshipping app.
- Choose suppliers with suitable warehouse locations and delivery times for your target customers.
- Use paid advertising or organic product content to bring interested people to your store.
Table of Contents
- 1. Understand What Shopify Does and Doesn’t Do
- 2. Create Your Shopify Account and Choose a Plan
- 3. Add Your Own Products or Choose Dropshipping
- 4. Find a Dropshipping Supplier with Suitable Shipping Times
- 5. Design Your Shopify Storefront
- 6. Promote Your Store and Get Your First Sales
- Build the Product, Store, and Marketing Together
- Go Further with My Free Shopify Course
1. Understand What Shopify Does and Doesn’t Do
Shopify is an ecommerce platform, not a business model. It gives you the tools to create an online store, display products, and accept payments. Signing up doesn’t automatically give you products to sell or customers to sell them to.
There are three main parts to building your Shopify business:
- Your product: Find or develop something that solves a problem, provides value, and gives people a reason to buy.
- Your store: Create a storefront that presents that product clearly and allows customers to purchase it.
- Your marketing: Get interested people to visit your store so you can make sales and, after expenses, turn a profit.
This distinction matters. A nicely designed store won’t make up for a product nobody wants, and a great product won’t sell if nobody knows your store exists.
2. Create Your Shopify Account and Choose a Plan
Start by creating a Shopify account. Enter your email address, complete the signup questions, and set your password. Once that’s done, you’ll arrive at your Shopify dashboard.
You can use my Shopify partner link to check the available introductory offer. The offer demonstrated was a three-day free trial followed by three months at $1 per month on eligible plans. Promotions and eligibility can change, so check the terms shown during signup rather than assuming those exact prices still apply.
Start with the Basic plan
For a beginner store, I recommend starting with Basic. It covers the core features needed for the setup described here, and you can upgrade later if your business needs more.
- Find the trial notice in your dashboard and select Select a plan.
- Choose Basic.
- Review the introductory price, billing terms, and regular subscription price.
- Enter your payment information and confirm your subscription.
In the offer demonstrated, choosing a plan within the initial three-day trial unlocked the discounted three-month period. I like to take care of this early so there’s more time to build and refine the store before the regular subscription price begins.
If you decide not to continue, pay attention to the cancellation terms and your next billing date. Shopify’s official plan documentation is a useful reference for understanding its subscription options.
3. Add Your Own Products or Choose Dropshipping
Once your account is ready, you need something to sell. The process is different depending on whether you already have a product or want a supplier to fulfill orders for you.
If you already have a product
In your Shopify dashboard, go to Products, then select Add product. This opens the product editor, where you enter the information customers need to make a buying decision.
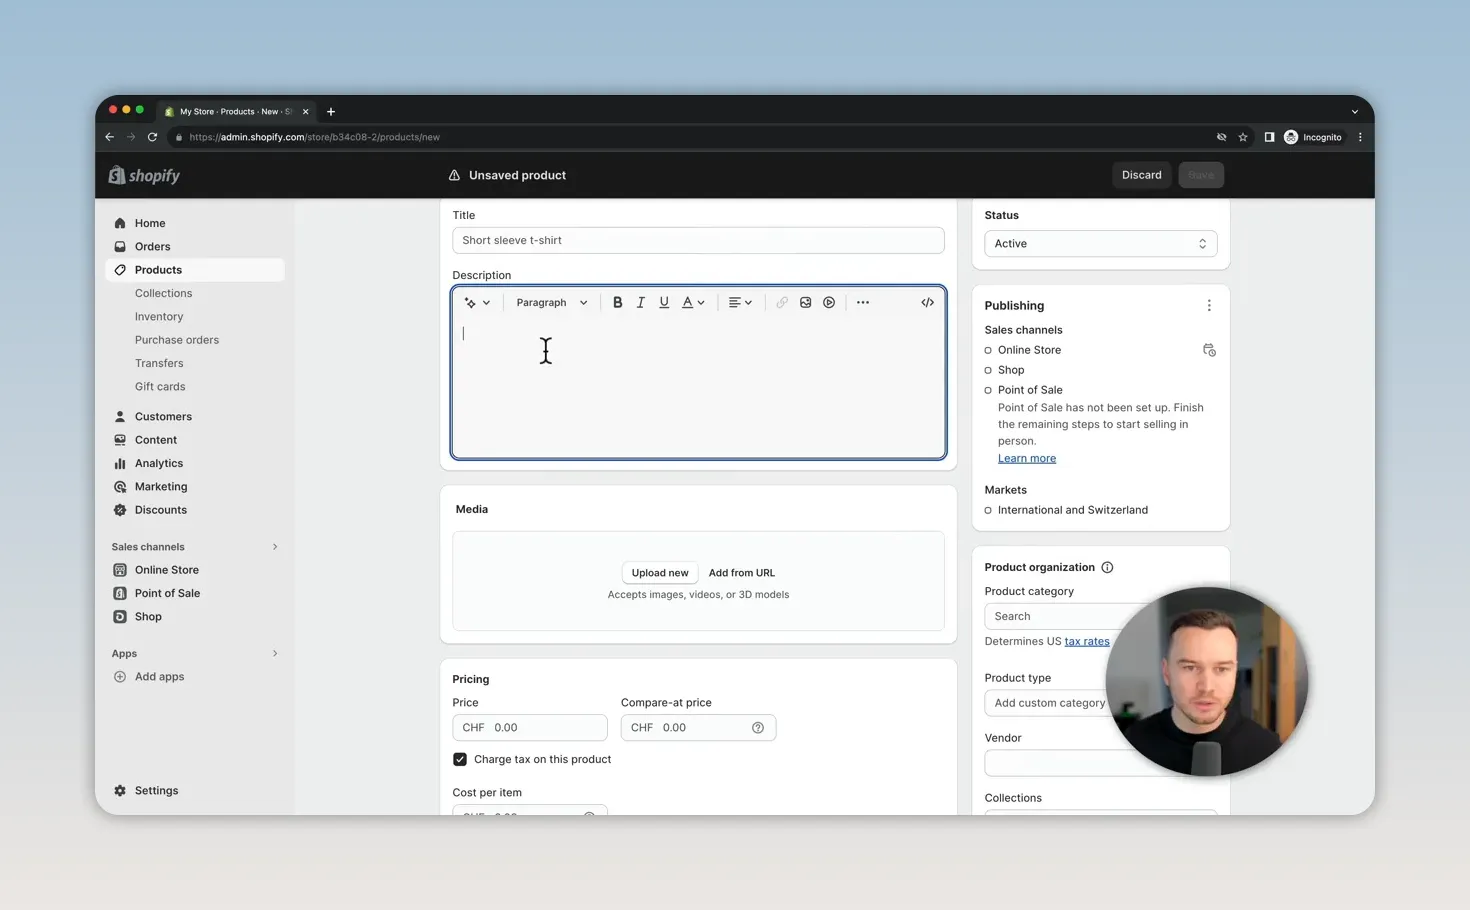
Work through these details:
- Title: Add the name of your product.
- Description: Explain its benefits and features, not just what it’s called.
- Media: Upload clear images that show your product in its best light.
- Price: Set the amount customers will pay.
- Cost per item: Enter your product cost if you want to help track margins.
- Inventory: Track the quantity you have available.
- Shipping information: Add the product’s weight if you plan to calculate shipping by weight.
- Variants: Add options such as different sizes or colors.
This is the straightforward route if you already hold inventory and want to use Shopify to present your products, make the sale, and collect payment.
If you don’t have a product: How dropshipping works
Dropshipping allows you to sell a supplier’s product without holding that inventory yourself. When a customer places an order through your store, the supplier ships the product directly to that customer.
- You find a product offered by a supplier.
- You list that product in your Shopify store at your retail price.
- A customer buys it from your store.
- You place the order with the supplier and pay their price.
- The supplier sends the product directly to your customer.
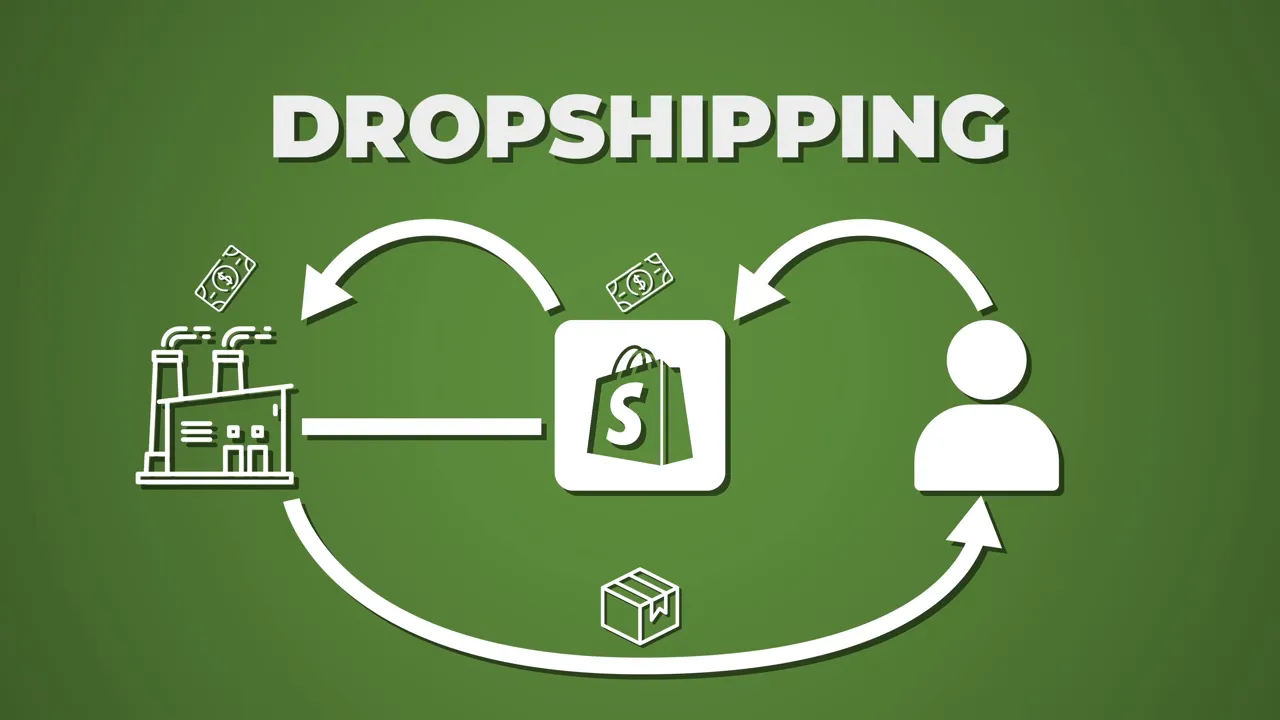
The difference between your selling price and the supplier’s price is not all profit. You still need to subtract fees, advertising costs, and other expenses.
That’s why choosing a low-cost product is only part of the decision. You also need a product people want and a supplier who can deliver a reasonable customer experience.
4. Find a Dropshipping Supplier with Suitable Shipping Times
There are several platforms you can use to find products for Shopify dropshipping. The main thing I would pay attention to, beyond the product itself, is where it ships from and how long delivery takes.
AliExpress: Inexpensive products, but check delivery carefully
AliExpress is one of the best-known places to source dropshipping products. It offers a large selection of inexpensive items, many manufactured and shipped from China, which you may be able to sell at a higher retail price.
The downside is shipping. Some deliveries can take two weeks to more than a month, depending on the supplier and destination. That can create problems when customers are used to receiving online orders within a few days.
Long delivery times can lead to complaints, refund requests, and extra customer service work. Some AliExpress suppliers have US warehouses, which may offer shorter delivery times for US customers, but you need to check each product rather than assume it ships locally.
CJDropshipping: Look for warehouses near your customers
CJDropshipping is another option, particularly if you want to search by warehouse location.
For example, its warehouse menu lets you look for products stored in the United States or Germany. If you’re selling to US customers, look at US warehouse inventory. If your customers are in Germany, a German warehouse may be a better fit.
The goal is simple: choose stock located closer to the people you’re selling to so you can reduce delivery times and avoid some of the headaches that come with long-distance shipping.
Zendrop: A beginner-friendly import and fulfillment workflow
I also recommend looking at Zendrop. Its product sourcing, importing, and order fulfillment workflow makes it a convenient option for beginners.
As with any supplier platform, check the specific product’s shipping options and delivery estimates. The platform name alone doesn’t tell you how quickly every item will arrive.
How to import a Zendrop product into Shopify
Here’s the workflow using casual hoodies as an example:
- Create your Zendrop account. Complete signup, then open the option to connect your Shopify store.
- Connect Shopify. In the demonstrated setup, this involves copying the store URL from the Shopify dashboard, pasting it into Zendrop, and selecting Connect.
- Install the app. Shopify opens an authorization page where you select Install app.
- Find a product. Browse Zendrop’s catalog and select Add to import list on the item you want.
- Review it. Open My Products, find the item, and select Review & Publish.
- Confirm the import. Complete the confirmation prompts and allow the product to transfer.
- Check Shopify. Return to Products in your Shopify dashboard and open the imported listing.
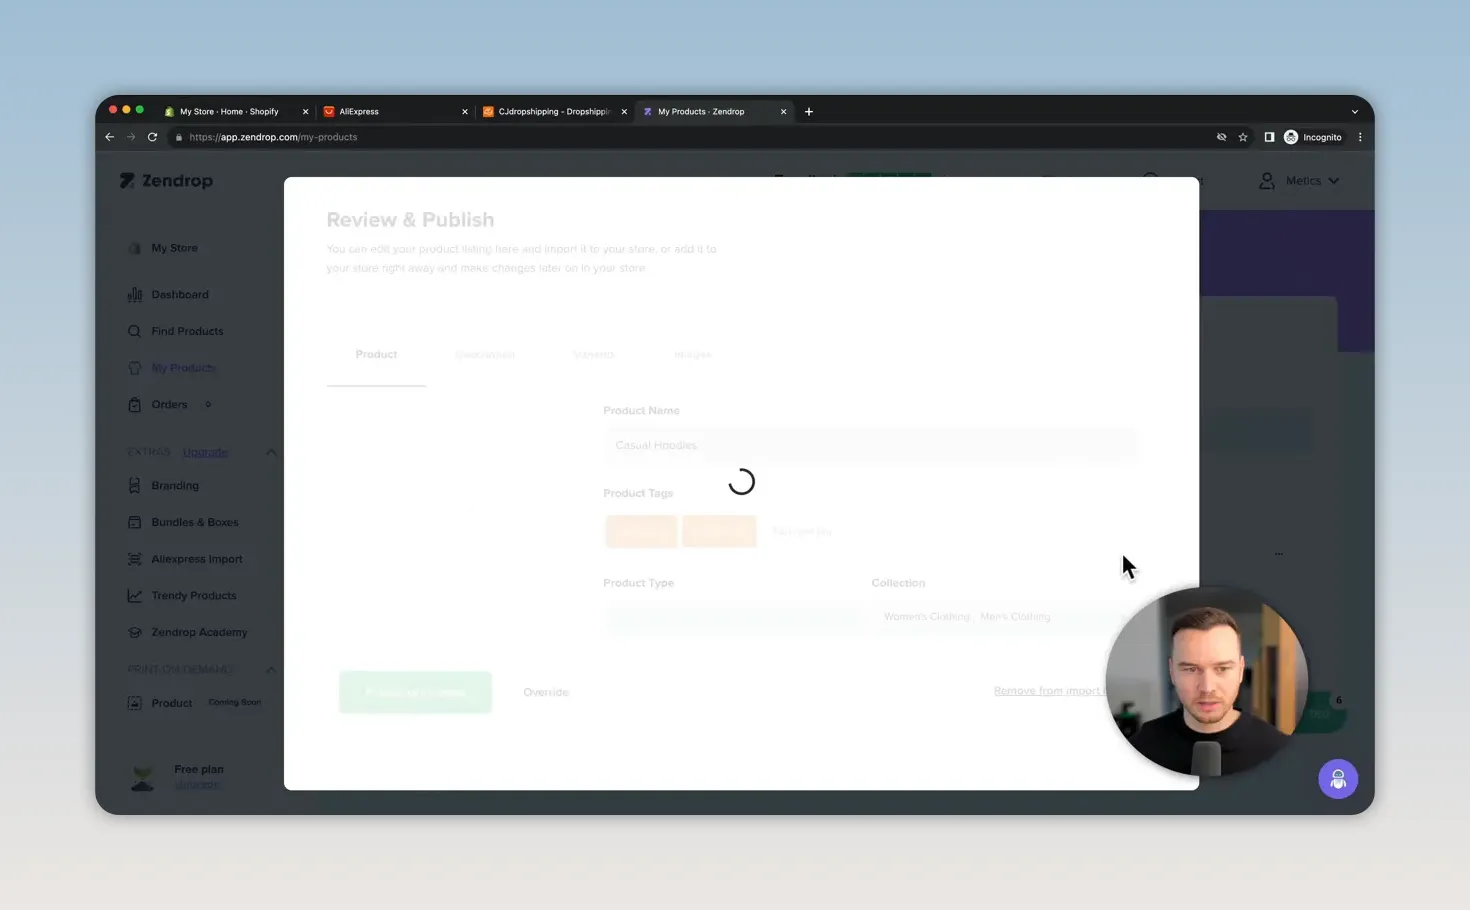
The import can bring across the title, description, images, prices, and variants such as sizes and colors. That saves you from entering everything manually, but you should still review those details before promoting the product.
If you choose AliExpress instead, I also have a separate AliExpress product import tutorial.
5. Design Your Shopify Storefront
Once you have one or more products in Shopify, the next step is designing what customers will see when they visit.
Go to Online Store > Themes. Your theme provides the basic design and page layouts for your store.
Use a free theme to get started
I recommend starting with a free theme rather than paying for one straight away. Dawn is the theme used in this example, and it’s a good starting point for a simple store.
You can browse other options in the theme library or Shopify Theme Store, but you don’t need to spend money on a premium design just to begin.
Click Customize to open the theme editor. From there, you can work on the homepage and switch to other page templates, including your product pages.
Your theme already provides much of the page structure. In the hoodie example, the imported product appears in the homepage’s featured products section, while its product page displays the images, price, colors, and sizes.
Check the mobile layout
Use the device preview controls in the editor to switch to mobile view. Don’t judge your store only by how it looks on a computer. Your customers may arrive from a TikTok or Instagram post on their phones.
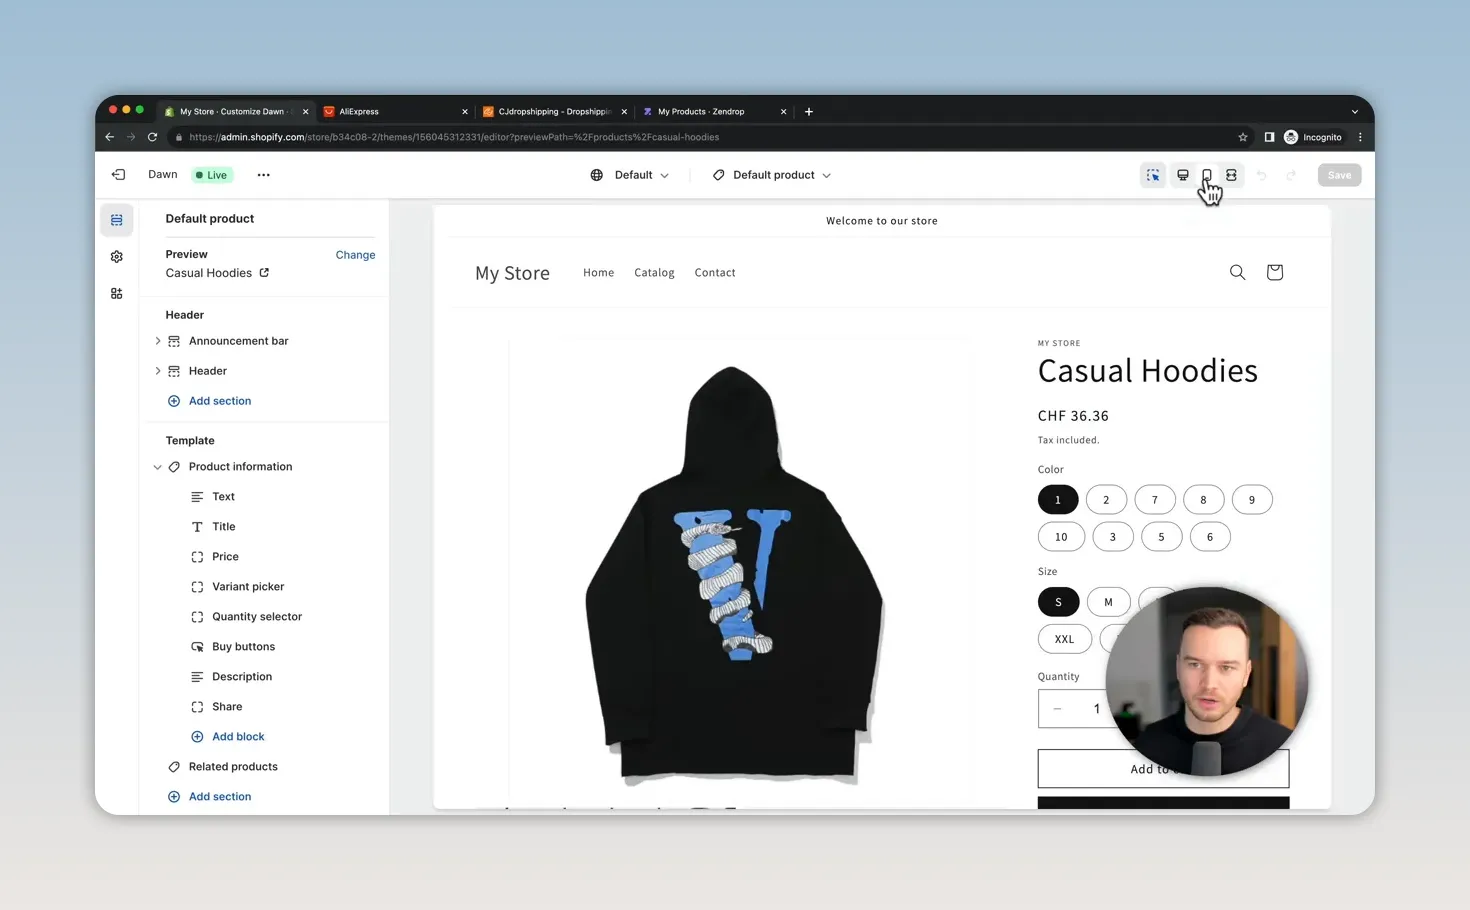
Review how the product images, title, variant options, and purchase controls fit on a small screen. The point is to make sure the product is easy to understand and the page is easy to use.
6. Promote Your Store and Get Your First Sales
Once your store is set up and you have a good product, you need to get people to it. This is where many beginners struggle, because publishing a store doesn’t automatically generate traffic.
There are two main routes: paid advertising and organic content.
Option 1: Paid advertising
You can pay to advertise your products on platforms such as:
- TikTok
If you have an advertising budget, TikTok is one route I would consider. It’s a platform I emphasize for product promotion, both through paid campaigns and organic posts.
However, don’t build your plan around the assumption that TikTok ads will always cost less than Facebook or Google ads. Advertising costs vary, and the important question is whether your campaigns can bring in sales profitably after all expenses.
Option 2: Organic short-form content
If you don’t have money to spend on ads, I recommend getting good at creating content.
The basic approach is to create short videos featuring your product, publish them on TikTok or Instagram, and use a profile link to direct interested people to your store.
This route doesn’t require paying for ad placements, but it does require time and effort. You’re creating the interest yourself rather than paying a platform to distribute an advertisement.
Use product content as research
A useful starting point is searching TikTok for TikTok made me buy it. You’ll find plenty of product demonstrations that show how sellers attract attention and connect that interest to a store.
Study how the product is presented, what makes its use clear, and how the account directs people toward a purchase.
One example is a small portable printer demonstration that had reached around 279 million plays at the time it was checked. Its store link didn’t work, which is a reminder that attracting attention is only useful if people can actually reach your offer.
Another example is Freeze Display, a brand selling frames that display small objects. One of its product clips had around 53 million plays, and its profile linked to a store offering a four-pack of the display frames.
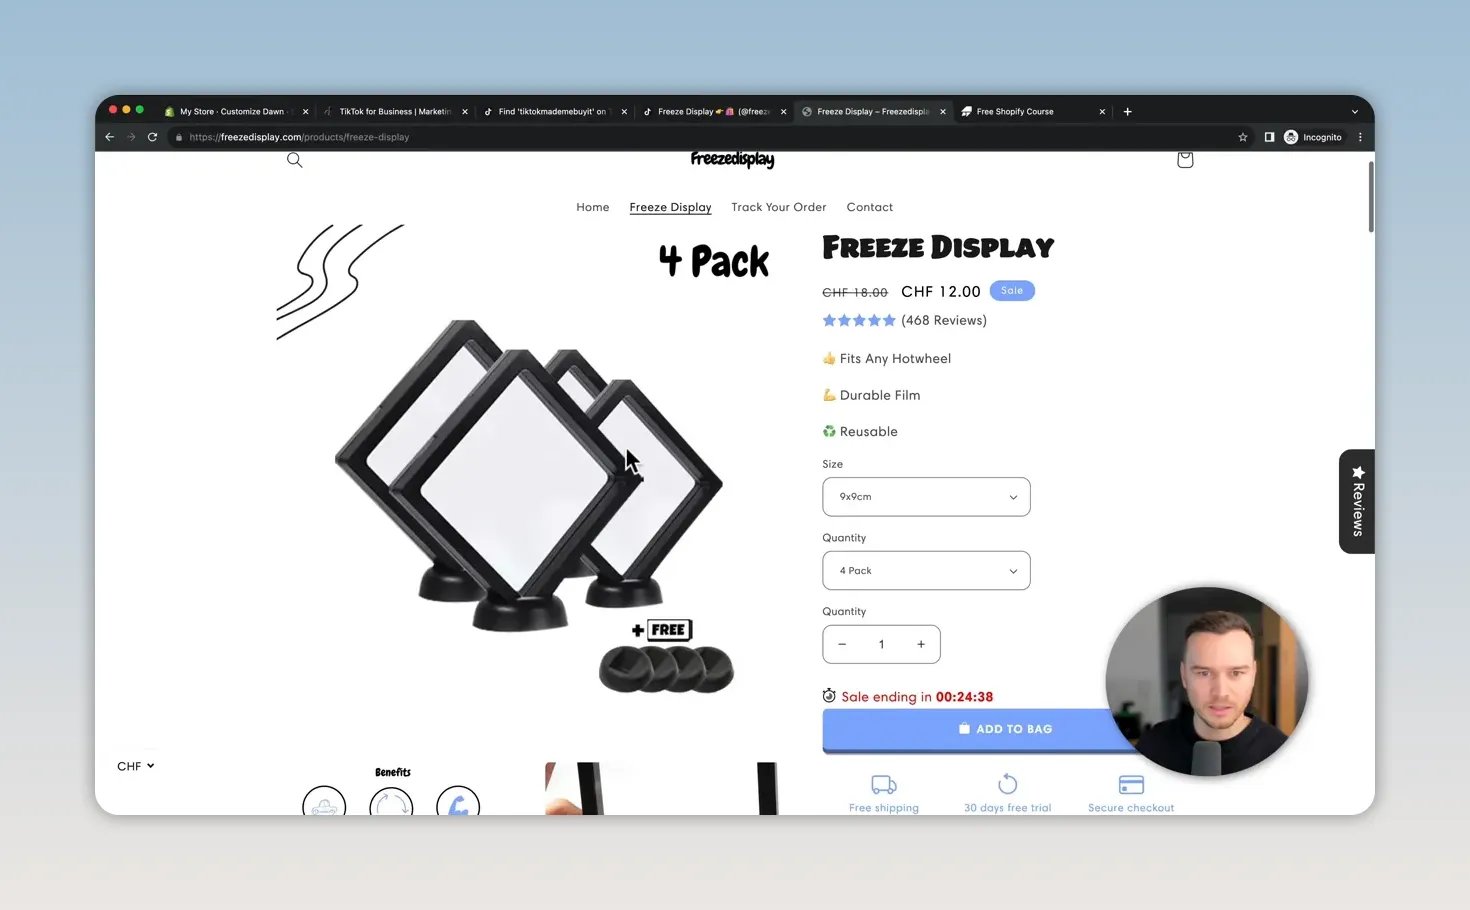
That illustrates the path you’re trying to build: someone discovers an interesting product, visits the account, follows the store link, and considers buying.
Large play counts don’t prove sales or profit, and those examples aren’t a guarantee of similar results. The useful lesson is the connection between the product content and the offer. Even without an ad budget, you can work on making that connection clear.
Build the Product, Store, and Marketing Together
Selling on Shopify isn’t simply about getting a website online. It’s about putting three things together: a product people want, a store that presents it well, and marketing that brings interested people to that store.
Start with a suitable plan, add your own products or connect a dropshipping supplier, and use a free theme to build your storefront. Then give customer acquisition the attention it deserves, whether that means funding advertising or investing your time in organic content.
Go Further with My Free Shopify Course
I’ve put together a free Shopify course that goes into more detail on the full process. It includes product research, finding suppliers with fast shipping, step-by-step store setup, logo creation, store settings, and advertising tutorials for TikTok, Facebook, and Google.
The course contains more than three hours of instruction, with no paid upsells. Enter your name and email on the enrollment page, and I’ll send access to your inbox.
|
Made with VideoToBlog using How to Sell on Shopify in 2026 (FOR BEGINNERS)


