Building your first Shopify store is easier when you work through it in the right order. Start with a theme, replace the placeholder content with your own branding and products, and then set up the settings that make the store work: payments, shipping, taxes, and your domain.
We’ll build a clothing store as an example, with collections for shirts, sweaters, and jackets. You can follow the same process for your own products, even if you’ve never built a website before.
What You'll Learn
- Customize a Shopify theme with your branding, homepage sections, and mobile-friendly layouts.
- Add product details and organize your catalog into collections customers can browse easily.
- Set up navigation, policy pages, payments, shipping rates, taxes, and a branded domain.
- Review your store’s essential settings before removing password protection and opening to customers.
Table of Contents
- 1. Create Your Shopify Account and Choose a Plan
- 2. Choose a Theme for Your Store
- 3. Get Comfortable With the Theme Editor
- 4. Add Your Products
- 5. Organize Products Into Collections
- 6. Display Collections and Featured Products on the Homepage
- 7. Use Shopify AI to Create a Custom Section
- 8. Review Your Product Page Template
- 9. Customize Colors, Fonts, and Animations
- 10. Build Your Navigation Menu
- 11. Finish the Header and Footer
- 12. Create Your Store Policies
- 13. Configure General Settings and Payments
- 14. Set Up Shipping Zones and Rates
- 15. Review Taxes and Connect Your Domain
- 16. Publish Your Shopify Store
1. Create Your Shopify Account and Choose a Plan
The signup offer used for this setup provides three days free, followed by three months for $1 per month. Promotions can change, so check the current offer and eligibility terms on the signup page before subscribing.
Using our affiliate link may earn us a small commission at no extra cost to you.
- Enter your email address on the signup page.
- Choose a password and create your Shopify account.
- Add your payment details, or skip that step temporarily if the option is available.
- Select your Shopify plan.
- Enter your business address, or your personal address if you don’t have a separate business address yet.
- Complete or skip the introductory business questions to reach your dashboard.
For the offer demonstrated here, payment details and a plan need to be added within the initial three-day trial to access the discounted three months.
My recommendation for a new store is to start with Basic. Higher plans can offer lower transaction fees, alongside other differences, but you can upgrade later as your sales grow. There’s no need to start with a more expensive plan just to build your first store.
Once you’re inside, the Shopify dashboard is the back end of your store. This is where you’ll manage products, collections, settings, and your online storefront. There’s also an AI assistant you can use for questions, but you can close it for now to give yourself more room.
2. Choose a Theme for Your Store
Your theme controls the starting design and layout of your website. Go to Online Store > Themes to see the theme currently installed.
For this setup, Shopify starts with the free Horizon theme. You can keep it, choose another theme, or try Shopify’s AI theme-generation tool.
Browse and preview free themes
- Scroll down on the Themes page and select Visit Theme Store.
- Apply the Free filter.
- Open a theme you like and select View demo.
- Explore the homepage, collection pages, and product pages.
- Check the mobile preview as well as the desktop layout.
- Select Try theme to add it to your store.
Adding a theme to your library doesn’t automatically make it your active theme. Back in Shopify, find it under Theme library, select Publish, and confirm.
I tried the Trade theme, but I’m using Horizon for the rest of this setup. I like its flexibility, and it supports features such as AI-generated custom sections.
Try AI-generated theme designs
On the Themes page, you may also see an option to generate themes. Enter a phrase describing your store or what you sell, then select Generate themes. Shopify will create several design options based on your description.
Personally, I prefer the premade themes for this store. Don’t feel you need to use AI just because it’s available. Choose the starting point that fits your products best.
3. Get Comfortable With the Theme Editor
From your active theme, select Edit theme. The editor has a live store preview and a sidebar showing the structure of the page you’re editing.
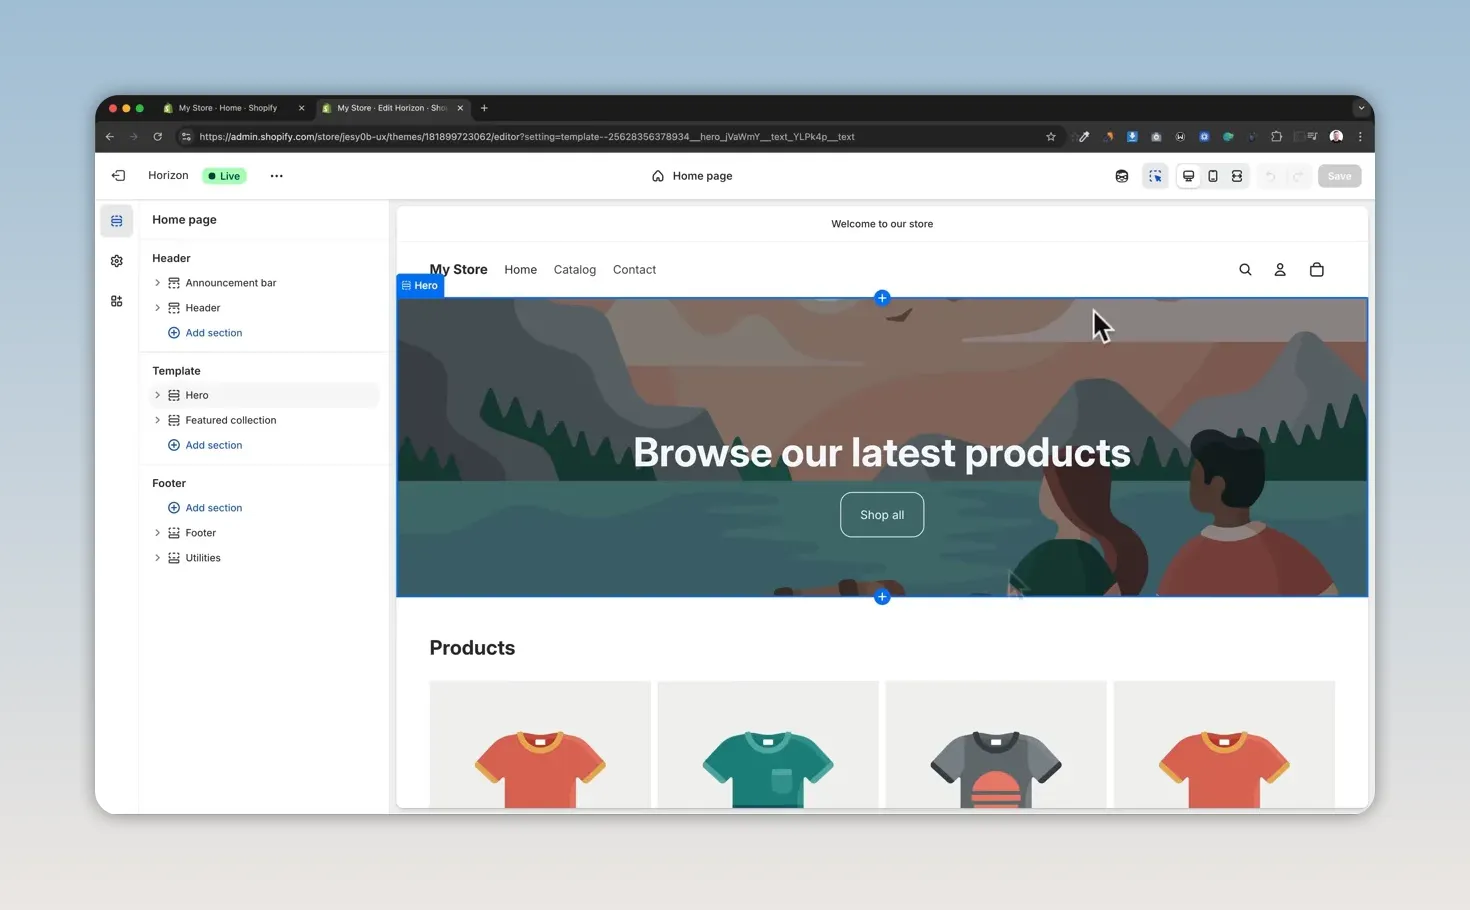
Most pages have three main areas:
- Header: Your logo, navigation, cart icon, and any announcement bar.
- Page content: The sections specific to that page, such as a hero banner or featured products.
- Footer: Policy links, social media links, signup content, and store details.
You can select a section directly in the preview or click its name in the sidebar. Either way opens the settings for that section.
The page selector at the top lets you move between the homepage, product templates, collection templates, and other pages. The device controls let you switch between desktop and mobile previews.
Check mobile throughout the design process. Shopify handles much of the responsive layout automatically, but you should still make sure your images, text, and buttons look good on a smaller screen.
Replace the hero images and text
The hero is the large banner at the top of the homepage. Select the Hero section and drag your image into its image field.
For the example store, I’m using two images side by side. After uploading the first image, add the second to the additional image field.
Then adjust the layout:
- Change the hero height from Medium to Large.
- Change the content position from Bottom to Center.
- Select the heading and replace the placeholder text with your own message.
- Select the button to edit its text and link.
You don’t need to copy these design choices exactly. Try the available settings and keep the version that works best with your images.
Add your logo and favicon
Open the gear icon for Theme settings, then select Logo and favicon.
- Upload your logo to the default logo field.
- Adjust its height so it fits the header comfortably. For this store, I reduced it from 36 to 30 pixels.
- Upload a favicon, which is the small icon that appears in the browser tab.
- Save your changes.
You can preview the storefront through the three-dot menu and select View to check the result, including the favicon.
To center the logo, return to the section list, open Header, and change Logo position from left to center. Save regularly as you work.
4. Add Your Products
Before we can feature products on the homepage, we need to add them to Shopify. Save your design changes, exit the editor, and go to Products > Add product.
Title, description, and images
Enter the product title and description. If you’re unsure how to describe the product, Shopify’s built-in AI writing feature can help you create a starting point. Review the result so it accurately represents what you sell.
Next, upload your product images. Use high-quality photos that show the product clearly. You can rearrange them to choose which image appears first.
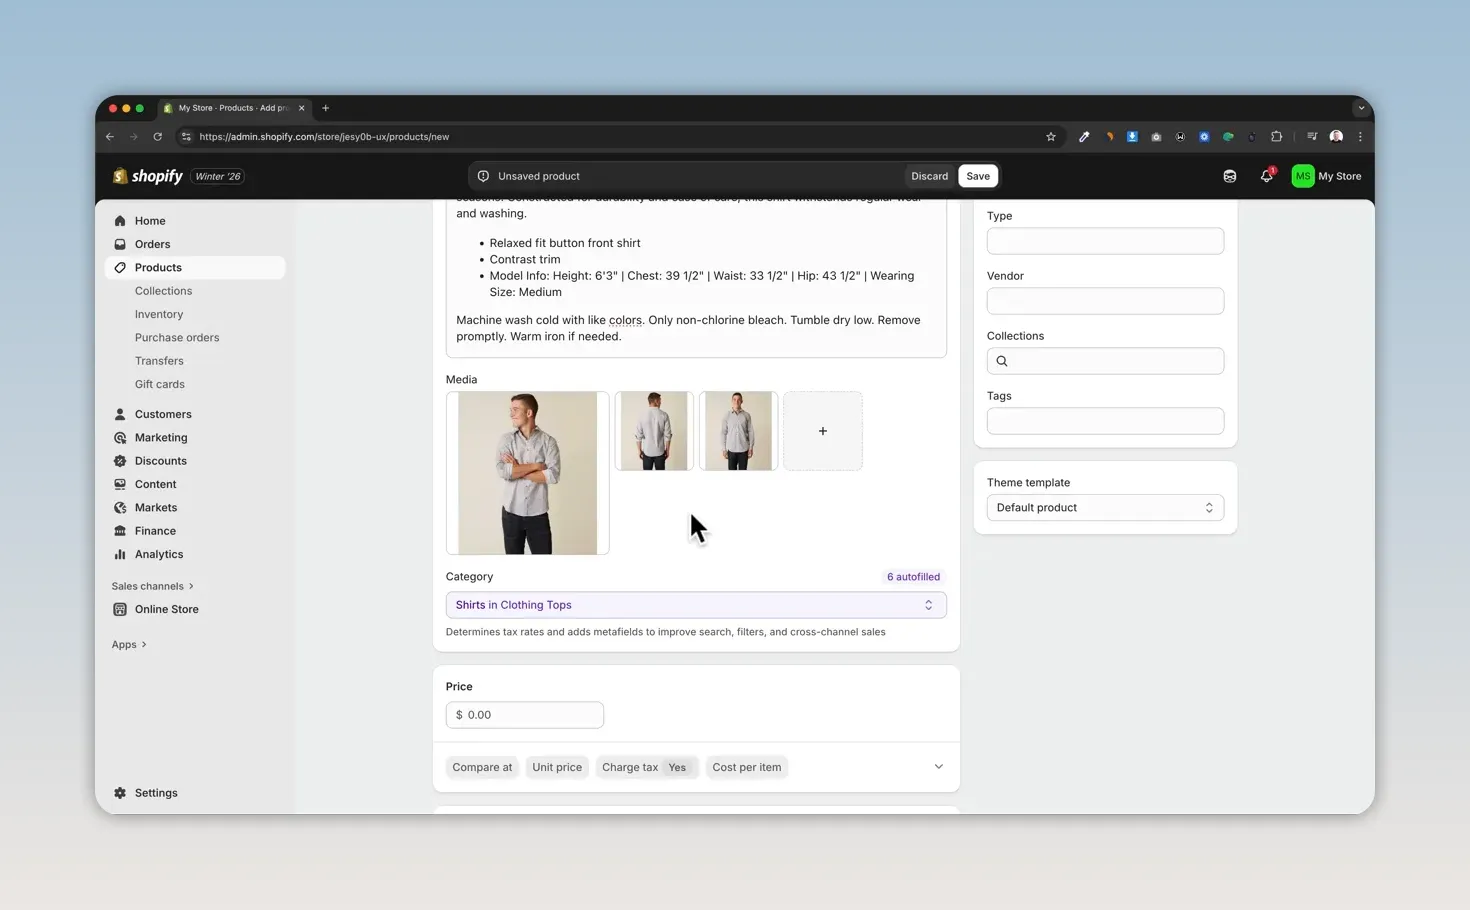
Price and compare-at price
Set your selling price. In this example, the shirt costs $49.
You can also add a compare-at price, which can appear as a crossed-out higher price beside the selling price. Only use it when it accurately reflects the price comparison you’re presenting to customers.
Inventory
Enter the quantity you have in stock. With inventory tracking enabled, Shopify reduces that quantity as products sell. When it reaches zero, the product will normally appear as sold out.
If you intend to accept orders without stock on hand, you can enable Continue selling when out of stock. Otherwise, leave it disabled and update your inventory when new stock arrives.
Shipping information and variants
The product’s shipping area includes details such as weight. These matter when your shipping calculations depend on the physical shipment. For this example, we’ll use flat shipping rates rather than weight-based pricing.
Under Variants, add options such as sizes or colors if your product has them. Variants can also have different prices, so you can charge more for a particular size or version when needed.
Near the bottom, you can review how the product appears in search engines. Once the information is ready, select Save, then repeat the process for your remaining products.
5. Organize Products Into Collections
Collections group related products together. For the clothing store, we’ll create collections for shirts, sweaters, and jackets, plus a separate New Arrivals collection for products we want to highlight.
- Go to Products > Collections.
- Select Add collection.
- Enter a title, such as Shirts.
- Upload a collection image.
- Keep the collection type set to Manual.
- Under Products, select Browse and choose the products to include.
- Select Add, then save the collection.
The Shirts collection in this example contains four products. Repeat the same steps for your other categories.
If Shopify has created a default homepage collection that you don’t need, you can remove it. That’s optional; the important part is having collections that match how you want customers to browse.
A product can be useful in more than one grouping. For example, your New Arrivals collection can feature new items drawn from several product categories.
6. Display Collections and Featured Products on the Homepage
Return to Online Store > Edit theme. Now that you’ve added products, the theme may already be displaying them in place of the original placeholders.
Rather than leaving a general assortment on the homepage, I want to give customers two clear ways to shop: browse a category or explore new products.
Add a collection list grid
- Remove the existing featured collection section if you don’t want to keep it.
- Select Add section.
- Find the collection layouts and choose Collection list grid.
- Open that section’s settings and select your collections.
- Choose Shirts, Sweaters, and Jackets for this example.
Shopify uses the images and names from those collections. Each card links to its collection page.
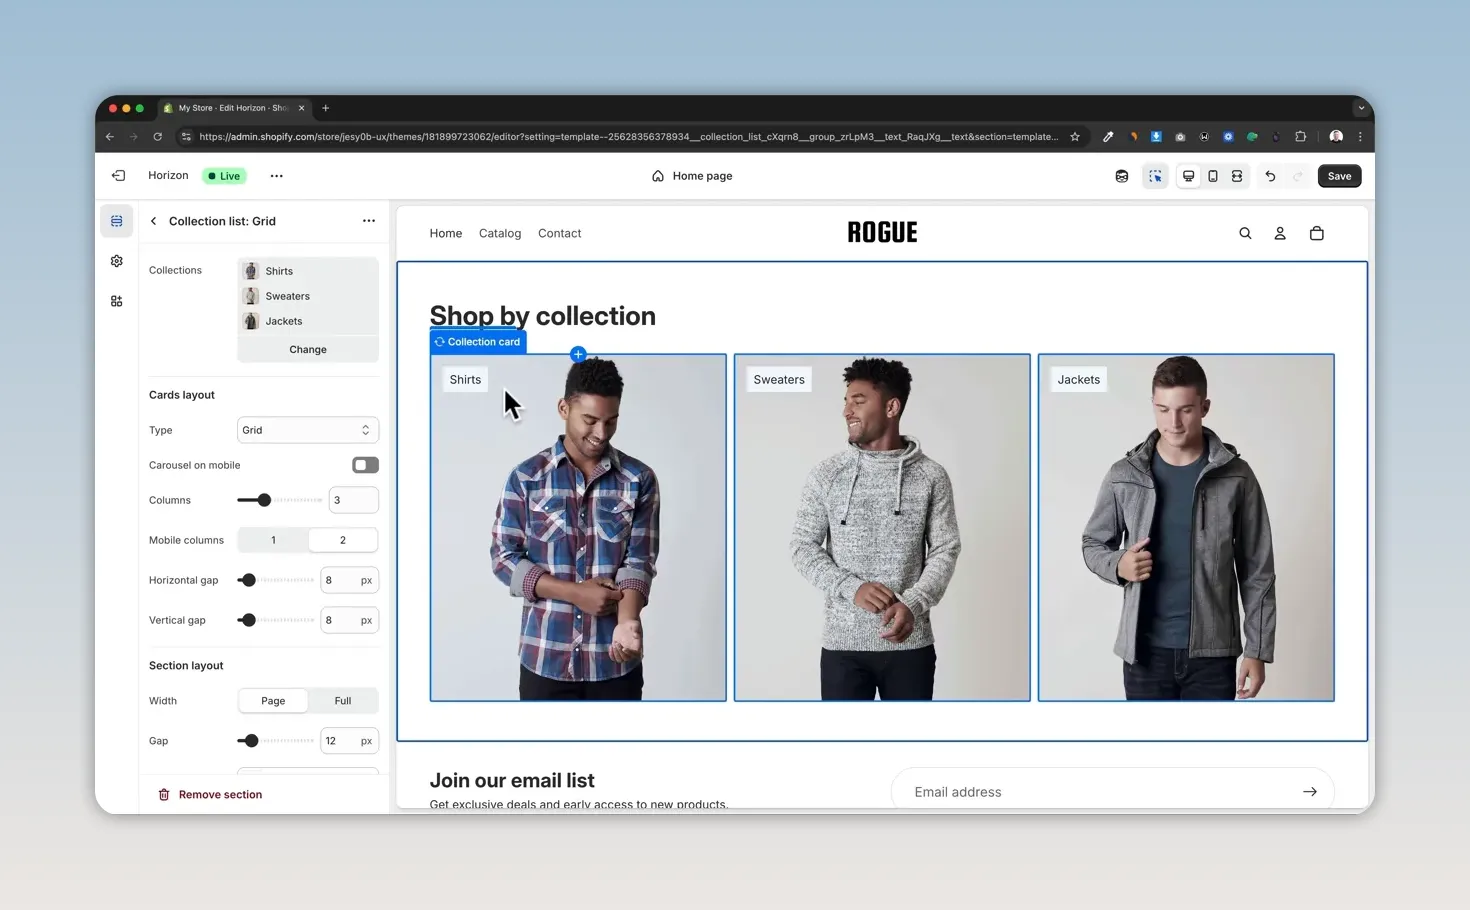
I’m removing the default “Shop by collection” heading because I prefer the cleaner layout without it. You can keep it or replace it with your own text.
Add a featured collection carousel
Below the collection grid, select Add section again and choose Featured collection carousel from the product sections.
Open its settings, select the New Arrivals collection, and save. Its products will now appear directly on the homepage, with arrows customers can use to move through the carousel.
At this point, the homepage has a simple structure:
- A hero banner introducing the brand.
- A collection grid for browsing categories.
- A New Arrivals carousel featuring individual products.
You can add more sections for text, FAQs, collections, or products. Take a little time to explore the available layouts, but don’t feel you have to use all of them.
7. Use Shopify AI to Create a Custom Section
If you can’t find the layout you want among the existing sections, you can try Shopify’s AI block generator.
Select Add section > Generate, then describe the layout you want. For this store, I asked for an image on the left and text on the right.
After generation, the new section has editable settings, much like a standard theme section. Upload your image, adjust the content, and inspect the result.
The first version didn’t include one setting I wanted: a way to make the image fill its frame. Instead of accepting that limitation, I returned to the prompt box and asked Shopify to add an image-style option for filling the frame.
The updated section included both Fit image and Fill frame. Selecting Fill frame gave me the layout I preferred.
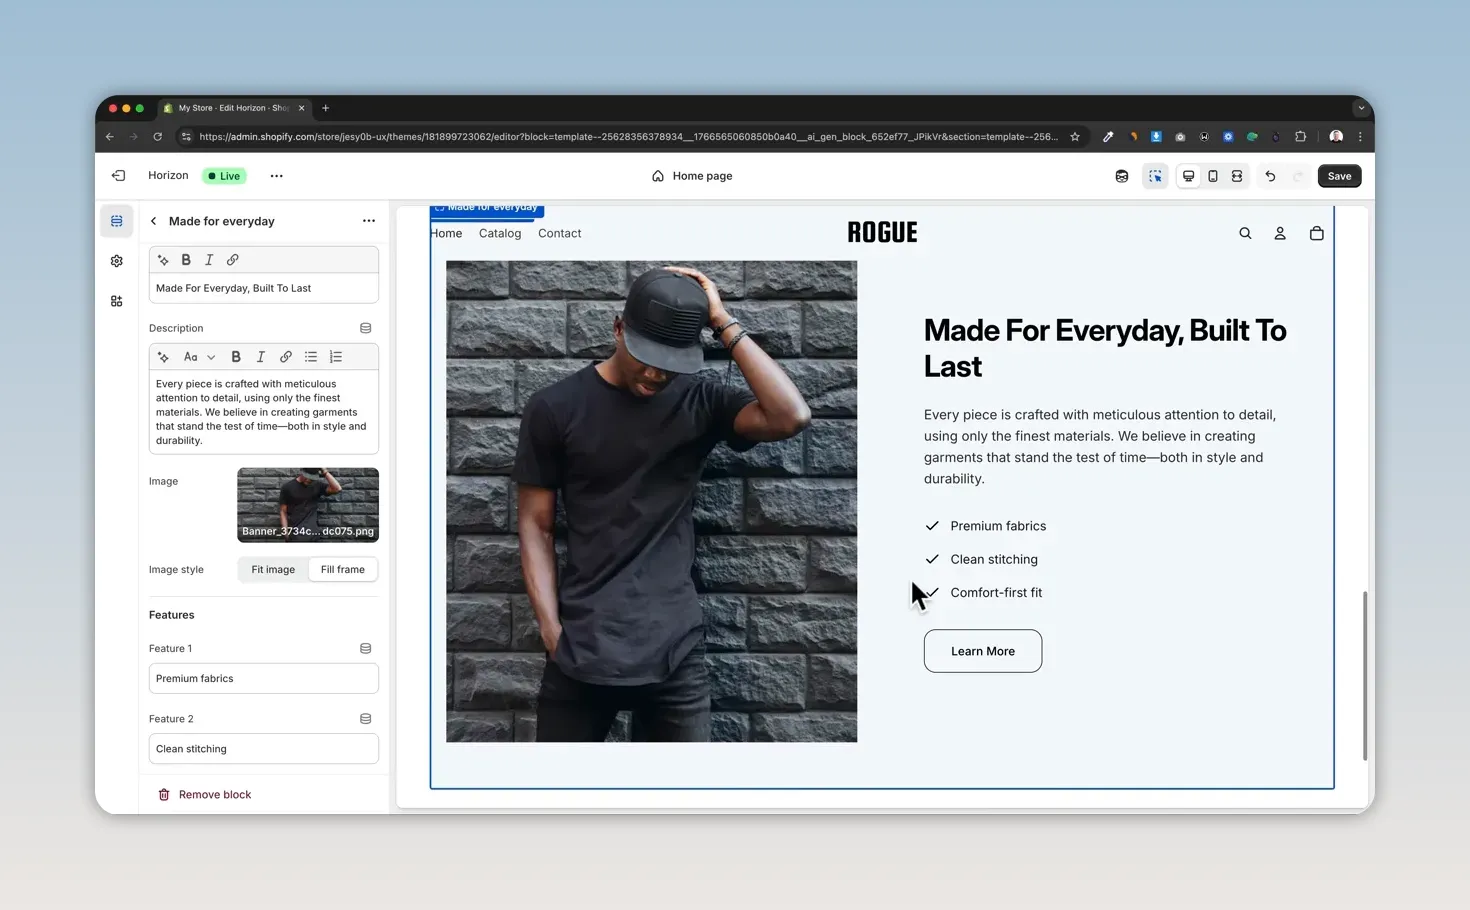
Treat AI design as a process you can refine. Generate the basic layout first, then ask for the specific controls or adjustments it still needs.
8. Review Your Product Page Template
So far, we’ve mainly worked on the homepage. To inspect your product layout, use the page selector at the top of the editor and choose Products > Default product.
The default template includes product information and a recommended-products section. You can select either section to change its options or use Add section to include more content.
Remember that you’re editing a template used by products assigned to it, rather than changing only the product currently shown in the preview.
I usually keep most of Shopify’s default product-page layout. It’s a useful starting point, and you don’t need to redesign every page to create a professional-looking store. Check that it suits your products and make changes where they’re actually useful.
9. Customize Colors, Fonts, and Animations
Apply a color scheme to a section
Select a section and look for Color scheme in its settings. You can switch among the available schemes without manually changing every color.
For example, one scheme may use a white background with black text, while another uses a dark background or a light blue background. For this store, I prefer the default white scheme.
Edit your brand colors
To change the schemes themselves, open Theme settings > Colors. Select a scheme and edit its background, text, and other available colors.
If you already have brand colors, this is where you can apply them. You can also create a new scheme and use it on selected sections.
Change typography and hover effects
Go to Theme settings > Typography to change the fonts for body text, headings, subheadings, and other text styles.
Another optional setting is under Animations. I like the subtle Zoom card-hover effect. After saving and opening the storefront preview, collection and product images zoom slightly when the pointer moves over them.
Small details like this can polish the design. There’s no need to change every theme setting, though. Keep the defaults that already work well.
10. Build Your Navigation Menu
Your main navigation should make it easy to reach the important parts of the store.
In the theme editor, select the header menu, open Main menu, and choose Edit. This takes you to Content > Menus in the dashboard.
- Remove default menu items you don’t need.
- Select Add menu item.
- Click the link field and choose Collections.
- Select the collection you want to link.
- Repeat for your other collections.
- Save the menu.
Preview the store and click each menu link to confirm that it opens the correct collection.
Create dropdown menus for subcategories
If you have broader categories, you can nest links beneath them. For example, create Men and Women menu items, then drag Shirts underneath Men and indent it.
After saving, the nested links appear as submenu items. This keeps the main navigation organized without placing every category at the same level.
11. Finish the Header and Footer
Edit or remove the announcement bar
The announcement bar sits above the main header. You can use it for a promotional message or discount code.
Select its text to replace the default message. If you don’t have anything useful to announce, remove the bar with the trash icon.
Clean up the footer
Scroll to the footer in the theme editor. For this store, I’m making three changes:
- Remove the Shopify credit: Select the footer text and turn off Show powered by Shopify.
- Add social links: Select the social icons and enter your profile URLs.
- Remove unused social icons: Clear any links for accounts you don’t have.
To replace “My Store” with your actual store name, save the theme and return to the dashboard. Go to Settings > General > Store details, select the edit icon, enter your store name, and save.
When you return to the storefront, the updated name should appear in the footer.
12. Create Your Store Policies
Go to Settings > Policies to set up your policy pages.
You’ll want to review the following:
- Return and refund policy.
- Privacy policy.
- Terms of service.
- Shipping policy.
- Contact information.
Shopify provides templates for several of these. Open a policy, select Insert template where available, and read through the entire document.
Replace every placeholder and make sure the terms match your store. A template is a starting point, not something to publish without reviewing.
The privacy policy was already created in this setup, but it still needs checking. The shipping policy requires your own content. You can use a writing tool such as ChatGPT to help draft it, but the final policy needs to reflect your actual shipping arrangements.
Publish each policy when it’s ready. Then refresh your storefront and check the footer’s policy links. Open them to make sure the correct pages appear.
13. Configure General Settings and Payments
A finished design is only part of the setup. Before launch, we need to make sure the store has the correct business information and can accept payments.
Review general settings
Under Settings > General, check your:
- Store name.
- Billing address.
- Store currency.
- Default units.
Activate Shopify Payments
Go to Settings > Payments and select Activate Shopify Payments if it’s available for your business and region.
Follow the setup process and connect your bank account so you can receive payouts. Have an identity document ready, such as a passport or driver’s license, for verification.
Depending on availability and configuration, customers can pay using options such as credit cards, Apple Pay, and Google Pay.
You can also select Add payment method to explore additional providers. For example, searching for Bitcoin displays providers that support that payment option.
Payment availability varies by location. If your options look different, check Shopify’s supported countries for Shopify Payments and the payment providers available to your store.
14. Set Up Shipping Zones and Rates
Go to Settings > Shipping and delivery. This is where you decide what customers pay to have products shipped to them.
There are three useful concepts to understand:
- Shipping profile: The products a set of shipping rules applies to.
- Shipping zone: The countries or regions covered by those rules.
- Shipping rate: The delivery option and price offered within a zone.
To keep this store simple, we’ll use one profile for all products and create rates for the United States.
- Open the shipping profile for all products.
- Review the products included in that profile.
- Scroll down to the shipping zones.
- Remove any default zone or rates you don’t intend to use.
- Select Add shipping zone.
- Select the United States and the regions you intend to serve, then confirm.
The example store initially had weight-based rates and free shipping for orders of $50 or more. Those were defaults in that account, not rates you need to keep.
Add standard and express flat rates
Inside the new zone, select Add rate and choose a flat rate.
For this example, I’m adding:
- Standard shipping: $6.
- Express shipping: $15, with a displayed delivery estimate of one to two business days.
These are example prices and delivery options. Use rates and estimates that match what you can actually provide.
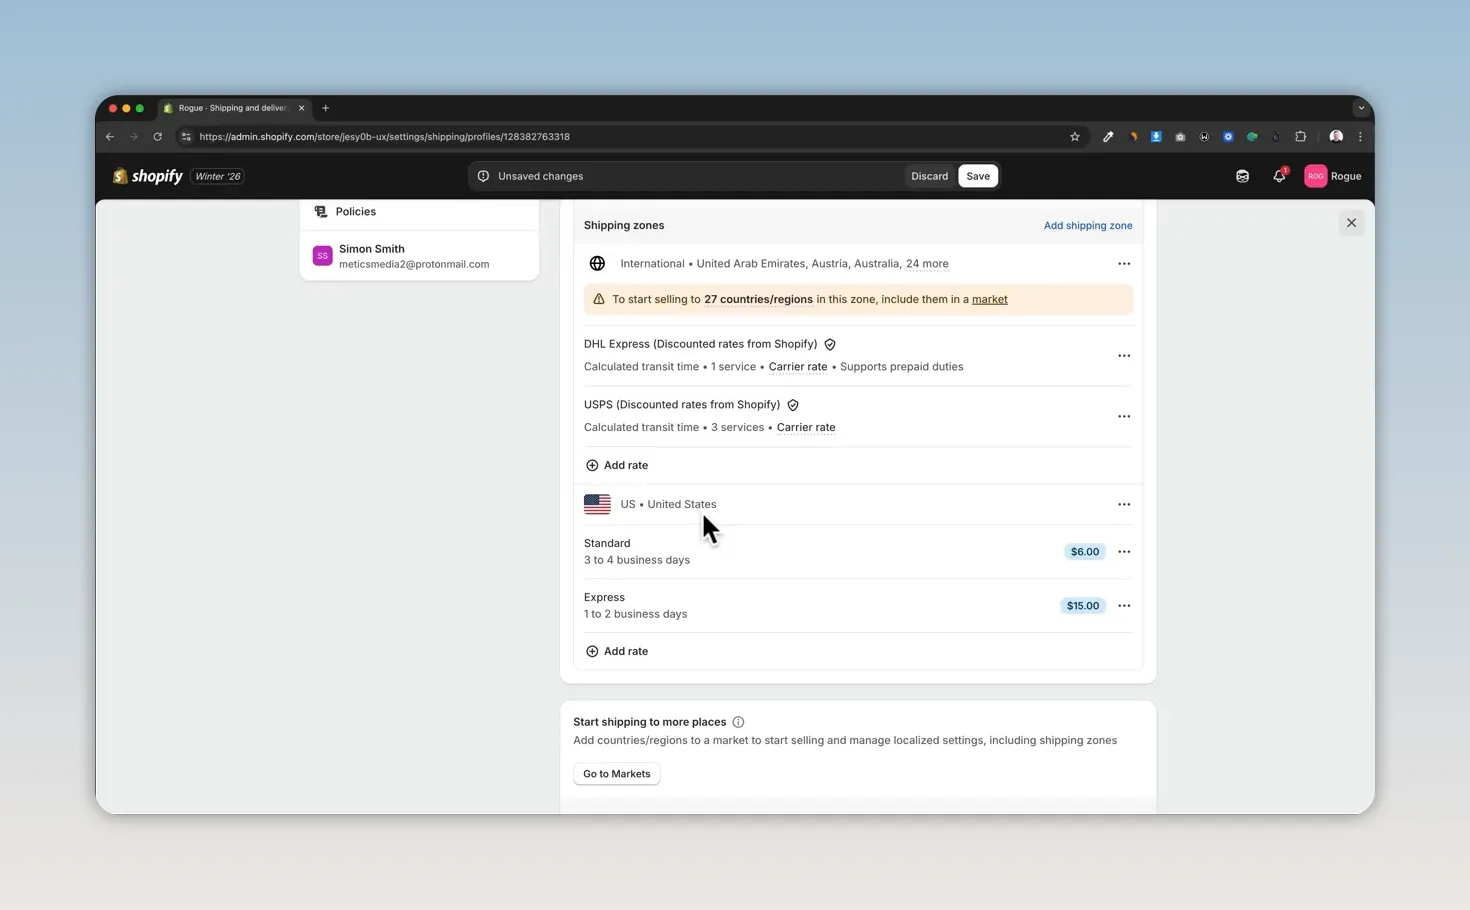
Save the shipping profile. Customers with eligible addresses can then choose between the available options at checkout.
If you need more complex rules, Shopify also supports other shipping approaches, including weight-based and carrier-calculated rates where available. Its shipping rate documentation explains those options in more detail.
15. Review Taxes and Connect Your Domain
Configure taxes for your situation
Open Settings > Taxes and duties. Your sales tax obligations depend on factors including where your business is located and where you sell.
Speak with a tax professional in your region to establish what applies to your business. Shopify’s tax services can help calculate applicable taxes, but you still need to configure your store for your circumstances.
Review the available tax service and regional settings rather than assuming the defaults cover everything.
Add a custom domain
Go to Settings > Domains. Your store starts with a Shopify address, but a custom branded domain gives customers a more professional address to use.
You have two options:
- Connect existing: Use a domain you already own.
- Buy new domain: Search for an available domain and purchase it through Shopify.
When buying through Shopify, enter your preferred name, check its availability, and review the price before purchasing. The example domain shown during setup was $16 per year, but prices vary by domain and extension.
A domain purchased through Shopify is connected as part of that process. If you’re connecting a domain from another provider, follow the connection instructions shown in your admin.
16. Publish Your Shopify Store
Before making the store public, run through one final check:
- Your branding has replaced the placeholder images and text.
- Products have the correct descriptions, prices, photos, and inventory.
- Collections and navigation links open the right pages.
- The homepage and product pages look good on mobile.
- Your policies and contact details are published.
- Payment setup, shipping rates, and tax settings have been reviewed.
- Your domain is ready.
Then go to Online Store. If the storefront is password protected, select Remove password and follow any prompts.
Once the password is removed, the store is open to the public. Select View store to open it.
You now have the foundation of your Shopify store: a branded storefront, an organized product catalog, clear navigation, policy pages, and the back-end settings needed to start selling. Keep the first version focused and easy to use. You can continue refining the design as your business develops.
Made with VideoToBlog using Shopify Tutorial for Beginners 2026 - Full Store Setup Guide


