Building a Shopify store from scratch is much easier once you understand how the pieces fit together. You need a clean design, properly organized products, and a few essential settings that allow customers to place real orders.
For this setup, I’m creating Northline Clothing, a simple clothing store with a modern layout. But you’re not locked into selling clothing. Swap the photos, colors, fonts, and products, and the same process works for beauty products, phone cases, art prints, or another type of store.
We’ll build the storefront, add products and collections, customize the navigation and policies, and then handle payments, shipping, taxes, and a custom domain before launching.
What You'll Learn
- Customize Horizon using global theme settings, page sections, and individual content blocks.
- Add products with images, pricing, inventory, variants, and tags for easier catalog organization.
- Build a complete storefront with collections, navigation, policies, and a shared product template.
- Configure payments, shipping, taxes, and a custom domain before making your store public.
Table of Contents
- 1. Create Your Shopify Account
- 2. Choose Your Theme and Learn the Editor
- 3. Design Your Hero Section
- 4. Add Your Products
- 5. Organize Your Products Into Collections
- 6. Build the Rest of Your Home Page
- 7. Customize Your Header, Logo, and Menu
- 8. Set Up Your Footer and Store Policies
- 9. Customize Your Product Page Template
- 10. Complete Your Launch Settings
- 11. Connect a Custom Domain
- 12. Launch Your Shopify Store
1. Create Your Shopify Account
Start by creating your Shopify account. The promotional offer used for this setup includes three days free, followed by three months at $1 per month. Check the signup page for the current availability and terms.
That gives you some time to build your store and start selling before moving to the full monthly subscription.
Disclosure: The Shopify offer link is an affiliate link. If you make a purchase through it, we may earn a commission at no extra cost to you.
- Enter your email address and create your account.
- Follow the prompts to claim the trial and promotional offer.
- Choose a plan. I recommend starting with Basic.
- Answer the remaining setup questions to reach your Shopify dashboard.
The dashboard is the back end of your store. This is where you’ll manage products, settings, and the storefront itself.
Before designing anything, click Settings in the bottom-left corner. Under your store’s contact details, enter your store name. I’m using Northline Clothing. You can also update the store email address and phone number here. Click Save, then close Settings.
2. Choose Your Theme and Learn the Editor
From the left sidebar, open Online Store. In this setup, Shopify starts with the Horizon theme, which is the theme I recommend for most beginners.
You can browse other themes further down the page, but I’m sticking with Horizon. Click Edit theme to open the theme editor. If you receive the third-party cookie permission prompt used in this setup, complete it so the editor can load correctly.
Understand pages, sections, and blocks
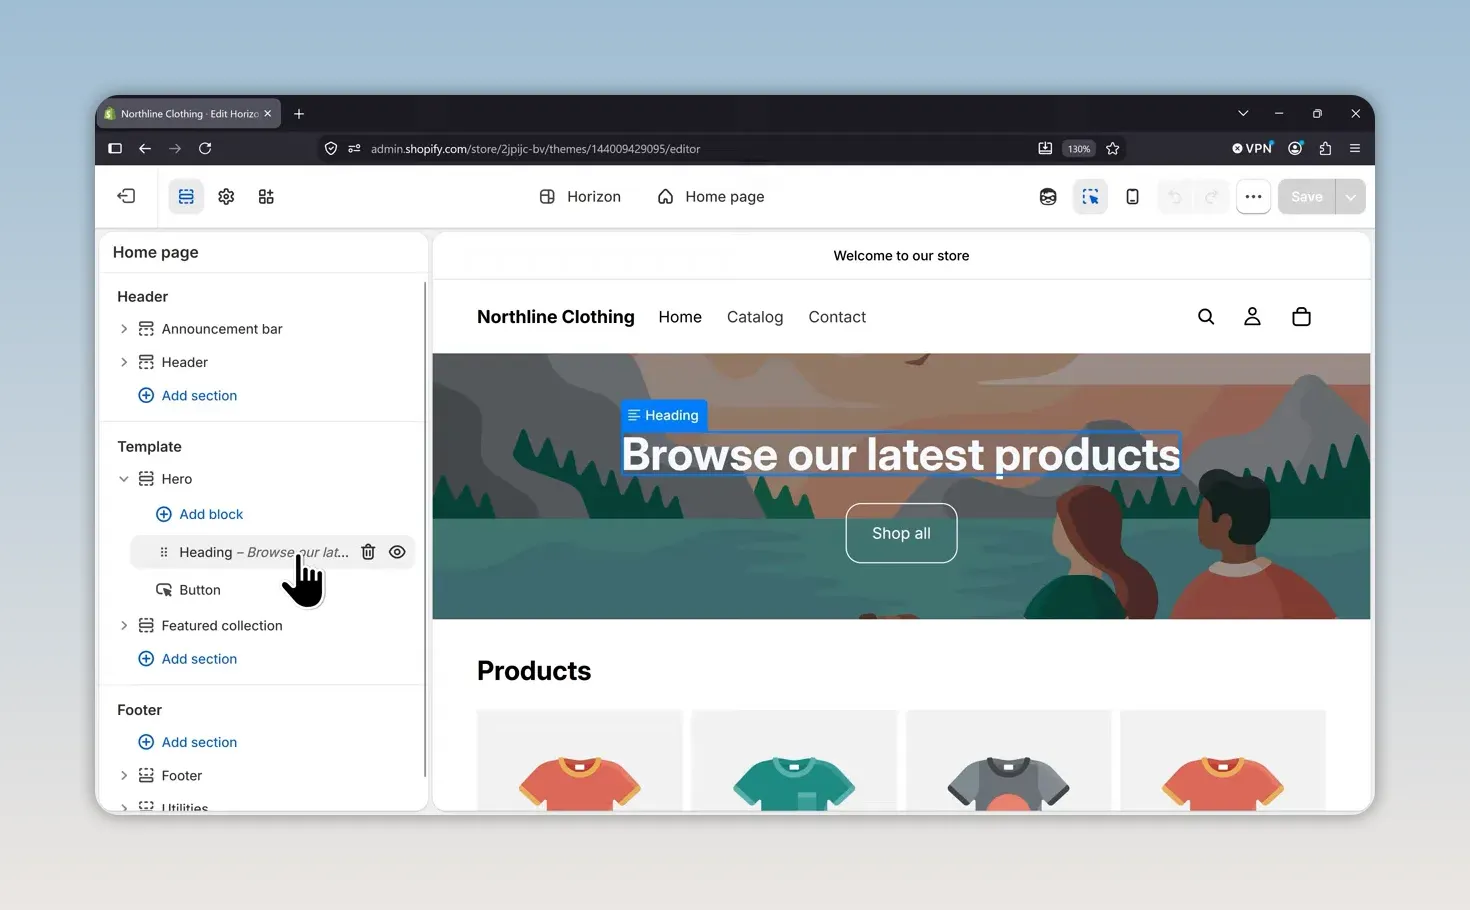
The theme editor becomes much simpler when you think of it in three levels:
- Pages and templates: Use the selector at the top to move between the home page, product templates, and other parts of the store.
- Sections: These are the larger areas listed in the left sidebar, such as the header, hero, and featured collection.
- Blocks: Expand a section to see the smaller pieces inside it, such as headings, images, and buttons.
The right side shows a live preview. You can select something directly in that preview or click its name in the sidebar to open its settings.
Set your global design preferences
Click the gear icon near the top-left corner to open Theme settings. These settings control the overall appearance of your store rather than one individual section.
- Logo and favicon: Upload your brand assets here later.
- Colors: Adjust the store’s color schemes to match your brand.
- Typography: Customize your fonts and related text styling.
- Page settings: Adjust options such as the page background and width.
For this store, I also like to make a few changes under animations:
- Turn on Page transition.
- Turn on Product card to product page transition.
- Change the Card hover effect from None to Lift.
These effects work nicely with Horizon and make the store feel more polished. Once you’re done, use the sections icon to return to the page layout.
3. Design Your Hero Section
The hero is the first main section customers see when they land on your home page. We’ll give it a strong image, a simple heading, and a clear shopping button.
Upload the image and fix its crop
- Select the Hero section.
- Make sure the media type is set to Image.
- Click Select, upload your image, and click Done.
If the image crops awkwardly, adjust its focal point. For example, my photo contains two people, but the initial crop doesn’t show their faces properly.
Click the pencil icon on the selected image to open the image editor. Set the focal point between the two people, around their eye line, then save and return to the theme editor. This helps the section keep the important part of the image in view.
Adjust the layout, heading, and button
To recreate the Northline hero, use these section settings:
- Position: Center.
- Height: Large.
- Blurred reflection: On.
- Reflection opacity: 30%, reduced from 75% for a more subtle effect.
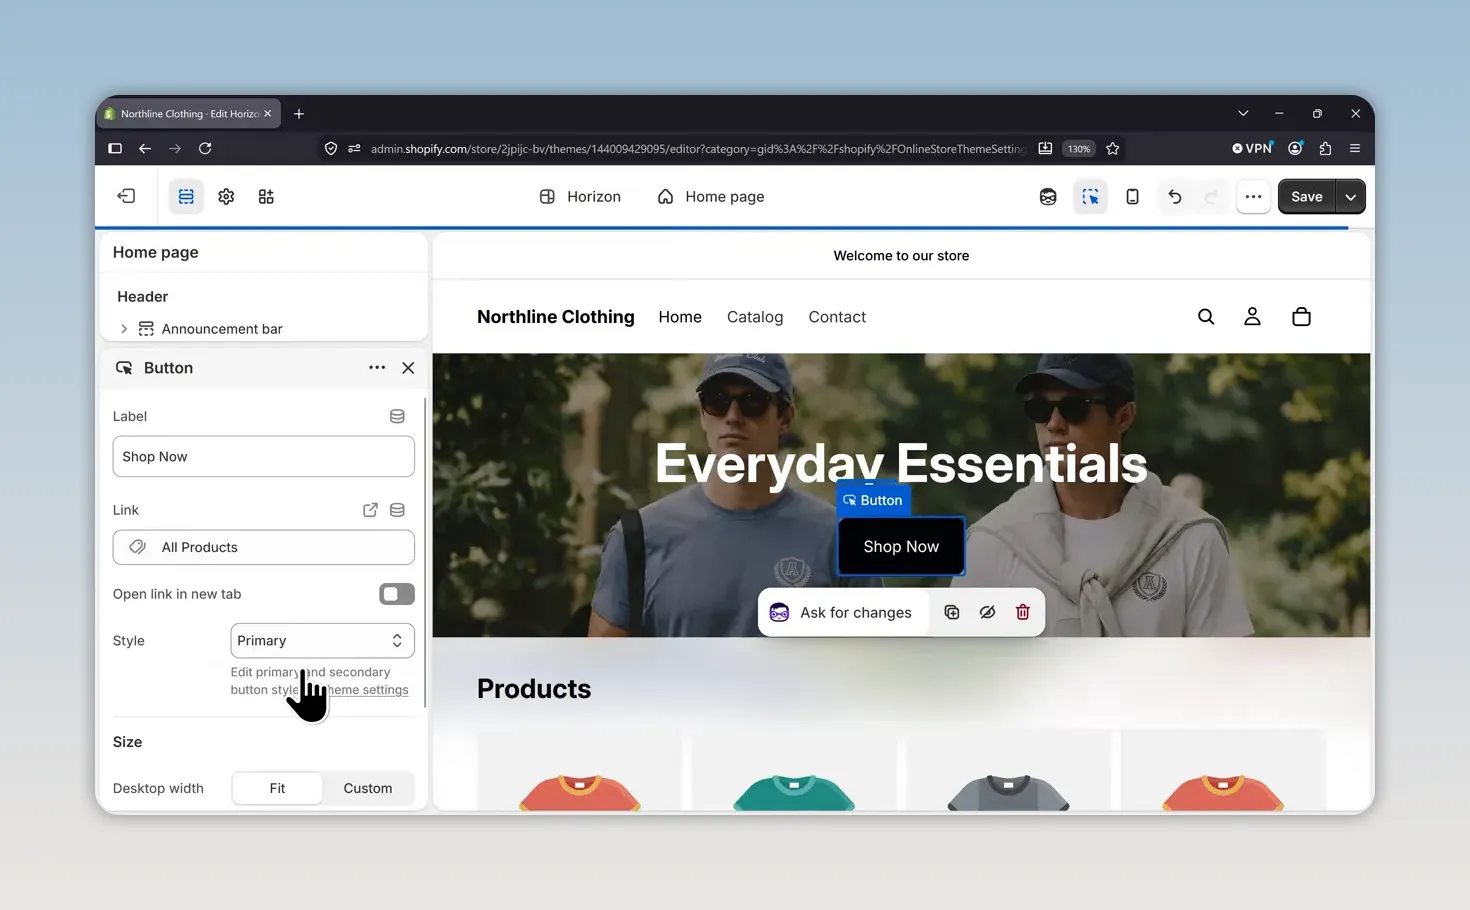
Next, select the heading block and change the text to Everyday Essentials. Change its preset from Heading 2 to Heading 1.
Select the button and change its label from Shop all to Shop now. I’m keeping the destination set to All products, but you can link to a specific product or collection instead. Change the button style from Custom to Primary, then save.
4. Add Your Products
Now it’s time to replace the theme’s placeholder products with the things you actually sell.
I like keeping the Shopify admin open in one browser tab and the theme editor in another. Open the editor’s back-to-admin link in a new tab so you can quickly switch between managing products and designing the store.
In the admin, go to Products > Add product.
Add the title, description, and photos
My first product is the Northline Classic Hat. Enter your product title, then add the description below it.
You can write the description yourself, use a tool such as Claude or ChatGPT to help draft it, or use Shopify’s built-in text generation option through the sparkle icon. Whichever method you choose, make sure the final description accurately represents your product.
Under Media, upload your product photos. The image in the first, leftmost position becomes the primary product image. Drag the photos into a different order if you want another image to appear first.
Set pricing, cost, and inventory
For the hat example, I’m entering:
- Price: $24.99.
- Compare-at price: $30.
- Cost per item: $10.
- Initial inventory: 100 units.
The compare-at price allows the storefront to display $30 crossed out alongside the $24.99 selling price. Use it when it represents a genuine price comparison for your product.
Entering your cost lets Shopify display a product margin calculation. Keep in mind that this is based on the cost information you provide, not necessarily every expense involved in running your business.
The example product has the charge-tax option enabled. Your final tax setup should match your business’s obligations, which we’ll review before launch.
For a hat or another physical item, leave Physical product enabled under Shipping. You would disable that for something such as a digital download. You can also enter package dimensions and weight here. This store uses flat-rate shipping, so I’m leaving those package settings unchanged for now.
Create color variants and assign the correct images
Variants let customers choose different versions of the same product, such as colors or sizes.
- Under Variants, click Add options like size or color.
- Choose Color.
- Review Shopify’s suggested values.
- Edit any labels that don’t match how you describe the product.
- Click Done.
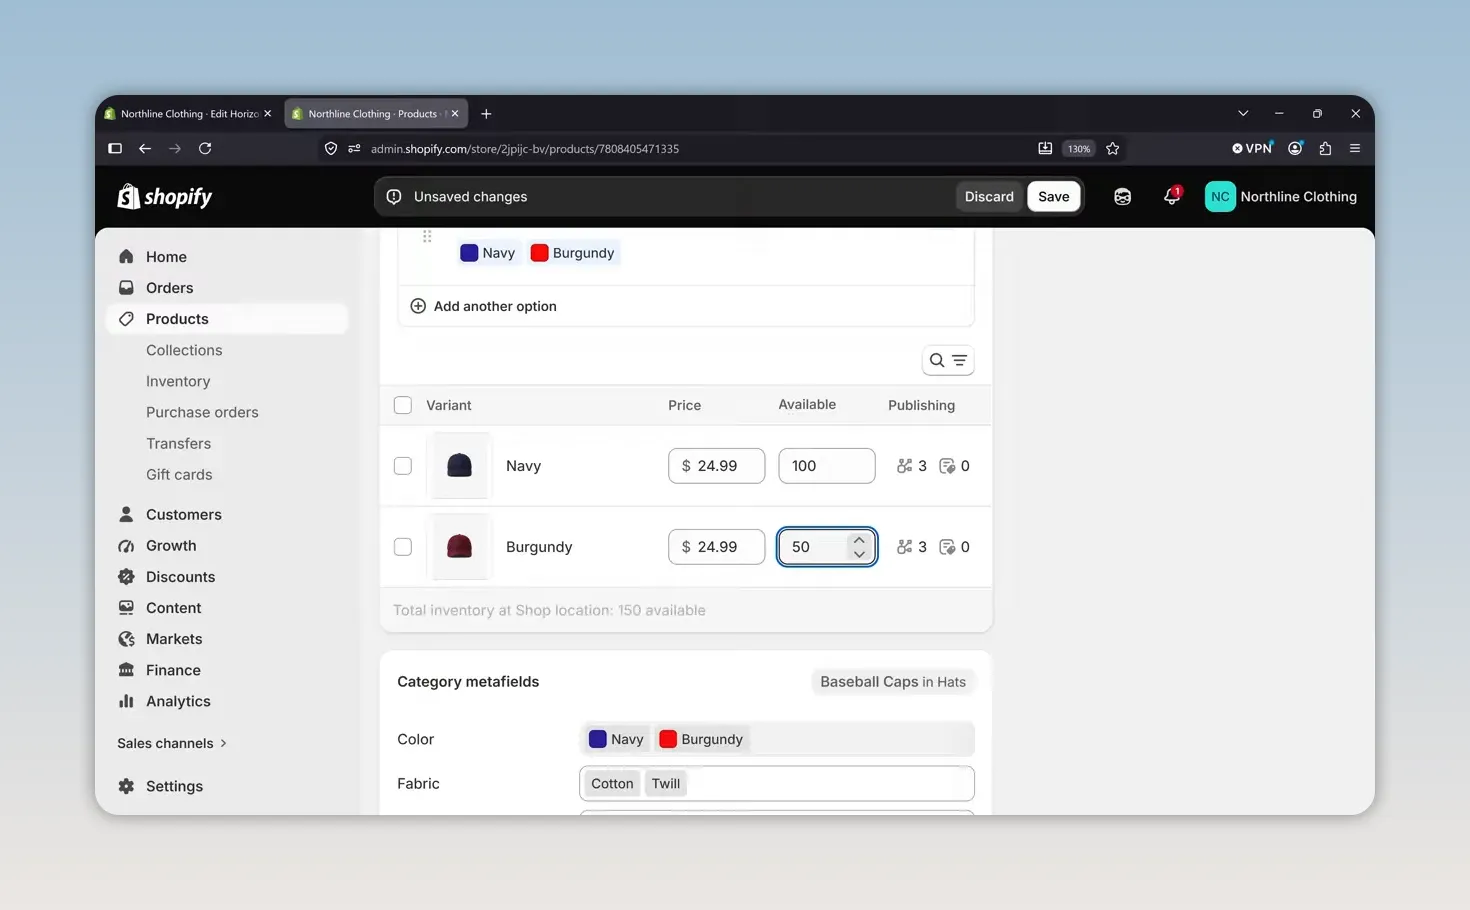
Shopify suggests Navy and Red for my hat. Since I’m selling the second color as Burgundy, I open the red value, choose Edit, change the label to Burgundy, and save.
Next, assign an image to each variant using the image icon beside it. Select the navy hat photo for Navy and the burgundy hat photo for Burgundy. That way, selecting a color on the product page shows the matching image.
You can also manage prices and inventory separately for each variant. In this example, I’m setting 100 navy hats and 50 burgundy hats, so Shopify can track each color independently.
Add tags and save the product
Shopify may fill in some category metafields automatically. Review those as needed, then find the Tags field.
Add a tag called new to products you want to group as new arrivals. Tags help you organize and filter your catalog in the admin. We’ll use that tag when building a collection.
Make sure the product status is Active, then click Save.
Add size variants for clothing
Repeat the product setup process for your other items. For a T-shirt, you may need both color and size options.
After adding colors, click Add another option > Size. Add the sizes you sell. For this store, that includes Small, Medium, Large, and XL.
Expand the variant groups to adjust the inventory and price for individual combinations. For example, you could set the available XL quantity to 20 and its price to $35.99 if that version costs more to produce.
Save the product, then return to Products to see your catalog. Use Add product to continue until everything you want to sell has been entered.
5. Organize Your Products Into Collections
Collections are categories for your products. Think of them like the aisles in a physical store: they give customers a straightforward way to find what they need.
Open Products > Collections. In this setup, Shopify includes a default collection called Home page. I’m deleting it because I’ll be creating my own groups. Select its checkbox, open the three-dot menu, and choose Delete collection if you want to do the same.
Create your main categories
- Click Add collection.
- Enter a title. My first collection is Tops.
- Add a description if you want one.
- Upload a collection image.
- Click Add products and select the relevant items.
- Click Add, then save the collection.
For Tops, I’m adding the sweatshirt, T-shirt, hoodie, and quarter-zip. I’m also adding a collection image because we’ll use it in the home page’s category section.
Repeat the process for Bottoms or whichever main categories make sense for your catalog.
Use tags to build a New Arrivals collection
Create another collection called New Arrivals, upload its image, and click Add products.
Instead of searching through the entire catalog, choose Add filter > Tags > new. Shopify will show the products carrying that tag. Select the products you want, add them, and save.
This is a manual collection workflow. The tag helps you find products to add, but filtering the product picker does not create an automatic rule that adds future tagged products to this collection.
6. Build the Rest of Your Home Page
Return to the theme editor and allow the preview to refresh. Your real products should now appear, but the default layout may need a little cleanup.
Feature your new arrivals
Select the Featured collection section. Replace the current collection with New Arrivals.
For my three-product collection, I’m using:
- Product count: 3.
- Columns: 3.
- Alignment: Center.
Matching the number of columns to the number of featured products removes the awkward empty space left by the default four-column layout.
Add a category grid
I want the main categories to sit between the hero and the new arrivals.
- Return to the section list and collapse any expanded sections.
- Hover between the Hero and Featured collection sections.
- Click the plus icon.
- Search for Collection list: Grid and add it.
- Select the Tops and Bottoms collections.
- Change the column count from 3 to 2.
- Change the heading to Shop by Category.
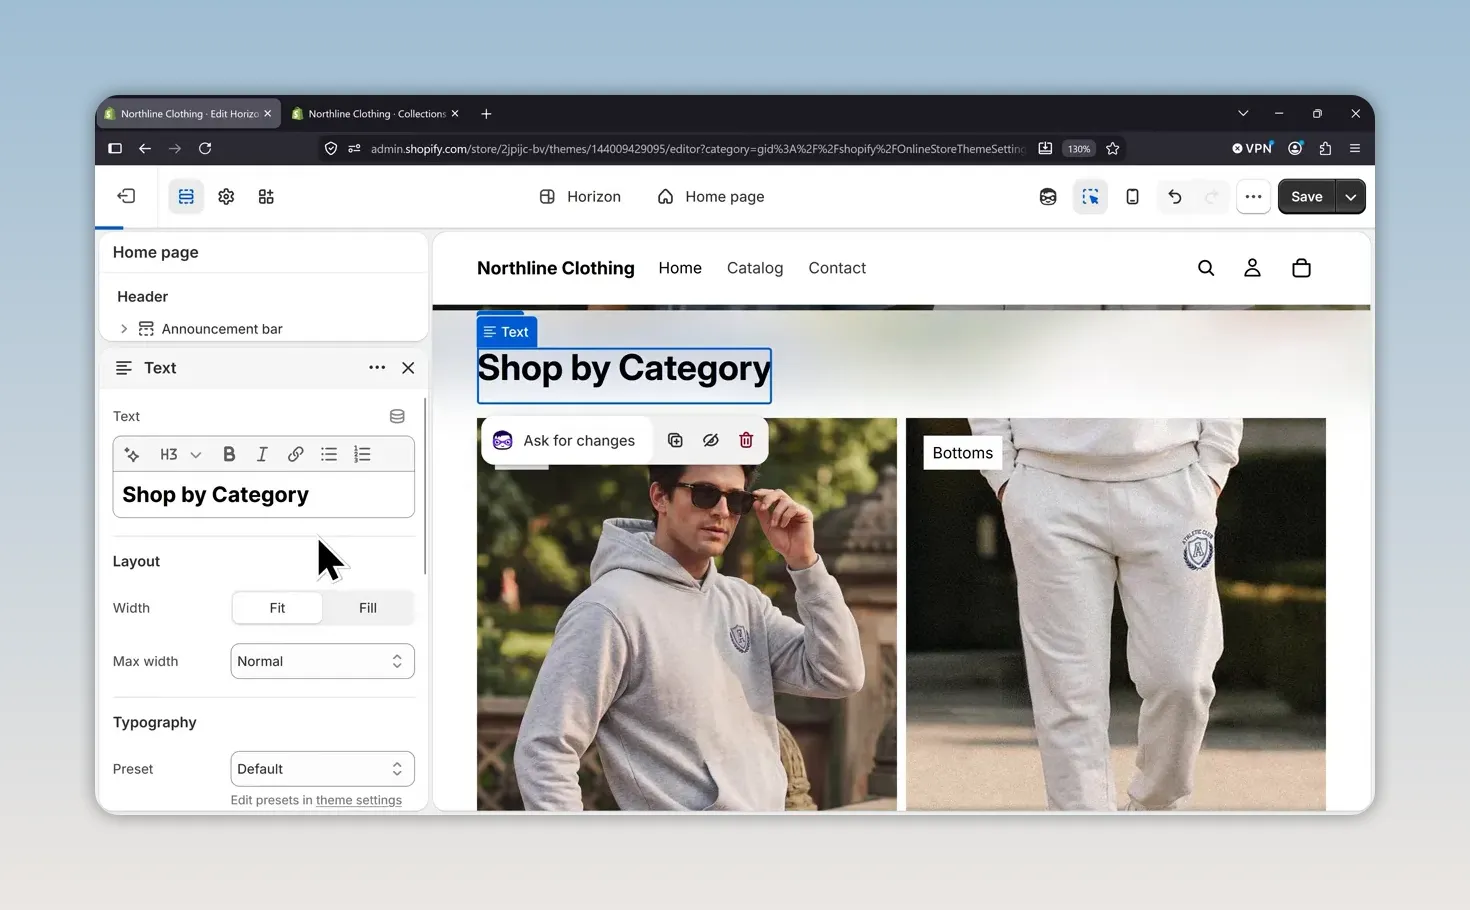
The home page now has a simple structure: a hero at the top, two main shopping categories, and a row of new arrivals.
Generate a custom section with Shopify AI
Below the products, I want a short section explaining why someone should shop with us. Shopify’s section generation feature lets you describe the section you want rather than building every piece manually.
Click Add section > Generate, then enter instructions like these:
Create a clean section with three short shopping benefits: free shipping on orders over $75, 30-day returns, and secure checkout. Include a simple icon for each benefit.
Only use promises that match your actual store policies and settings. Then send the request and allow Shopify to generate the section.
Review the result carefully. In my first version, the returns icon looks a little strange. I send a follow-up instruction asking Shopify to revise that icon and check that the result looks correct.
Once generated, the section has editable settings in the sidebar, just like a standard section.
Reorder, hide, or remove sections
You don’t need to get everything perfect on the first attempt:
- Reorder: Drag a section using its dotted handle.
- Hide: Click the eye icon.
- Remove: Click the trash icon.
- Undo: Use the undo arrow near the top-right corner.
Try different arrangements, keep the one you like, and save your changes.
7. Customize Your Header, Logo, and Menu
The header and announcement bar appear across your store, so changes here affect more than the home page.
I’m removing the announcement bar for a cleaner look. If you prefer the same layout, hover over it in the sidebar and click the trash icon.
Upload your logo and favicon
Select the logo area, then follow the link to Theme settings. Beside Default logo, click Select and upload your logo.
My logo initially feels too large, so I reduce its desktop height from 36 to 22. Use the phone icon near the top of the editor to check the mobile version too. The mobile logo has its own height setting.
Next, upload a favicon in the same settings area. This is the small icon that appears in a browser tab. It may not appear inside the theme editor, so check it on the storefront after launch.
Build the main navigation
Select the header menu, then open Main menu > Edit. This opens the menu settings in a separate tab.
The starting menu contains Home, Catalog, and Contact. I’m keeping those destinations but renaming Catalog to All Products. Its link already points to all products, so that can stay unchanged.
To add a collection:
- Click Add menu item.
- Enter the label, such as Tops.
- Click the Link field and search for the matching collection.
- Select the collection and click the checkmark.
Add Bottoms and New Arrivals the same way. Drag the menu items by their dotted handles to arrange them in your preferred order. Save the menu, return to the theme editor, and save there as well.
8. Set Up Your Footer and Store Policies
The footer also appears across your store. It’s where customers can find policies, social accounts, and other supporting information.
Select the copyright block if you want to turn off Powered by Shopify. Then select the social links block and add your own profiles.
The email signup section can help you collect customer email addresses for a newsletter. Adjust its text and settings if you want to use it.
Create and review your policies
Select the terms and policies area, then click Manage policies. You’ll find the store’s policy settings here.
In this setup, the privacy policy is already automated by Shopify. The remaining policies need attention:
- Return and refund policy: Insert the available template, then review every section and fill in details such as your return address.
- Terms of service: Insert the template, replace the placeholders, read it carefully, and save.
- Shipping policy: Write your own policy describing what you charge and roughly how long delivery takes. This setup does not provide a template for it.
- Contact information: Insert the template and complete your business details.
- Legal notice: Check whether your location requires one. Requirements vary, particularly across European countries.
Don’t publish policy templates without reviewing them. Your policies need to reflect how your business actually operates. AI tools can help clarify or draft wording, but they don’t replace checking your legal requirements.
For additional platform guidance, Shopify’s store policy documentation explains how policy settings work.
9. Customize Your Product Page Template
At the top of the theme editor, open the page selector and choose Products > Default product.
This is a shared template. Changes apply to products using that template, so you don’t have to redesign the layout for every item.
The default layout already includes the main elements customers need:
- Product photos.
- Title and price.
- Variant selectors.
- Add to cart and additional payment options.
- Product description.
I’m leaving most of that alone. The main adjustment is the product image gallery:
- Select the product media area.
- Change the layout from Grid to Carousel.
- Change the navigation from Counter to Thumbnails.
This gives the main product image more space while keeping the other photos easy to access.
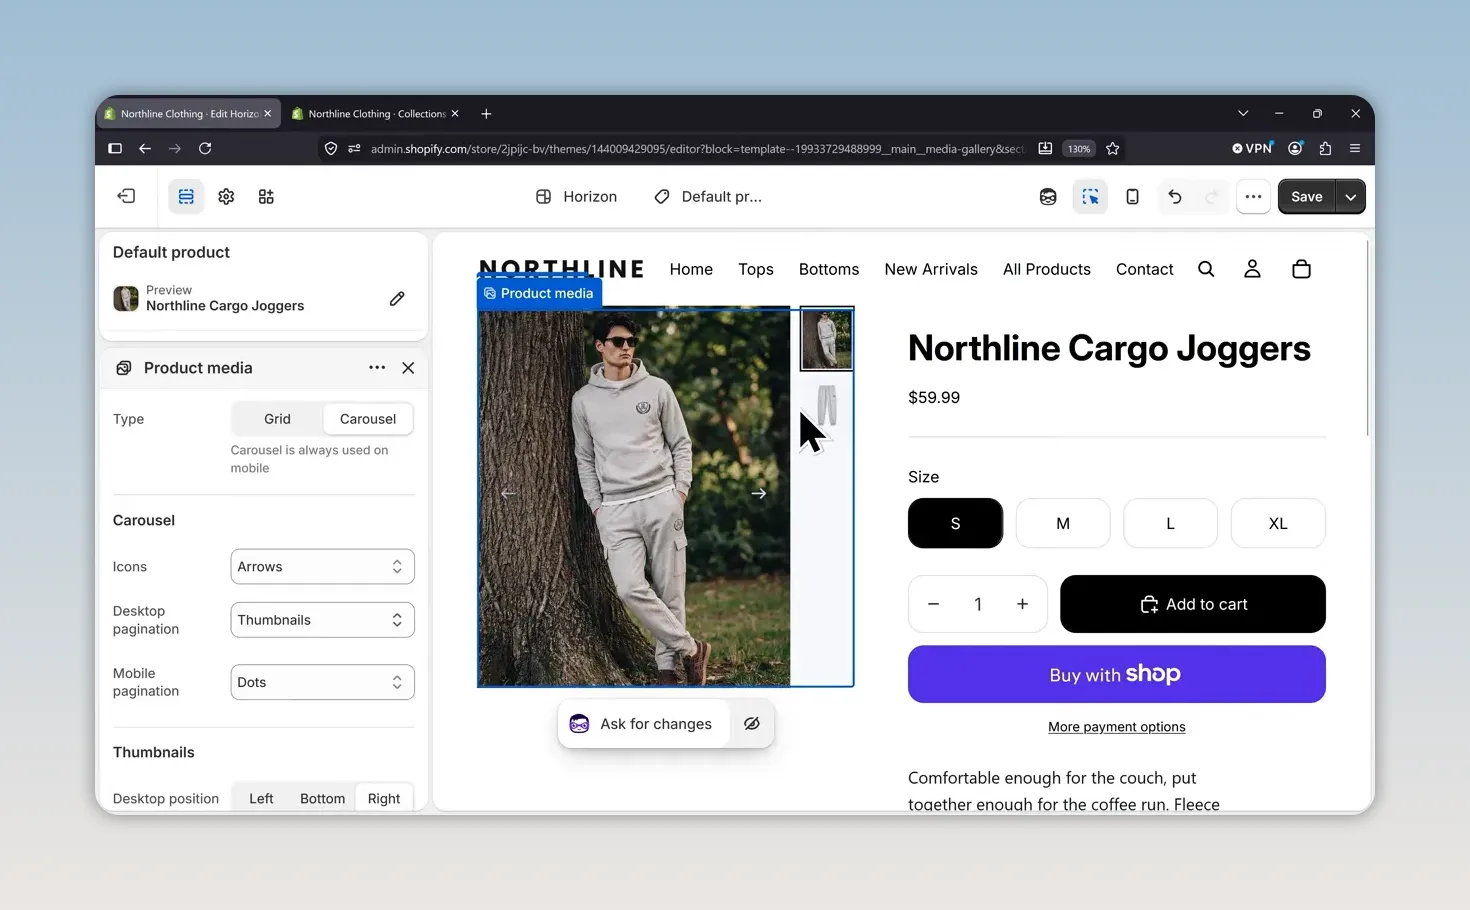
Switch to mobile preview and scroll through the page. Check the images, product information, selectors, and purchase buttons, then save.
10. Complete Your Launch Settings
The storefront design is finished, but there are still a few important settings to handle. Exit the theme editor and open Settings.
Check your store details and currency
Under General, confirm that your store name, email address, phone number, and address are correct.
Also check the store currency. For the US-based Northline example, I’m using US dollars.
Set up payments
Open Payments. I recommend Shopify Payments for this setup where it’s available for your business.
Click Complete setup and follow the prompts to finish the payment configuration. For country and business eligibility details, refer to Shopify Payments supported countries.
Configure shipping rates
Go to Shipping and delivery > General profile. For this store, I’m using a simple domestic shipping setup:
- Standard flat-rate shipping: $10.
- Free shipping: Orders over $75.
Edit the shipping options to match how your business fulfills orders. Make sure the threshold and charges agree with your shipping policy and any benefits displayed on the home page.
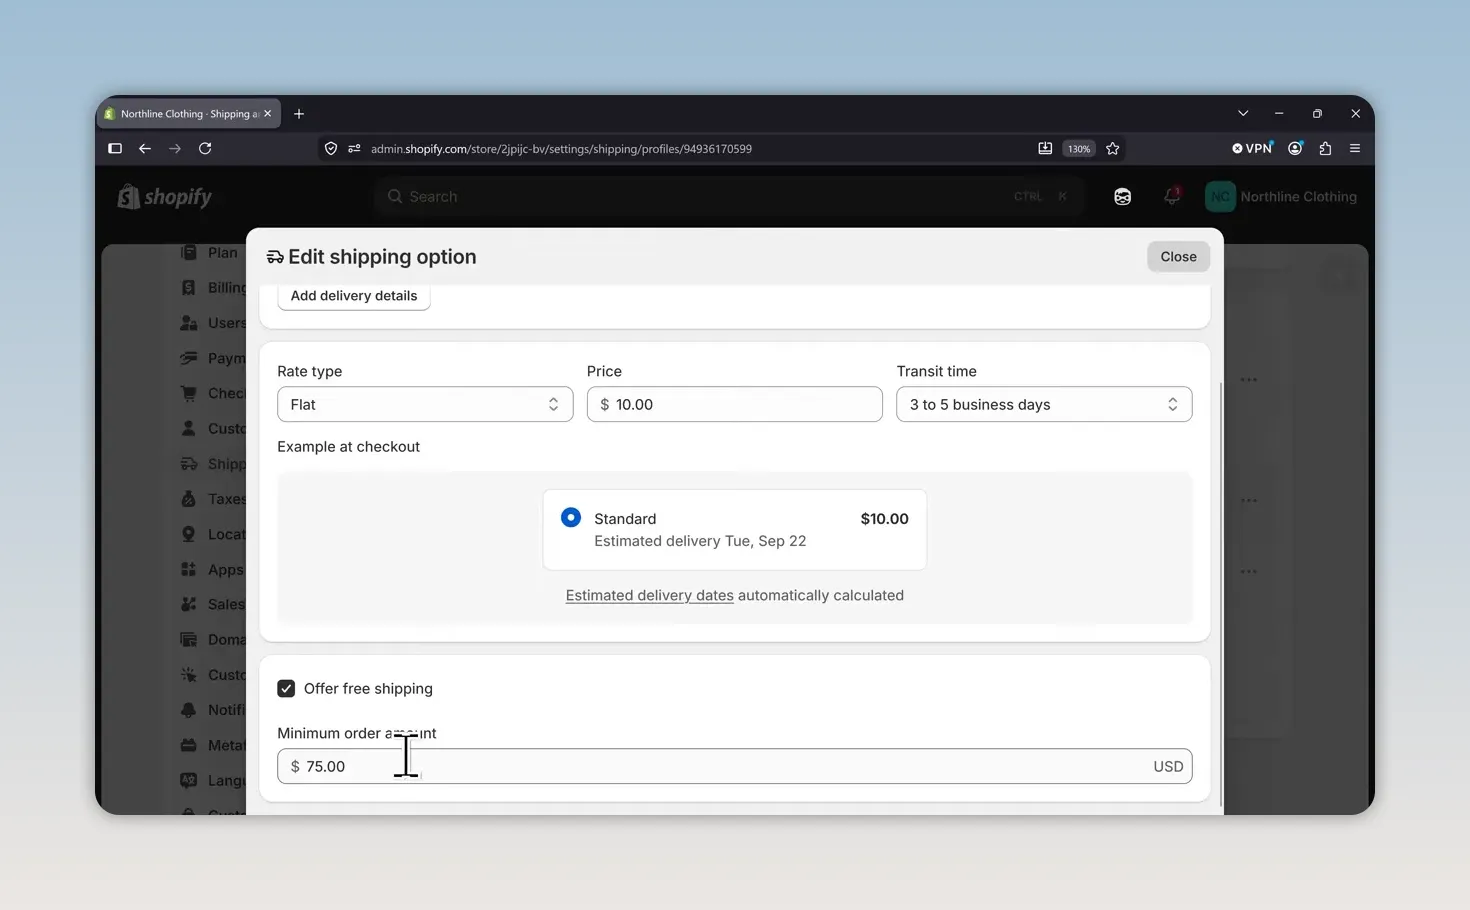
Northline is only offering domestic shipping. If you want to ship to other countries, use Add zone to configure those destinations and their rates.
Review taxes and duties
Open Taxes and duties and select your region. Review the information Shopify provides and use Set up tax collection where appropriate.
An active tax service does not, by itself, mean every tax obligation has been handled. If you’re unsure where you need to register or collect tax, this is worth discussing with a tax professional.
11. Connect a Custom Domain
Your store starts with a Shopify-provided address. To give it a branded web address, open Settings > Domains.
You have two options:
- Connect existing domain: Use this if you already own the domain you want.
- Buy new domain: Search for and purchase one through Shopify.
For this example, I’m buying northlineclothes.com. Search for your preferred domain, choose an available option, and click Buy.
Enter your contact information and payment method, then click Buy domain to complete the purchase.
Shopify connects a domain purchased through its interface automatically, but it can take up to 48 hours for everything to finish updating. Also check your email and complete the domain registration steps Shopify sends you.
12. Launch Your Shopify Store
Once your settings are complete, return to Online Store.
- Open the store visibility control, which is currently set to Private.
- Change it to Public.
- Click Launch store.
- Once the launch finishes, click View store.
Your store is now live. Open the storefront and confirm that the custom domain, favicon, navigation, product information, and design appear as expected.
You can continue making changes after launch. Return to Online Store > Edit theme, or use the Edit theme shortcut when it’s available while you’re signed in.
You now have the core pieces of a Shopify store in place: a branded storefront, real products with variants and inventory, collections, clear navigation, store policies, and the settings needed to begin accepting orders.


