You can build a custom Shopify store without hiring a developer, buying an expensive theme, or writing the theme code yourself. With Claude Code connected to your Shopify theme, you describe what you want in plain English, review the result, and ask for changes.
The best part is that you are still building a normal Shopify store. You can upload the finished theme to Shopify, change its text and images in the theme editor, rearrange sections, and manage your products just as you normally would.
I’ll use a clothing store as the example, but the same workflow works whether you sell handmade products, run a dropshipping business, or have your own product line. We’ll go from the initial setup to a published store, including products, design, payments, shipping, and policy pages.
What You'll Learn
- Connect Claude Code to a local Shopify theme using Node.js, Git, and Shopify CLI.
- Give AI real products, organized assets, and visual references before starting the design.
- Build and refine sections individually, then continue editing the uploaded theme in Shopify.
- Complete payments, shipping, taxes, and policies before publishing and removing the storefront password.
Table of Contents
- 1. Create Your Shopify Store
- 2. Install the Tools That Connect AI to Shopify
- 3. Add Your Products and Collections First
- 4. Gather Design Inspiration and Organize Your Assets
- 5. Connect Claude Code to Your Shopify Theme
- 6. Give Claude a Plan Before Asking It to Build
- 7. Preview and Refine the Hero Section
- 8. Build the Remaining Homepage Sections
- 9. Customize the Product Pages, Header, and Footer
- 10. Upload the Theme and Edit It in Shopify
- 11. Configure the Store Settings Before Launch
- 12. Publish Your Shopify Store
1. Create Your Shopify Store
Start by creating your Shopify account. The offer arranged for this tutorial includes a three-day free trial, followed by your first three months at $1 per month. Check the terms displayed during signup before subscribing.
Enter your email address, create a password, and add your payment information to activate the offer. When Shopify presents its plans, I recommend starting with Basic. You can skip the optional setup questions and extras for now to get to your dashboard.
The Shopify link is an affiliate link. If you make a purchase through it, we may earn a commission at no extra cost to you.
The two subscriptions used for this build are Shopify and Claude Pro. Claude Pro includes access to Claude Code and is shown at $20 per month in this setup. You do not need to purchase a premium Shopify theme to follow this process.
2. Install the Tools That Connect AI to Shopify
There are three main tools behind this workflow, plus one helper:
- Node.js: Runs the tools we need in the background.
- Claude Code: The AI tool that reads and changes your theme files.
- Shopify CLI: Connects your local theme project to Shopify so you can download, preview, and upload a theme.
- Git: A helper tool needed for the setup.
Think of it this way: Claude Code builds the theme, Shopify CLI moves that work between your computer and Shopify, and Node.js supports the tooling.
Keep the full setup guide open as you work. It includes the commands and starter prompt in the order you need them, including the operating-system-specific instructions.
Install Node.js
- Open the Node.js website and go to the download page.
- Find the prebuilt installer for your operating system.
- Download and open the installer.
- Accept the license agreement and keep the default installation settings.
- Complete the installation.
On Windows, the installer may offer additional tools for native modules. For this particular setup, I leave that option unchecked.
Once Node.js is installed, you generally won’t need to interact with it directly during the build.
Create Your Claude Account
Go to Claude, enter your email address, and complete the email verification. Depending on the email you receive, you may need to enter a verification code or click a sign-in link.
Choose the Pro plan and complete the subscription process. You can select monthly or annual billing.
Claude may also offer its desktop app during onboarding. That app is optional for this workflow. It is useful for regular AI chats, including help with product descriptions, but installing it does not replace installing Claude Code.
Install Git and Shopify CLI
Download Git for your operating system and complete the installer.
Next, open your terminal:
- Windows: Search for PowerShell from the Start menu.
- Mac: Press Command + Space, search for Terminal, and open it.
Install Shopify CLI with this command:
npm install -g @shopify/cli@latestWait for the installation to finish, then check it:
shopify versionIf you get a version number, Shopify CLI is installed. Installation output can contain notices and other messages, so the version check is a useful way to confirm the result. For additional reference, Shopify maintains official Shopify CLI documentation.
Install and Authorize Claude Code
Use the Claude Code installation command for your operating system from the setup guide. On Windows, the command used here is:
irm https://claude.ai/install.ps1 | iexOnce the installation reports that it is complete, close your terminal and open a fresh instance. Then run:
claudeComplete the onboarding:
- Choose your preferred terminal appearance.
- Select the option to sign in with a Claude account that has a subscription.
- Authorize access in the browser page that opens.
- If prompted, copy the authorization code and paste it back into the terminal.
- Continue through the remaining setup prompts and confirm the workspace you intend to use.
Claude Code is now ready. Before asking it to design anything, though, we need to give it real products and a clear visual direction.
3. Add Your Products and Collections First
Add your products before building the theme. That gives the design something real to work around, including your product photography, product names, and collections.
In Shopify, open Products → Add product.
Add a Title, Description, and Photos
You can write the product copy yourself or use a regular Claude chat to help. For the example store, I upload a photo of a red T-shirt and ask Claude for a concise product title and description.
Review the result, request any changes, and copy the approved text into Shopify.
In the Media section, upload your product images. These could be photos you have taken, product images you are authorized to use, or suitable AI-generated images. The important part is that the images accurately represent what you are selling.
Set Pricing, Inventory, and Variants
For the sample T-shirt, I use a price of $19.99 and initially enter an inventory quantity of 100. Use the actual price and stock information for your own product.
If your product has options, select Add options like size or color. For the T-shirt, I add:
- Small
- Medium
- Large
- XL
Shopify lets you adjust pricing and inventory for individual variants. You can also assign variant-specific images, which is particularly useful when customers choose between different colors.
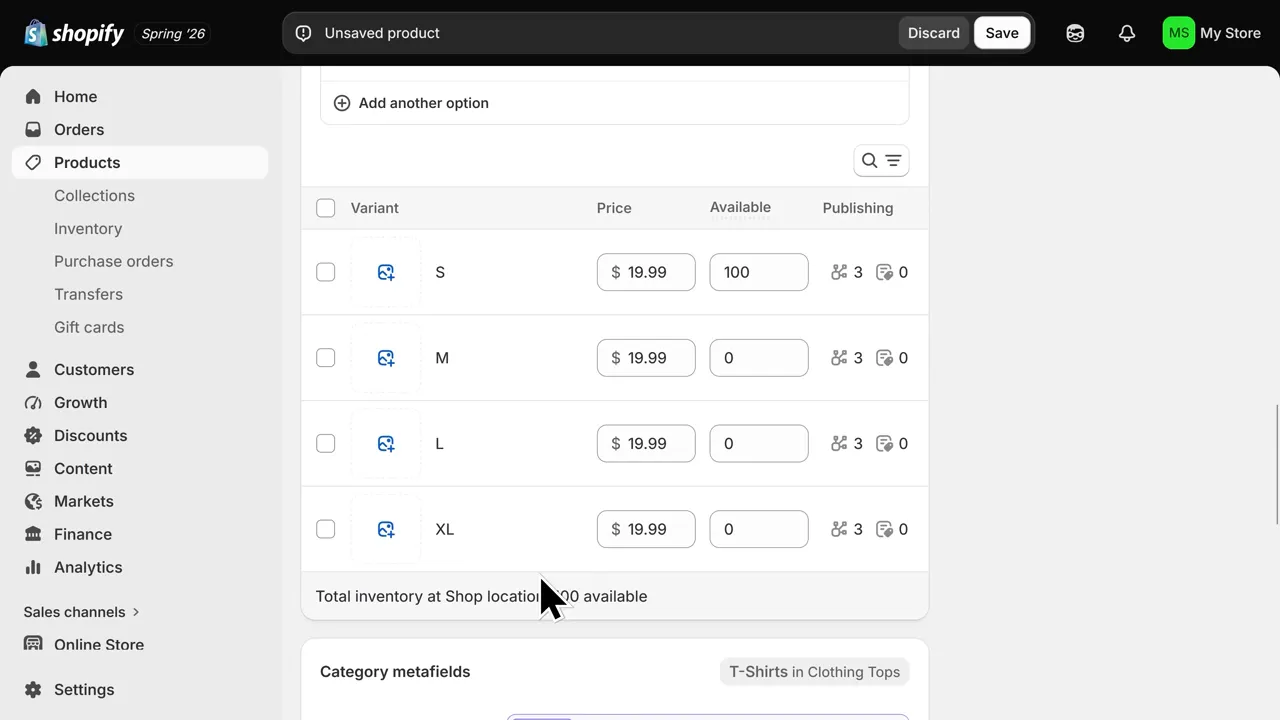
Category metafields and search engine listing settings are available farther down the page. You can return to those after the core product information is in place.
Organize Products Into Collections
Collections group related products together. In a clothing store, you might have separate collections for T-shirts, hoodies, and pants.
From the product’s collection settings:
- Select Add collections.
- Create a new collection.
- Enter a title, such as “T-shirts.”
- Choose a manual collection for this example.
- Add a collection image if you want one.
- Save the collection, then save the product.
Repeat this process for the rest of your catalog. My example store has three products ready before I begin the design work.
4. Gather Design Inspiration and Organize Your Assets
AI gets a much clearer brief when it has visual references. Rather than asking for a “professional-looking store” and hoping for the best, collect examples of the specific layouts and sections you like.
Use Shopify Theme Demos as References
Go to Online Store. The starting theme in this example is Horizon. Leave that in place as the foundation.
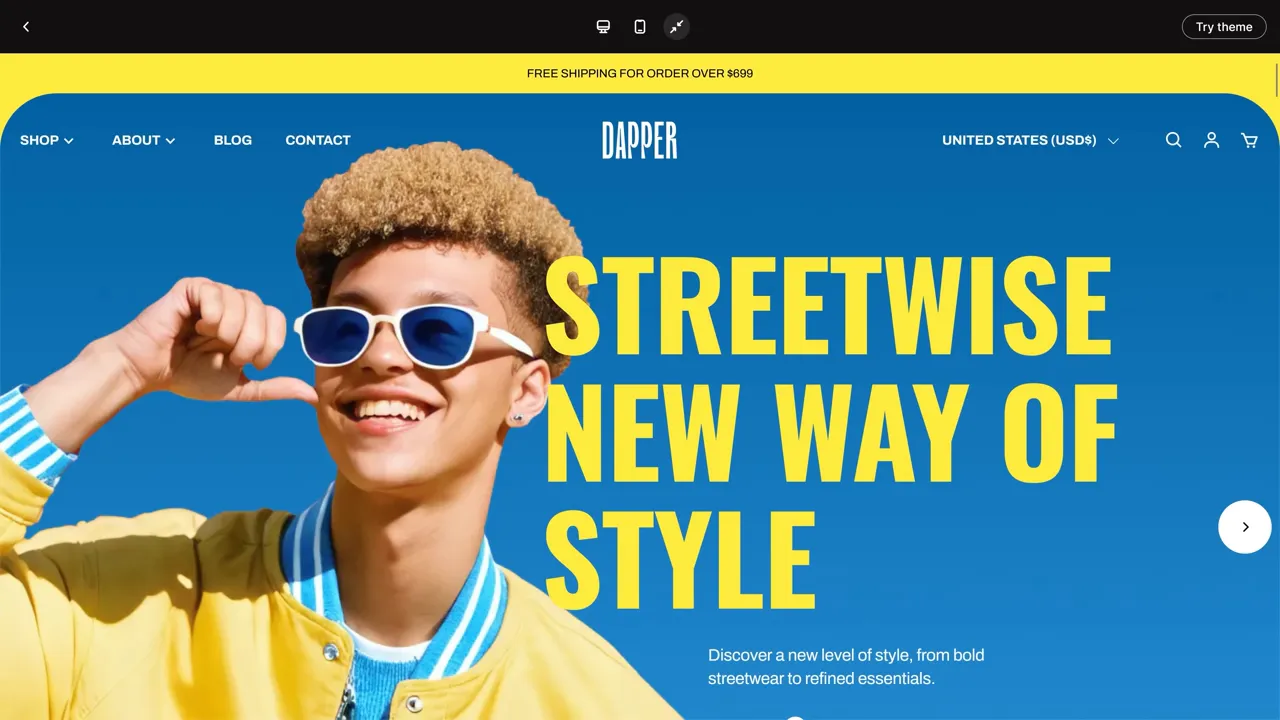
Scroll to the theme library, open the Shopify Theme Store, and explore a few demos. Take screenshots of useful design references, such as:
- A homepage hero section
- A shop-by-category layout
- A featured product display
- A customer review layout
- An Our Story section or page
- A product detail page
You can combine inspiration from multiple themes. The idea is to communicate layout and style preferences, then build a design around your own brand and assets.
Create a Simple Asset Folder
I organize the files into four groups:
- Product photos: The images used for the actual products.
- Store inspiration images: Screenshots of layouts and sections I like.
- Store logo: Versions with a background, plus transparent light and dark versions.
- Homepage images: Lifestyle photography for banners and other sections.
For this example, I create the logo in Canva and use lifestyle photos from Pexels. You can also use your own photography or suitable AI-generated imagery.
Your folder structure does not have to match mine exactly. What matters is keeping the references, branding, and usable images easy to identify.
5. Connect Claude Code to Your Shopify Theme
Now we’ll create a clean project folder and download the current Shopify theme into it. This gives Claude Code a local copy of the theme files it can work on.
Create Your Project Folder
If Claude Code is still open in the terminal, enter /exit to return to the regular command prompt.
Then run these commands one at a time:
mkdir my-store-build
cd my-store-build
You are now inside the folder that will hold the theme project.
Pull Your Current Theme From Shopify
In Shopify, open Settings and find your store’s Shopify domain. Use that domain in the following command, replacing the example:
shopify theme pull --store your-store.myshopify.com --liveA browser window should open so you can sign in to Shopify. If Shopify asks you to confirm a device code, check that it matches the code displayed in your terminal before confirming.
When the process finishes, the terminal should report that the theme has been pulled successfully.
At this point, your theme files are on your computer. Your products and store settings still live in Shopify. Downloading a theme is not the same as downloading your entire Shopify business.
Add the Shopify Knowledge Setup
The setup guide includes an additional command at this stage to give Claude Shopify-specific development context. Run that command before starting the design conversation.
This step matters because access to your theme files and knowledge of Shopify’s theme conventions are two different things. We want Claude to have both.
Copy Your Assets Into the Project
Create an inspiration folder:
mkdir inspirationOn Windows, you can open the current project in File Explorer with:
explorer .On a Mac, open the project folder in Finder. Copy your organized asset folders into inspiration.
Then return to the terminal, still inside my-store-build, and launch Claude Code:
claudeComplete any workspace prompts. The Claude in Chrome extension is optional and is not needed for this build.
6. Give Claude a Plan Before Asking It to Build
The biggest improvement you can make to this workflow is simple: do not ask Claude to build the entire store in one giant request.
Instead, have it inspect the project, ask questions, propose a plan, and build one section at a time. That gives you a chance to catch problems before they spread across the whole design.
Use the initial prompt in the setup guide and replace the brand-name placeholder with your own. Its purpose is to establish a few clear instructions:
- Inspect the current theme and the inspiration folder.
- Understand the brand and available assets.
- Ask questions before choosing a design direction.
- Present a plan before building.
- Build each section separately and pause for feedback.
Answer the Brand and Layout Questions
Claude may notice conflicts between your references. In my case, the inspiration theme uses bold blue and yellow colors, while my logo and product photography are much more neutral. Claude asks which direction should lead the design.
That is exactly the kind of question you want it to ask. A reference can be useful for layout without dictating your entire color palette.
For the example homepage, I select:
- A hero section
- Shop by category
- Featured products
- Customer reviews
- A brand story section
I also keep the suggested Inter font.
Choose a Local Development Preview
Claude offers several preview approaches, including a local development server, an unpublished preview theme, and static mockups. I use the local development server.
That gives you a browser preview for reviewing the work before publishing it. As the theme files change, the preview can update so you can check each section during development.
Claude may ask again for your Shopify domain and for confirmation to start. Provide the domain and approve the plan to build only the first section.
You will also encounter command approval requests. Read what Claude wants to run and approve actions you understand and expect for the build. If something is unclear, ask Claude to explain it before continuing.
7. Preview and Refine the Hero Section
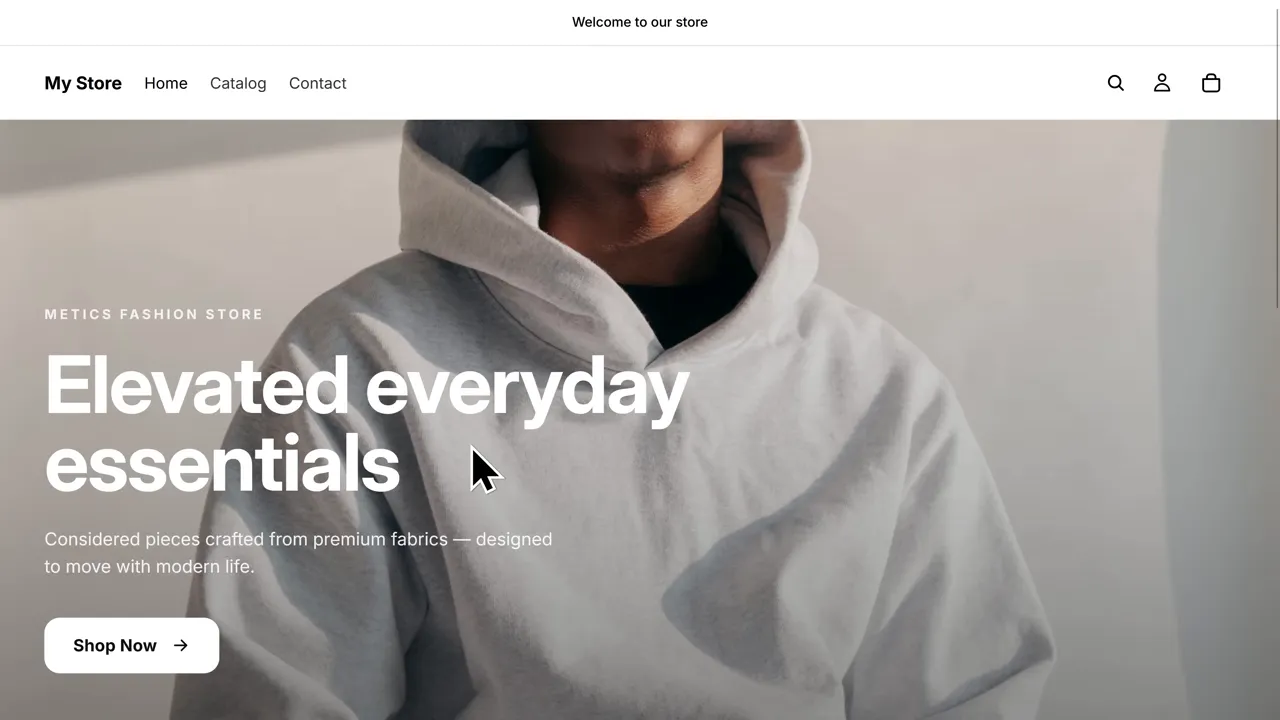
Once Claude has built the hero, use the development preview command it provides.
- Open a second PowerShell tab or Terminal window.
- Navigate to your my-store-build folder.
- Paste and run the preview command supplied by Claude.
- Enter the storefront password if prompted.
- Open the preview link displayed in the terminal.
The storefront password is not your Shopify account password. It is the password used to protect the storefront before launch. In Shopify, you can find it through the Online Store password settings, using Edit password.
Keep the preview terminal running while you work. Use your original terminal tab for the conversation with Claude.
Describe Changes Like You Would to a Designer
Review the images, headline, button, spacing, and section size. If something does not look right, explain what you want in ordinary language.
For example, my first version feels too static. The text and images appear immediately, so I ask for a more polished entrance:
Keep the current hero design, but add subtle easing as the text and images appear. Give the sections a gentle fade-in as they enter the page.
Claude makes the changes, then I refresh the preview and check the result. If the movement is too slow or too pronounced, I can ask it to adjust the animation speed and timing.
This is the core feedback loop for the entire store:
- Build one piece.
- Review it in the browser.
- Describe the specific change you want.
- Check the revision.
- Approve it before moving on.
8. Build the Remaining Homepage Sections
Once the hero looks right, ask Claude to build the next section in the same visual style.
Check the Category Icons
The first category section looks clean, but some icons do not match their category labels. Rather than accepting the result just because the layout looks good, I ask Claude to check the section and correct the mismatches.
This is a useful reminder: review meaning as well as appearance. A polished icon is not helpful if it represents the wrong product category.
Use Real Products in the Featured Section
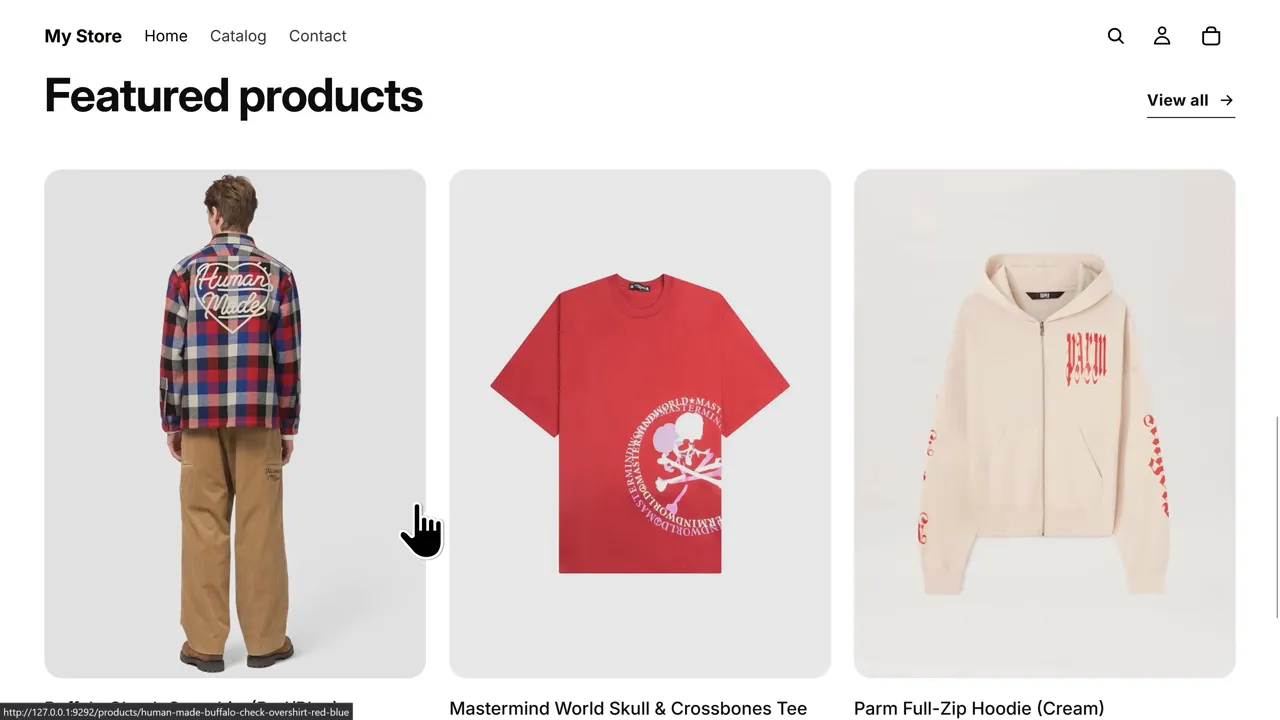
Before Claude builds the featured products section, remind it that your catalog already exists in Shopify.
Use the three existing products in my Shopify catalog for the featured products section, rather than creating sample product content.
Then check that the section displays the correct products, images, names, and prices.
Finish the Reviews and Story Sections
Next, have Claude complete the remaining homepage content. In this example, the last build step adds the customer review layout and the story section.
The initial reviews use placeholder names, text, and images. Treat these as design placeholders, not publishable customer testimonials. Replace them with genuine reviews or remove the section until you have real material.
Review the brand story copy as well. Make sure any statements about your business or products are accurate.
Request a Final Homepage Quality Pass
Once the homepage sections work together, ask Claude to review the whole page for remaining issues and polish.
Review the completed homepage for quality and consistency. Fix anything you missed and refine the details so the sections feel like one finished design.
Some changes may be behind the scenes, while others affect layout or styling. Refresh the preview and check the result yourself before moving on.
9. Customize the Product Pages, Header, and Footer
A finished homepage is only part of a finished store. You also need the rest of the shopping experience to match.
At this stage, I ask Claude to:
- Create polished product pages for the three products.
- Customize the header and include the store logo.
- Create a footer with policy links.
- Bring the rest of the store into the same visual style as the homepage.
The starting Horizon header still looks like the default theme, so this pass helps make the design feel consistent.
Refine the Navigation
After reviewing the revised header, I decide to remove the announcement banner. I also move the Home, Catalog, and Contact links into a hamburger menu.
These are design preferences, not requirements. The important part is that you can make these decisions after seeing a working version instead of trying to specify every detail upfront.
Check the Product Image Layout
The revised product page uses an image slideshow rather than displaying all the images across the page at once. I can click through the different product photos while keeping the purchasing information alongside them.
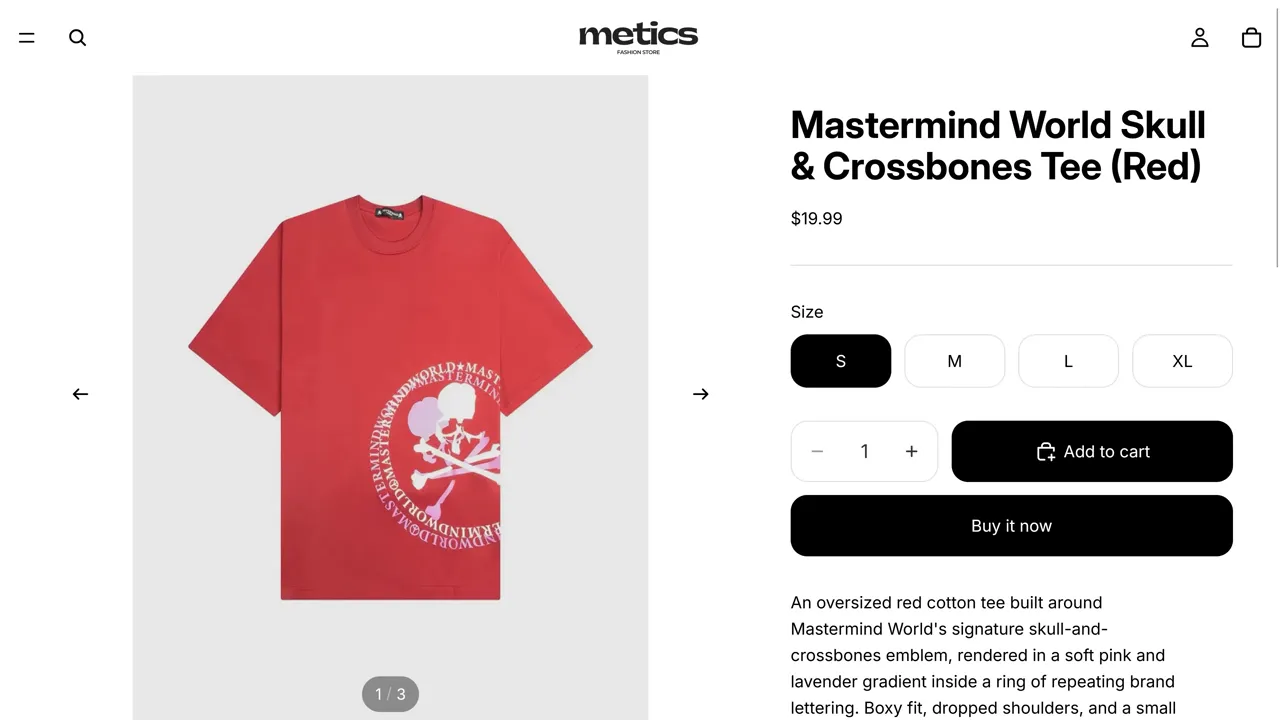
Also open the catalog and contact pages. In this build, Claude adds a matching banner to each and keeps the contact form below the contact-page banner.
If you need another page, want a different section order, or dislike a design detail, use the same plain-English feedback process.
Claude also points out that the footer’s policy links depend on policies being created in Shopify’s admin. We’ll add those before launch.
10. Upload the Theme and Edit It in Shopify
When the design is ready, tell Claude that you want to move the finished theme into Shopify.
For this workflow, upload it as an unpublished theme first. That leaves room for a final review in Shopify before it replaces the live theme.
- Copy the upload command Claude provides.
- Switch to the terminal running your development preview.
- Press Control + C to stop the preview process.
- Run the upload command.
- Wait for the upload to complete.
Return to Online Store in Shopify, find the uploaded theme in the theme library, and select Edit theme.
Make Manual Changes in the Theme Editor
This is one of my favorite parts of the process. The custom theme is still editable through Shopify.
In the example build, I can:
- Click the hero section and change its text.
- Replace the hero image.
- Adjust the section’s available settings.
- Drag sections into a different order.
- Add sections using the plus button.
- Undo changes while editing.
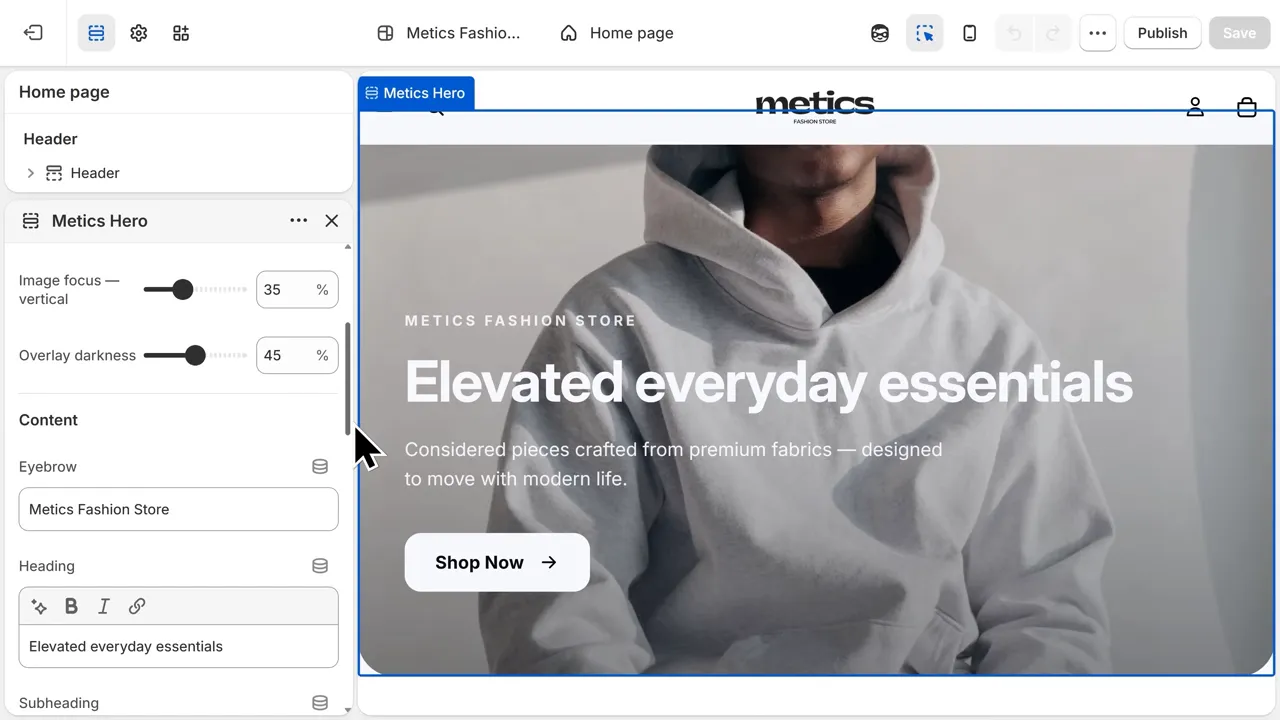
Check that the controls you need are actually available. If Claude has built a section without the settings you want, ask it to make those parts editable before considering the build finished.
Review the Mobile Layout
Use the phone icon in the theme editor to switch to mobile preview. The example already has a responsive layout, but you should still check every page and section on both desktop and mobile.
Pay particular attention to headline wrapping, image crops, product cards, menus, and spacing. Save your changes when you are happy with the result.
11. Configure the Store Settings Before Launch
The design is ready. Now we need to finish the settings that make the store usable for your business.
Store Name
Open Settings and update the store name to match your brand. Save the change.
Payments
Open Settings → Payments. In this example, I use Shopify Payments and select Complete setup.
Follow the onboarding steps and provide the requested business and payment information so the store can accept payments.
Shipping and Delivery
Open Settings → Shipping and delivery, then select your shipping profile.
For the example store, I simplify the domestic shipping options:
- Remove the express shipping option.
- Edit the standard option and rename it “Free shipping.”
- Enable the free-shipping option.
- Use a $10 order-amount threshold in the example configuration.
- Set the displayed transit time to five to eight business days.
Those are example settings, not a shipping strategy you need to copy. Your rates, eligibility thresholds, and delivery estimates should match what you can actually offer.
Review the international shipping zones as well. Configure them for the countries you serve, or remove the international zone if you do not offer international shipping. My example is set up for domestic shipping within the United States.
Save the shipping profile when you are finished.
Taxes and Duties
Open Settings → Taxes and duties. The example account has Shopify Tax active, with regional tax settings available for review.
Check the regions where your business needs to collect tax. If you are unsure about your obligations, speak with a tax professional rather than assuming the default settings cover your situation.
Policy Pages
Open Settings → Policies and work through the policies relevant to your business.
Some policies, such as the return and refund policy, may offer an Insert template option. Use the template as a starting point, then read it carefully and replace any placeholders.
For example, if the template asks for a return address, enter your actual return address before publishing.
The shipping policy in this setup does not offer a template. You can ask Claude to help draft one, but give it your exact shipping details first:
- The countries or regions you ship to
- Your shipping charges or free-shipping conditions
- The delivery estimates you offer
- Any other shipping terms customers need to know
Review the result and publish the finished policy, not placeholder text. Legal notice requirements and other policy obligations depend on your business and location, so get professional advice if you are unsure what applies.
Once the policies are published, check that the custom footer displays the links as intended.
Custom Domain
Open Settings → Domains. You can connect a domain you already own or buy one through Shopify.
The store starts with a default Shopify domain, but I recommend a branded domain for a professional store. The example domain search shows a .com option at $16 per year, though the price will depend on the domain you choose.
12. Publish Your Shopify Store
Return to Online Store and open the finished theme for one final check. Confirm that the footer policy links appear and that the pages look right.
Before publishing, make sure you have completed the essentials:
- Product information, prices, images, variants, and inventory are correct.
- The homepage, product pages, catalog, contact page, and navigation have been reviewed.
- Placeholder reviews and unfinished copy have been removed or replaced.
- Desktop and mobile layouts have been checked.
- Payment setup is complete.
- Shipping zones, rates, and delivery estimates match your business.
- Tax settings and policies have been reviewed.
- Your domain is configured if you are using a custom one.
Then select Publish and confirm the theme change. Remove the storefront password when you are ready to make the store publicly accessible.
Use View store to open the public storefront and confirm the result.
You now have a custom Shopify theme built with AI, backed by Shopify’s normal product and store-management tools. For future changes, you have two options: make routine edits in the Shopify theme editor, or return to Claude Code for more involved design work.
The key is not getting a perfect store from one prompt. It is giving Claude real assets, a clear direction, and specific feedback, then refining the store one piece at a time.


