Building a Shopify store is much easier when you work through it in the right order. Start with a theme, add your products, organize them into collections, and then use that content to build out your website. Once the design is ready, you can connect payments, set your shipping rates, add a branded domain, and launch.
I’ll use a bag and backpack store as the example, with Shopify’s free Trade theme. You can follow the same process for your own products, replacing the images, descriptions, collections, and branding with your own.
The goal is a complete, professional ecommerce website, not just a good-looking homepage. That includes product pages, an About page, FAQs, a contact form, navigation, policies, and the settings that allow customers to place an order.
What You'll Learn
- Build a complete Shopify storefront using the free Trade theme and its section-based editor.
- Add product variants and organize your catalog into collections before finishing the homepage.
- Create page templates, assign them correctly, and connect pages through your navigation menus.
- Complete mobile, payment, shipping, and domain settings before removing storefront password protection.
Table of Contents
- 1. Create Your Shopify Account and Choose a Plan
- 2. Install the Free Trade Theme
- 3. Understand the Shopify Theme Editor
- 4. Customize Your Homepage Hero Section
- 5. Add Your Products
- 6. Organize Products into Collections
- 7. Build Out the Rest of Your Homepage
- 8. Customize Product and Collection Pages
- 9. Create Your About, FAQ, and Contact Pages
- 10. Build Your Main Navigation Menu
- 11. Customize the Header, Logo, and Favicon
- 12. Create Policies and Finish the Footer
- 13. Set Your Brand Colors and Fonts
- 14. Review Every Page on Mobile
- 15. Check Store Details and Connect Payments
- 16. Configure Shipping Zones and Rates
- 17. Connect a Custom Domain
- 18. Remove Password Protection and Launch
1. Create Your Shopify Account and Choose a Plan
Start by creating your Shopify account. Enter your email address, complete the signup process, choose your business location, and create your login. Shopify may ask a few questions about your business. You can skip the optional onboarding questions if you want to go straight to the dashboard.
I recommend checking the Shopify trial offer before signing up so you have time to build your store before moving onto regular billing.
Check the terms displayed during signup. Trial lengths, promotional periods, and subscription prices can change. The example setup used a three-day trial followed by one month for $1, with regular Basic billing shown at $39 per month afterward. Treat those as demonstration prices, not a guaranteed current offer.
To select your plan:
- Click Select a plan in the Shopify dashboard.
- Choose the plan you want to use. For this example store, I use Basic.
- Review the promotional period, regular subscription price, and billing schedule.
- Enter your payment information and business address.
- Confirm your subscription.
If your offer requires choosing a plan before the free trial ends, complete that step within the deadline shown in your account.
2. Install the Free Trade Theme
Your theme gives you the starting design for your Shopify website. It controls the overall layout and provides the sections you can use to build your pages.
In this example, Shopify starts with Dawn installed, but I’m going to use Trade instead.
- Go to Online Store > Themes.
- Open the Shopify Theme Store.
- Filter the themes to show the free options.
- Find Trade and open its details.
- Click Try theme to add it to your theme library.
- Back in your dashboard, click Publish beside Trade and confirm.
- Click Customize to open the theme editor.
You can also browse the official Shopify Theme Store if you want to compare other designs. For this build, sticking with Trade keeps the process simple and avoids paying for a theme.
Trade is responsive, so its layouts adapt to different screen sizes. We’ll do most of the design work in the desktop preview, then review the mobile layout before launch.
3. Understand the Shopify Theme Editor
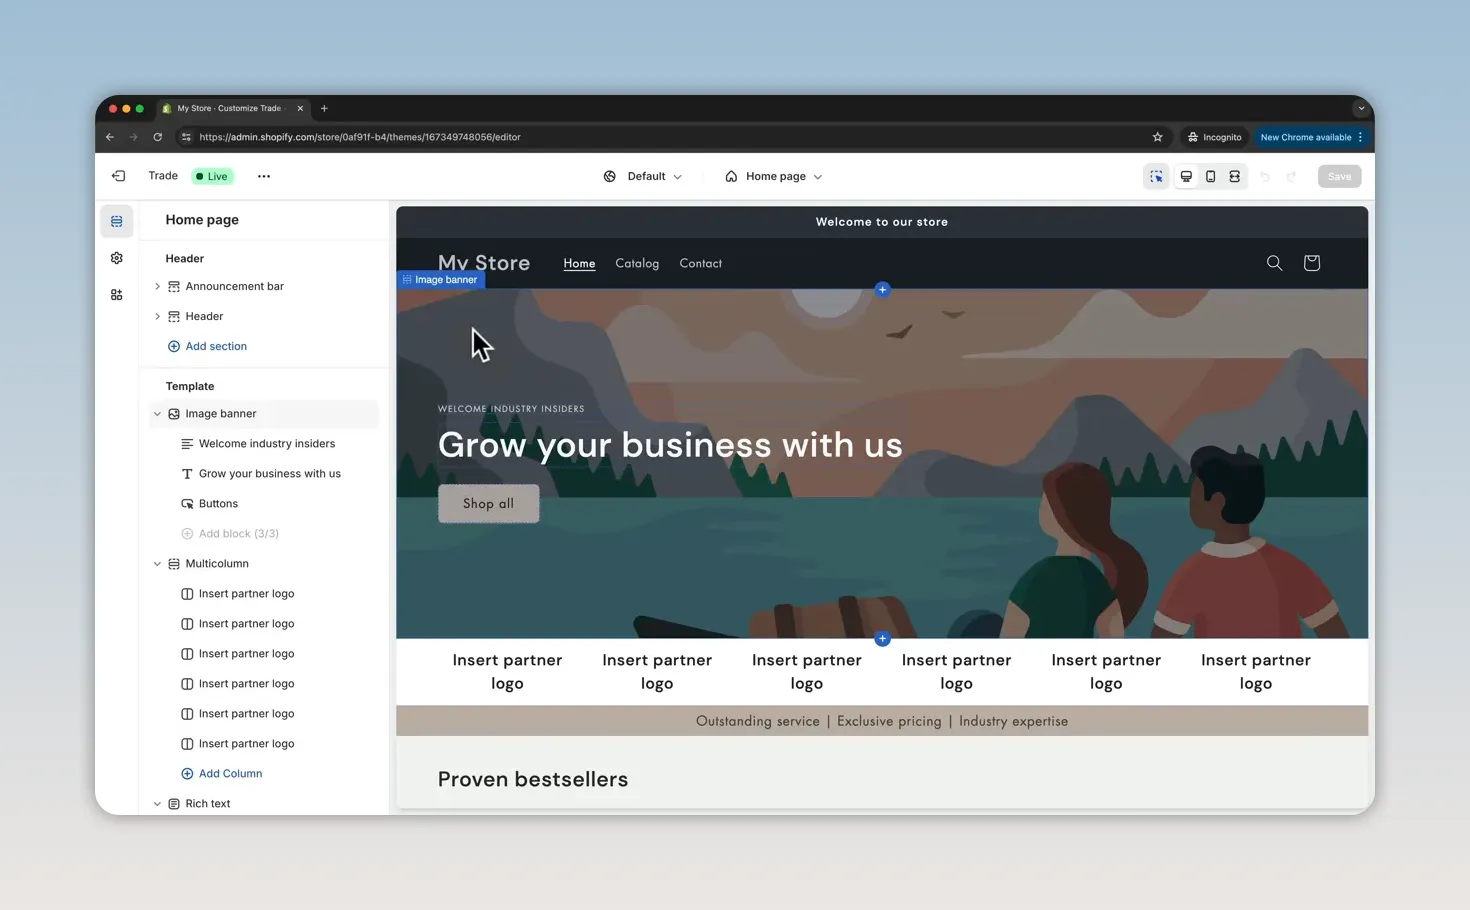
The theme editor has a preview of your website and a sidebar showing the content on the current page. Once you understand sections, blocks, and templates, most of the editing process becomes straightforward.
Sections and blocks
A page is made up of sections. Inside many sections, you’ll find smaller pieces of content called blocks.
For example, an Image banner section can contain a heading block, a text block, and a button block. A Multicolumn section contains individual column blocks.
- Edit content: Click the section or block in the sidebar, or select it in the preview.
- Remove content: Use the trash icon or the Remove section option.
- Hide content: Use the eye icon when you want to keep something without displaying it.
- Reorder content: Drag sections or blocks into a different position.
- Add content: Click a plus icon between sections or use Add section at the bottom of the page outline.
Global areas and page templates
The header and footer appear across your storefront. The content between them depends on the page template you’re editing.
Use the dropdown at the top of the editor to switch between the homepage, product pages, collections, standard pages, cart, and checkout-related areas. Use the device controls to switch between desktop and mobile previews.
Save regularly. Before moving back to the dashboard, save your design changes. I also like keeping the theme editor open in one browser tab and the Shopify dashboard in another. That makes it much easier to move between adding products and designing the store.
4. Customize Your Homepage Hero Section
The hero is the large banner at the top of your homepage. Start by replacing the theme’s placeholder image with a photograph that fits your products and brand.
If you want to practice with the same example materials, you can use the store website assets.
- Select the Image banner section.
- Under First image, upload an image or drag it into the image field.
- Adjust the image overlay opacity to make the photograph darker or lighter.
- Choose a banner height.
- Set the content position and alignment.
- Edit the heading and supporting text blocks.
- Customize the button label and destination.
For this store, I use one Shop button linked to all products. You can add a second button if you have two clear shopping destinations, such as separate collections for different audiences.
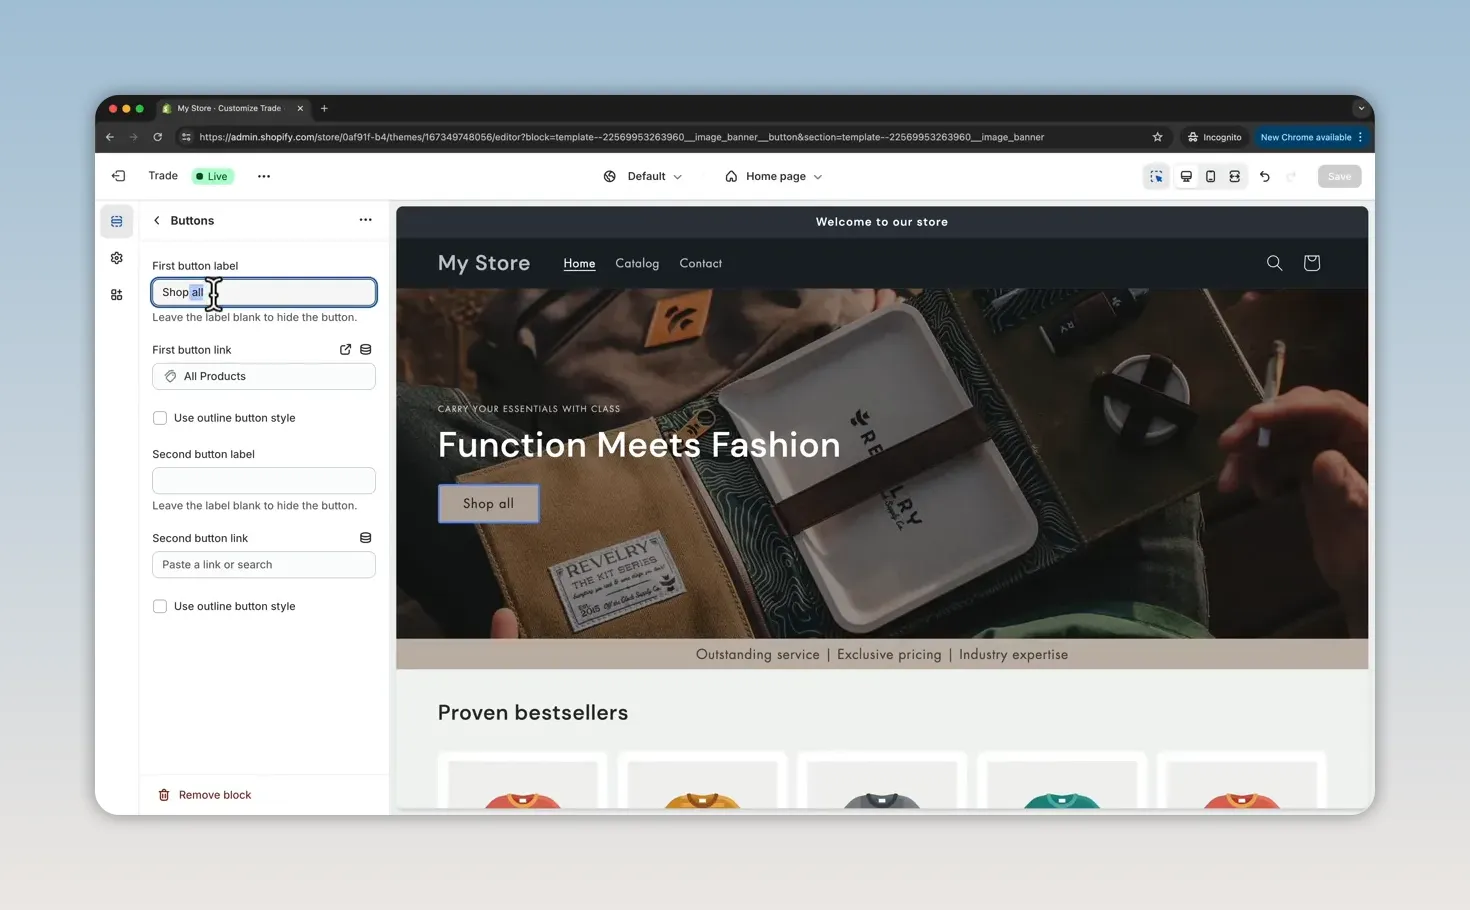
The banner also supports a second image if you want a split-image layout. You don’t have to use every option, though. One strong image, a clear heading, and one useful button are enough for this example.
Below the hero, edit the Rich text section to introduce a few brand values. In the example, those values focus on quality, sustainability, and individuality. If that section doesn’t add anything useful to your store, remove it.
Before filling out the product sections on the homepage, we need actual products and collections.
5. Add Your Products
In the Shopify dashboard, go to Products > Add product. I’ll start with a backpack called The Explorer.
Product title, description, and images
Enter your product name and description. Shopify’s Generate text tool can help you draft a description using keywords and a selected tone, or you can paste in copy you’ve already prepared.
Next, upload your product images. High-quality product photography is important. Add the images you want customers to see, then drag them into the order you prefer.
Pricing and inventory
Set the selling price. In this example, the backpack costs $50. There’s also a Compare-at price field, which can display a higher reference price alongside the selling price. The demonstration uses $65 as the comparison price.
Under Inventory, enter the quantity you have available. Shopify can then track the remaining stock as products sell.
You’ll also find an option to continue selling when the product is out of stock. Only enable it if you intend to accept orders after inventory reaches zero.
In the Shipping area, enter the product weight if you’ll use weight-based shipping rates. The example later uses fixed shipping rates rather than weight-based rates.
Add product variants
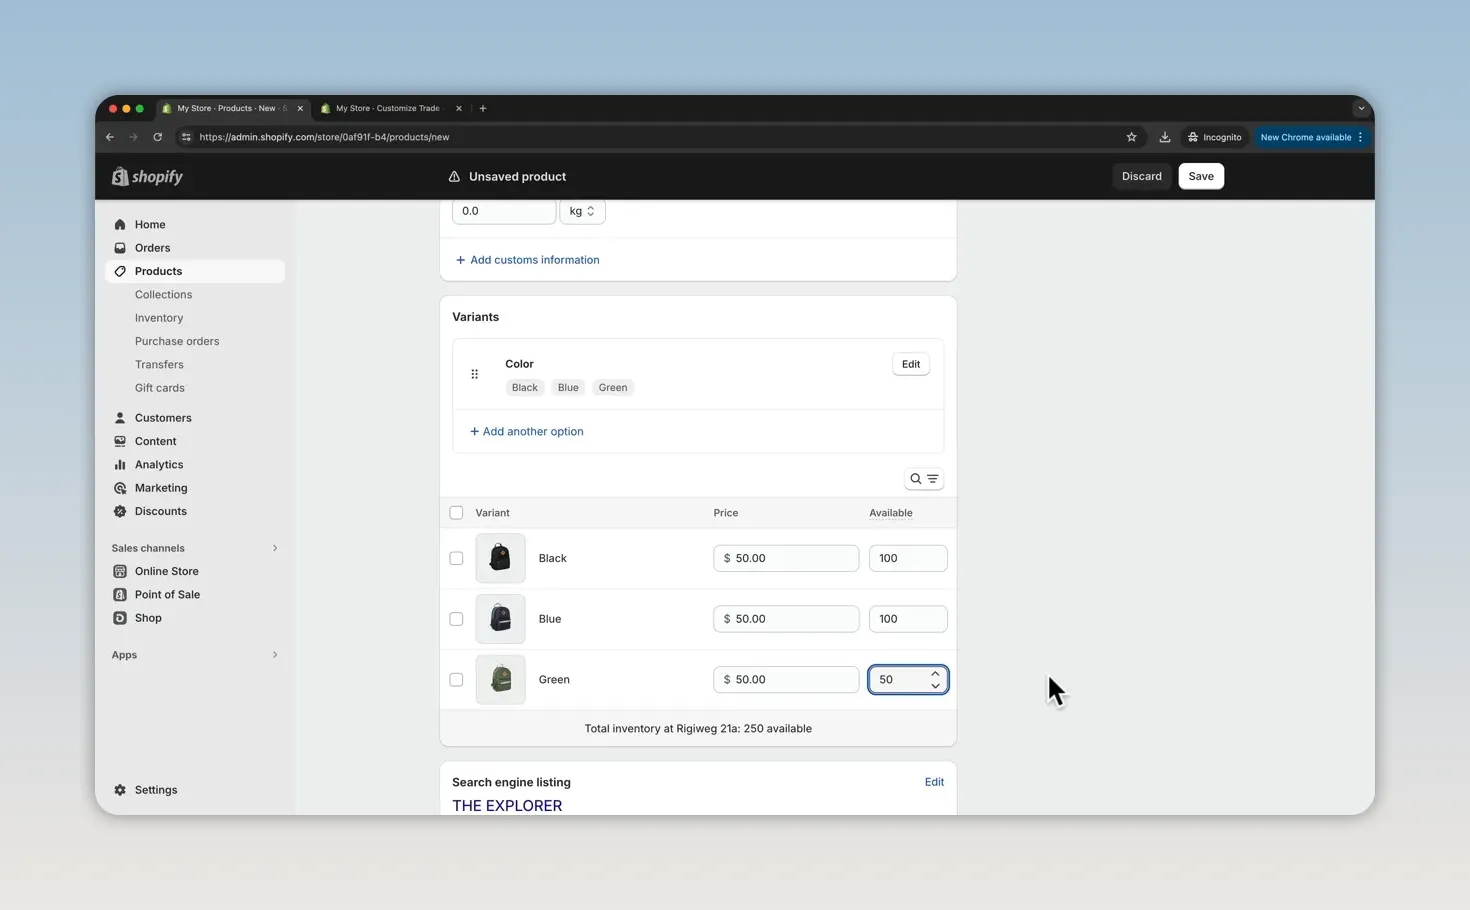
The Explorer comes in black, blue, and green, so we need a Color option.
- Under Variants, click Add options.
- Name the option Color.
- Add Black, Blue, and Green as the option values.
- Click Done.
- Assign the matching product image to each color.
- Enter the available inventory for each variant.
The example has 100 black backpacks, 100 blue backpacks, and 50 green backpacks. You can also set a different price for each variant if needed.
Edit the search engine listing
At the bottom of the product editor, open the Search engine listing settings if you want to customize:
- The product page title.
- The meta description.
- The URL handle.
Save the product, then repeat the same process for the rest of your catalog. Adding your products now gives you real content to work with when designing the homepage and collection pages.
6. Organize Products into Collections
Shopify uses collections to group products. For this store, collections act as shopping categories such as Backpacks, Duffel Bags, and Accessories. I also create collections for New Arrivals and Best Sellers.
Create a manual collection
- Go to Products > Collections.
- Click Create collection.
- Enter a title, such as Backpacks.
- Add a short description if needed.
- Choose Manual as the collection type.
- Upload a collection image.
- Save.
You can remove an unused default collection if you don’t need it, then repeat the process for your own categories.
Add products in bulk
Creating a manual collection doesn’t automatically fill it with products. Go back to Products and select the items that belong in one category.
- Select all of your backpacks, for example.
- Open the three-dot actions menu.
- Choose Add to collections.
- Select Backpacks.
- Save.
Repeat this for the rest of your catalog. A product can also belong to a special collection, such as New Arrivals, alongside its main shopping category.
For the practice store, I select example products to populate those special collections. For your own store, choose products that fit the collection name.
7. Build Out the Rest of Your Homepage
Return to the theme editor. If you closed it, open Online Store > Themes > Customize.
Now that your catalog is ready, you can replace the placeholder products and category cards with your own content.
Feature a collection
Select the Featured collection section, click Select collection, and choose New Arrivals.
For this layout, I make the following changes:
- Change the heading to New Arrivals.
- Limit the number of displayed products to five.
- Use an outlined View all button.
- Change Quick add from Bulk to either Standard or None.
Standard provides a simpler add-to-cart option. None removes the quick-add controls and leaves the product image, title, and price.
When the collection contains more products than the section displays, the View all option gives customers a way to reach the rest.
Show your top categories
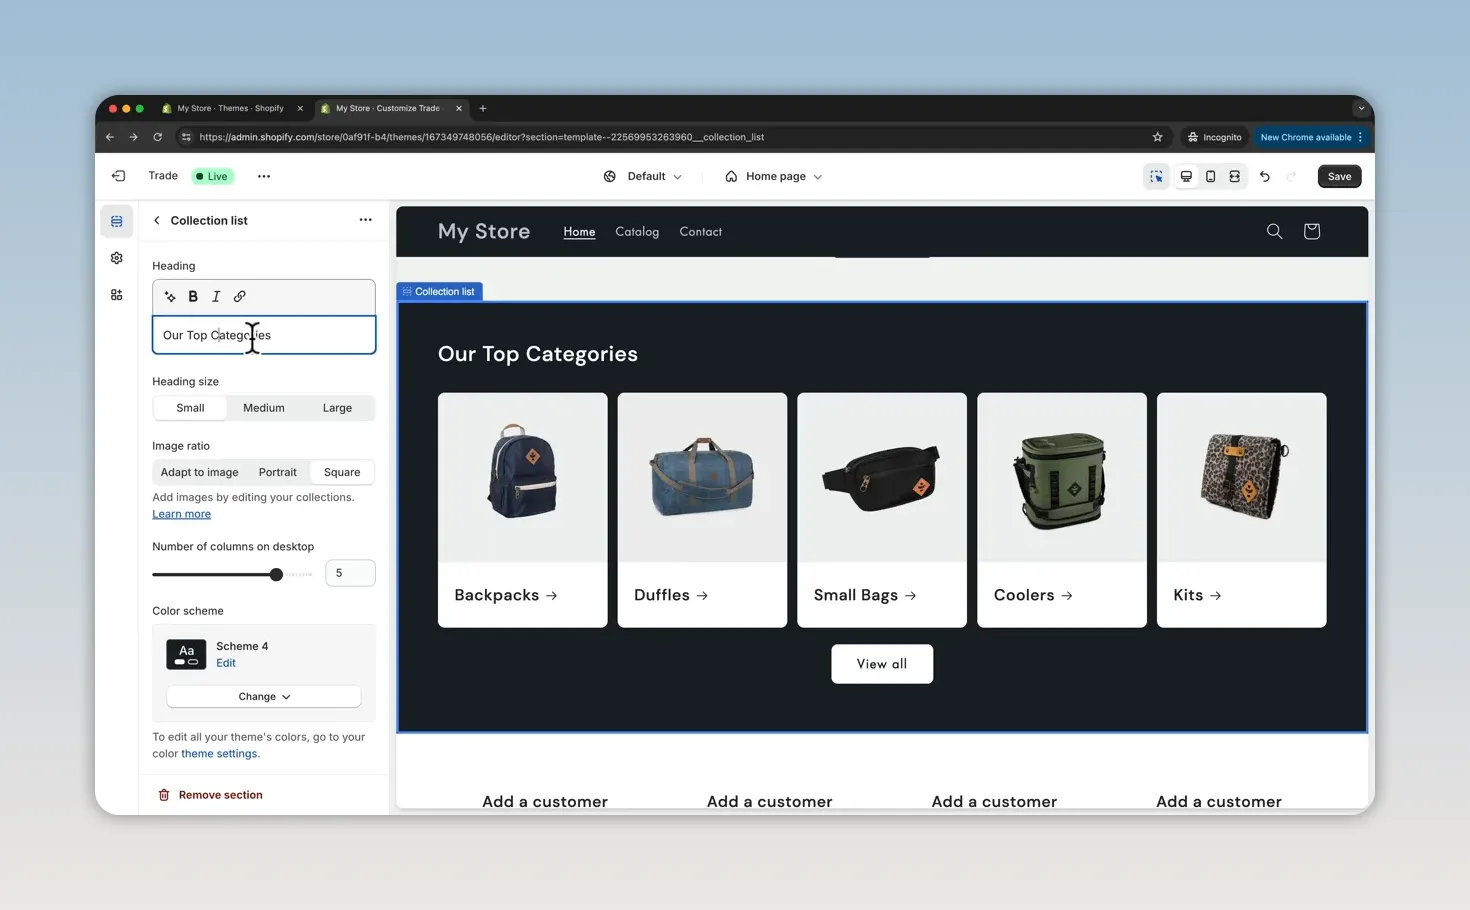
Use the Collection list section to display your main shopping categories. Open each collection block and assign the correct collection.
You can add more collection blocks and drag them into a different order. I prefer keeping this homepage section to one row of five categories, then enabling the View all button so customers can open the full collection list page.
Change the heading to Our Top Categories and save.
Add a lifestyle slideshow
Remove any remaining default sections you don’t want. Then add a Slideshow section to show your products in use.
To create an image-only slideshow:
- Open the first slide.
- Clear its heading, subheading, and button label.
- Disable Show container on desktop.
- Upload the first lifestyle image.
- Duplicate that slide to reuse its settings.
- Replace the image in each duplicate.
- Delete any unused placeholder slide.
The example uses three images. In the storefront preview, the slides change automatically after five seconds, and the navigation arrows also let customers move between them.
Feature a single product
Add a Featured product section when you want one item to have more space on the homepage. Click Select product and choose the product you want to highlight. In the example, I use the Rolltop Limited backpack.
Create a collage
A Collage section lets you combine a lifestyle image, a product, and a related collection in one layout.
Upload the lifestyle image, select the matching product, and choose the collection it belongs to. This connects a product-in-use photograph with a direct shopping option and a broader category.
There are more sections available under Add section, but you don’t need to use them all. Keep the sections that help explain your brand or make it easier to shop.
8. Customize Product and Collection Pages
Edit the default product template
At the top of the theme editor, open Products > Default product.
The title, description, price, and product images come from the product information you entered in the dashboard. The template controls how that information is arranged and what extra sections appear around it.
You can remove or hide blocks you don’t need, such as the default information rows, and add sections in the same way you did on the homepage.
Any content you add to a template appears on every product assigned to that template. For example, a slideshow added to Default product isn’t limited to the product currently shown in the preview.
Create a separate product template when needed
If your backpacks need different supporting content from your duffel bags, create a dedicated template:
- Open the product template dropdown.
- Choose Create template.
- Name it Backpacks.
- Add the sections you want, such as a Multicolumn section explaining three backpack features.
- Save the template.
- Return to Products in the dashboard and open a backpack.
- Change its Theme template from Default product to Backpacks.
- Save the product.
Creating the template and assigning the product are separate steps. If you want to keep things simple, use one general product template that works for your entire catalog.
Review collection templates
There are two different collection-related layouts to check:
- Collection list: Displays your different shopping categories.
- Default collection: Displays the products inside an individual category.
Open each from the template dropdown. You can adjust the existing section settings or add extra sections, such as a banner, wherever they’re useful.
9. Create Your About, FAQ, and Contact Pages
These pages give customers more information about your business and a place to find help. Before building them, it’s useful to prepare a consistent banner layout.
Prepare a reusable page layout
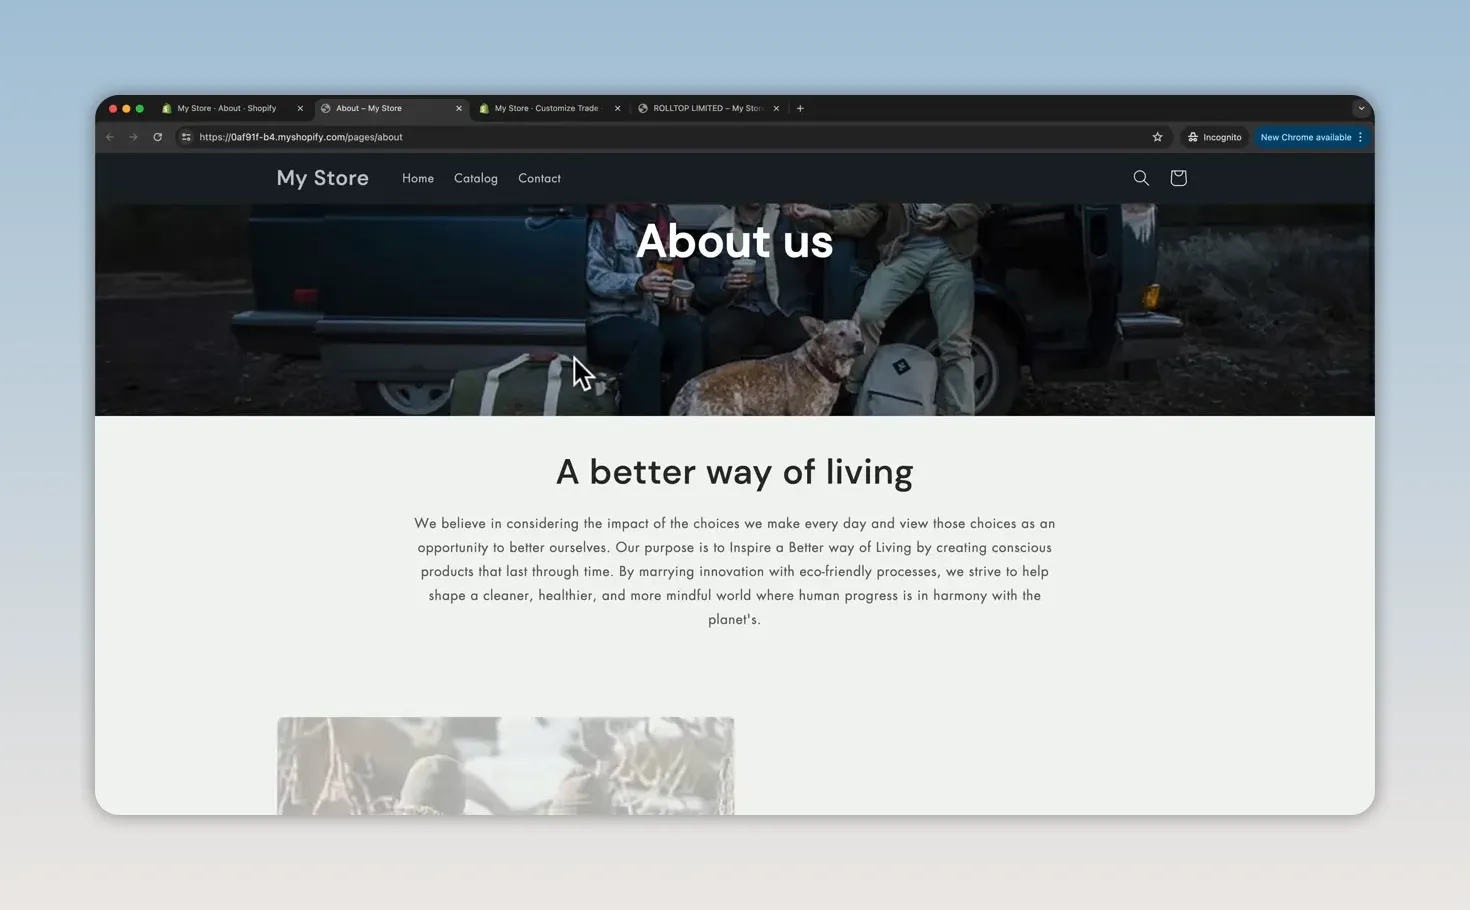
In the theme editor, open Pages > Default page. For this design, I hide the standard page-title section and replace it with a small Image banner.
In that banner, disable the desktop container, remove the text and button blocks, and keep a large heading. Save this as the starting layout for the custom page templates.
One important detail: text and images entered directly into a template are shared by pages using that template. We’ll create separate templates so each page can have its own banner and content.
Build the About page
- Under Pages in the template dropdown, click Create template.
- Name the template About us.
- Change the banner heading to About Us.
- Upload the About banner image.
- Choose a color scheme with readable text over the image.
- Adjust the overlay opacity if the heading needs more contrast.
For the example, I use white heading text and an image overlay of around 30%.
Below the banner, add a Rich text introduction followed by a Multirow section. The multirow layout lets you pair images with text about what you make, why you make it, and the technology behind your products.
Remove captions or buttons you don’t need. You can also add an Email signup section at the bottom if you want that as part of your store design.
You’ve now designed a template, but you haven’t created the page yet. To finish:
- Return to Online Store > Pages in the dashboard.
- Click Add page.
- Enter About as the title.
- Choose About us under Theme template.
- Save and preview the page.
Build the FAQ page
Create a separate FAQ template using the same banner approach. Change the heading to FAQ, upload its background image, and choose a suitable text color scheme.
Below the banner, add a Collapsible content section. This gives you expandable rows for questions and answers.
- Change the section heading to something useful, such as Find your answers here.
- Customize one question row first.
- Remove the default icon if you don’t want it.
- Duplicate the row for the remaining questions.
- Enter a question in each heading field and its answer in the content field.
A shipping-time question is a good example. Make sure the answer reflects your own shipping arrangements.
At the bottom, add a Rich text section for customers who still need help. Give it a short heading and link its button to the Contact page.
Finally, create an actual FAQ page in the dashboard, assign the FAQ template, and save.
Customize the Contact page
In this example, Shopify already provides a Contact template with a contact form and a Contact page assigned to it.
Open the Contact template and give it the same banner style as the other pages:
- Upload the contact banner image.
- Set the banner height to Small.
- Increase the overlay opacity if needed. The example uses about 50%.
- Add a large, bold Contact heading.
- Set desktop content position to Middle center and text alignment to Center.
- Choose a color scheme that makes the heading readable.
Save, then confirm in the Pages area that the Contact page uses the Contact template.
10. Build Your Main Navigation Menu
Creating a page doesn’t automatically add it to your main menu. To customize navigation, open the menus area in your Shopify dashboard. In the demonstrated interface, this is Online Store > Navigation.
Open Main menu. Remove any default links you don’t want, then add links to About, FAQ, and Contact.
Add a Shop dropdown
- Click Add menu item.
- Choose Products > All products as the destination.
- Change the label to Shop.
- Add your collection links.
- Drag each collection link underneath Shop and slightly to the right to make it a submenu item.
- Save the menu.
Preview the store to check how the dropdown looks.
Organize a larger menu into columns
For this example, I take the menu one step further and organize it into three groups beneath Shop:
- Categories: Main product categories, such as Backpacks and Accessories.
- Discover: Special collections, including New Arrivals and Best Sellers.
- Featured: Links to individual featured products.
To create this structure, add Categories beneath Shop, then nest the collection links beneath Categories. Repeat that process for Discover and Featured.
This creates three navigation levels: Shop, a group label, and the individual links. In the Trade layout used here, those groups display as separate columns.
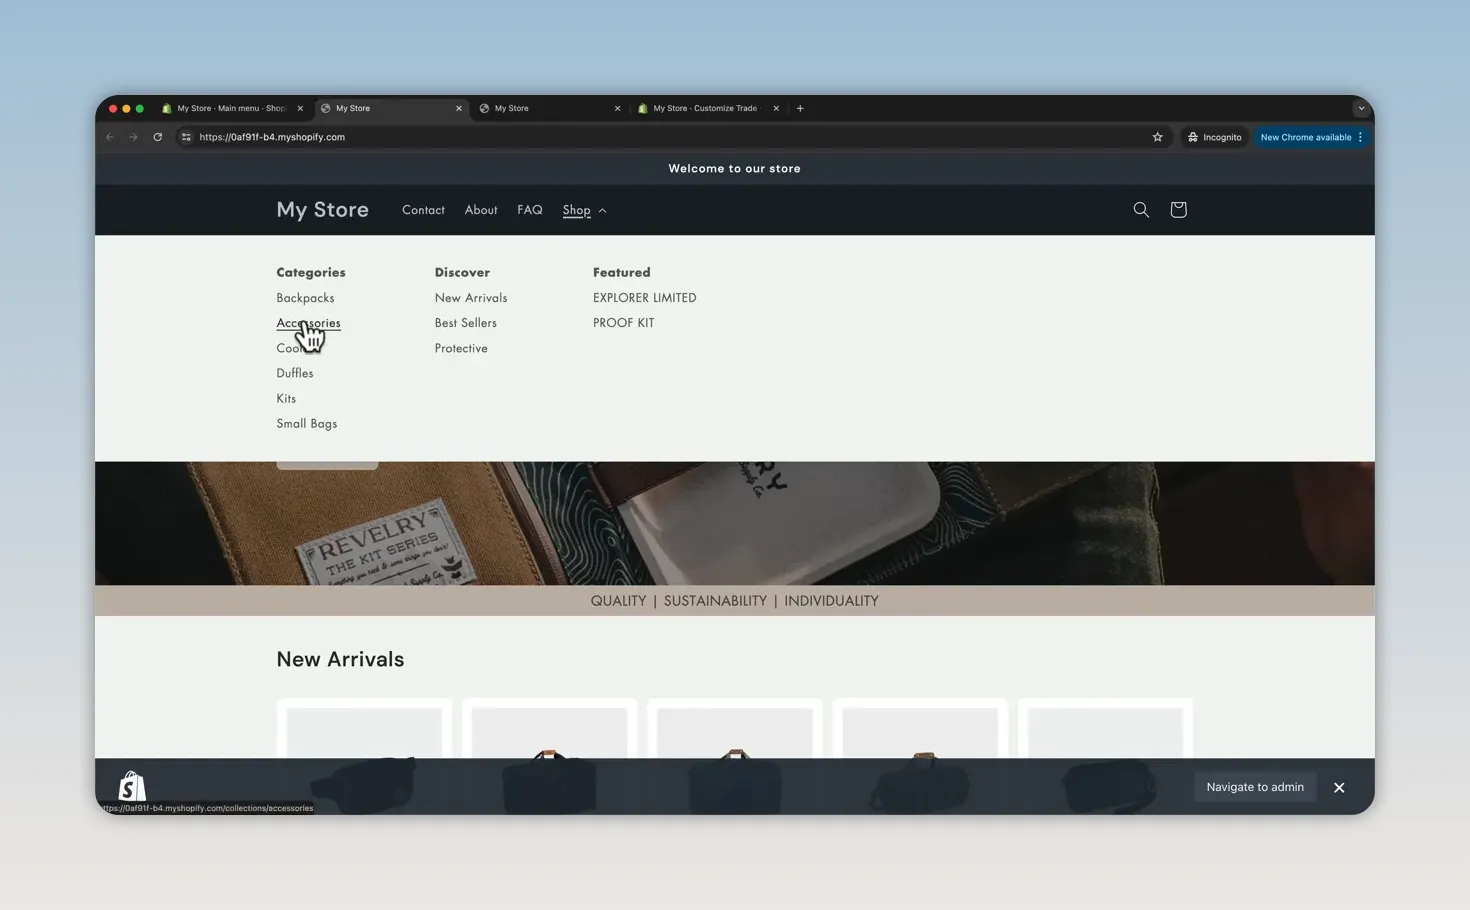
Finally, reorder the main links. My example uses Shop, About, FAQ, Contact.
11. Customize the Header, Logo, and Favicon
Set your announcement bar
The announcement bar is a good place for a short message, such as a discount or free-shipping threshold. You can also remove it entirely.
For this store, the message is free shipping on orders of $50 or more. Later, we’ll configure a shipping rate with that same threshold.
Adjust the header layout
Select Header in the theme editor. I change the desktop logo position from Middle left to Middle center, placing the logo in the middle and the navigation to the left.
Upload your logo and site icon
Go to Theme settings > Logo and upload a version of your logo that contrasts with the header background. In this design, the header is dark, so I use a white logo and set its width to 100 pixels.
Upload a favicon in the same area. This is the small icon that appears in the browser tab. A square version of your brand mark works well for the example.
The checkout has its own branding settings. Open Checkout and new customer accounts from the editor dropdown and upload the logo there too. Because the checkout background is light, I use the dark version of the logo.
12. Create Policies and Finish the Footer
Add your store policies
Go to Settings > Policies. The example includes:
- Return and refund policy.
- Privacy policy.
- Terms of service.
- Shipping policy.
- Contact information.
Where Shopify provides a template, use it as a starting point. Read the entire policy, replace placeholders, and make sure it applies to your business. Generating text isn’t the same as finishing your policy.
For the example shipping policy, I use a separately prepared draft because no shipping-policy template is available in that setup. Review any draft just as carefully before publishing. Shopify’s store policy guidance provides additional context on managing these pages.
Put policy links in the footer menu
After saving your policies, the theme may display them automatically at the bottom of the footer. I prefer placing them in the footer menu instead.
- In the footer settings, disable Show policy links to remove the separate automatic list.
- Return to the dashboard and open Footer menu.
- Remove the default Search link if you don’t need it.
- Add menu items and select each policy as its destination.
- Save the menu and theme changes.
You can also remove the footer menu heading if you prefer a cleaner layout.
Add social links and payment icons
Open Theme settings > Social media and paste the direct URLs for your brand’s social profiles. The relevant icons appear once links are added.
The footer also has a Show payment icons option. I like leaving these visible so customers can see the available payment options.
Update the store name and remove the Shopify credit
To replace My Store with your brand name, open Settings > Store details, edit the store profile, enter your store name, and save.
To remove the Powered by Shopify text:
- Go to Online Store > Themes.
- Open the three-dot menu beside the active theme.
- Choose Edit default theme content.
- Search for powered.
- Replace the Powered by Shopify field content with a single space.
- Save and refresh your storefront preview.
13. Set Your Brand Colors and Fonts
Customize color schemes
Trade uses color schemes that you can apply to individual sections. Each scheme contains coordinated settings for backgrounds, text, buttons, and other elements.
To change a section’s appearance, select it and choose a different Color scheme. To edit the colors inside a scheme, go to Theme settings > Colors and open that scheme.
Editing a scheme updates every area using it. That’s useful for making consistent changes, but remember to check the other schemes too. If you change the button color in one scheme and leave a different button color in another, the store may look inconsistent.
Checkout colors need a separate adjustment. Open the checkout editor and update its button and accent colors to match your branding. In the example, I use the thank-you page preview to see the button color clearly.
Choose heading and body fonts
Go to Theme settings > Typography. You can choose separate fonts for headings and body text.
- Click Change beside the font you want to edit.
- Select a font to preview it across the store.
- Click Select to apply it.
- Adjust the font scale if you want larger or smaller text.
There are additional theme settings for layouts, animations, and button styles. Personally, I leave many of those at their defaults because they already work well together. Change the settings that help your brand rather than changing everything just because you can.
14. Review Every Page on Mobile
Before launching, switch the editor to the mobile preview and go through every page. A responsive theme gives you a good starting point, but it’s still worth checking the actual result.
Look at the homepage, product pages, collection pages, About page, FAQ page, and Contact page. Check how your images, headings, and sections fit on the smaller screen.
Some sections have separate mobile settings. For example, the Collection list section lets you choose between one and two columns. I prefer two columns for this example because the category list becomes more compact.
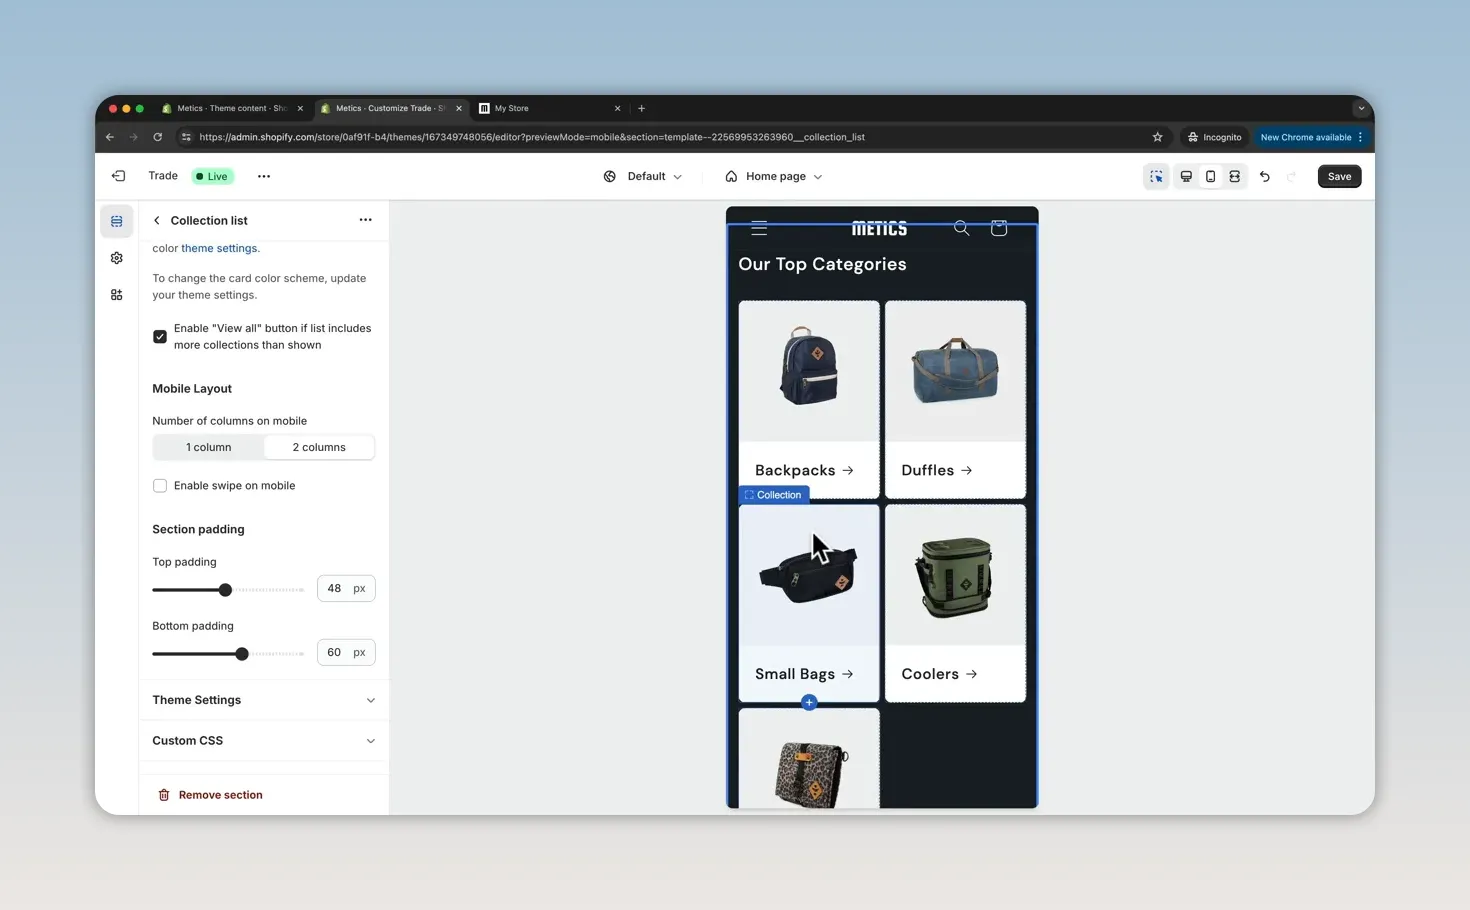
Save once you’re happy with the desktop and mobile layouts.
15. Check Store Details and Connect Payments
The design is now in place. Next, open Settings in the dashboard and check the information that makes the store functional.
Start with Store details. Confirm that your business information, store currency, and measurement units are correct.
Set up Shopify Payments
Under Settings > Payments, complete the Shopify Payments setup if it’s available for your business.
Enter the requested business information and bank account details so you can receive payouts. Shopify Payments supports card payments and eligible options such as Apple Pay and Google Pay. Availability depends on your setup and location, so refer to the Shopify Payments documentation for the applicable requirements.
Review PayPal
Also review the PayPal section. In the example setup, PayPal appears by default, but you should complete the setup and connect the account you want to use.
If you don’t want to accept PayPal, deactivate it. Don’t leave the payment settings unchecked just because a payment option appears in the dashboard.
16. Configure Shipping Zones and Rates
Go to Settings > Shipping and delivery and open the general shipping profile.
A shipping zone groups destinations. A shipping rate determines what customers in that zone pay. One zone can contain multiple rates.
For this example, I remove the default zones and create a simple setup manually.
Create a United States shipping zone
- Click Create zone.
- Name the zone United States.
- Select the United States as the destination.
- Click Done.
- Click Add rate.
- Name it Standard shipping.
- Set the price to $7 USD.
Add free shipping for orders of $50 or more
Add a second rate in the same zone:
- Name it Free shipping.
- Set the shipping charge to zero.
- Open Conditional pricing.
- Choose a condition based on order price.
- Set the minimum order price to $50 USD.
- Confirm the rate.
This makes the free-shipping rate available when the order reaches $50. It also matches the offer in the announcement bar.
Add an international zone
If you’re selling outside the United States, create another zone containing the other destinations you intend to serve.
The example calls this zone International and adds an International shipping rate of $15.
These are example charges, not recommended rates for every business. Shopify also has other shipping options, including weight-based conditions. For this beginner setup, fixed rates and an order-value threshold keep things straightforward.
Save your shipping changes before leaving the settings.
17. Connect a Custom Domain
Your store initially has a myshopify.com address. To use your own branded web address, open Settings > Domains.
You have two options:
- Buy new domain: Search for an available domain and purchase it through Shopify.
- Connect existing domain: Connect a domain you already own.
If you buy through Shopify, search for the name you want, review its availability and purchase details, enter the required information, and confirm the purchase. The domain is then connected to your store through that setup process.
A branded domain is one of the final pieces that makes the store feel like your own business rather than an unfinished Shopify setup.
18. Remove Password Protection and Launch
Before opening the store to customers, make one final pass through the essentials:
- Your products have the correct descriptions, images, prices, variants, and inventory.
- Collections contain the intended products.
- Navigation links lead to the correct pages.
- About, FAQ, Contact, and policy pages are ready.
- Your logo, colors, and fonts are consistent, including at checkout.
- The mobile layouts look good.
- Payment setup is complete.
- Shipping zones and rates match the destinations and offers you intend to use.
- Your branded domain is connected.
When you’re ready, go to Online Store and click Remove password to turn off storefront password protection.
Your Shopify website is now live. You have a complete storefront with products, collections, supporting pages, branded navigation, payment options, and shipping rates, all built around a free theme.
Made with VideoToBlog using Shopify Tutorial for Beginners in 2026 - Complete Guide


