Sending money internationally with Wise comes down to a few straightforward steps: create your account, choose your currencies, enter the recipient’s details, and pay for the transfer. The part worth paying extra attention to is the payment method, because that can make a noticeable difference to the fees.
I’ll walk you through the full process using an example of sending €1,000 and having the recipient receive British pounds. We’ll compare the transfer options, check the exchange rate, complete identity verification, and cover the important final step of sending the money from your bank to Wise.
Wise was previously called TransferWise, so if you recognize the older name, it’s the same service. The exact screens, fees, payment methods, and delivery estimates can vary with your country and currencies. Always use the details shown in your own account.
What You'll Learn
- Create a Wise account and complete the identity checks required for your transfer.
- Compare payment fees and arrival estimates before choosing how to fund your transfer.
- Pay manual transfers separately through your bank using Wise’s exact details and reference.
- Track your transfer from the dashboard and share its progress with the recipient.
Table of Contents
- Before You Start
- 1. Create Your Wise Account
- 2. Choose Your Sending and Receiving Currencies
- 3. Compare Transfer Types to Keep Fees Low
- 4. Review the Fees and Exchange Rate
- 5. Enter Your Details and the Recipient’s Bank Information
- 6. Complete Identity Verification
- 7. Check the Summary and Confirm Your Payment Method
- 8. Send the Money From Your Bank to Wise
- 9. Track Your Wise Money Transfer
Before You Start
Have an identity document ready. Wise is a regulated financial company, so it asks for personal information and verifies your identity before handling your transfer.
Depending on the verification instructions you receive, this may involve a passport, national ID card, or driver’s license. You’ll also need access to your phone to verify your number and complete the identity checks.
For this walkthrough, it also helps to have:
- The currency and amount you want to send.
- The currency the recipient should receive.
- The recipient’s name and bank details, if you know them.
- Access to your online banking if you plan to use a manual bank transfer.
If you’re new to Wise, my referral offer may reduce the fees on your first transfer. The signup page used in this example offered a fee-free transfer up to 600 CHF, with the benefit also applying to other currencies. Check the current offer and eligibility on the signup page rather than assuming that exact amount still applies. This is a referral link, and I may receive a benefit if you use it.
1. Create Your Wise Account
Start by entering your email address on the signup page. If you’re using the referral page, select Claim your fee-free transfer, then follow the account setup prompts.
- Choose an account type. Select Personal account for personal use or Business account if you’ll use Wise for your business.
- Select your country of residence. Choose the country where you live. In my example, that’s Switzerland.
- Verify your phone number. Enter your number, request a verification code, and submit the code you receive.
- Create a password. Enter your password and continue to finish creating the account.
Wise may then ask what you’d like to do first, such as send money, order a card, or open a currency account. You can choose Decide later to go directly to the dashboard.
A quick look at the dashboard
The dashboard gives you an overview of your accounts and transactions. You can open accounts in different currencies, which can be useful for spending abroad, and the Cards section lets you explore ordering a Wise debit card where available.
You don’t need to go through those features for this transfer. To get started, click Send money near the top left.
2. Choose Your Sending and Receiving Currencies
The first transfer screen is where you tell Wise how much you’re sending and which currency the recipient should receive.
There are two options:
- Same currency: Use this when the money is sent and received in the same currency, such as euros to euros.
- International: Use this when you want to convert between currencies, such as euros to British pounds.
For our example, select International, enter 1,000 EUR as the sending amount, and choose GBP as the receiving currency.
Wise will show a breakdown of the fees, the amount it will convert, the exchange rate, and the amount the recipient should receive. Before continuing, compare the available transfer types.
3. Compare Transfer Types to Keep Fees Low
Open the transfer-type dropdown to see your options. In this example, Wise offers Fast, Low-cost, and Easy transfers.
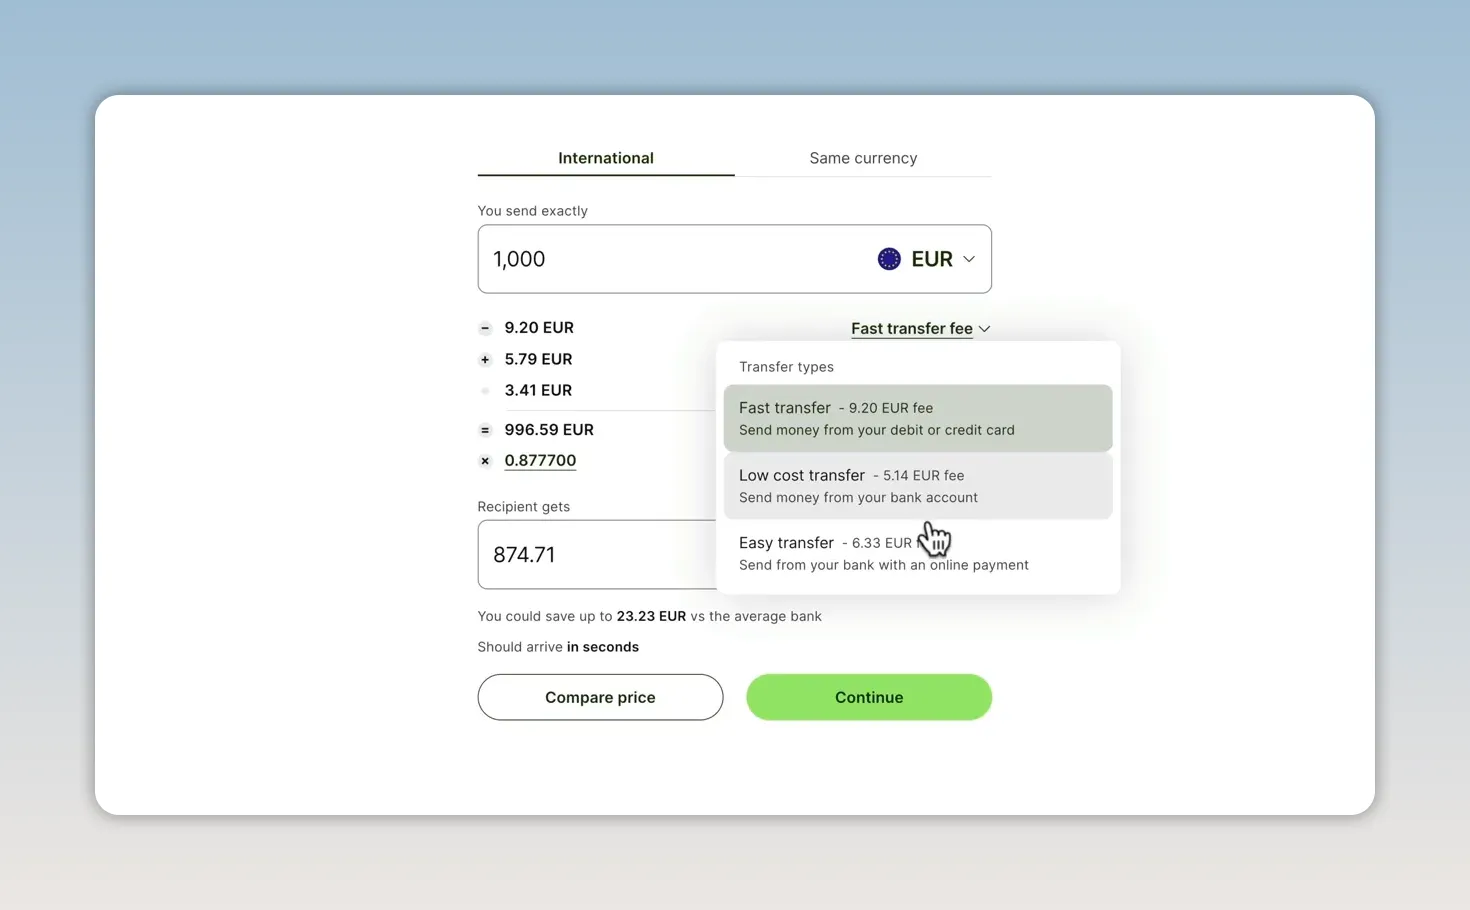
Fast transfer
A fast transfer lets you pay with a debit or credit card. Paying by card can make the funding process quicker, but it comes with higher fees in this example.
If speed matters, compare both the price and the actual estimated arrival date. A payment method labeled fast isn’t automatically worth the extra cost for every transfer.
Low-cost transfer
With a low-cost transfer, you manually send the money from your bank account to the bank details Wise provides.
For the euro-to-pound example, you send euros to Wise’s euro account. Once Wise receives the money, it pays British pounds to the recipient’s bank account. This option avoids the debit or credit card fees associated with card funding.
Personally, I usually choose the low-cost option when I’m not in a hurry. It’s the cheapest method in this walkthrough.
Easy transfer
The easy-transfer option lets you pay from your bank through an online payment process. It has a higher fee than the manual bank transfer in this example, so compare the convenience with the additional cost.
Other options depend on your currencies
Changing the currencies can change the available transfer types. You may see an advanced-transfer option for situations involving a pound-denominated bank account outside the United Kingdom, for example.
Choose the option that matches your actual bank account and transfer route. If the low-cost option is available and suitable, compare it first.
4. Review the Fees and Exchange Rate
Before moving on, make sure you understand the quote. The sending amount and the amount converted aren’t necessarily the same, because Wise deducts the transfer fee from the amount you’re sending in this example.
With a €1,000 sending amount and a €3.41 fee, the amount converted is €996.59. Wise then applies the displayed exchange rate to calculate the recipient’s payout in pounds.
These figures are an illustration, not a current quote. Your fees and exchange rate will depend on the details shown when you set up your own transfer.
Check each part of the breakdown:
- Any discount: An eligible referral discount should appear in the quote.
- Total fees: Check the final fee after any discount.
- Amount converted: This is the amount remaining after the fee deduction.
- Exchange rate: This determines the conversion into the recipient’s currency.
- Recipient gets: Confirm the final receiving amount.
You can click the exchange rate to see a chart of how it has changed over time.
Also check how long the rate is guaranteed. That window varies by currency and transfer. It might be several hours or much longer. Later, Wise will show when it needs to receive your payment to preserve the quoted rate.
Once the quote looks right, click Continue.
5. Enter Your Details and the Recipient’s Bank Information
Wise may ask whether this is a personal or business transfer. Choose the option that matches the transaction, then enter the personal details requested, such as your legal name, date of birth, and address.
Next, choose who you’re sending money to. The options shown include yourself, someone else, or a business or charity. For this example, select Someone else.
If you know the recipient’s bank details
Enter the recipient’s email address so they can receive information about the transfer. Keep I know their bank details selected, then complete the required bank fields.
The available fields depend on the receiving currency. For British pounds, the example provides a choice between:
- Local bank account: For the relevant UK bank details.
- IBAN: For entering an International Bank Account Number.
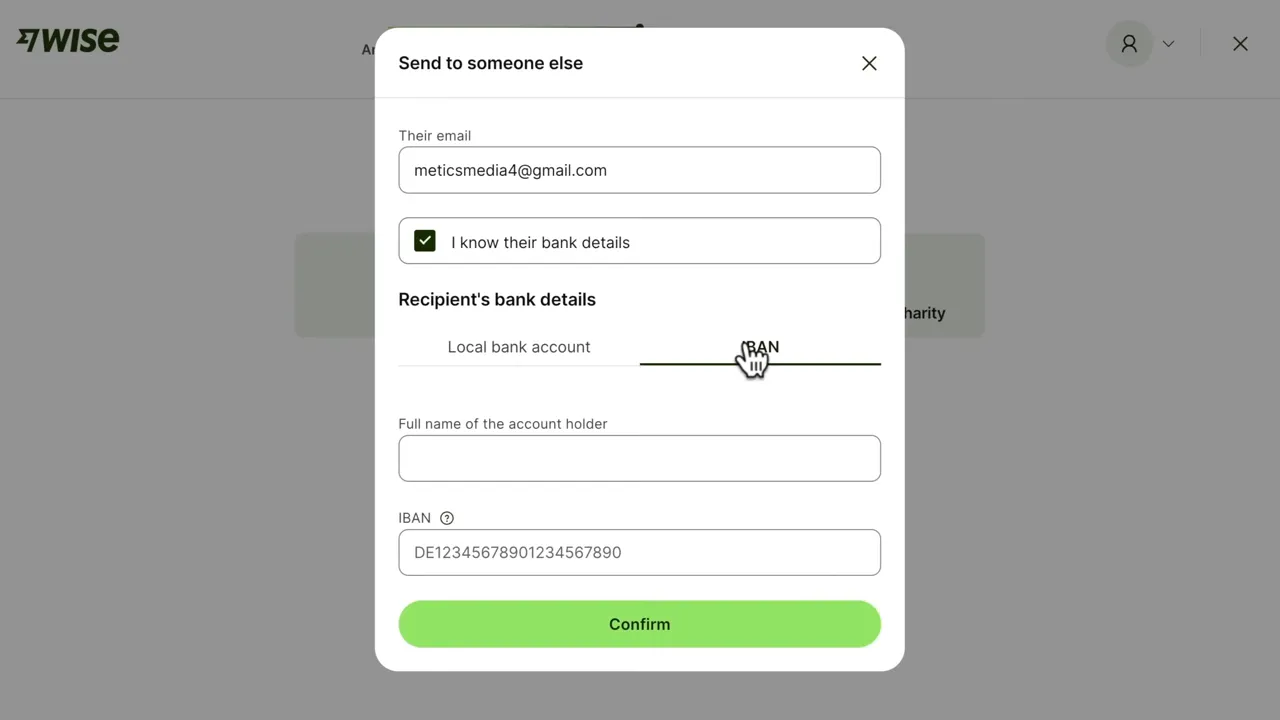
Select the appropriate option, enter the account holder’s name and bank details, and click Confirm. Check the information carefully before submitting it.
If you don’t know the recipient’s bank details
In the example flow, you can untick I know their bank details. Wise can then email the recipient and ask them to provide their bank information.
This gives you another way to set up the transfer without entering bank details on their behalf.
6. Complete Identity Verification
Wise will prompt you to verify your identity. The desktop flow provides two ways to continue on your phone:
- Get a link by email: Open the email link on your phone and follow the instructions.
- Scan a QR code: Use your phone’s camera to open the verification process.
Follow the prompts to capture your identity document and a photo of yourself. The purpose is to check that the document belongs to you. For questions about the documents requested in your situation, use the Wise Help Centre.
After verification, choose the reason for your transfer and submit it. Select the reason that accurately describes your payment. In this example, I use Other.
7. Check the Summary and Confirm Your Payment Method
Before confirming, review the transfer summary. Check the sending amount, fees, currencies, recipient details, and final receiving amount. If everything is correct, select Confirm and continue.
Wise then shows the available payment methods again. For this example, I keep Manually transfer the money from your bank selected because it has the lowest fee.
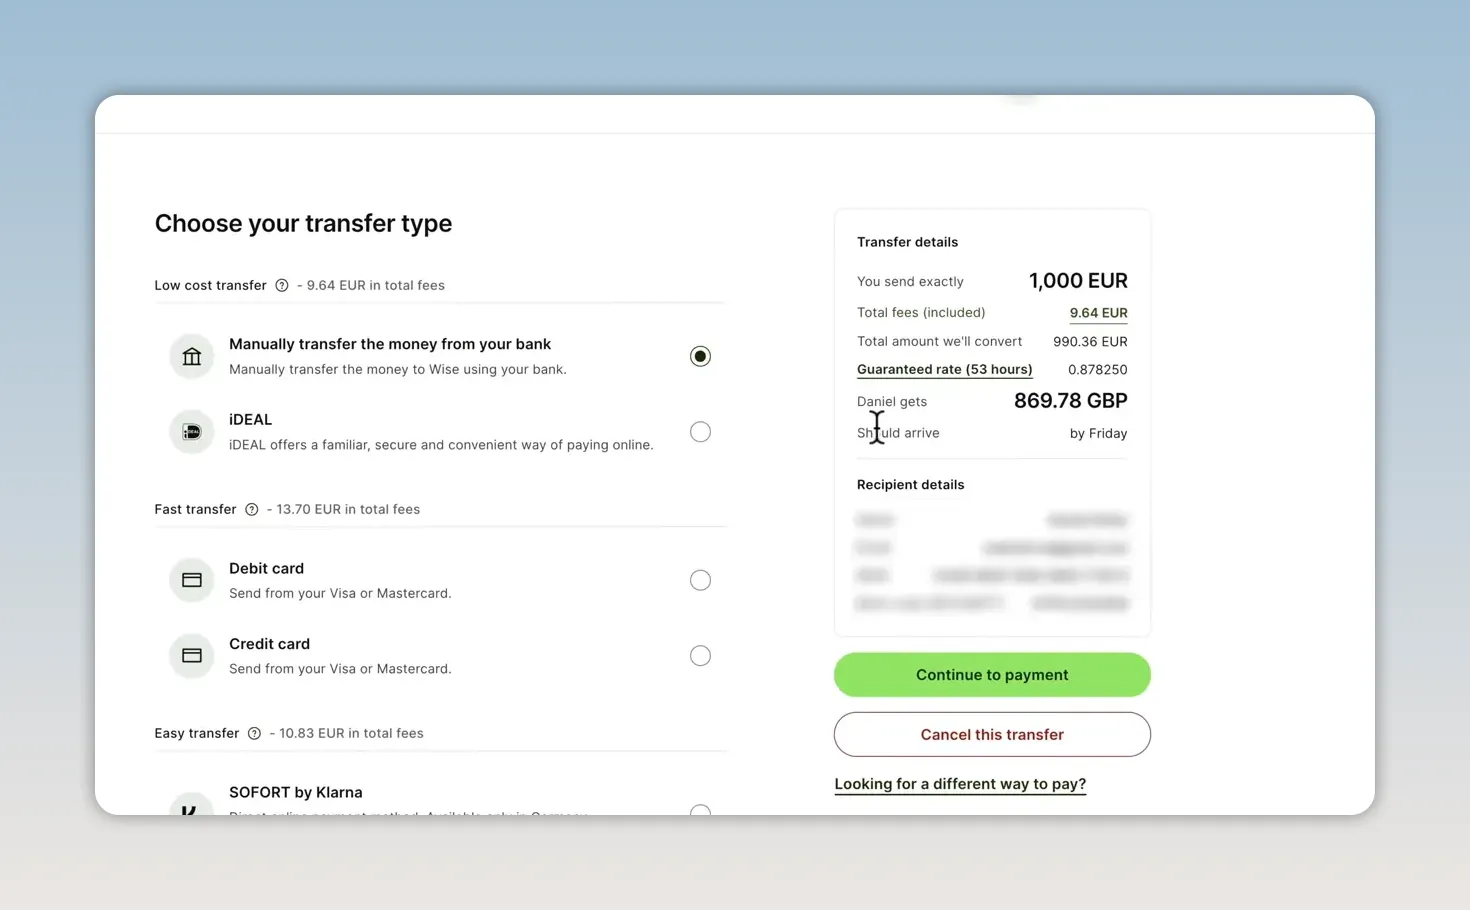
Pay attention to the Should arrive estimate. In this walkthrough, the transfer is being set up on a Wednesday and is expected to arrive by Friday. Other transfers may arrive the same day, depending on the details.
If you need the money to arrive sooner, select a card option and check whether the estimate changes. In my example, paying the higher card fee does not improve the arrival date, so I switch back to the manual bank transfer.
Once you’ve chosen a method, click Continue to payment.
8. Send the Money From Your Bank to Wise
This is the most important step to understand: setting up a manual bank transfer in Wise does not move money out of your bank account.
Wise displays a notice explaining that it won’t take the money automatically. You need to make a separate payment through your bank.
- Acknowledge the notice by clicking I understand.
- Answer the question about the account you’re paying from. In this example, I select Yes, I’m the account holder.
- Choose how you’ll make the payment: online banking, telephone banking, or a bank branch.
- For online banking, select that option and continue to Wise’s bank details.
Wise will now show the receiving bank details for your payment. Because we’re sending euros, the example provides euro bank account details.
Open your bank’s online banking separately and create the payment using the details shown in your own Wise transfer. Copy the required information accurately, including:
- The payee name.
- The amount and currency.
- The IBAN or other bank account details.
- The payment reference.
- Any additional bank information requested.
Don’t leave out the payment reference. Use the reference Wise gives you so it can identify your payment.
Check the payment deadline as well. Wise needs to receive the money within the stated window for the displayed exchange-rate guarantee to apply.
After making the payment through your bank, return to Wise and select I’ve made my bank transfer. If you haven’t paid yet, choose I’ll transfer my money later. There is also an option to cancel if you decide not to proceed.
Clicking the confirmation button only tells Wise that you’ve paid. It does not replace the payment you need to make through your bank.
9. Track Your Wise Money Transfer
Return to the dashboard and find the transfer under Transactions. Open it to see its progress and estimated timeline.
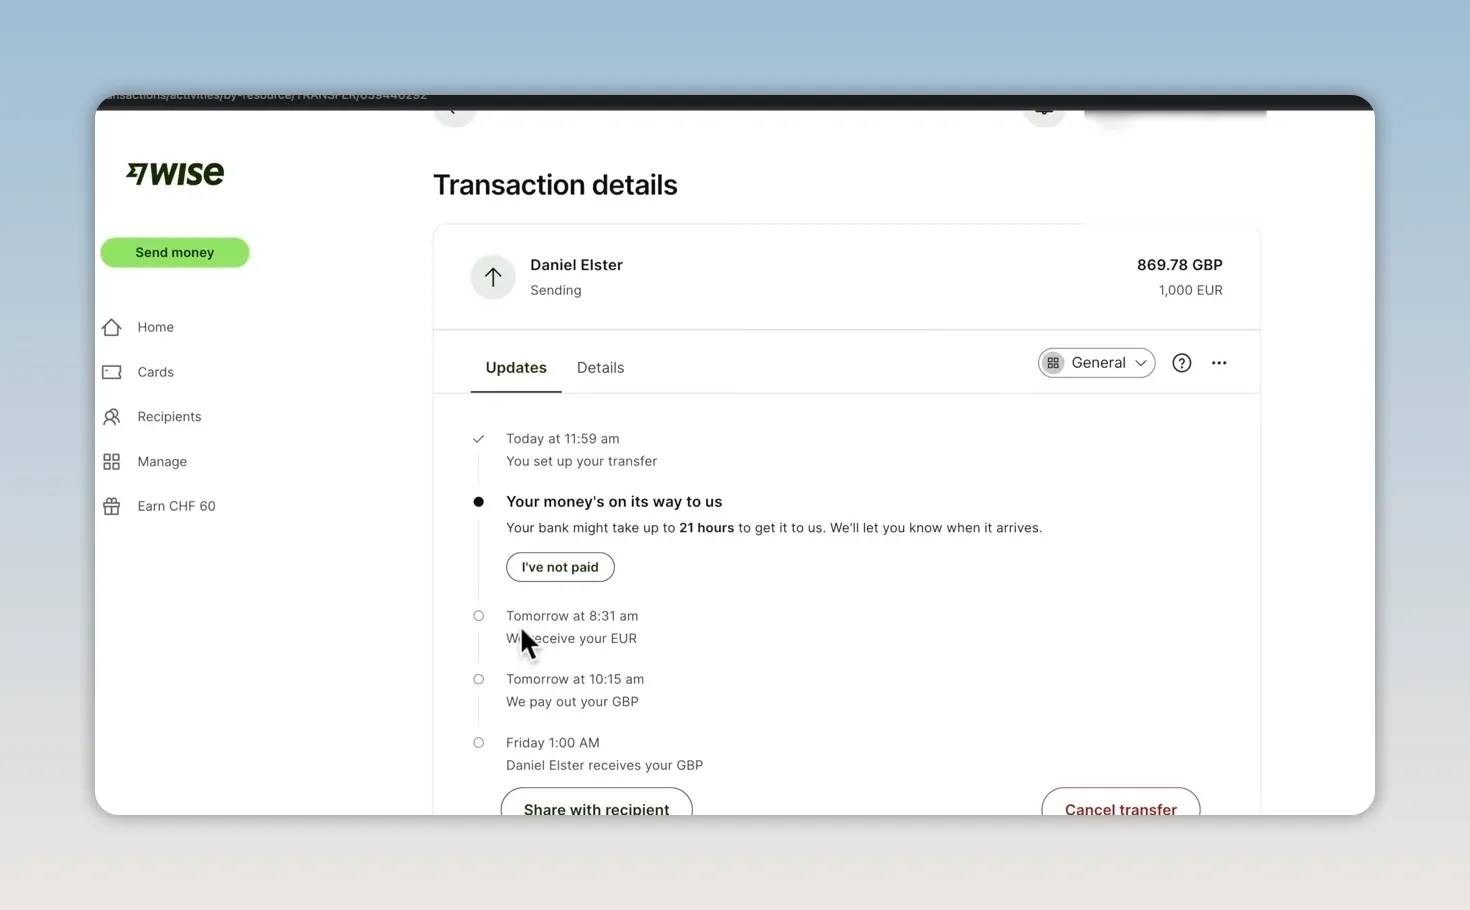
The transfer details show the stages of the payment:
- When you set up the transfer.
- Whether your money is on its way to Wise.
- When Wise expects to receive it.
- When Wise intends to pay out the receiving currency.
- When the money is expected to reach the recipient’s bank.
You can also use Share with recipient to copy a tracking link or share the information by email. If you need to stop the payment, check whether Cancel transfer is still available in the transaction details.
The main things to get right are the payment method, recipient information, and bank payment instructions. Compare the fee against the actual arrival estimate, use the exact bank details and reference Wise provides, and remember to complete the separate bank payment when choosing a manual transfer.
Made with VideoToBlog using WISE Money Transfer Tutorial - How To Use Wise


