You don’t need to know how to code to create a professional WordPress website. With a free theme, a few free plugins, and a visual page builder, you can start with a finished design and customize it to fit your business, portfolio, or personal brand.
The setup we’ll use is straightforward: WordPress for managing the website, Astra for the theme, Starter Templates for the design, and Elementor for drag-and-drop editing. You’ll need hosting and a domain, but you won’t need to buy a premium theme or page builder to follow these steps.
We’ll build a portfolio website as an example. The same process also works for many other types of websites, including service businesses and restaurants.
What You'll Learn
- Use self-hosted WordPress to build with the free themes and plugins covered in this tutorial.
- Set up hosting, register a domain, and install WordPress before importing your website design.
- Customize an Astra starter website with Elementor’s visual editor without writing code.
- Add pages, reuse template blocks, and edit navigation, headers, and footers with the appropriate tools.
Table of Contents
- WordPress.com vs. WordPress.org: Choose the Right Starting Point
- The Five-Step WordPress Website Setup
- Step 1: Set Up Your WordPress Hosting
- Step 2: Register Your Domain Name
- Step 3: Install WordPress
- Step 4: Install Astra and Starter Templates
- Step 5: Choose Elementor and Import a Website Template
- Customize Your Pages With Elementor
- Add a New Page and Reuse Template Blocks
- Add the New Page to Your Navigation Menu
- Customize the Header and Footer
- Your WordPress Website Is Ready to Make Your Own
WordPress.com vs. WordPress.org: Choose the Right Starting Point
Before you buy anything, it’s important to understand the difference between WordPress.com and WordPress.org. They sound almost identical, but they lead to different website-building experiences.
WordPress.org is the free software
WordPress.org is where you can get the free, open-source WordPress software. You install that software on a hosting account and use it to build and manage your website.
This is what people usually mean when they talk about a self-hosted WordPress website. You choose your hosting provider, install WordPress, and then add themes and plugins to create the website you want.
You don’t have to download and install the software manually for this tutorial. Our hosting provider will handle the installation.
WordPress.com is a hosted service
WordPress.com offers hosting and website-building plans built around WordPress. It has a free option and several paid plans, but the features available depend on the plan you choose.
The important thing to check is whether a plan gives you the theme and plugin access you need. Don’t assume that every WordPress.com plan provides the same flexibility as installing WordPress on your own hosting account.
For this setup, I recommend self-hosted WordPress. It gives us the flexibility to use the free tools covered here without choosing a hosted website-builder plan to unlock them.
What hosting actually does
Hosting means renting space on a server where your website’s files are stored. That server stays connected to the internet so people can access your website at any time.
Your domain is the address people enter to reach the site. Hosting is where the site lives, and WordPress is the software you use to manage it.
The Five-Step WordPress Website Setup
Here’s the order we’ll follow:
- Set up hosting for your website files.
- Register a domain for your website address.
- Install WordPress on your hosting account.
- Install a theme and plugins, then import a website template.
- Customize your website, including pages, navigation, header, and footer.
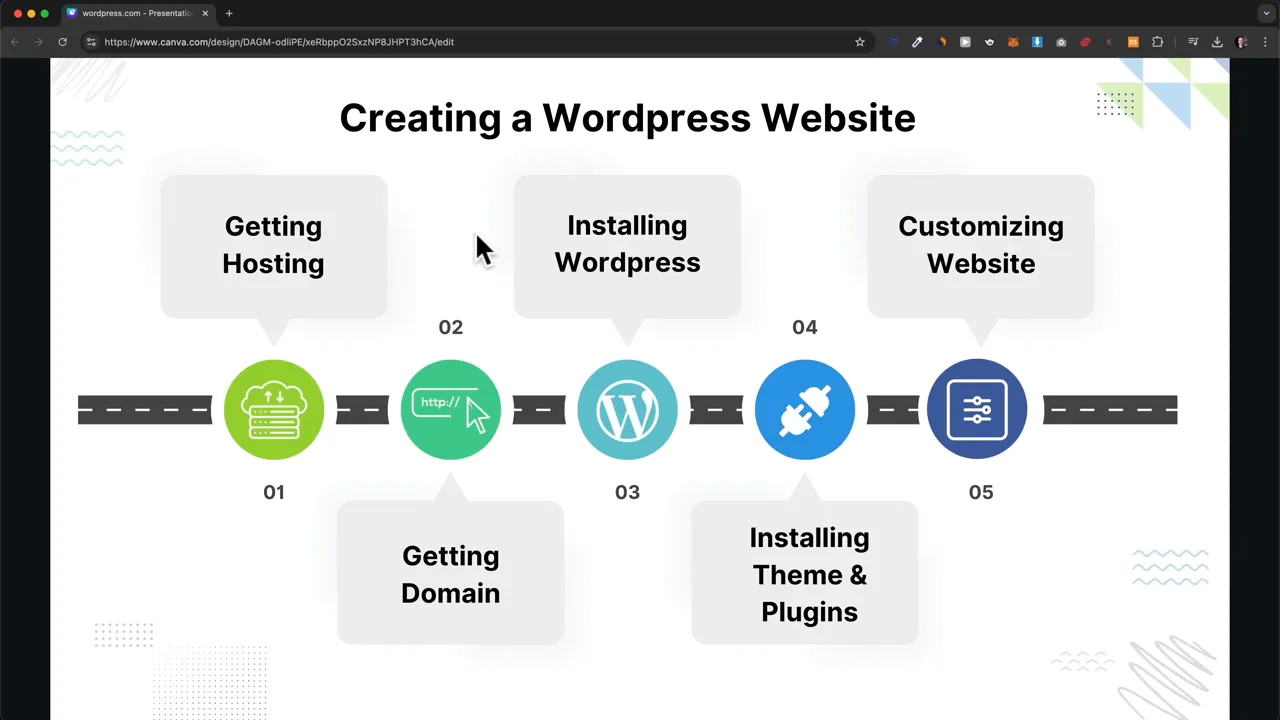
Following this order keeps things simple. First we get the website running, then we work on its design and content.
Step 1: Set Up Your WordPress Hosting
I use Hostinger for this walkthrough. I previously used Bluehost, but switched to Hostinger because I found it more affordable and easier to use.
I’ve also partnered with Hostinger to offer a hosting discount. The partner link is an affiliate link, which means I may earn a commission if you purchase through it, at no additional cost to you.
Choose Premium or Business
The two plans I recommend considering for this setup are Premium and Business.
- Premium: A lower-cost option if you want to keep your initial spending down.
- Business: The option I choose for this example, with more storage, greater traffic capacity, and a CDN feature.
A CDN, or content delivery network, helps deliver website files from locations around the world. This can improve loading speed for people who are far from your main hosting server.
If your budget allows and performance is a priority, I’d choose Business. If you want the more affordable starting point, Premium will work for the website-building process covered here.
Compare the payment periods carefully
Next, choose how many months of hosting to pay for upfront. The checkout offers different terms, including longer commitments such as 48 months.
Check both the introductory price and the renewal price. A low monthly equivalent can require a larger upfront payment, and the price may increase when the initial term ends.
As an illustration, the Business checkout used for this setup offered a 48-month term at $3.99 per month, renewing at $8.99 per month. Hosting offers change, so use the prices and terms displayed in your own checkout rather than treating those figures as a current quote.
The offer also included a 30-day money-back guarantee. Review the current refund terms before purchasing.
Create and verify your account
- Create a Hostinger account with your email address and a password, or use the available Google sign-in option.
- Before paying, open the coupon-code field.
- Enter METICSMEDIA and apply it. The promotion demonstrated provided an additional 10% discount; confirm the discount shown in your order.
- Select your payment method, enter your details, and complete the purchase.
- Open your email inbox and verify your Hostinger email address.
After payment, Hostinger may open an onboarding questionnaire. For this route, you can skip the optional questions and go to the hosting dashboard by clicking the Hostinger logo and confirming that you want to leave onboarding.
Once your account email is verified, you’re ready to register your domain.
Step 2: Register Your Domain Name
In the Hostinger dashboard, go to Home and look for Claim domain. This is the route used to register the domain included with the selected hosting offer.
I generally recommend choosing a .com address when a suitable one is available. It’s familiar and easy for people to recognize.
For the name itself, keep it:
- Short and simple.
- Easy to remember.
- Relevant to your personal name, business, or organization.
- Free of unnecessary numbers.
A personal website can use your name, while a company website can use the business name. I use a numbered domain for the demonstration because my main domain is already registered, but I wouldn’t choose that approach for a real business website unless the numbers were part of the brand.
Complete the registration
- Enter your preferred name and select the domain extension.
- Click Check availability.
- If it’s available, click Claim domain.
- Choose whether you’re registering as an individual or a company or organization.
- Enter the required contact information and finish the registration.
If you’re offered another hosting plan afterward, skip it. You’ve already purchased hosting.
There’s one more verification step: open the domain contact-verification email and follow its confirmation link. This is separate from verifying your Hostinger account email.
Return to the dashboard and refresh the page. Your new domain should now appear as active.
Step 3: Install WordPress
Go back to Home in Hostinger, find your hosting plan, and click Set up.
- Skip any optional introductory questions.
- Choose I’ll create a website.
- Select WordPress, not the Hostinger Website Builder.
- Enter the email address and password you want to use for your WordPress administrator account.
- Choose Create blank site.
- Select the domain you registered earlier.
Your Hostinger account and your WordPress administrator account serve different purposes. Hostinger manages the hosting and domain, while your WordPress login lets you manage the website itself.
Choose a server location
Select a server location close to the people most likely to use your website. If most of your traffic will come from the United States, choose a US location. For a mainly European audience, choose a European location.
A CDN can help deliver files globally, but choosing a nearby main server is still a sensible starting point.
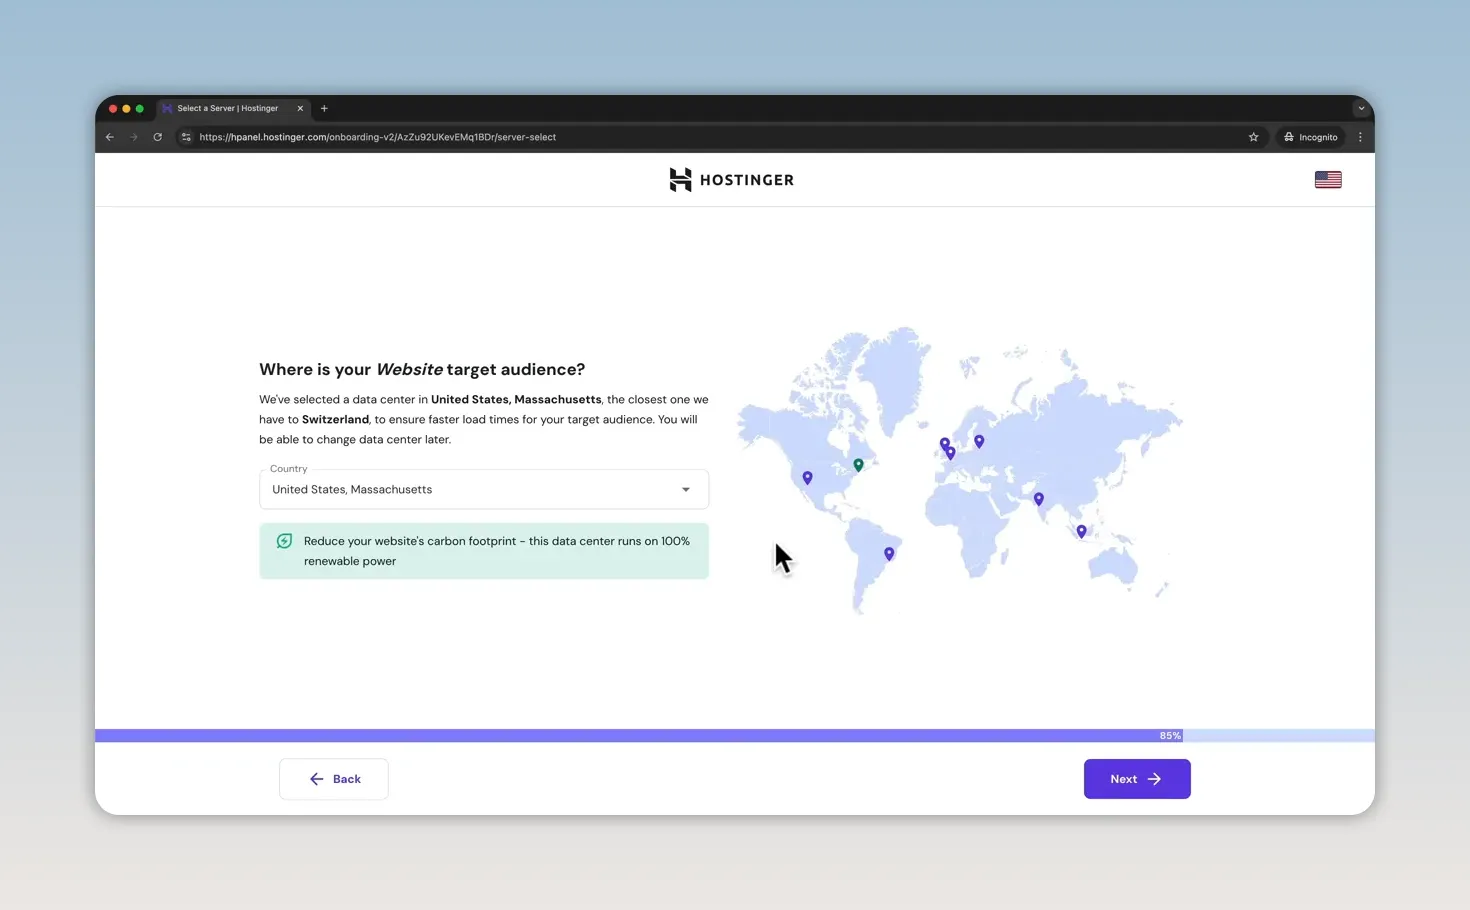
Continue and wait for WordPress to install. Once it’s ready, you should be taken to the WordPress dashboard.
How to log in to WordPress later
To return to your dashboard, enter your domain followed by /wp-admin in your browser’s address bar.
Sign in using the WordPress email address and password you created during installation. The dashboard is the back end of your website, where you’ll manage pages, themes, plugins, and settings.
Step 4: Install Astra and Starter Templates
Now we’ll add the free tools that make designing the website much easier.
Install the Astra theme
A theme provides your site’s basic design foundation. For this website, we’ll use the free Astra theme.
- In WordPress, go to Appearance > Themes.
- Click Add New Theme.
- Search for Astra.
- Click Install, then Activate.
Installing a theme and activating it are separate actions. Make sure Astra appears as the active theme before continuing.
Install Starter Templates
Next, go to Plugins > Add New Plugin, search for Starter Templates, and install and activate it.
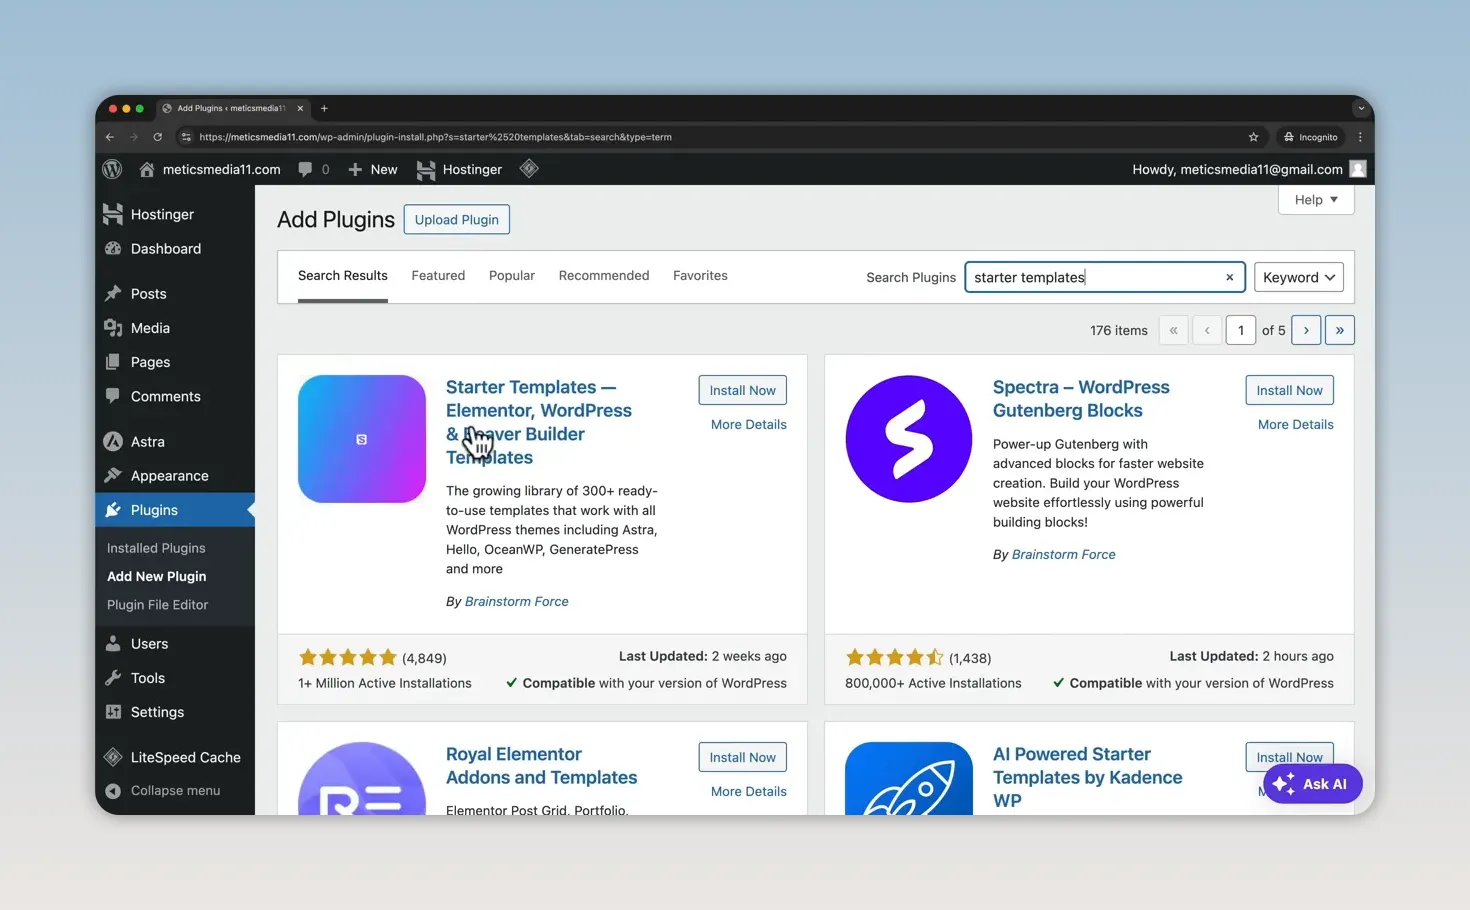
This plugin gives us a library of professionally designed website templates. Instead of designing every section from scratch, we can import a complete layout and replace its sample content.
Remove optional onboarding plugins
The Hostinger installation used here includes plugins such as Hostinger AI, Hostinger Easy Onboarding, and Hostinger Tools. We don’t need those optional tools for this particular workflow.
To remove them, select the relevant plugins, choose Deactivate under Bulk actions, and click Apply. Then select them again, choose Delete, and confirm.
Be selective here. You’re removing the optional onboarding tools, not every plugin on the site.
I also temporarily deactivate LiteSpeed Cache while building. It’s a caching plugin that helps with performance, and you can reactivate it once the website is finished.
Step 5: Choose Elementor and Import a Website Template
Open Starter Templates using its Get Started option. In the builder selector, choose Elementor rather than the AI website builder.
Elementor lets us edit the page visually. We can click text to change it, replace images, and drag new elements into place without writing code.
Find a suitable free template
Browse the categories or search for the type of website you want to create. Searching for “restaurant,” for example, brings up designs suited to restaurant websites.
Some designs have a Premium label. Choose a free design if you want to follow this setup without buying additional template access.
For our example, search for portfolio and select a layout you like.
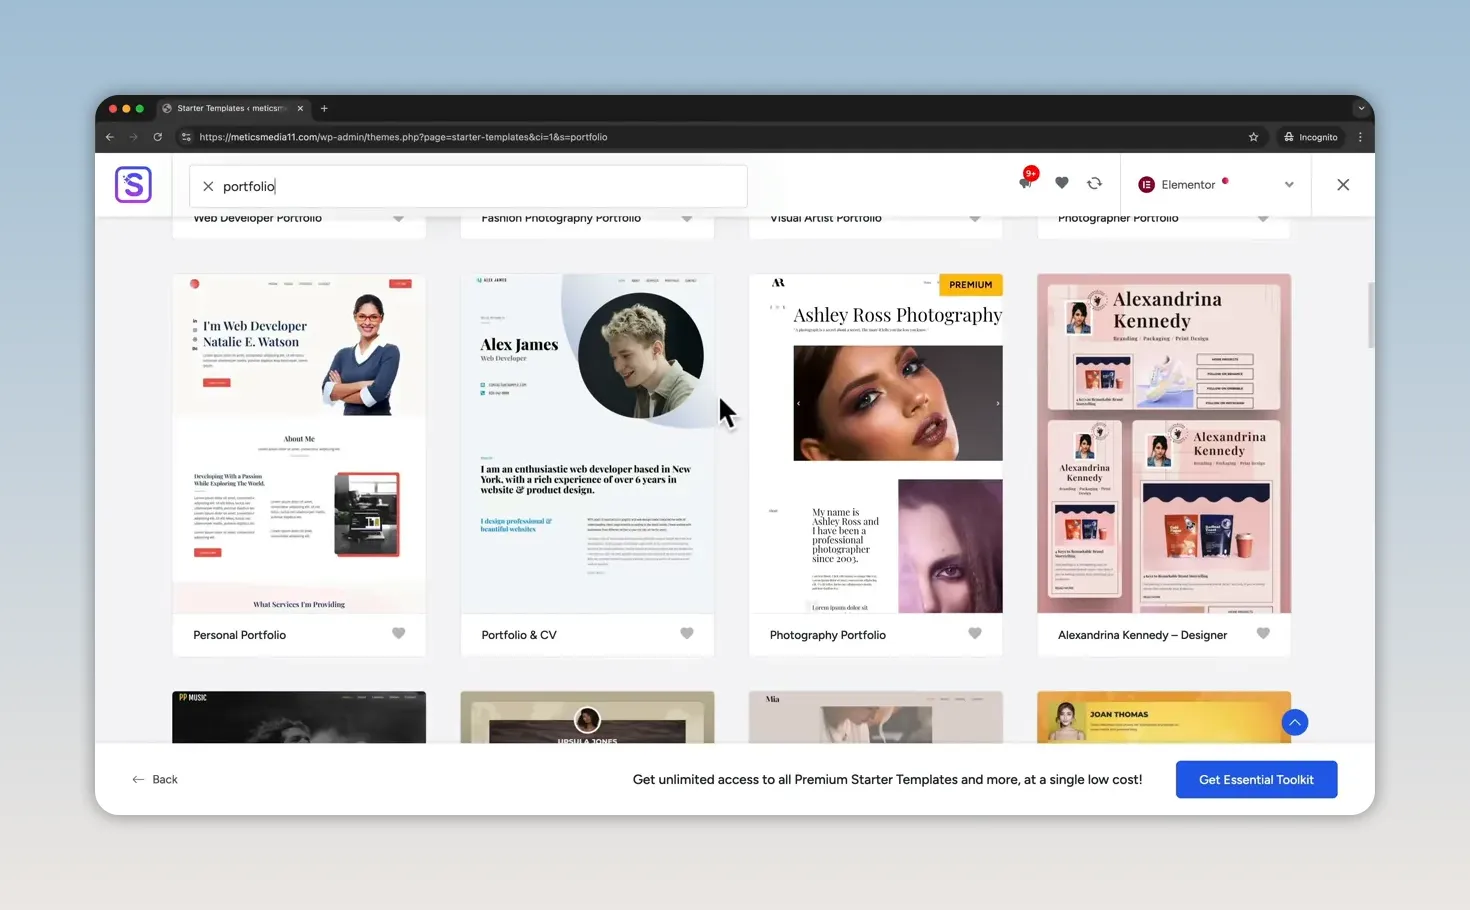
I recommend starting with a template, especially for your first website. It saves time and gives you a more consistent starting point than building every section on an empty page.
Set the initial branding and build the site
After selecting the design, you can adjust a few basics:
- Upload a site logo.
- Choose a font combination.
- Select a color scheme.
I choose a blue color scheme for this example. You can change these settings later, so you don’t need to make every design decision right now.
Click Continue, skip the optional additional features for this basic setup, and select Submit and Build My Website. Starter Templates will import the design and install the plugins it requires, including Elementor for the selected template.
When the import finishes, click View Your Website. Our example now has a homepage, About page, Portfolio page, and Contact page.
The imported website is already public. Opening your domain in another browser tab will load it, so the next job is replacing the sample content with your own.
Customize Your Pages With Elementor
There are two easy ways to open a page in Elementor:
- Visit the page while logged into WordPress, then click Edit with Elementor in the top administrator bar.
- Go to Pages in your WordPress dashboard, hover over the page, and click Edit with Elementor.
Understand containers and elements first
Before changing the layout, open Elementor’s structure panel. It shows how the page is organized.
The basic hierarchy is:
- Outer containers form the main sections of the page.
- Nested containers divide those sections into smaller areas or columns.
- Elements, also called widgets, hold the actual content.
For example, the first section of our portfolio homepage contains three smaller containers. One holds an icon list, another holds a heading, text, and button, and the third holds an image.
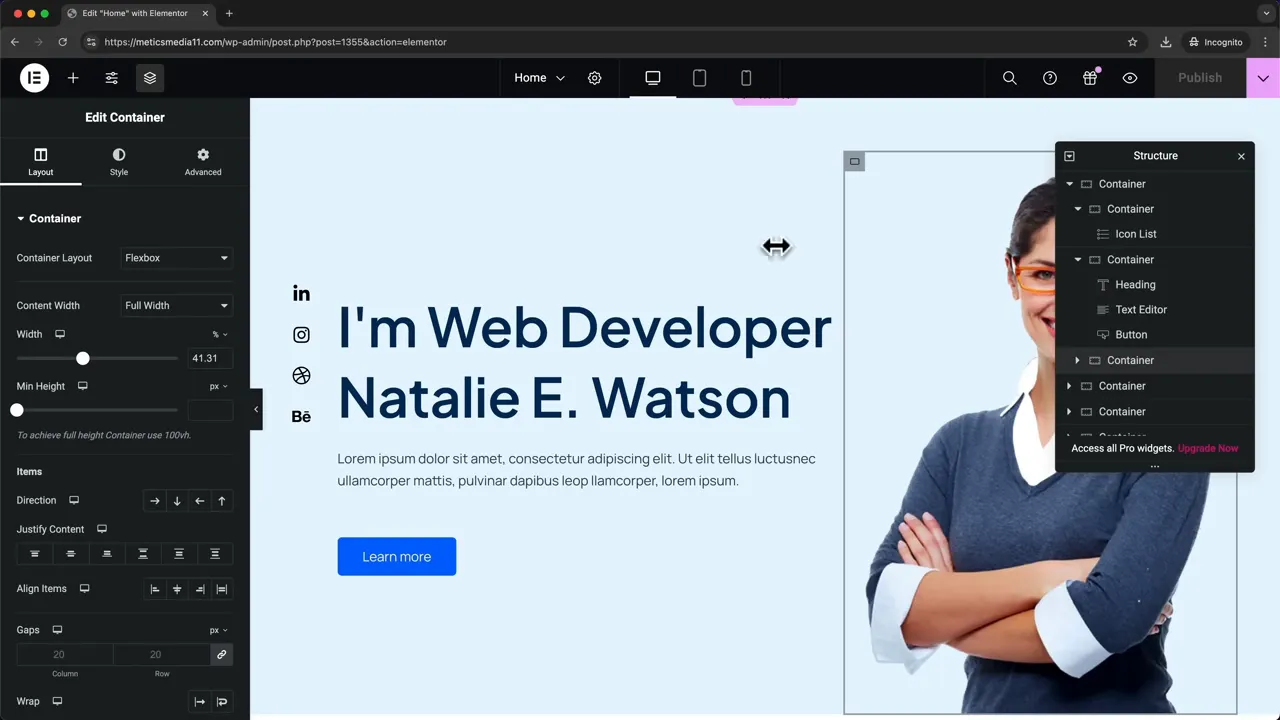
This distinction matters when deleting or moving content. Selecting an image changes that image. Selecting its parent container affects the larger area around it.
Edit text and headings
Click the heading or text you want to change. Its settings appear in the left panel, where you can replace the sample wording.
You can also edit text directly on the page by clicking into it, selecting the existing words, and typing your own content.
Change button text and links
Click a button to open its settings. Update its label, then add the destination in the Link field.
You can paste a web address or search for another page on your own website. For example, typing “Portfolio” lets you select the existing Portfolio page, and Elementor inserts its link.
A button needs both a useful label and a destination. Changing only its text doesn’t tell it where to send someone.
Replace images
- Click the image you want to replace.
- Open its image selector in the left panel.
- Upload your replacement image by dragging it into the media window.
- Select the image and confirm.
The replacement appears in the existing layout, so you can keep the template’s structure while making the design your own.
Add or delete elements
Click the plus icon at the top left to open the available elements. Drag the element you want into position. For example, drag a Text Editor element above a heading to add a short introduction.
To remove an element, right-click it and choose Delete. To remove an entire section, select its container and use its delete control.
For our example, I remove an unneeded video section. Deleting the parent container removes the entire section and everything inside it.
Publish your changes
Click Publish to save your edits and make the updated version public. Then use the page selector at the top of Elementor, or return to the WordPress Pages list, to open another page.
The same editing process applies across the site: select an element, change its content or settings, and publish.
Add a New Page and Reuse Template Blocks
You’re not limited to the pages included in your original template. We’ll add an Our Team page to show how this works.
- Open your website while logged into WordPress.
- In the administrator bar, choose New > Page.
- Enter Our Team as the page title.
- Click Publish and confirm.
- Click Edit with Elementor.
You can now build the page by dragging in headings, text, and images. But there’s a faster option: import a prebuilt block.
Import a team block
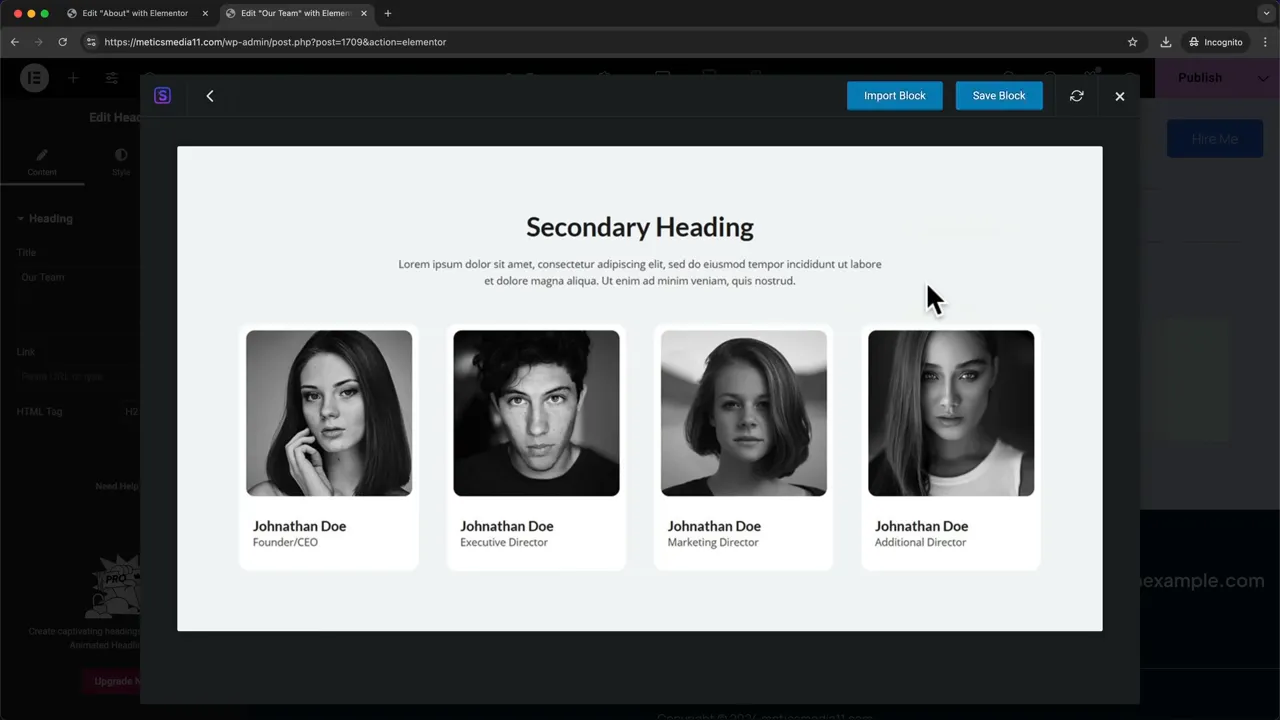
In the empty Elementor content area, click the Starter Templates S icon. Open Blocks and search for “team.”
Select a layout, preview it, and click Import Block. Once it’s inserted, change the heading, names, roles, and images just as you would with any other Elementor content.
Import an individual page from another template
You can also reuse an entire page design without importing another complete website.
- Click the Starter Templates icon again.
- Open Pages.
- Select a website design to see its available pages.
- Choose a page, such as an About page, and preview it.
- Click Import Template.
The page layout is inserted into the page you’re editing. From there, remove sections you don’t need and replace the sample content.
This is useful when you like your main website design but want a different layout for one particular page. Publish the changes, then use Elementor’s preview icon to check the result.
Add the New Page to Your Navigation Menu
Publishing a page makes it available, but you still need to add it to the menu if you want it to appear in your main navigation.
For this Astra setup:
- Open your website and click Customize in the administrator bar.
- Go to Menus.
- Select the Main Menu used in the header.
- Click Add Items.
- Select the Our Team page.
- Click Publish.
Your new page will now appear alongside the other navigation links.
Customize the Header and Footer
In this setup, Elementor handles the content inside your pages, while Astra’s Customizer handles the shared header and footer.
Change the header logo
Click Customize, then hover over the header. Pencil icons identify the editable parts.
Click the pencil icon for the logo to open its settings, then replace the template logo with your own.
Edit the footer content
While still in the Customizer, scroll down to the footer and click the pencil icon for the area you want to edit. This opens the relevant footer-builder settings.
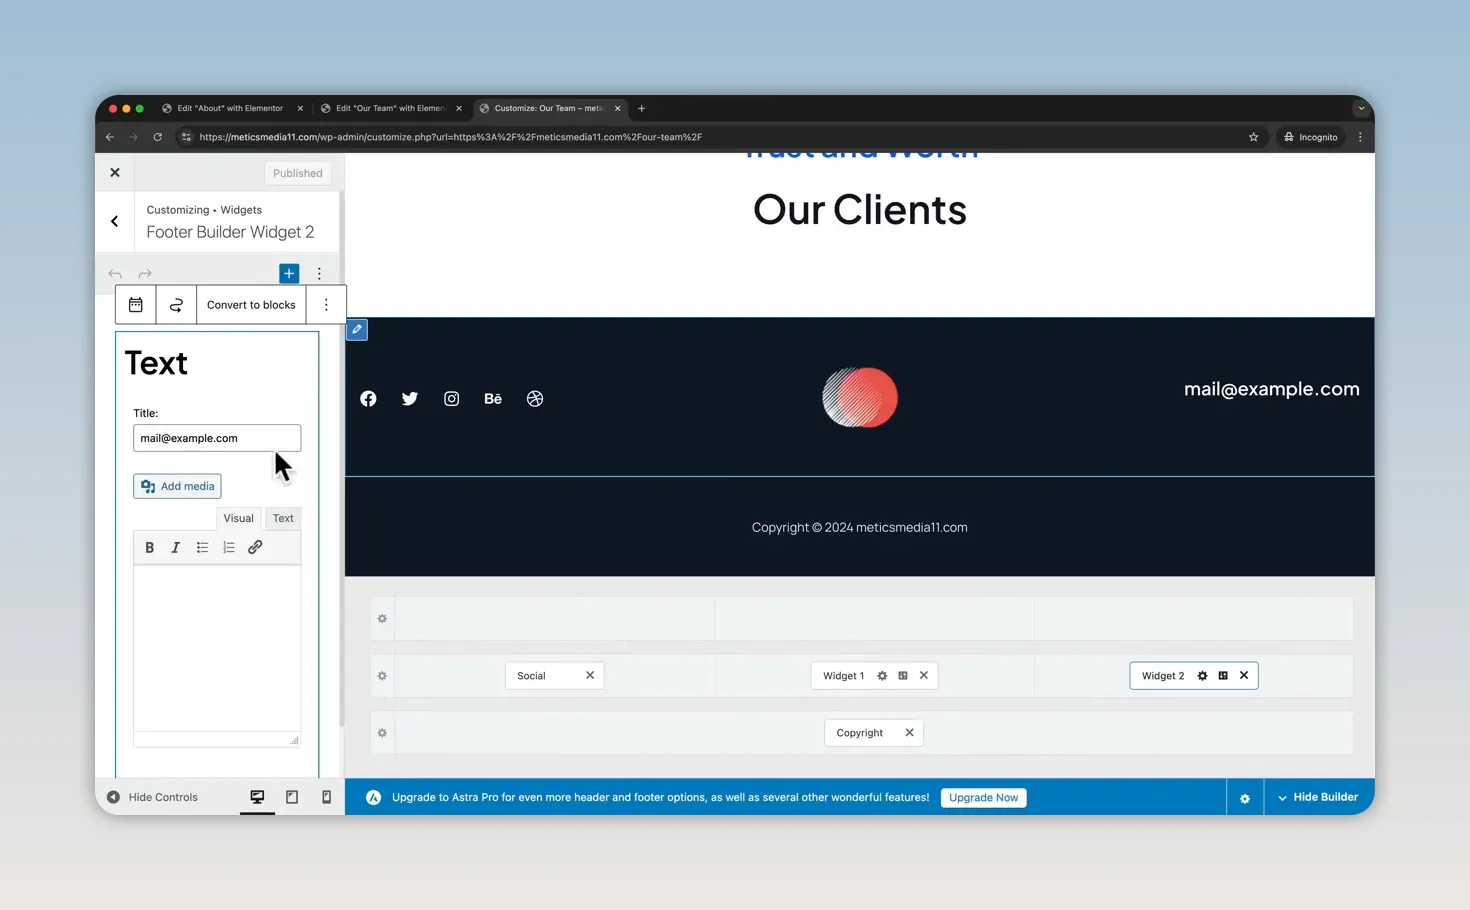
Depending on the selected template, you can update the footer logo, email address, social icons, and text at the bottom of the site.
Click Publish when you’re finished. These shared areas should match the rest of your website rather than keeping the template’s original branding and contact details.
Your WordPress Website Is Ready to Make Your Own
You now have the complete foundation: hosting, a domain, WordPress, a free Astra theme, and an Elementor website built from a professional template.
Work through each page and replace the remaining sample content. Check the button links, update your navigation, and finish the header and footer. Once you’re done building, reactivate LiteSpeed Cache if you disabled it earlier.
The key is understanding which tool controls which part of the site. Use WordPress to manage pages, Elementor to edit page content, and Astra’s Customizer to update the shared navigation, header, and footer.
For a closer look at the editing tools, the detailed WordPress and Elementor tutorial covers customization in more depth.
Made with VideoToBlog using WordPress Tutorial for Beginners 2026 - Step by Step


